通过Groovy来消除代码噪声
Java是在JVM上运行的最广泛使用的编程语言。不过,还有很多其他基于JVM的语言,比如Groovy,Scala,JRuby,Jython,Kotlin等等。其中,Groovy和Scala现在在Java社区中已经被广泛采用并大受欢迎。 本文介绍如何在Spring Boo中使用Groovy语言来编程。
Groovy
Groovy是一种基于Java的语法的基于JVM的编程语言。Groovy支持动态输入,闭包,元编程,运算符重载等等语法。除此之外,Groovy还提供了许多类似脚本语言的功能,比如,多行字符串,字符串插值,优雅的循环结构和简单的属性访问。另外,结尾分号是可选的。而这些都有足够的理帮助开发人员为了提高开发效率。
换句话说,Groovy就是一种继承了动态语言的优良特性并运行在JVM上的编程语言。由于Groovy的语法非常接近Java,所以Java开发人员很容易开始使用Groovy。 Spring Boot应用中也支持使用Groovy编程语言进行开发。
Groovy字符串
我们可以使用单引号或双引号在Groovy中创建字符串。当使用单引号时,字符串被看作为java.lang.String的一个实例,而当使用双引号时,它被会被看为groovy.lang.Gstring的一个实例,支持字符串变量值。
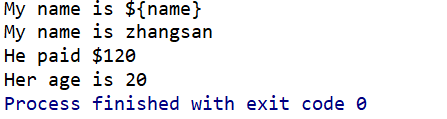
def name = "zhangsan"
def amount = 120
println('My name is ${name}')
println("My name is ${name}")
println("He paid \$${amount}")

def age = 20
print("Her age is ${age}")
输出结果为:
由于在第一个println()语句中使用单引号,所以,![会按原样打印,而在第二个()语句中使用双引号,则会打印变量值。如果需要打印 {name}会按原样打印,而在第二个println()语句中使用双引号,则会打印变量值。如果需要打印]() 符号,则需要还是用转义字符\ 。并且,Groovy还支持使用三个引号(“”“或”’“)的多行字符串,如下所示:
符号,则需要还是用转义字符\ 。并且,Groovy还支持使用三个引号(“”“或”’“)的多行字符串,如下所示:
//使用单引号
def content = '''My Name is zhangsan.
    I live in china.
    I am a software developer'''
def name1 = 'zhangsan'
def address = 'china'
def occupation = 'software developer'

//使用双引号
def bio = """My name is ${name1}.
        I live in ${address}.
        I am a ${occupation}."""
Groovy在多行创建跨越一行的字符串时非常方便,比如,表格,带占位符的HTML模板等。
POJO属性
在Java中,一般是通过为这些属性创建私有属性和getter、setter方法来获取和创建Bean。 虽然我们可以使用IDE生成setter和getter,但还是稍微有点繁杂,特别是增删改属性后。
而在Groovy中,我们直接通过声明属性来创建bean,然后使用object.propertyName语法访问它们,而无需创建setter和getters。如下代码片段:
package com.groovydemo.groovy.entity

class Stu {
    Integer id;
    String name;
    Integer age;

}
在这里,我们可以看到值直接被分配给了Bean的属性,比如 p.id = 1,而不需要为id创建setter。 同样,可以使用p.id读取属性ID,而不需要获取id的getter。 因为Groovy会默认将为这些属性生成setter和getters,省去手动的get和set操作。
循环语法
除了常规while和for循环之外,Groovy还支持各种循环结构。比如,使用范围运算符(..)进行迭代,如下例子:
1、常规for用法:
for(i in 0..5) { print "${i}" }1
输出:
0 1 2 3 4 5
2、使用upto()的来确定下限和上限:
0.upto(3) { print "$it " }1
输出:
0 1 2 3
3、使用times()从0开始迭代:
5.times { print "$it " }1
输出:
0 1 2 3 4
4、使用step()的下限和上限,来迭代并使用步长值:
0.step(10, 2) { print "$it "}1
输出:
0 2 4 6 8
实战:在Spring Boot中使用Groovy
我们可以使用IDE,也可以使用在线Spring Boot应用程序生成器http://start.spring.io创建应用,并选择Groovy作为编程语言。
以Maven构建工具为例,使用插件:gmavenplus-plugin编译Groovy代码。如下代码所示。
pom.xml:
<?xml version="1.0" encoding="UTF-8"?>
<project xmlns="http://maven.apache.org/POM/4.0.0" xmlns:xsi="http://www.w3.org/2001/XMLSchema-instance"
         xsi:schemaLocation="http://maven.apache.org/POM/4.0.0 http://maven.apache.org/xsd/maven-4.0.0.xsd">
    <modelVersion>4.0.0</modelVersion>

    <groupId>com</groupId>
    <artifactId>groovy-demo</artifactId>
    <version>0.0.1-SNAPSHOT</version>
    <packaging>jar</packaging>

    <name>groovy-demo</name>
    <description>Demo project for Spring Boot</description>

    <parent>
        <groupId>org.springframework.boot</groupId>
        <artifactId>spring-boot-starter-parent</artifactId>
        <version>2.0.4.RELEASE</version>
        <relativePath/> <!-- lookup parent from repository -->
    </parent>

    <properties>
        <project.build.sourceEncoding>UTF-8</project.build.sourceEncoding>
        <project.reporting.outputEncoding>UTF-8</project.reporting.outputEncoding>
        <java.version>1.8</java.version>


    </properties>

    <dependencies>
        <dependency>
            <groupId>org.codehaus.groovy</groupId>
            <artifactId>groovy</artifactId>
            <version>2.4.15</version>
        </dependency>
        <dependency>
            <groupId>org.springframework.boot</groupId>
            <artifactId>spring-boot-starter-web</artifactId>
        </dependency>

        <dependency>
            <groupId>org.springframework.boot</groupId>
            <artifactId>spring-boot-starter-test</artifactId>
            <scope>test</scope>
        </dependency>
    </dependencies>

    <build>
        <plugins>
            <plugin>
                <groupId>org.springframework.boot</groupId>
                <artifactId>spring-boot-maven-plugin</artifactId>
            </plugin>
            <!-- groovy -->
            <plugin>
                <groupId>org.codehaus.gmavenplus</groupId>
                <artifactId>gmavenplus-plugin</artifactId>
                <executions>
                    <execution>
                        <goals>
                            <goal>addSources</goal>
                            <goal>addTestSources</goal>
                            <goal>generateStubs</goal>
                            <goal>compile</goal>
                            <goal>testGenerateStubs</goal>
                            <goal>testCompile</goal>
                            <goal>removeStubs</goal>
                            <goal>removeTestStubs</goal>
                        </goals>
                    </execution>
                </executions>
            </plugin>
        </plugins>
    </build>


</project>
Stu:
package com.groovydemo.groovy.entity

class Stu {
    Integer id;
    String name;
    Integer age;

}
StuController:
package com.groovydemo.groovy.controller

import com.groovydemo.groovy.entity.Stu
import com.groovydemo.groovy.service.StuService
import org.springframework.beans.factory.annotation.Autowired
import org.springframework.stereotype.Controller
import org.springframework.web.bind.annotation.GetMapping
import org.springframework.web.bind.annotation.RequestMapping
import org.springframework.web.bind.annotation.RestController

@RestController
@RequestMapping("Stu")
class StuController {

    @Autowired
    private StuService service;


    @GetMapping("/test")
    String test(){

        Stu stu = service.getStuByid(1);
        return "Ok==>You can use groovy!";
    }
}
StuService:
package com.groovydemo.groovy.service

import com.groovydemo.groovy.entity.Stu

interface StuService {
    Stu getStuByid(int i)
}
StuServiceImpl:
package com.groovydemo.groovy.service.impl

import com.groovydemo.groovy.entity.Stu
import com.groovydemo.groovy.service.StuService
import org.springframework.stereotype.Service

@Service
class StuServiceImpl implements StuService {
    @Override
    Stu getStuByid(int i) {

        Stu stu = new Stu();
        stu.setId(1);
        stu.setName("zhangsan");
        stu.setAge(18);
        return stu;
    }
}
RunAppGroovy:
package com.groovydemo

import org.springframework.boot.SpringApplication
import org.springframework.boot.autoconfigure.SpringBootApplication

@SpringBootApplication
class RunAppGroovy {

    static void main(String[] args) {
        SpringApplication.run RunAppGroovy,args
    }

}
访问:http://localhost:8080/Stu/test
结果如下:
Ok==>You can use groovy!