1 <!DOCTYPE html>
2 <html lang="en">
3
4 <head>
5 <meta charset="UTF-8">
6 <title>wangEditor基本操作</title>
7 </head>
8 <style type="text/css">
9 .toolbar {
10 border: 1px solid #ccc;
11 }
12
13 .text {
14 border: 1px solid #ccc;
15 height: 400px;
16 }
17 textarea{
18 width: 100%;
19 resize: none;
20 padding: 0 10px;
21 box-sizing: border-box;
22 }
23 </style>
24
25 <body>
26
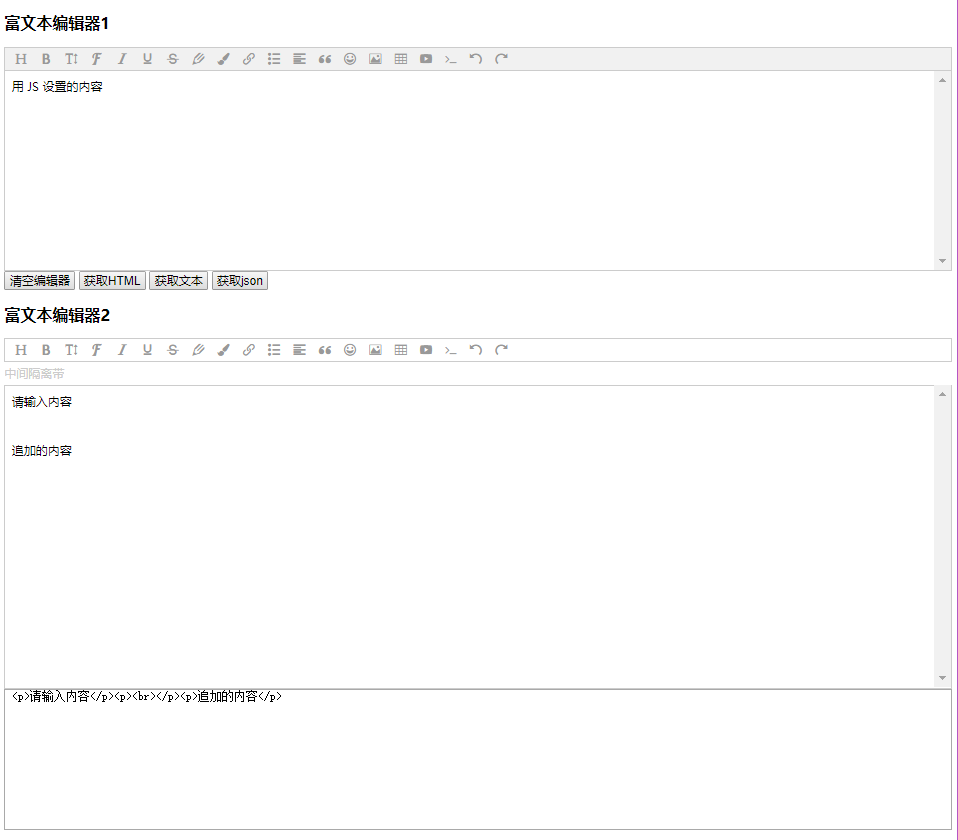
27 <h2>富文本编辑器1</h2>
28
29 <div id="editor"></div>
30
31 <button onclick="editor1.txt.clear()">清空编辑器</button>
32
33 <button onclick="alert(editor1.txt.html())">获取HTML</button>
34
35 <button onclick="alert(editor1.txt.text())">获取文本</button>
36
37 <button onclick="getJson()">获取json</button>
38
39 <h2>富文本编辑器2</h2>
40
41 <div id="div1" class="toolbar"></div>
42
43 <div style="padding: 5px 0; color: #ccc">中间隔离带</div>
44
45 <div id="div2" class="text" style="min-height: 456px;">
46
47 <!--可使用 min-height 实现编辑区域自动增加高度-->
48
49 <p>请输入内容</p>
50
51 </div>
52
53 <textarea name="" id="text" rows="10"></textarea>
54
55 <!-- 注意, 只需要引用 JS,无需引用任何 CSS !!!-->
56 <script src="http://code.jquery.com/jquery-1.11.3.min.js"></script>
57 <script type="text/javascript" src="script/wangEditor-3.1.1.js"></script>
58
59 <script type="text/javascript">
60
61 // 声明富文本编辑器
62 var E = window.wangEditor;
63
64 // 初始化富文本编辑器
65 var editor1 = new E('#editor');
66
67 // css的z-index
68 editor1.customConfig.zIndex = 100;
69
70 // 自定义菜单配置
71 editor1.customConfig.menus = [
72 'head', // 标题
73 'bold', // 粗体
74 'fontSize', // 字号
75 'fontName', // 字体
76 'italic', // 斜体
77 'underline', // 下划线
78 'strikeThrough', // 删除线
79 'foreColor', // 文字颜色
80 'backColor', // 背景颜色
81 'link', // 插入链接
82 'list', // 列表
83 'justify', // 对齐方式
84 'quote', // 引用
85 'emoticon', // 表情
86 'image', // 插入图片
87 'table', // 表格
88 'video', // 插入视频
89 'code', // 插入代码
90 'undo', // 撤销
91 'redo' // 重复
92 ]
93
94 // 自定义字体
95 editor1.customConfig.fontNames = [
96 '宋体',
97 '微软雅黑',
98 ]
99
100 // 表情面板可以有多个 tab ,因此要配置成一个数组。数组每个元素代表一个 tab 的配置
101 editor1.customConfig.emotions = [
102 {
103 // tab 的标题
104 title: '默认',
105 // type -> 'emoji' / 'image'
106 type: 'image',
107 // content -> 数组
108 content: [
109 {
110 alt: '[坏笑]',
111 src: 'http://img.t.sinajs.cn/t4/appstyle/expression/ext/normal/50/pcmoren_huaixiao_org.png'
112 },
113 {
114 alt: '[舔屏]',
115 src: 'http://img.t.sinajs.cn/t4/appstyle/expression/ext/normal/40/pcmoren_tian_org.png'
116 }
117 ]
118 },
119 {
120 // tab 的标题
121 title: 'emoji',
122 // type -> 'emoji' / 'image'
123 type: 'emoji',
124 // content -> 数组
125 content: ['', '', '', '', '']
126 }
127 ]
128
129 // 自定义配置颜色(字体颜色、背景色)
130 editor1.customConfig.colors = [
131 '#000000',
132 '#eeece0',
133 '#1c487f',
134 ]
135
136 // 自定义语言
137 editor1.customConfig.lang = {
138 '设置标题': 'title',
139 '正文': 'p',
140 '链接文字': 'link text',
141 '链接': 'link',
142 '上传图片': 'upload image',
143 '上传': 'upload',
144 '创建': 'init'
145 // 还可自定添加更多
146 }
147
148 // 通过 url 参数配置 debug 模式。url 中带有 wangeditor_debug_mode=1 才会开启 debug 模式
149 editor1.customConfig.debug = true;
150 // editor1.customConfig.debug = location.href.indexOf('wangeditor_debug_mode=1') > 0;
151
152 // 创建编辑器1
153 editor1.create();
154
155 // 用 JS 设置的内容
156 editor1.txt.html('<p>用 JS 设置的内容</p>')
157
158 // 初始化编辑器2
159 var editor2 = new E('#div1', '#div2');
160
161 // 隐藏“网络图片”tab
162 editor2.customConfig.showLinkImg = false;
163
164 // 下面两个配置,使用其中一个即可显示“上传图片”的tab。但是两者不要同时使用!!!
165 // editor2.customConfig.uploadImgShowBase64 = true // 使用 base64 保存图片
166 // editor2.customConfig.uploadImgServer = '/upload' // 上传图片到服务器
167
168 // 使用 base64 保存图片
169 editor2.customConfig.uploadImgShowBase64 = true;
170
171 // 同步textarea
172 editor2.customConfig.onchange = function (html) {
173 // 监控变化,同步更新到 textarea
174 $('#text').val(html);
175 }
176
177 // onblur
178 editor2.customConfig.onblur = function (html) {
179 // html 即编辑器中的内容
180 console.log('onblur', html)
181 }
182
183 // onfocus
184 editor2.customConfig.onfocus = function () {
185 // html 即编辑器中的内容
186 console.log('onfocus')
187 }
188
189 // 关闭粘贴样式的过滤
190 editor2.customConfig.pasteFilterStyle = false;
191
192 // 忽略粘贴内容中的图片
193 editor2.customConfig.pasteIgnoreImg = true;
194
195 // 自定义处理粘贴的文本内容
196 editor2.customConfig.pasteTextHandle = function (content) {
197 // content 即粘贴过来的内容(html 或 纯文本),可进行自定义处理然后返回
198 return content + '<p>在粘贴内容后面追加一行</p>';
199 }
200
201 // 插入图片的回调
202 editor2.customConfig.linkImgCallback = function (url) {
203 console.log(url); // url 即插入图片的地址
204 }
205
206 // 插入链接的校验
207 editor2.customConfig.linkCheck = function (text, link) {
208 console.log(text); // 插入的文字
209 console.log(link); // 插入的链接
210
211 return true; // 返回 true 表示校验成功
212 // return '验证失败' // 返回字符串,即校验失败的提示信息
213 }
214
215 // 插入网络图片的校验
216 editor2.customConfig.linkImgCheck = function (src) {
217 console.log(src); // 图片的链接
218
219 return true; // 返回 true 表示校验成功
220 // return '验证失败' // 返回字符串,即校验失败的提示信息
221 }
222
223 // 创建编辑器2
224 editor2.create();
225
226 // js追加文本
227 editor2.txt.append('<p>追加的内容</p>')
228
229 // 初始化 textarea 的值
230 $('#text').val(editor2.txt.html());
231
232 // 禁用编辑功能
233 editor1.$textElem.attr('contenteditable', false);
234
235 // 开启编辑功能
236 editor2.$textElem.attr('contenteditable', true);
237
238 // 获取json
239 function getJson() {
240 var json = editor1.txt.getJSON(); // 获取 JSON 格式的内容
241 var jsonStr = JSON.stringify(json);
242 console.log(json);
243 console.log(jsonStr);
244 }
245
246
247
248 </script>
249
250 </body>
251
252 </html>