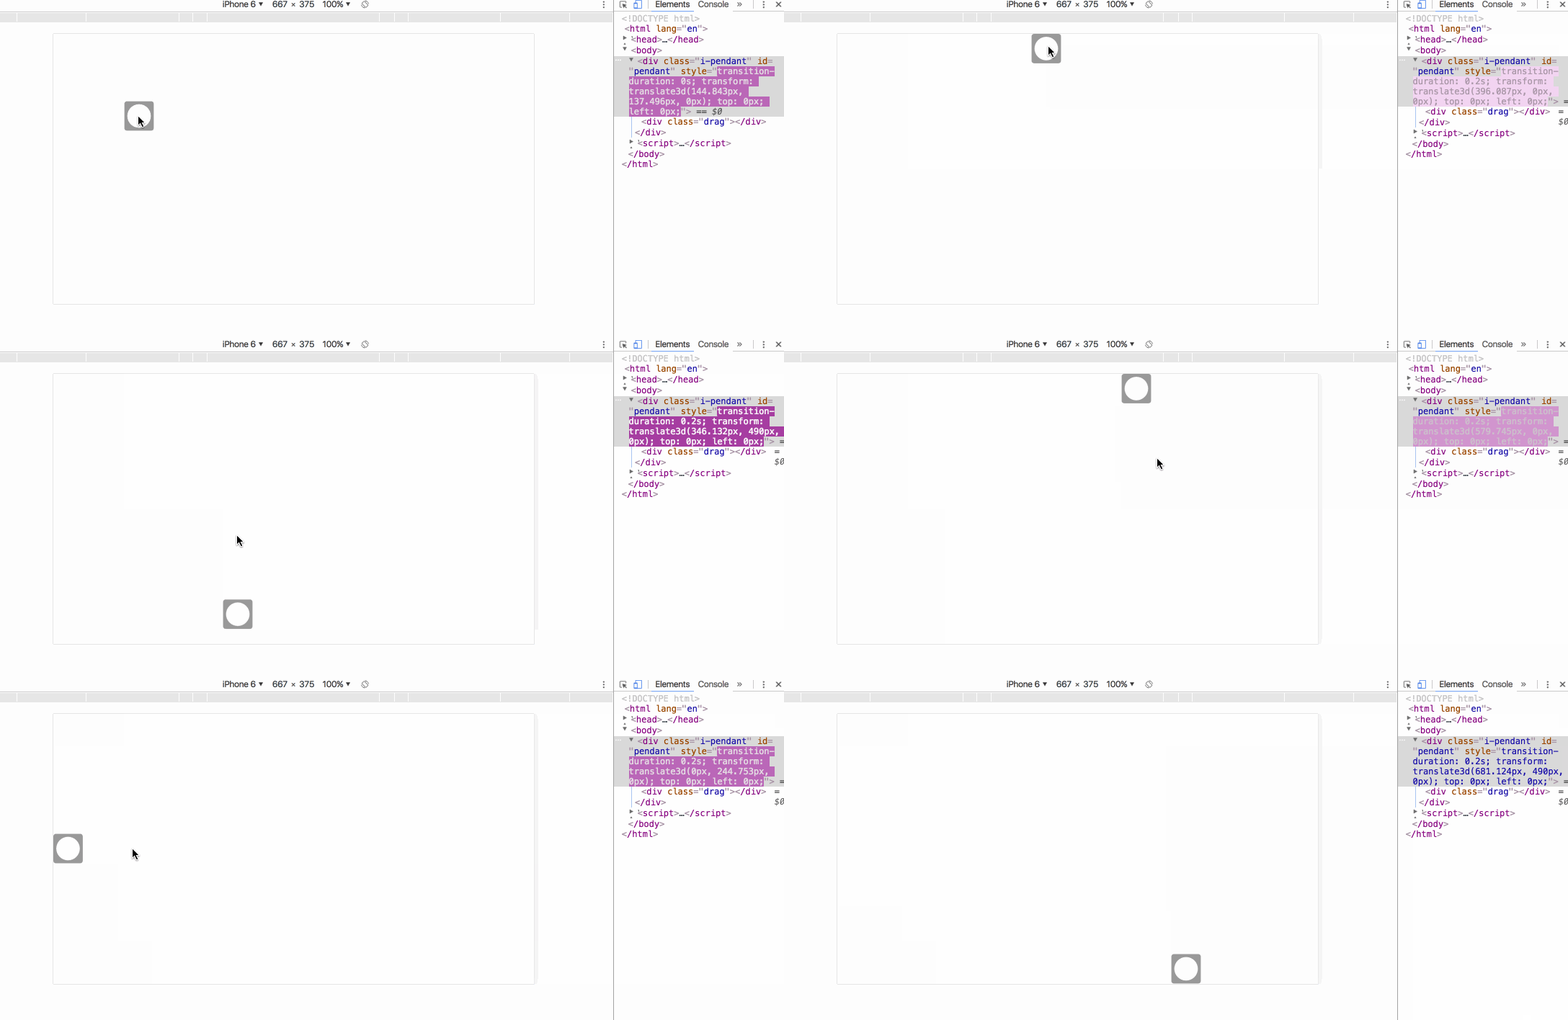
用过苹果的大家都知道,苹果公司做了一个虚拟按钮,让页面上的挂件可被拖拽并吸附到屏幕边框处,降低挂件对用户的干扰。该效果如果用JavaScript进行实现又该如何实现呢,接下来我将分享给大家。首先上一张效果图
![]()
一、思路来源
首先体验过该虚拟按钮的都知道,它是根据距离屏幕边距进行一个位移判断的。当手从屏幕中放开的时候,对边距判断后进行动态效果操纵,这里动态我们将用到transform进行控制,代码也是纯原生JavaScript。这里我们也只是做一个移动效果的模拟,对于其中的一些功能并没有添加进来。
二、代码编写
1、html
<div class="i-pendant" id="pendant">
  <div class="drag"></div>
</div>
2、css
.i-pendant {
  width: 60px;
  height: 60px;
  border-radius: 5px;
  background: #999;
  position: fixed;
  top: 300px;
  right: 0;
  z-index: 90;
  -webkit-transform: translate3d(0, 0, 0);
          transform: translate3d(0, 0, 0);
  -webkit-transition-property: -webkit-transform;
  transition-property: -webkit-transform;
  transition-property: transform;
  transition-property: transform, -webkit-transform;
  -webkit-transition-delay: 0s;
          transition-delay: 0s;
  -webkit-transition-timing-function: ease-out;
          transition-timing-function: ease-out;
}
.drag {
  width: 80%;
  height: 80%;
  margin: 10%;
  border-radius: 100%;
  background: #fff;
}
3、JavaScript
首先我们需要先获取虚拟按钮,并定义一些全局状态,方便之后的拖拽判定
var pendant = document.getElementById("pendant");
var posX = parseInt(pendant.offsetLeft);
var posY = parseInt(pendant.offsetTop);
var screenWidth = document.documentElement.clientWidth;
var screenHeight = document.documentElement.clientHeight;

// 判断手势按下状态
var state = {
  type: null
};

//检测是否move事件
var isMove = false;
定义不同手势对应的事件
var Events = {
  // 手势按下
  onmousedown: function (event) {},
  // 手势抬起
  onmouseup: function (event) {},
  // 手势移动
  onmousemove: function (event) {}
};
接下来我们需要做的就是一一实现这些手势事件,手势按下事件实现:
// 手势按下
onmousedown: function (event) {
  state.type = 'down';

  screenWidth = document.documentElement.clientWidth;
  screenHeight = document.documentElement.clientHeight;

  var _touchs = event.targetTouches[0];
  posX = _touchs.clientX;
  posY = _touchs.clientY;

  isMove = false;
}
手势抬起事件实现:
// 手势抬起
onmouseup: function (event) {

  if (isMove) {
    var _top = posY,
      _left = posX;

    state.type = 'up';

    if ((posY + parseInt(pendant.clientHeight) / 2) <= (screenHeight / 2)) {
      //在上半部分
      if ((posX + parseInt(pendant.clientWidth) / 2) <= (screenWidth / 2)) {
        //在左半部分
        if ((posY + parseInt(pendant.clientHeight) / 2) <= (posX + parseInt(pendant.clientWidth) / 2)) {
          //靠近上方
          _top = 0;
        } else {
          //靠近左边
          _left = 0;
        }
      } else {
        //在右半部分
        if ((posY + parseInt(pendant.clientHeight) / 2) <= (screenWidth - (posX + parseInt(pendant.clientWidth) / 2))) {
          //靠近上方
          _top = 0;
        } else {
          //靠近右边
          _left = (screenWidth - parseInt(pendant.clientWidth));
        }
      }
    } else {
      //下半部分
      if ((posX + parseInt(pendant.clientWidth) / 2) <= (screenWidth / 2)) {
        //在左半部分
        if ((screenHeight - (posY + parseInt(pendant.clientHeight) / 2)) <= (posX + parseInt(pendant.clientWidth) / 2)) {
          //靠近下方
          _top = (screenHeight - parseInt(pendant.clientHeight));
        } else {
          //靠近左边
          _left = 0;
        }
      } else {//在右半部分
        if ((screenHeight - (posY + parseInt(pendant.clientHeight) / 2)) <= (screenWidth - (posX + parseInt(pendant.clientWidth) / 2))) {
          //靠近上方
          _top = (screenHeight - parseInt(pendant.clientHeight));
        } else {
          //靠近右边
          _left = (screenWidth - parseInt(pendant.clientWidth));
        }
      }
    }
    setTransform(_left, _top);
  } else {
    if (!!event) {
      //点击事件触发入口
      console.log('touch event');
    }
  }
}
手势移动事件实现:
// 手势移动
onmousemove: function (event) {
  isMove = true;

  // 如果这个元素的位置内只有一个手指的话
  var _top = posY,
    _left = posX;

  state.type = 'move';

  if (event.targetTouches.length === 1) {
    event.preventDefault();// 阻止浏览器默认事件,重要
    var touch = event.targetTouches[0];
    if ((touch.clientY) <= 0) {
      //超过顶部
      _top = 0;

    } else if (touch.clientY > (screenHeight - parseInt(pendant.clientHeight))) {//超过底部
      _top = screenHeight - parseInt(pendant.clientHeight);

    } else {
      _top = touch.clientY - parseInt(pendant.clientHeight) / 2;

    }

    if (touch.clientX <= 0) {
      //超过左边
      _left = 0;

    } else if (touch.clientX > (screenWidth - parseInt(pendant.clientWidth))) {
      //超过右边
      _left = screenWidth - parseInt(pendant.clientWidth);

    } else {
      _left = touch.clientX - parseInt(pendant.clientWidth) / 2;

    }

    setTransform(_left, _top);

  }
}
我们在手势事件中可以看到一个函数叫setTransform,接下来我们将实现它:
/**
 * @param {[type]} _left [左偏移]
 * @param {[type]} _top  [顶部偏移]
 */
function setTransform(_left, _top) {
  posX = _left;
  posY = _top;

  if (state.type === 'up') {
    pendant.style.webkitTransitionDuration = '.2s';
  } else {
    pendant.style.webkitTransitionDuration = '0s';
  }
  pendant.style.webkitTransform = 'translate3d(' + posX + 'px,' + posY + 'px,0)';
}
最后我们还需要对虚拟按钮进行一个参数的初始化
//初始化虚拟按钮参数
function init() {
  screenWidth = document.documentElement.clientWidth;
  screenHeight = document.documentElement.clientHeight;

  var _top = posY,
    _left = posX;

  if ((posY + parseInt(pendant.clientHeight)) > screenHeight) {
    //窗口改变适应超出的部分
    _top = (screenHeight - parseInt(pendant.clientHeight));
  }
  if ((posX + parseInt(pendant.clientWidth)) > screenWidth) {
    //窗口改变适应超出的部分
    _left = (screenWidth - parseInt(pendant.clientWidth));
  }

  //把样式的top、left赋值到transform去
  setTransform(_left, _top);

  pendant.style.top = 0;
  pendant.style.left = 0;

  state.type = 'init';

  Events.onmouseup(null);
}
最后我们调用一下init方法,虚拟按钮拖动效果就模拟出来了。小伙伴还不赶紧去试一下看看,是不是和苹果的虚拟按钮拖动起来是一样的效果呢。如果觉得好用或者好玩的话,记得给qiangdada点个赞哦↖(^ω^)↗
原文发布时间为:2017年01月18日
原文作者: qiangdada
本文来源:开源中国 如需转载请联系原作者


