JAVA之旅(三十)——打印流PrintWriter,合并流,切割文件并且合并,对象的序列化Serializable,管道流,RandomAccessFile,IO其他类,字符编码
![]()
一.打印流PrintWriter
打印流有PrintWriter和PrintStream,他的特点可以直接操作输入流还有文件
- 该流提供了打印方法,可以将各种数据类型原样打印
- file对象 File
- 字符串路径 String
- 字节打印流
- 字符打印流
我们演示一遍大家就对此有所了解了
package com.lgl.hellojava;
import java.io.BufferedReader;
import java.io.IOException;
import java.io.InputStreamReader;
import java.io.PrintWriter;
public class HelloJJAVA {
public static void main(String[] args) {
try {
BufferedReader bufr = new BufferedReader(new InputStreamReader(
System.in));
PrintWriter oWriter = new PrintWriter(System.out, true);
String line = null;
while ((line = bufr.readLine()) != null) {
if (line.equals("over")) {
break;
}
oWriter.write(line);
}
oWriter.close();
bufr.close();
} catch (IOException e) {
e.printStackTrace();
}
}
}
要想存到文件里,也是可以直接把文件给放进去的
二.合并流
我们来看看什么是合并流,在API文档上说,他可以串联流
package com.lgl.hellojava;
import java.io.FileInputStream;
import java.io.FileNotFoundException;
import java.io.FileOutputStream;
import java.io.IOException;
import java.io.SequenceInputStream;
import java.util.Enumeration;
import java.util.Vector;
public class HelloJJAVA {
public static void main(String[] args) {
try {
Vector<FileInputStream> v = new Vector<FileInputStream>();
v.add(new FileInputStream("1.txt"));
v.add(new FileInputStream("2.txt"));
Enumeration<FileInputStream> elements = v.elements();
SequenceInputStream sis = new SequenceInputStream(elements);
FileOutputStream fos = new FileOutputStream("3.txt");
byte[] buf = new byte[1024];
int len = 0;
while ((len = sis.read(buf)) != -1) {
fos.write(buf, 0, len);
}
fos.close();
sis.close();
} catch (FileNotFoundException e) {
e.printStackTrace();
} catch (IOException e) {
e.printStackTrace();
}
}
}
把1.txt和2.txt乃至add更多的内容合并到3.txt文件中,这就是流的合并
三.切割文件
合并文件可以,那肯定可以切割了,我们来看下具体是怎么去制作的
public static void splitFile() {
try {
FileInputStream fis = new FileInputStream("1.jpg");
FileOutputStream fos = null;
byte[] buf = new byte[1024 * 1024];
int len = 0;
int count = 1;
while ((len = fis.read(buf)) != -1) {
fos = new FileOutputStream((count++) + ".patch");
fos.write(buf, 0, len);
fos.close();
}
fis.close();
} catch (FileNotFoundException e) {
e.printStackTrace();
} catch (IOException e) {
e.printStackTrace();
}
}
当运行结束之后,我们可以看到
![这里写图片描述]()
已经成功切割了
切割完我们可以合并了
public static void merge() {
ArrayList<FileInputStream> al = new ArrayList<>();
for (int i = 1; i <= 2; i++) {
try {
al.add(new FileInputStream(i + ".patch"));
} catch (FileNotFoundException e) {
e.printStackTrace();
}
}
Iterator<FileInputStream> iterator = al.iterator();
Enumeration<FileInputStream> en = new Enumeration<FileInputStream>() {
@Override
public boolean hasMoreElements() {
return iterator.hasNext();
}
@Override
public FileInputStream nextElement() {
return iterator.next();
}
};
try {
SequenceInputStream seq = new SequenceInputStream(en);
FileOutputStream fos = new FileOutputStream("2.jpg");
byte[] buf = new byte[1024];
int len = 0;
while ((len = seq.read(buf)) != -1) {
fos.write(buf, 0, len);
}
fos.close();
seq.close();
} catch (FileNotFoundException e) {
e.printStackTrace();
} catch (IOException e) {
e.printStackTrace();
}
}
这样我们就把图片拷贝出来了,可以看到
![这里写图片描述]()
这段代码是非常帮的,我们一定会用到的,希望能用的上
四.对象的序列化Serializable
其实就是可以直接操作对象的流,他会实现一个Serializable()接口,我们用代码来看下他是怎么用的,我们直接写读取对象的类了
package com.lgl.hellojava;
import java.io.FileInputStream;
import java.io.FileOutputStream;
import java.io.IOException;
import java.io.ObjectInputStream;
import java.io.ObjectOutputStream;
import java.io.Serializable;
public class HelloJJAVA {
public static void main(String[] args) {
readObj();
}
private static void readObj() {
try {
ObjectInputStream ois = new ObjectInputStream(new FileInputStream(
"obj.txt"));
Person p = (Person) ois.readObject();
System.out.println(p);
ois.close();
} catch (IOException e) {
e.printStackTrace();
} catch (ClassNotFoundException e) {
e.printStackTrace();
}
}
private static void writeObj() {
try {
ObjectOutputStream oos = new ObjectOutputStream(
new FileOutputStream("obj.txt"));
oos.writeObject(new Person("zhangsan", 20));
oos.close();
} catch (IOException e) {
e.printStackTrace();
}
}
}
class Person implements Serializable {
String name;
int age;
public Person(String name, int age) {
this.name = name;
this.age = age;
}
}
OK,自己去验证一下
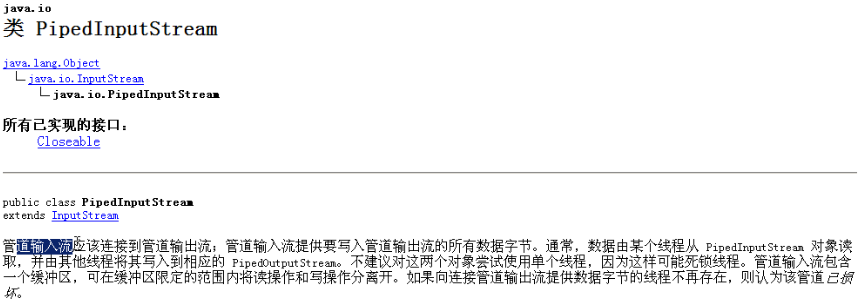
五.管道流
输入输出可以直接进行连接,通常结合线程使用
![这里写图片描述]()
package com.lgl.hellojava;
import java.io.IOException;
import java.io.PipedInputStream;
import java.io.PipedOutputStream;
public class HelloJJAVA {
public static void main(String[] args) {
PipedInputStream pi = new PipedInputStream();
PipedOutputStream po = new PipedOutputStream();
try {
pi.connect(po);
} catch (IOException e) {
e.printStackTrace();
}
Read read = new Read(pi);
Write write = new Write(po);
new Thread(read).start();
new Thread(write).start();
}
}
class Read implements Runnable {
private PipedInputStream in;
public Read(PipedInputStream in) {
this.in = in;
}
@Override
public void run() {
try {
byte[] buf = new byte[1024];
int len = in.read(buf);
String s = new String(buf, 0, len);
System.out.println(s);
in.close();
} catch (IOException e) {
e.printStackTrace();
}
}
}
class Write implements Runnable {
private PipedOutputStream out;
public Write(PipedOutputStream out) {
this.out = out;
}
@Override
public void run() {
try {
out.write("yes".getBytes());
out.close();
} catch (IOException e) {
e.printStackTrace();
}
}
}
现在就可以联通了
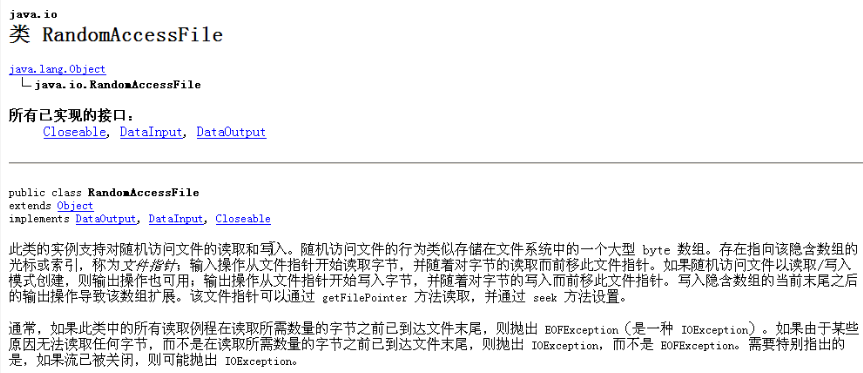
六.RandomAccessFile
这是一个很特别的家伙,他继承的是Object
![这里写图片描述]()
- 该类不是IO体系中的子类
- 但是他是IO包中的成员,他同时具备读写功能
- 内部封装了一个数组,而且通过指针对数组中的元素进行操作
- 可以通过getFilePointer或者指针位置同时可以通过seek改变指针的位置
其实完成读写的原理就是内部封装了字节输入,输出流,通过构造函数可以看出该类具备操作文件的能力,而且操作文件还有模式
package com.lgl.hellojava;
import java.io.FileNotFoundException;
import java.io.IOException;
import java.io.RandomAccessFile;
public class HelloJJAVA {
public static void main(String[] args) {
writeFile();
}
public static void writeFile() {
try {
RandomAccessFile raf = new RandomAccessFile("1.txt", "rw");
raf.write("zhangssan".getBytes());
raf.writeInt(99);
raf.close();
} catch (FileNotFoundException e) {
e.printStackTrace();
} catch (IOException e) {
e.printStackTrace();
}
}
}
这只是一个写的过程,我们的特性还没有体现出来,我们来看下他是怎么读的
private static void ReadFile() {
try {
RandomAccessFile raf = new RandomAccessFile("1.txt", "r");
raf.seek(8 * 0);
byte[] buf = new byte[1024];
raf.read(buf);
String s = new String(buf);
System.out.println(s);
raf.close();
} catch (FileNotFoundException e) {
e.printStackTrace();
} catch (IOException e) {
e.printStackTrace();
}
}
如果操作的文件不存在,就会自动创建,如果存在,直接覆盖
七.IO其他类
IO其他包里,还有一些其他的使用
1.基本数据类型
我们先来看下基本数据类型的,我直接读写都写出来
public static void readData() {
try {
DataInputStream dis = new DataInputStream(new FileInputStream(
"data.txt"));
int num = dis.readInt();
boolean d = dis.readBoolean();
System.out.println(num + "" + d + "");
dis.close();
} catch (FileNotFoundException e) {
e.printStackTrace();
} catch (IOException e) {
e.printStackTrace();
}
}
public static void writeDatea() {
try {
DataOutputStream dos = new DataOutputStream(new FileOutputStream(
"data.txt"));
dos.writeInt(55);
dos.writeBoolean(true);
dos.close();
} catch (FileNotFoundException e) {
e.printStackTrace();
} catch (IOException e) {
e.printStackTrace();
}
}
读取基本数据类型
二.字节数组
这个偶尔用下,但是我们还是要去学习一下的
- ByteArrayInputStream: 在构造的时候,需要接收数据源,而且数据源是一个字节数组
- ByteArrayOutputStream:在构造的时候,不用定义数据的目的,因为该对象中已经内部封装了可变程度的字节数组
因为这两个流的对象都操作的数组,并且没有使用系统资源,所以,不用进行close关闭!
package com.lgl.hellojava;
import java.io.ByteArrayInputStream;
import java.io.ByteArrayOutputStream;
public class HelloJJAVA {
public static void main(String[] args) {
ByteArrayInputStream bis = new ByteArrayInputStream("123".getBytes());
ByteArrayOutputStream bos = new ByteArrayOutputStream();
int ch = 0;
while ((ch = bis.read()) != -1) {
bos.write(ch);
}
System.out.println(bos.size());
System.out.println(bos.toString());
}
}
是不是比较简单,字符流我就不说了,和字节流是类似的,但是他会衍生出一个新的内容就是字符编码
八.字符编码
这些乱七八糟的编码说真的,东西还是挺多的,但是我并不想讲那么多,因为本身我也不是很清楚,其次这玩意大致的知道一点就可以了(个人觉得),什么ASCLL,GBK,UTF-8之类的
String s = "hello java"
byte [] b1 = s.getBytes()
System.out.println(Arrays.toString(b1))
他得到的是什么?
![这里写图片描述]()
现在我换一个编码
byte [] b1 = s.getBytes("GBK");
我设置成GBK,他的值是一样的,说明默认的是GBK
九.练习
写完这个练习,我们的I/O流就GG了,感慨颇多,写I/O写了很多篇,但是仍然晕乎乎的,应该继续加深印象的,我们来看下需求
- 有五个学生,每个学生有三门课程,从键盘输入以下数据(包括姓名,三门课成绩),输入的格式,如zhangsan,30,60,96计算出总成绩,并把学生的信息和计算出的总分数高低顺序存入文件student.txt中去;
好了,开始撸代码了
package com.lgl.hellojava;
import java.io.BufferedReader;
import java.io.BufferedWriter;
import java.io.FileWriter;
import java.io.IOException;
import java.io.InputStreamReader;
import java.util.Set;
import java.util.TreeSet;
public class HelloJJAVA {
public static void main(String[] args) {
/**
* 逻辑:
* 1.通过获取键盘录入一行数据,然后取出数据封装成学生对象
* 2.需要从高到低排列,需要排序,使用集合TreeSet就可以了
* 3.写入文件
*/
try {
Set<Student> stus = StudentInfoTool.getStudents();
StudentInfoTool.writeFile(stus);
} catch (IOException e) {
e.printStackTrace();
}
}
}
class Student implements Comparable<Student> {
private String name;
private int n1, n2, n3;
private int sum;
public Student(String name, int n1, int n2, int n3) {
this.name = name;
this.n1 = n1;
this.n2 = n2;
this.n3 = n3;
sum = n1 + n2 + n3;
}
public String getName() {
return name;
}
public void setName(String name) {
this.name = name;
}
public int getSum() {
return sum;
}
public void setSum(int sum) {
this.sum = sum;
}
@Override
public int compareTo(Student o) {
int num = new Integer(this.sum).compareTo(new Integer(o.sum));
if (num == 0) {
return this.name.compareTo(o.name);
}
return num;
}
@Override
public int hashCode() {
return name.hashCode() + sum * 78;
}
@Override
public boolean equals(Object obj) {
if (!(obj instanceof Student)) {
throw new ClassCastException("Type Error");
}
Student s = (Student) obj;
return this.name.equals(s.name) && this.sum == s.sum;
}
}
class StudentInfoTool {
public static Set<Student> getStudents() throws IOException {
BufferedReader bufr = new BufferedReader(new InputStreamReader(
System.in));
String line = null;
Set<Student> stus = new TreeSet<>();
while ((line = bufr.readLine()) != null) {
if (line.equals("over")) {
break;
}
String[] info = line.split(",");
Student student = new Student(info[0], Integer.parseInt(info[1]),
Integer.parseInt(info[2]), Integer.parseInt(info[3]));
stus.add(student);
}
bufr.close();
return stus;
}
public static void writeFile(Set<Student> stus) {
try {
BufferedWriter bufw = new BufferedWriter(new FileWriter(
"student.txt"));
for (Student stu : stus) {
bufw.write(stu.getName());
bufw.write(stu.getSum() + "");
bufw.newLine();
bufw.flush();
}
bufw.close();
} catch (IOException e) {
e.printStackTrace();
}
}
}
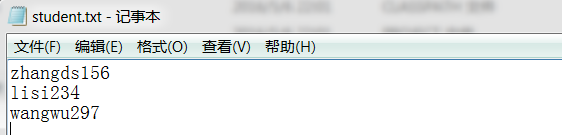
输出的结果,可以看到
![这里写图片描述]()
总数,从小到大,如果你想从高到低的话,自己去实现下排序,看看你们学的怎么样了
好的,我们本篇到这里就结束了,这篇也是憋了挺久的才别出来的,终于把IO写完了
原文地址http://www.bieryun.com/2848.html