如何用两个button等分屏幕宽度?
问题引入
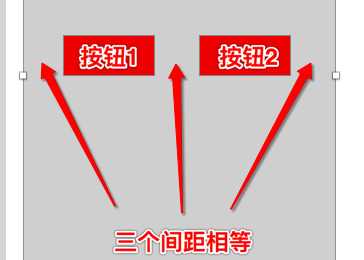
现有一个小问题:如何使用两个按钮,然后将屏幕宽度评分?如图:
![实现最终效果图 实现最终效果图]()
再进一步细节:如果按钮的宽度相等呢?不相等呢?
看看人家的实现
Android的实现
1.按钮宽度相等的实现
这里直接上布局文件(.xml)的代码:
<?xml version="1.0" encoding="utf-8"?>
<LinearLayout xmlns:android="http://schemas.android.com/apk/res/android"
    android:orientation="horizontal" android:layout_width="match_parent"
    android:layout_height="match_parent">

    <View
        android:layout_width="0dp"
        android:layout_height="wrap_content"
        android:layout_weight="1"
        android:visibility="invisible"/>
    <Button
        android:layout_width="wrap_content"
        android:layout_height="wrap_content"
        android:text="注册"
        />
    <View
        android:layout_width="0dp"
        android:layout_height="wrap_content"
        android:layout_weight="1"
        android:visibility="invisible"/>
    <Button
        android:layout_width="wrap_content"
        android:layout_height="wrap_content"
        android:text="忘记密码"
        />
    <View
        android:layout_width="0dp"
        android:layout_height="wrap_content"
        android:layout_weight="1"
        android:visibility="invisible"/>
</LinearLayout>
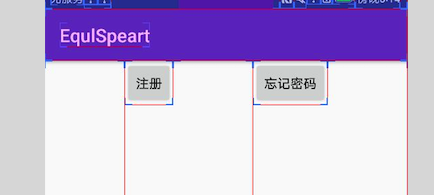
效果如下:
![按钮等宽平分 按钮等宽平分]()
Android里面使用LinearLayout布局,然后直接使用了三个view,然偶设置其不可见(visibility="invisible"),但是占用当前的位置。最后设置每个layout里面的控件的weight为1,这样就保证了用两个按钮将屏幕等分。
2.按钮宽度不相等的实现:
<?xml version="1.0" encoding="utf-8"?>
<LinearLayout xmlns:android="http://schemas.android.com/apk/res/android"
    android:orientation="horizontal" android:layout_width="match_parent"
    android:layout_height="match_parent">

    <View
        android:layout_width="0dp"
        android:layout_height="wrap_content"
        android:layout_weight="1"
        android:visibility="invisible"/>
    <Button
        android:layout_width="wrap_content"
        android:layout_height="wrap_content"
        android:text="注册"
        android:minWidth="0dp"
        />
    <View
        android:layout_width="0dp"
        android:layout_height="wrap_content"
        android:layout_weight="1"
        android:visibility="invisible"/>
    <Button
        android:layout_width="wrap_content"
        android:layout_height="wrap_content"
        android:text="忘记密码"
        android:minWidth="0dp"
        />
    <View
        android:layout_width="0dp"
        android:layout_height="wrap_content"
        android:layout_weight="1"
        android:visibility="invisible"/>
</LinearLayout>
效果如下:
![android unequal android unequal]()
这里的代码和上面的大同小异,唯一的区别就是button设置了minWidth。
CSS+HTML的实现:
    <style type="text/css">
        .container {
            display: -webkit-box;
        }
        .container .tempDiv {
            -webkit-box-flex:1;
        }
    </style>

        <section class="container">
            <div class="tempDiv"></div>
            <button class="btn_login">登录</button>
            <div class="tempDiv"></div>
            <button class="btn_forget">忘记密码</button>
            <div class="tempDiv"></div>
        </section>
运行效果如下:
![html 实现 html 实现]()
html这边比较简单,只是把关键代码列出来了。直接使用-webkit-box来设置,然后将每个tempDiv的-webkit-box-flex都设置为1即可。
因为比较简单,所以也没有分按钮width是否相等两种情况。
iOS中的实现
iOS实现如果单独做计算也是可以的。可以先将按钮的宽度相加,然后(屏幕宽度-按钮相加宽度)/3 得到间隙的大小,然后再将按钮按照计算结果进行计算放置即可。这里需要固定按钮的宽度,才能实现。这里有个精度损失问题,因为在Int和Float之间转换有损失。关键代码如下:
         let interval = (screenWidth - CGFloat(forgetButtonWidth)  - CGFloat(loginButtonWidth) )/3

        loginButton.setTitle("登录", for: UIControlState.normal)
        loginButton.setTitleColor(UIColor.white, for: UIControlState.normal)
        loginButton.backgroundColor = UIColor.brown
        loginButton.frame = CGRect.init(x: Int(interval), y: 100, width: loginButtonWidth, height: 40)

        forgetPwdButton.setTitle("忘记密码", for: UIControlState.normal)
        forgetPwdButton.setTitleColor(UIColor.white, for: UIControlState.normal)
        forgetPwdButton.backgroundColor = UIColor.darkGray
        forgetPwdButton.frame = CGRect.init(x: Int(interval)*2+loginButtonWidth, y: 100, width: forgetButtonWidth, height: 40)

        self.view.addSubview(loginButton)

        self.view.addSubview(forgetPwdButton)
严格来说,这里并没有将其平分为三份,不过如果不是太严谨的话可以当做平分。
上面的这种通过计算的方式适合于按钮等宽或者不等宽的情况进行平分。接下来看看另一种方式:Stack view分割。
先简单说一下Stack view。它在IOS中的体现就是UIStackView这个类,是iOS9新增的一个布局技术,可以用来进行多个控件的快速布局。具体的介绍就不多说了,不了解的可以参考这里。
通过StackView,可以快速地实现分割,关键代码如下:
          loginButton.setTitle("登录", for: UIControlState.normal)

            loginButton.setTitleColor(UIColor.white, for: UIControlState.normal)
            loginButton.backgroundColor = UIColor.brown

            forgetPwdButton.setTitle("忘记密码", for: UIControlState.normal)

            forgetPwdButton.setTitleColor(UIColor.white, for: UIControlState.normal)
            forgetPwdButton.backgroundColor = UIColor.darkGray


            tempViewOne.backgroundColor = UIColor.clear

            tempViewTwo.backgroundColor = UIColor.clear
            tempViewThree.backgroundColor = UIColor.clear

            stackView.addArrangedSubview(tempViewOne)
            stackView.addArrangedSubview(forgetPwdButton)
            stackView.addArrangedSubview(tempViewTwo)
            stackView.addArrangedSubview(loginButton)
            stackView.addArrangedSubview(tempViewThree)
    //
            //set vertical or horizontal
            stackView.axis = UILayoutConstraintAxis.horizontal

            stackView.distribution = UIStackViewDistribution.fillEqually

            self.view.addSubview(stackView)
这里是用了三个临时的占位view,然后将他们和两个按钮都放到stackView里面,设置stackView的distribution为fillEqually。这样就实现了等分效果,这里需要注意:我们只需要对stack进行约束,然后其他的控件布局会由stack view自动管理。实现效果如下:
![stack view handle stack view handle]()
这样就实现了两个button把界面均分。
这里面设置的distribution是 fillEqually,也就是把stackview里面的控件都充满stackview,并且stackview的arranged view都是等宽的。
Question
1、还有其他的方式实现么?


