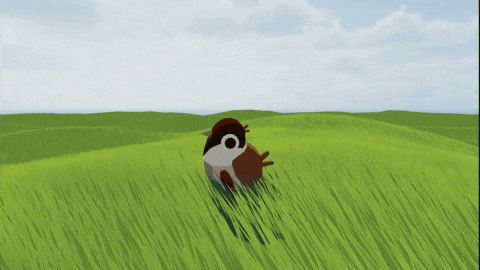
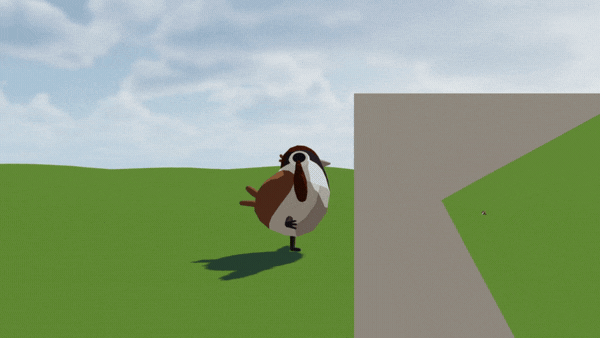
背景 本文主要讲的是程序化生成无限大的地图,并在上面长满草的故事。
“ 老规矩,Demo 先行:
https://chengxu1973.github.io/stylized-grass-dist/
如果是电脑用户,可以使用 WSAD 或者方向键来控制小鸟移动,按住鼠标左键并移动来控制视角方向。
如果使用的是移动设备,可以点击屏幕并滑动来进行操作。
本文接下来会从 风格化草 、 GPU INSTANCING 、 无限地图 三部分进行说明。
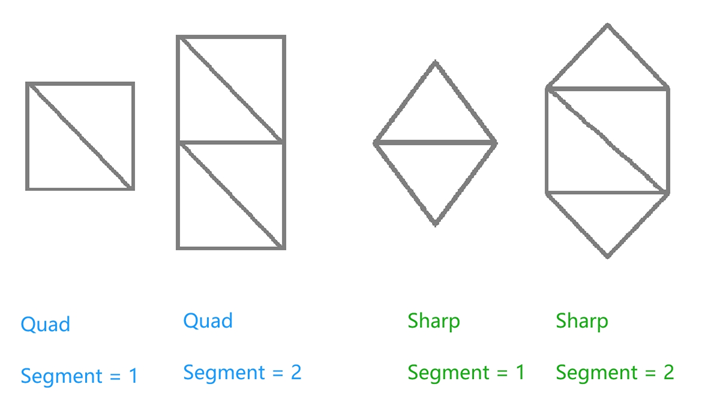
风格化草 首先我们要生成草的 mesh,这里我们可以预设 Sharp 与 Quad 两种形状,并用 segment 参数来控制草的段数:
接下来我们需要考虑如何让地形生草。
export interface GrassSampler { sample(): GrassSampleInfo; } export interface GrassSampleInfo { positions: Float32Array < ArrayBuffer >; normals: Float32Array < ArrayBuffer >; count: number ; } 一般的情况是在一个地形上均匀地长草,因此首先要读取地面模型的 mesh 以及贴图信息,然后在三角面内均匀随机采样,就可以获得草的生长位置。
如果计算量比较大,可以考虑 预计算 或者使用 task-homie 分帧处理:
“ task-homie 链接: https://gist.github.com/ChengXu1973/47f5816312b5af11e4d92e01960b345e)
this ._terrainPosition = mesh.readAttribute( 0 , ATTR_POSITION) as Float32Array ; this ._terrainNormal = mesh.readAttribute( 0 , ATTR_NORMAL) as Float32Array ; this ._terrainIndices = mesh.readIndices( 0 ) as Uint32Array ; // 如果需要使用贴图的alpha通道作为采样用的概率 if ( this .useProbabilityTexture) { // some code this ._terrainTexCoord = mesh.readAttribute( 0 , ATTR_TEX_COORD) as Float32Array ; director.root.device.copyTextureToBuffers( mainTexture.getGFXTexture(), [ this ._terrainTexture], [copy] ); // some code } 对于每一棵草来说,我们可以将地形 mesh 的每个三角形的面积作为草落在这个三角形内的概率,然后在三角形内随机生成一个点就可以了。
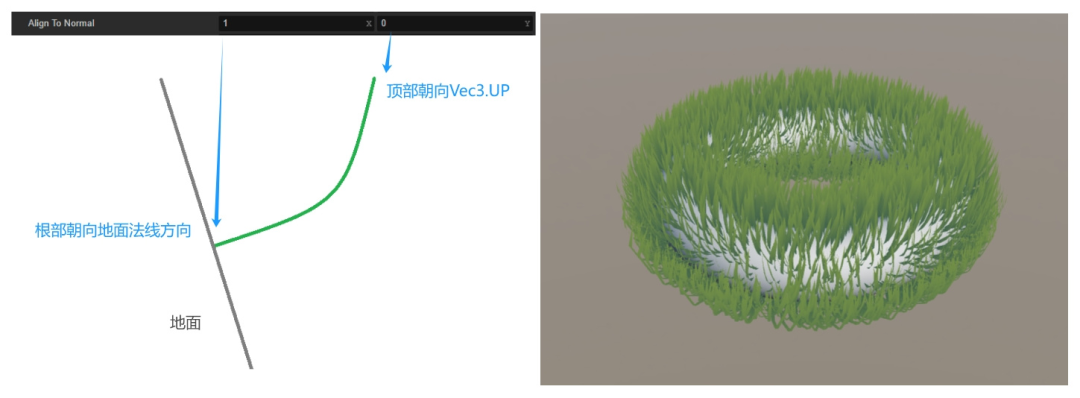
一般来说,草的根部垂直于地面,也就是指向地形的法线方向,其顶部朝上,因此我们可以用一个 alignToNormal 参数控制草的姿态。
风格化渲染最重要的是什么?就是有自己的风格,而本人最擅长的风格就是 unlit!所以我们新建一个 unlit 材质,给草添加一个绿色。
当然,如果为了让草看起来像是从地面长出来的,我们可以再添加一个地面颜色,根据草的高度做一个渐变:
vec4 col = mix(groundColor, mainColor, 1.0 - v_uv.y); 同时为了让草看起来更生动,我们还可以添加风的动画,颜色渐变等等,这部分我不是很擅长,论坛里也有其他解决方案,就不再赘述。
GPU INSTANCING 首先需要判断一下当前环境是否支持 INSTANCING:
gfx.deviceManager.gfxDevice.hasFeature(gfx.Feature.INSTANCED_ARRAYS); 这里说句题外话,如果设备不支持 INSTANCING ,最简单粗暴的方式就是把所有草合在一起生成一个巨大的 mesh:
this ._mesh = utils.MeshUtils.createMesh({ positions, indices, uvs }, null ); 不过这个方案太不优雅了。
查看引擎源码我们可以看到,创建 mesh 这一通操作最后的结果是向 RenderScene 提交了一个 renderer.scene.Model,因此我们选择自定义两种 Model:
let model: GrassModel;
if (gfx.deviceManager.gfxDevice.hasFeature(gfx.Feature.INSTANCED_ARRAYS)) {
  model = director.root.createModel(GrassModelInstancing);
} else {
  model = director.root.createModel(GrassModelNormal);
}
GrassModelInstancing 对于单独的一棵草来说,我们只要知道了其生长点,地面法线,就可以通过各个顶点的 uv 来计算其位置,因此 uv 属性的 isInstanced 应为 false ,而位置、法线则为 true :
const VERTEX_ATTRS = [ new gfx.Attribute( gfx.AttributeName.ATTR_POSITION, gfx.Format.RGB32F, false , 0 , true ), new gfx.Attribute( gfx.AttributeName.ATTR_NORMAL, gfx.Format.RGB32F, false , 0 , true ), new gfx.Attribute( gfx.AttributeName.ATTR_TEX_COORD, gfx.Format.RG32F, false , 1 ), ] as (gfx.Attribute & { offset?: number })[]; 一开始我们将草的 uv 信息提交之后就不用关心了:
const vBuffer: ArrayBuffer = new ArrayBuffer ( this ._vertAttrSizeStatic * this ._vertCount ); const vbFloatArray = new Float32Array (vBuffer); for ( let i = 0 ; i < this ._uvs.length; ++i) { vbFloatArray[i] = this ._uvs[i]; } vertexBuffer.update(vBuffer); 而草的生长点位置以及法线信息就可以每帧动态更新:
// some code for ( let count = 0 ; count < info.count; count++) { let offset = count * this ._vertAttrsFloatCount; this ._vdataF32[offset++] = info.positions[count * 3 + 0 ]; this ._vdataF32[offset++] = info.positions[count * 3 + 1 ]; this ._vdataF32[offset++] = info.positions[count * 3 + 2 ]; this ._vdataF32[offset++] = info.normals[count * 3 + 0 ]; this ._vdataF32[offset++] = info.normals[count * 3 + 1 ]; this ._vdataF32[offset++] = info.normals[count * 3 + 2 ]; } // some code const ia = this ._subModels[ 0 ].inputAssembler; ia.vertexBuffers[ 0 ].update( this ._vdataF32!); ia.firstIndex = 0 ; ia.indexCount = this ._indexCount; ia.instanceCount = count; ia.vertexCount = this ._iaVertCount; 创建出来的 Model 最后由持有它的 ModelRenderer 添加至场景就可以了:
this ._getRenderScene().addModel(model); 上面我们提到,对于单独的一棵草只要知道了其生长点与法线,就可以通过顶点 uv 来计算顶点位置,我们来看看 shader 的部分(伪代码如下):
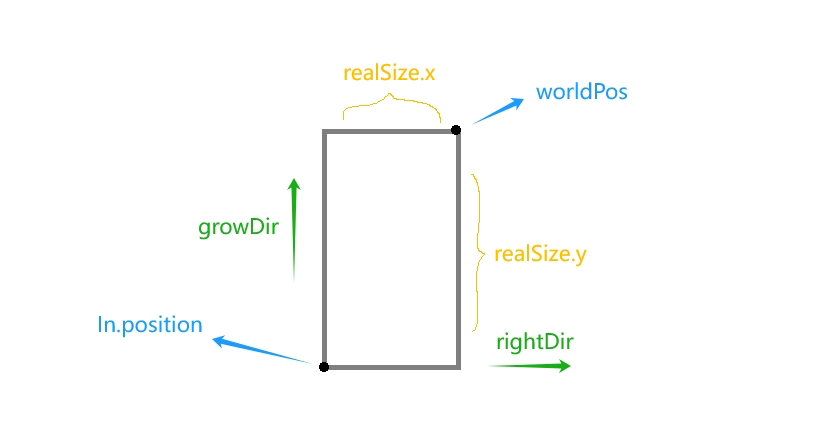
float v_heightFactor = 1.0 - uv.y;
vec3 growDir = balabala(noise, align);
vec3 rightDir = cross(finalNormal, viewDir);

growDir = normalize(growDir);
rightDir = normalize(rightDir);

vec2 realSize = balabala(noise, size);

float xOffset = uv.x - 0.5;
worldPos += xOffset * realSize.x * rightDir +
    v_heightFactor * realSize.y * growDir;
首先使用世界坐标获取一个唯一的随机因子 noise,然后用随机因子计算草的旋转方向与大小,接着根据草的 uv 将生长点位置进行偏移便得到了最终的顶点位置:
GrassModelNormal GrassModelNormal 相比于 GrassModelInstancing 就简单很多,我们将数据都合在一起提交给渲染场景就可以:
// some code for ( let count = 0 ; count < info.count; count++) { for ( let vert = 0 ; vert < this ._vertCount; vert++) { let offset = (vert + count * this ._vertCount) * this ._vertAttrsFloatCount; this ._vdataF32[offset++] = info.positions[count * 3 + 0 ]; this ._vdataF32[offset++] = info.positions[count * 3 + 1 ]; this ._vdataF32[offset++] = info.positions[count * 3 + 2 ]; this ._vdataF32[offset++] = info.normals[count * 3 + 0 ]; this ._vdataF32[offset++] = info.normals[count * 3 + 1 ]; this ._vdataF32[offset++] = info.normals[count * 3 + 2 ]; this ._vdataF32[offset++] = this ._uvs[vert * 2 + 0 ]; this ._vdataF32[offset++] = this ._uvs[vert * 2 + 1 ]; } } // some code const ia = this ._subModels[ 0 ].inputAssembler; ia.vertexBuffers[ 0 ].update( this ._vdataF32!); ia.firstIndex = 0 ; ia.indexCount = this ._indexCount * count; ia.vertexCount = this ._iaVertCount; 无限地图 为了让小鸟在无尽的草地上自由奔跑,我们要分别解决地形与草的生成及渲染问题。
地形生成 程序化生成哪家强,Perlin Noise 帮大忙!
通过采样噪声图作为高度,可让地形有所起伏,为了地图能够无穷无尽,我有两种方案:
生成一张大一点的贴图 : 分为 9 个区块,保证每个区块能覆盖相机的 far,在跨越区块时,我们将当前区块更新至中间并重置一下坐标,搭配阈值与分帧策略,理论上可以用于制作任意的地形。
制作一张噪声图 :再按照中心对称的方式拼接,采样时搭配 repeat 模式就可以了。
这里我们选方案二。
首先在网上找一张 128 的 Perlin Noise 贴图,然后手动拼接。
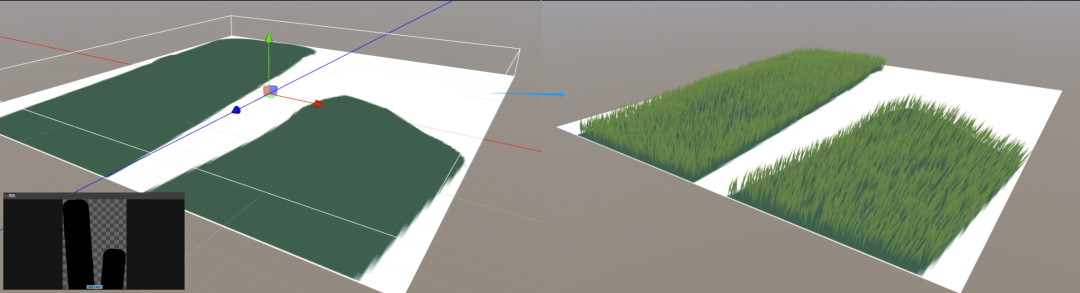
地形渲染 由于相机只能看到无尽地图的一部分,所以我们也只需要渲染这一部分就可以了,这里又有两种思路:
生成一系列地块 :当相机移动时,我们计算出需要显示的地块,并根据距离相机的远近以及 LOD 策略进行渲染。
放一个面片模型到相机面前 :相机无论转到哪里都显示的是这个面片,在顶点着色器里面根据高度调整顶点位置就可以了。
这里我们选方案二。
那么问题来了,地形渲染搞定了,那角色移动怎么办?只能在 CPU 里面采样一次。
首先拷贝一下纹理数据:
width = this .noise.width; height = this .noise.height; this ._pixels = new Uint8Array (width * height * 4 ); const region = new gfx.BufferTextureCopy(); region.texOffset.x = 0 ; region.texOffset.y = 0 ; region.texExtent.width = width; region.texExtent.height = height; director.root.device.copyTextureToBuffers( this .noise.getGFXTexture(), [ this ._pixels], [region] ); 然后根据位置采样一下:
u = this .node.worldPosition.x * this .terrainScale; v = this .node.worldPosition.z * this .terrainScale; // 修正至像素中心 u -= 0.5 / width; v -= 0.5 / height; // 归一化 u = u - Math .floor(u); v = v - Math .floor(v); // 像素坐标 x = u * width; y = v * height; // 双线性采样的四个邻近像素坐标 x0 = Math .floor(x); y0 = Math .floor(y); x1 = x0 + 1 ; y1 = y0 + 1 ; // repeat模式 x0 = (x0 + width) % width; y0 = (y0 + height) % height; x1 = (x1 + width) % width; y1 = (y1 + height) % height; // 取像素r通道 r00 = this ._getPixel(x0, y0, 0 ); r10 = this ._getPixel(x1, y0, 0 ); r01 = this ._getPixel(x0, y1, 0 ); r11 = this ._getPixel(x1, y1, 0 ); // 计算权重 dx = x - x0; dy = y - y0; w00 = ( 1 - dx) * ( 1 - dy); w10 = dx * ( 1 - dy); w01 = ( 1 - dx) * dy; w11 = dx * dy; // 加权 r = r00 * w00 + r10 * w10 + r01 * w01 + r11 * w11; 最后我们根据采样的值设置一下节点坐标,这样我们的小鸟就能爪踏实地了!
远处的草 远处的草很小,所以和地形一样,跟着相机移动就可以了。
如果实在很远,也可以不渲染,我们在只需要在渲染地面时在地上显示一点斑驳的绿点,这里通过取深度值再混合一下颜色:
// vert
cam_diatance = position.z / cc_nearFar.y;

// frag
vec4 col = mix(mainColor, subColor, cam_diatance * texture(mainTexture, 0.1 *worldPos.xz).r);
近处的草 近处的草不能再跟随相机移动,所以得分块之后按需展示,和正常的地块逻辑差不多。
但是考虑到草的生长是杂乱无章的,我们可以只生成一小块草的位置信息,然后每一块都单位的“复制粘贴”这一部分位置信息就可以:
// some code colMin = Math .floor((x - this .shownRadius) / this .unitSize); colMax = Math .ceil((x + this .shownRadius) / this .unitSize); rowMin = Math .floor((z - this .shownRadius) / this .unitSize); rowMax = Math .ceil((z + this .shownRadius) / this .unitSize); for ( let i = colMin; i <= colMax; i++) { for ( let j = rowMin; j <= rowMax; j++) { offsetX = i * this .unitSize; offsetY = j * this .unitSize; for ( let index = 0 ; index < this ._unit.count; index++) { // 复制一下生长点信息 } } } 最后看起来就是这样:
写在最后 点击 【阅读原文】 ,获取项目源码。
有任何问题或建议,欢迎在评论区留言交流!
欢迎关注 Cocos 官方公众号,第一时间获取更多实用信息与技术干货。