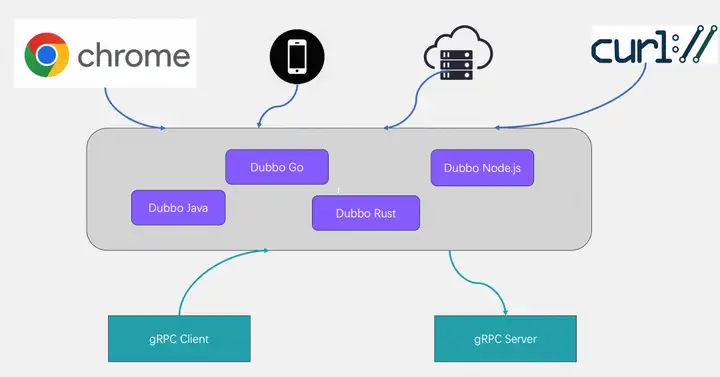
基于 Dubbo3 定义的 Triple 协议,你可以轻松编写浏览器、gRPC 兼容的 RPC 服务,并让这些服务同时运行在 HTTP/1 和 HTTP/2 上。Dubbo TypeScript SDK[1]支持使用 IDL 或编程语言特有的方式定义服务,并提供一套轻量的 APl 来发布或调用这些服务。
Dubbo-js 已于 9 月份发布支持 Dubbo3 协议的首个 alpha 版本,它的发布将有机会彻底改变微服务前后端的架构与通信模式,让你能直接在浏览器页面或 web 服务器中访问后端 Dubbo、gRPC 服务。
![]()
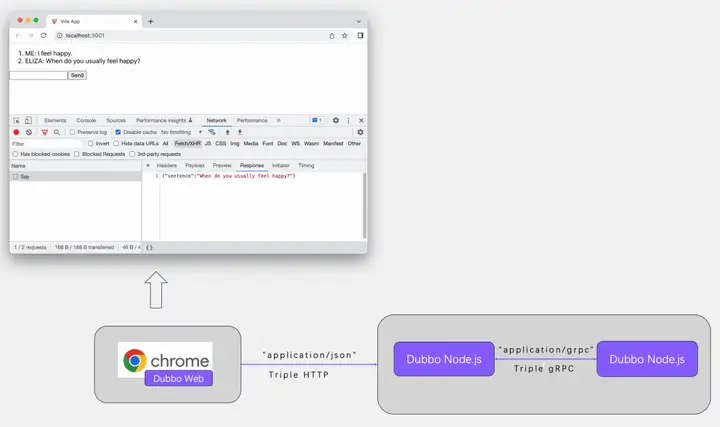
浏览器 Web 应用示例
本示例演示了如何使用 dubbo-js 开发运行在浏览器上的 web 应用程序,web 页面将调用 dubbo node.js 开发的后端服务并生成页面内容。本示例演示基于 IDL 和非 IDL 两种编码模式。
![]()
IDL 模式
前置条件
首先,我们将使用 Vite 来生成我们的前端项目模板,它内置了我们稍后需要的所有功能支持。
npm create vite@latest -- dubbo-web-example --template react-ts
cd dubbo-web-example
npm install
因为使用 Protocol Buffer 的原因,我们首先需要安装相关的代码生成工具,这包括 @bufbuild/protoc-gen-es、@bufbuild/protobuf、@apachedubbo/protoc-gen-apache-dubbo-es、@apachedubbo/dubbo。
npm install @bufbuild/protoc-gen-es @bufbuild/protobuf @apachedubbo/protoc-gen-apache-dubbo-es @apachedubbo/dubbo
使用 Proto 定义服务
现在,使用 Protocol Buffer (IDL) 来定义一个 Dubbo 服务。
src 下创建 util/proto 目录,并生成文件。
mkdir -p src/util/proto && touch src/util/proto/example.proto
写入内容:
syntax = "proto3";

package apache.dubbo.demo.example.v1;

message SayRequest {
  string sentence = 1;
}

message SayResponse {
  string sentence = 1;
}

service ExampleService {
  rpc Say(SayRequest) returns (SayResponse) {}
}
这个文件声明了一个叫做 ExampleService 的服务,为这个服务定义了 Say 方法以及它的请求参数 SayRequest 和返回值 SayResponse。
生成代码
创建 gen 目录,作为生成文件放置的目标目录。
mkdir -p src/util/gen
运行以下命令,利用 protoc-gen-es、protoc-gen-apache-dubbo-es 等插件在 gen 目录下生成代码文件:
PATH=$PATH:$(pwd)/node_modules/.bin \
  protoc -I src/util/proto \
  --es_out src/util/gen \
  --es_opt target=ts \
  --apache-dubbo-es_out src/util/gen \
  --apache-dubbo-es_opt target=ts \
  example.proto
运行命令后,应该可以在目标目录中看到以下生成的文件:
├── src
│   ├── util
│   │   ├── gen
│   │   │   ├── example_dubbo.ts
│   │   │   └── example_pb.ts
│   │   └── proto
│   │       └── example.proto
创建 App
需要先下载 @apachedubbo/dubbo-web。
npm install @apachedubbo/dubbo-web
现在我们可以从包中导入服务并设置一个客户端。在 App.tsx 中添加以下内容:
import { useState } from "react";
import "./App.css";

import { createPromiseClient } from "@apachedubbo/dubbo";
import { createDubboTransport } from "@apachedubbo/dubbo-web";

// Import service definition that you want to connect to.
import { ExampleService } from "./util/gen/example_dubbo";

// The transport defines what type of endpoint we're hitting.
// In our example we'll be communicating with a Dubbo endpoint.
const transport = createDubboTransport({
  baseUrl: "http://localhost:8080",
});

// Here we make the client itself, combining the service
// definition with the transport.
const client = createPromiseClient(ExampleService, transport, { serviceGroup: 'dubbo', serviceVersion: '1.0.0' });

function App() {
  const [inputValue, setInputValue] = useState("");
  const [messages, setMessages] = useState<
    {
      fromMe: boolean;
      message: string;
    }[]
  >([]);
  return (
    <>
      <ol>
        {messages.map((msg, index) => (
          <li key={index}>{`${msg.fromMe ? "ME:" : "Dubbo Server:"} ${msg.message}`}</li>
        ))}
      </ol>
      <form
        onSubmit={async (e) => {
          e.preventDefault();
          // Clear inputValue since the user has submitted.
          setInputValue("");
          // Store the inputValue in the chain of messages and
          // mark this message as coming from "me"
          setMessages((prev) => [
            ...prev,
            {
              fromMe: true,
              message: inputValue,
            },
          ]);
          const response = await client.say({
            sentence: inputValue,
          });
          setMessages((prev) => [
            ...prev,
            {
              fromMe: false,
              message: response.sentence,
            },
          ]);
        }}
      >
        <input value={inputValue} onChange={(e) => setInputValue(e.target.value)} />
        <button type="submit">Send</button>
      </form>
    </>
  );
}

export default App;
执行以下命令,即可得到样例页面。
npm run dev
启动 Server
接下来我们需要启动 Server,可以使用 Java、Go、Node.js 等 Dubbo 支持的任一语言开发 Server。这里我们采用 Dubbo 服务嵌入的 Node.js 服务器,具体可参考 Node.js 开发 Dubbo 后端服务[2]中的操作步骤。
不过需要注意,我们额外需要修改 Node.js 示例:引入 @fastify/cors 来解决前端请求的跨域问题。
npm install @fastify/cors
需要在 server.ts 文件下修改。
...
import cors from "@fastify/cors";

...
async function main() {
  const server = fastify();
  ...
  await server.register(cors, {
    origin: true,
  });
  ...
  await server.listen({ host: "localhost", port: 8080 });
  ...
}

void main();
最后,运行代码启动服务。
npx tsx server.ts
无 IDL 模式
在接下来的版本中,我们将继续提供无 IDL 模式的通信支持,这样就可以更方便的访问无 IDL 的后端服务。在这里,我们先快速的看一下无 IDL 模式的使用方式。
同样需要先安装 @apachedubbo/dubbo、@apachedubbo/dubbo-web。
npm install @apachedubbo/dubbo @apachedubbo/dubbo-web
现在就可以一个启动一个客户端,并发起调用了。App.tsx 中的代码与 IDL 模式基本一致,区别点在于以下内容:
// ...
// set backend server to connect
const transport = createDubboTransport({
  baseUrl: "http://localhost:8080",
});
// init client
const client = createPromiseClient(transport);

function App() {
  // ...
  // call remote Dubbo service
  const response = await client.call(
    "apache.dubbo.demo.example.v1.ExampleService",
    "say",
    {
      sentence: inputValue,
    });
}
执行以下命令,即可得到样例页面。
npm run dev
总结
直接在浏览器页面或 web 服务器中访问后端 Dubbo RPC 服务!Dubbo Triple 协议升级以及 Dubbo javascript sdk 的发布,对整个微服务体系是一个非常有力的补充,期待看到它能改变未来整个微服务架构以及前后端通信模式。
相关链接:
[1] Dubbo TypeScript SDK
https://github.com/apache/dubbo-js/
[2] Node.js 开发 Dubbo 后端服务
https://github.com/apache/dubbo-js/tree/dubbo3/example/dubbo-node-example
作者:蔡建怿
点击立即免费试用云产品 开启云上实践之旅!
原文链接
本文为阿里云原创内容,未经允许不得转载。