kaka-core 是一项服务于 Java 后端的事件领域模型,全局事件通知框架。
kaka-core 已移至 https://gitee.com/zkpursuit/kaka-core , 并支持 maven 直接安装。
本次更新新增与第三方消息队列对接的功能
1、稍加编码就能对接市面上所有第三方消息队列。
2、通过消息队列派发和消费事件可由远程事件处理器处理并返回处理结果。
3、返回处理结果与本地执行事件完全相同(注:SyncResult消费处理远程事件时不可用)。
4、事件保证一次消费处理,不会多次重复处理。
5、稳定性完全由第三方消息队列决定。
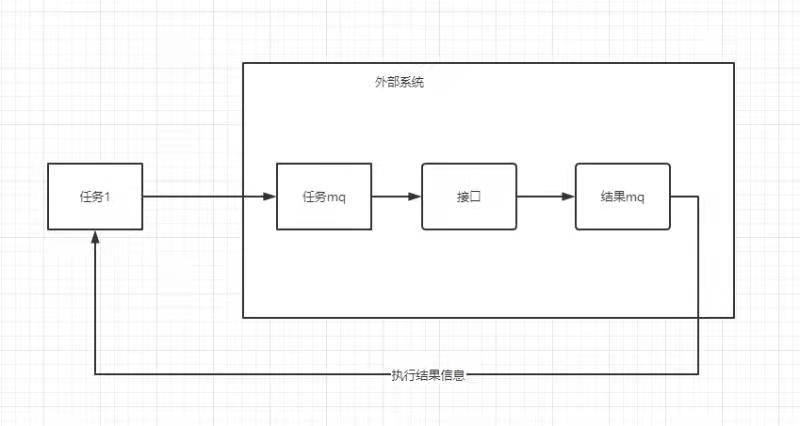
原理:每个事件调度中心为消息的发布者亦为消息的订阅者,派发事件即将事件发布到消息队列,订阅者消费到事件后本地化处理事件,处理完成后再次将事件发布到消息队列,根据事件ID在发送方找到缓存在内存的原始事件对象并进行结果赋值或回调。
原理执行流程图(感谢用户 微信名:碧涛 提供此图):
![]()
基本范例:
Facade facade = FacadeFactory.getFacade();
//以下通过ActiveMQ消息队列消费处理事件,并获得事件处理结果
        facade.initRemoteMessageQueue(new ActiveMQ("event_exec_before", "event_exec_after")); //此行全局一次设定
        Message message = new Message("20000", "让MyCommand接收执行");
        IResult<String> result4 = message.setResult("ResultMsg", new AsynResult<>(5000));
        facade.sendMessageByQueue(message);
        System.out.println("消息队列消费处理事件结果:" + result4.get());

        facade.sendMessageByQueue(new Message("40000", "", (IResult<Object> result) -> {
            String clasz = ((CallbackResult<Object>) result).eventHanderClass;
            StringBuilder sb = new StringBuilder("消息队列消费处理事件结果异步回调:\t" + clasz + "\t");
            Object resultObj = result.get();
            if (resultObj instanceof Object[]) {
                Object[] ps = (Object[]) resultObj;
                sb.append(Arrays.toString(ps));
            } else {
                sb.append(resultObj);
            }
            System.out.println(sb);
        }));
package kaka.test;

import com.kaka.notice.RemoteMessageQueue;
import kaka.test.util.KryoSerializer;
import kaka.test.util.Serializer;
import org.apache.activemq.ActiveMQConnection;
import org.apache.activemq.ActiveMQConnectionFactory;

import javax.jms.*;
import java.util.Map;
import java.util.concurrent.ConcurrentHashMap;
import java.util.function.Consumer;

/**
 * 本类仅为测试用例,ActiveMQ消息队列的访问实现代码是否为最优不做考虑,在此仅为范例参考
 */
public class ActiveMQ extends RemoteMessageQueue {

    private static class TestLocalMessageCache implements LocalMessageCache {
        private final Map<String, com.kaka.notice.Message> localMap = new ConcurrentHashMap<>();

        @Override
        public void add(String id, com.kaka.notice.Message message) {
            localMap.put(id, message);
        }

        @Override
        public com.kaka.notice.Message remove(String id) {
            return localMap.remove(id);
        }
    }

    private static final String BROKER_URL = "tcp://101.34.22.36:61616";
    private final ActiveMQConnectionFactory activeMQConnectionFactory;
    private final Serializer<MessageWrap> eventSerializer = new KryoSerializer<>();

    public ActiveMQ(String beforeTopic, String afterTopic) {
        super(beforeTopic, afterTopic);
        this.activeMQConnectionFactory = new ActiveMQConnectionFactory(
                ActiveMQConnection.DEFAULT_USER, ActiveMQConnection.DEFAULT_PASSWORD, BROKER_URL);
        this.init();
    }

    @Override
    protected LocalMessageCache initLocalMessageCache() {
        return new TestLocalMessageCache();
    }

    @Override
    protected void publishEventMessage(MessageWrap msgWrap, String topic) {
        byte[] bytes = this.eventSerializer.serialize(msgWrap);
        try {
            Connection connection = activeMQConnectionFactory.createConnection();
            connection.start();
            Session session = connection.createSession(false, Session.AUTO_ACKNOWLEDGE);
            MessageProducer producer = session.createProducer(session.createQueue(topic));
            producer.setDeliveryMode(DeliveryMode.PERSISTENT);
            BytesMessage bytesMessage = session.createBytesMessage();
            bytesMessage.writeBytes(bytes);
            producer.send(bytesMessage);
            producer.close();
            connection.close();
            session.close();
        } catch (JMSException e) {
            e.printStackTrace();
        }
    }

    private void init() {
        new Thread(() -> {
            try {
                consume(beforeTopic, (byte[] bytes) -> {
                    MessageWrap remoteMsgWrap = eventSerializer.deserialize(bytes);
                    receivedBeforeEventMessage(remoteMsgWrap); //这里很重要,必须调用
                });
            } catch (Exception e) {
                e.printStackTrace();
            }
        }).start();
        new Thread(() -> {
            try {
                consume(afterTopic, (byte[] bytes) -> {
                    MessageWrap remoteMsgWrap = eventSerializer.deserialize(bytes);
                    receivedAfterEventMessage(remoteMsgWrap); //这里很重要,必须调用
                });
            } catch (Exception e) {
                e.printStackTrace();
            }
        }).start();
    }

    private void consume(String topic, Consumer<byte[]> callback) throws Exception {
        Connection connection = this.activeMQConnectionFactory.createConnection();
        connection.start();
        Session session = connection.createSession(false, Session.AUTO_ACKNOWLEDGE);
        Destination destination = session.createQueue(topic);
        MessageConsumer consumer = session.createConsumer(destination);
        while (true) {
            Message message = consumer.receive();
            if (null == message) break;
            if (message instanceof BytesMessage) {
                BytesMessage bytesMessage = (BytesMessage) message;
                try {
                    int byteSize = (int) bytesMessage.getBodyLength();
                    byte[] bytes = new byte[byteSize];
                    bytesMessage.readBytes(bytes);
                    callback.accept(bytes);
                } catch (JMSException e) {
                    e.printStackTrace();
                }
            }
        }
        consumer.close();
        session.close();
        connection.close();
    }
}
以上范例完整代码可在源码 test 中查阅,
源码地址:https://gitee.com/zkpursuit/kaka-core/tree/master/src/test/java/kaka/test