一、简介
Spring MVC框架在工作中经常用到,配置简单,使用起来也很方便,很多书籍和博客都有介绍其处理流程,但是,对于其原理,总是似懂非懂的样子。我们做技术,需要做到知其然,还要知其所以然。今天我们结合源码来深入了解一下Spring MVC的处理流程。
![]()
以上流程图是Spring MVC的处理流程(参考:spring-mvc-flow-with-example),原作者对流程的解释如下:
Step 1: First request will be received by DispatcherServlet.

Step 2: DispatcherServlet will take the help of HandlerMapping and get to know the Controller class name associated with the given request.

Step 3: So request transfer to the Controller, and then controller will process the request by executing appropriate methods and returns ModelAndView object (contains Model data and View name) back to the DispatcherServlet.

Step 4: Now DispatcherServlet send the model object to the ViewResolver to get the actual view page.

Step 5: Finally DispatcherServlet will pass the Model object to the View page to display the result.
针对以上流程,这里需要更加详细一点:
1、请求被web 容器接收,并且根据contextPath将请求发送给DispatcherServlet
2、DispatcherServlet接收到请求后,会设置一些属性(localeResolver、themeResolver等等),在根据request在handlerMappings中查找对应的HandlerExecutionChain;然后根据HandlerExecutionChain中的handler来找到HandlerAdapter,然后通过反射来调用handler中的对应方法(RequestMapping对应的方法)
3、handler就是对应的controller,调用controller中的对应方法来进行业务逻辑处理,返回ModelAndView(或者逻辑视图名称)
4、ViewResolver根据逻辑视图名称、视图前后缀,来获取实际的逻辑视图
5、获取实际视图之后,就会使用model来渲染视图,得到用户实际看到的视图,然后返回给客户端。
二、Demo样例
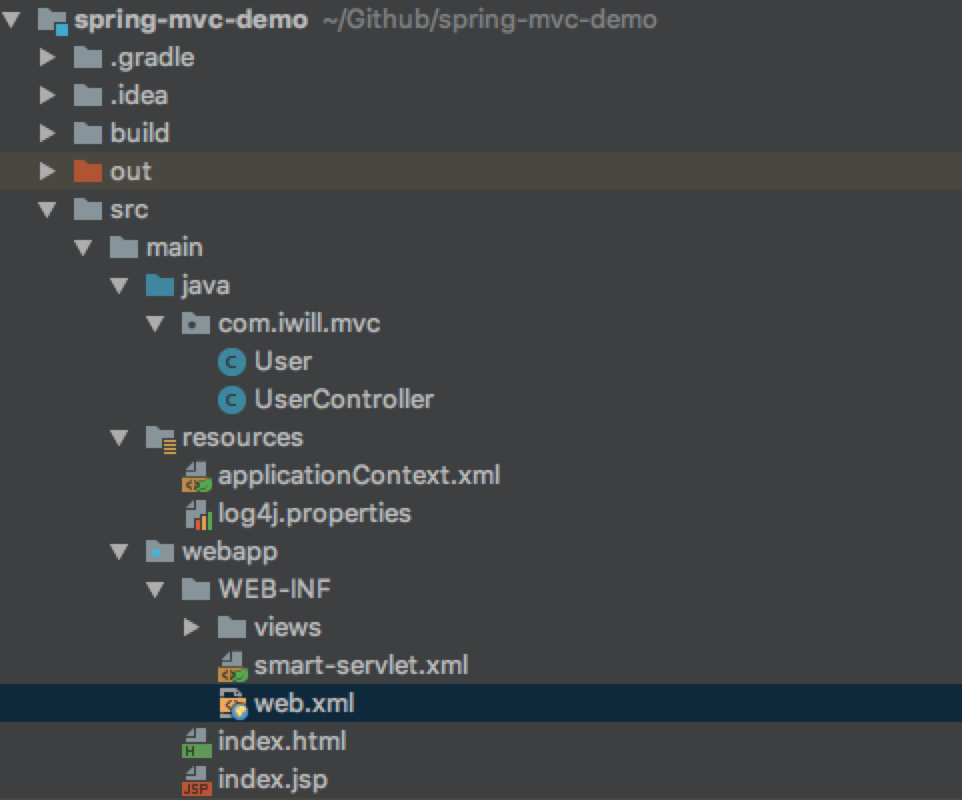
我们运行一个小样例(github地址:https://github.com/yangjianzhou/spring-mvc-demo)来了解Spring MVC处理流程,项目结构如下:
![]()
web.xml配置如下:
<?xml version="1.0" encoding="UTF-8"?>
<web-app version="2.5" xmlns="http://java.sun.com/xml/ns/javaee"
         xmlns:xsi="http://www.w3.org/2001/XMLSchema-instance"
         xsi:schemaLocation="http://java.sun.com/xml/ns/javaee
	http://java.sun.com/xml/ns/javaee/web-app_2_5.xsd">
    <context-param>
        <param-name>contextConfigLocation</param-name>
        <param-value>classpath:/applicationContext.xml</param-value>
    </context-param>
    <listener>
        <listener-class>org.springframework.web.context.ContextLoaderListener</listener-class>
    </listener>

    <servlet>
        <servlet-name>smart</servlet-name>
        <servlet-class>org.springframework.web.servlet.DispatcherServlet</servlet-class>
        <load-on-startup>1</load-on-startup>
    </servlet>

    <servlet-mapping>
        <servlet-name>smart</servlet-name>
        <url-pattern>/</url-pattern>
    </servlet-mapping>

    <welcome-file-list>
        <welcome-file>index.jsp</welcome-file>
    </welcome-file-list>

</web-app>
smart-servlet.xml的内容如下:
 <context:component-scan base-package="com.iwill.mvc"/>

    <!-- 在使用Excel PDF的视图时,请先把这个视图解析器注释掉,否则产生视图解析问题-->
    <bean class="org.springframework.web.servlet.view.InternalResourceViewResolver"
          p:order="100" p:viewClass="org.springframework.web.servlet.view.JstlView"
          p:prefix="/WEB-INF/views/" p:suffix=".jsp"/>
UserController.java的代码如下:
package com.iwill.mvc;

import org.apache.log4j.Logger;
import org.springframework.stereotype.Controller;
import org.springframework.web.bind.annotation.RequestMapping;
import org.springframework.web.bind.annotation.RequestMethod;
import org.springframework.web.servlet.ModelAndView;

@Controller
@RequestMapping("/user")
public class UserController {

    Logger logger = Logger.getLogger(UserController.class);

    @RequestMapping("register")
    public String register() {
        logger.info("invoke register");
        return "user/register";
    }

    @RequestMapping(method = RequestMethod.POST)
    public ModelAndView createUser(User user) {
        ModelAndView mav = new ModelAndView();
        mav.setViewName("user/createSuccess");
        mav.addObject("user", user);
        return mav;
    }
}
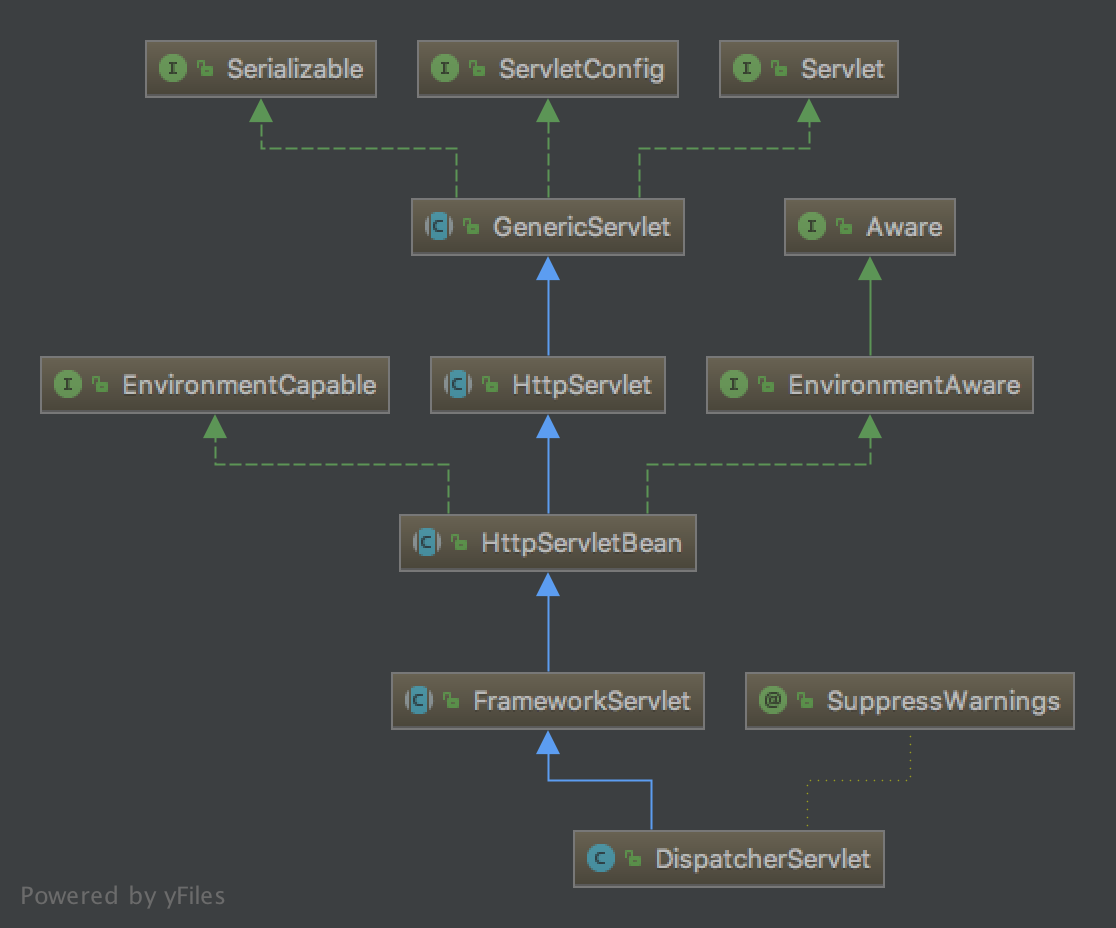
三、请求接收
DispatcherServlet的类继承关系如下:
![]()
可以看出,DispatcherServlet是一个HttpServlet,因此,它可以处理http请求。
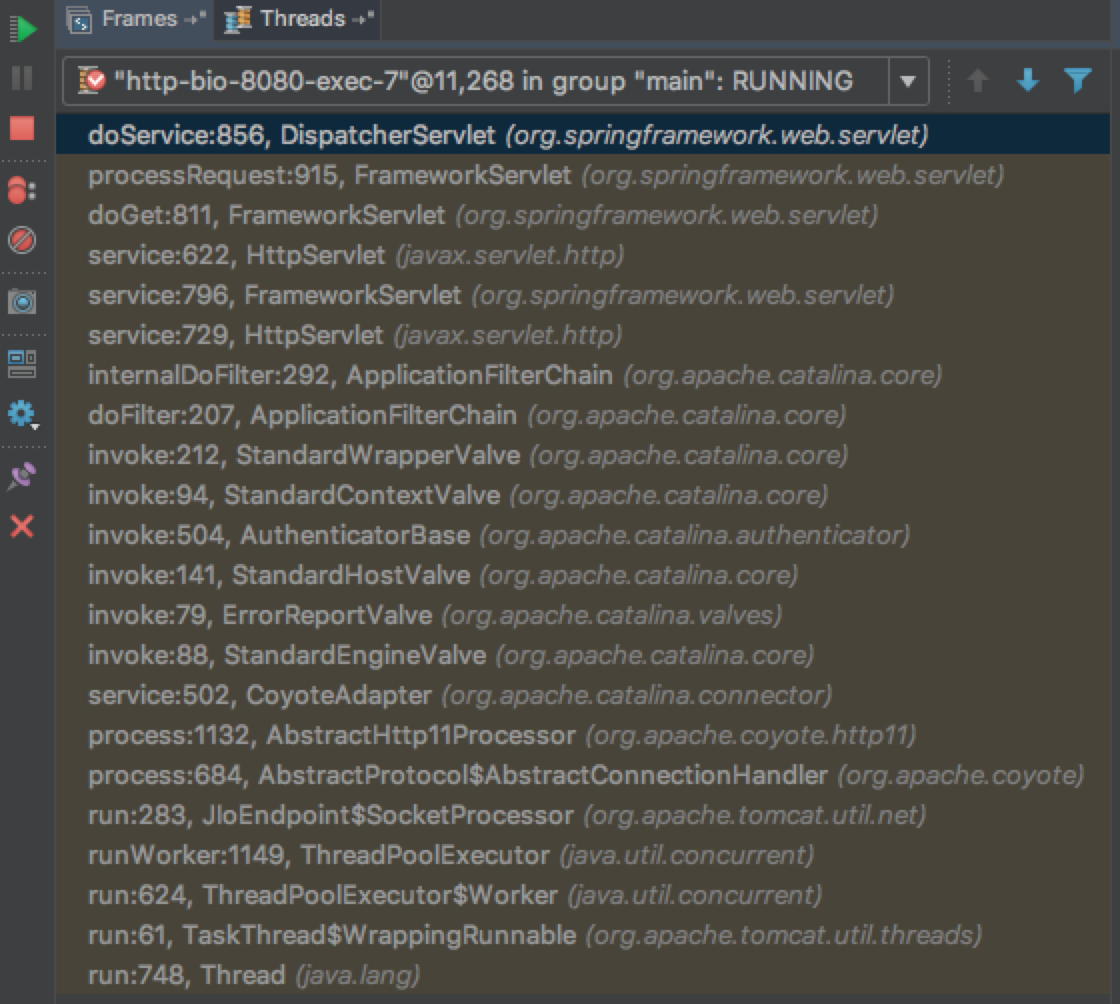
在浏览器中输入http://localhost:8080/spring-mvc-demo/user/register,因为在web服务器上配置了spring-mvc-demo的contextPath为spring-mvc-demo,所以/spring-mvc-demo/user/register的请求就会被DispatcherServlet处理,请求处理路径如下:
![]()
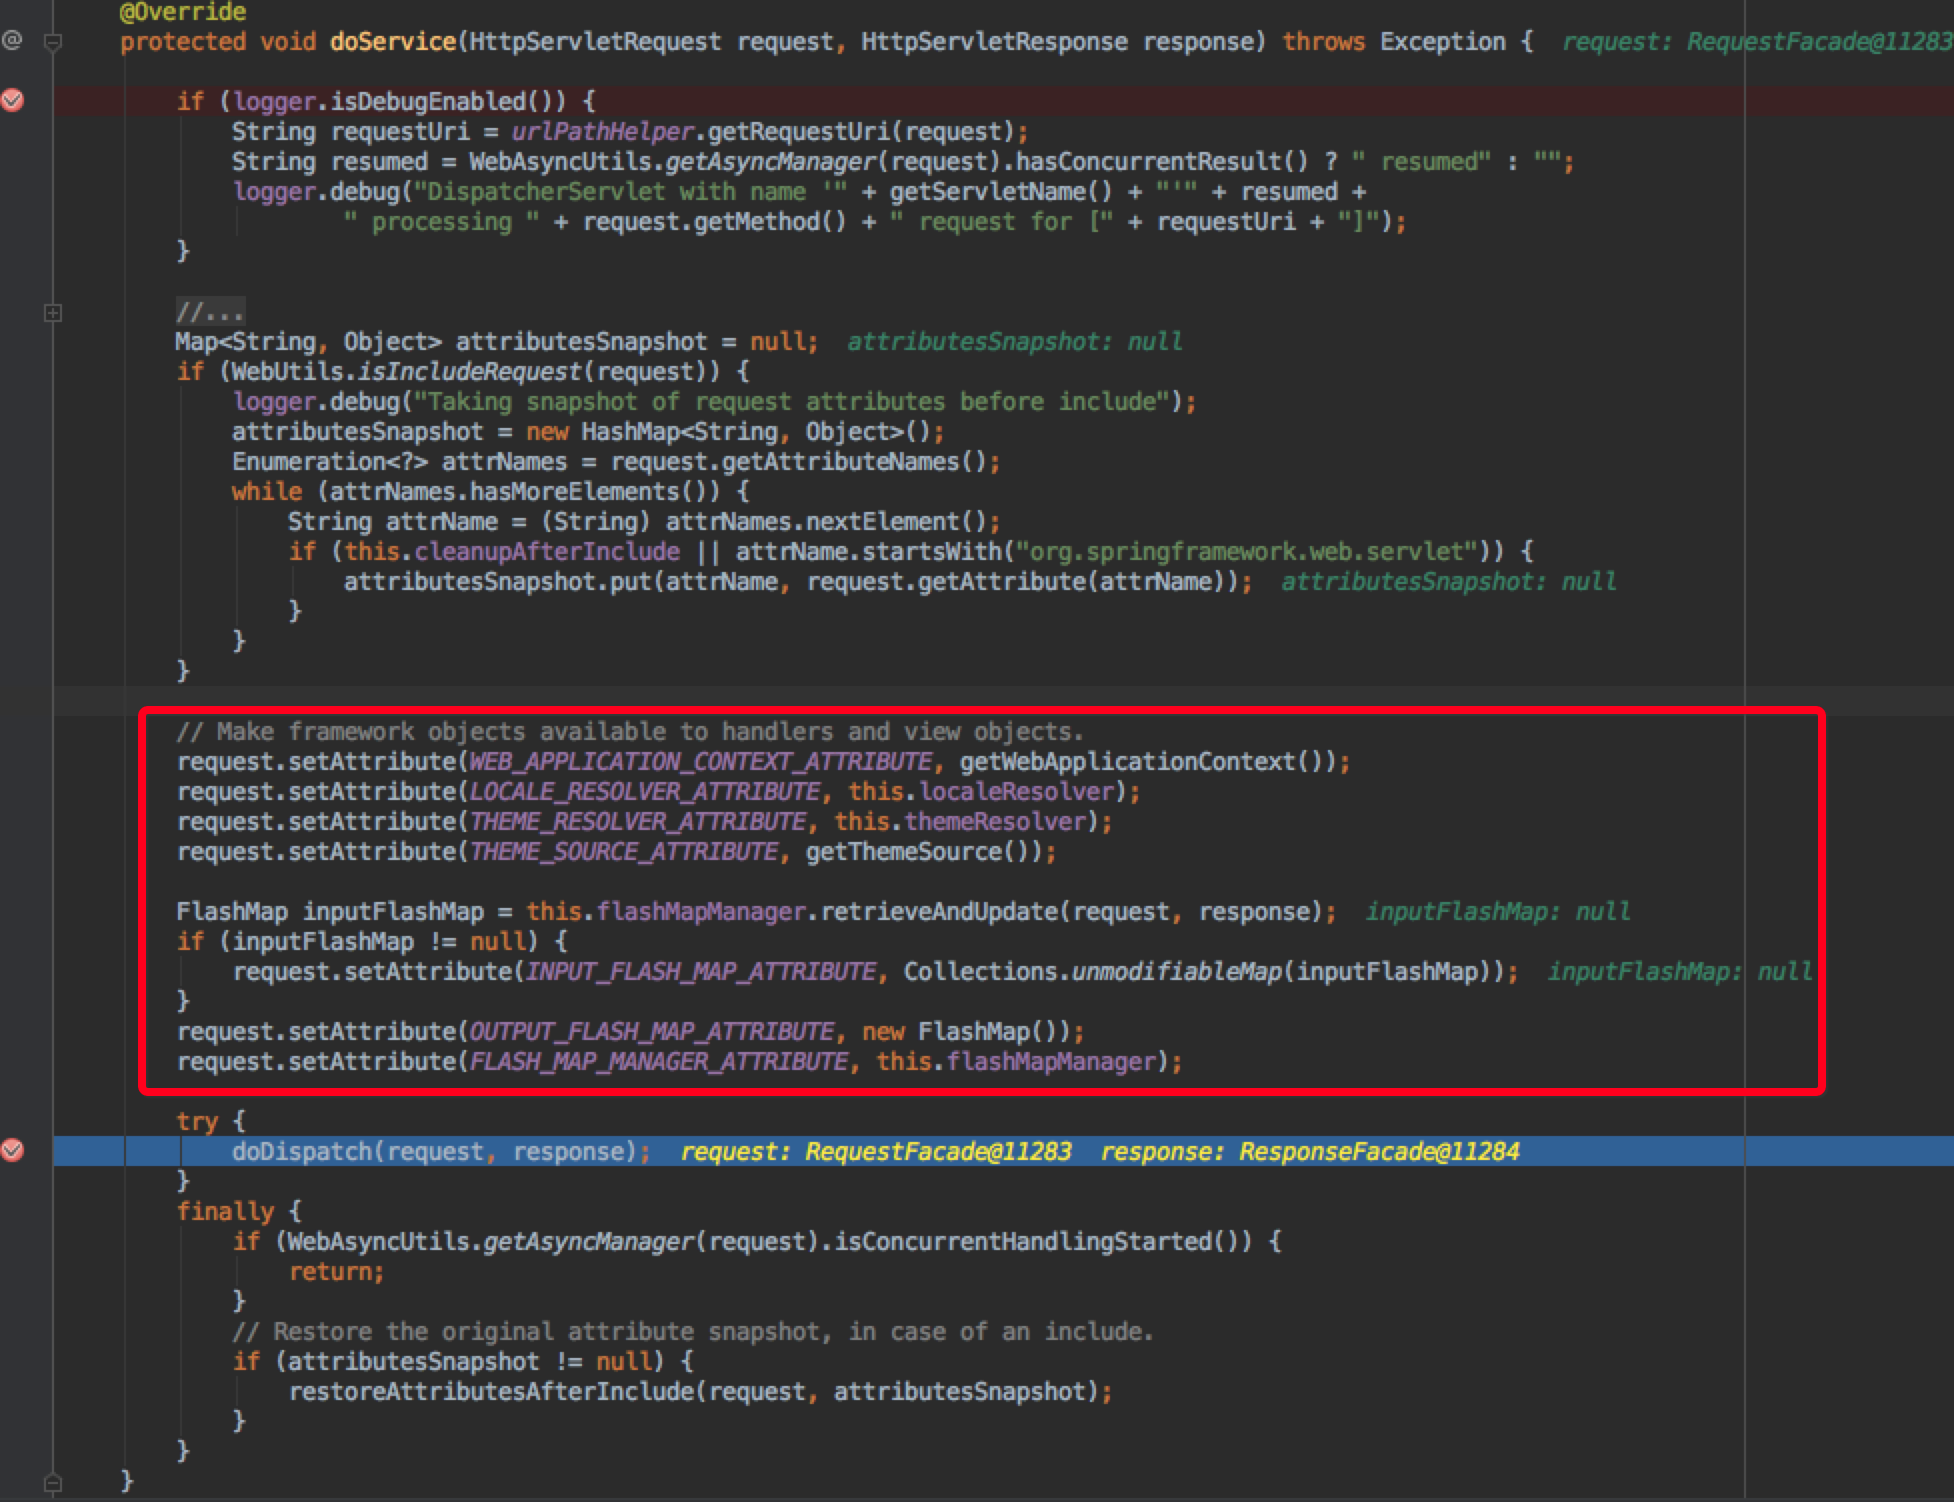
请求由tomcat传递给了DispatcherServlet了,DispatcherServlet接收后,就开始自己的特殊处理了。
![]()
红框中是Spring MVC自己特有的逻辑,主要是与视图、主题有关。
接下来的主要处理逻辑在org.springframework.web.servlet.DispatcherServlet#doDispatch中:
protected void doDispatch(HttpServletRequest request, HttpServletResponse response) throws Exception {
		HttpServletRequest processedRequest = request;
		HandlerExecutionChain mappedHandler = null;
		boolean multipartRequestParsed = false;

		WebAsyncManager asyncManager = WebAsyncUtils.getAsyncManager(request);

		try {
			ModelAndView mv = null;
			Exception dispatchException = null;

			try {
				processedRequest = checkMultipart(request);
				multipartRequestParsed = processedRequest != request;

				// 根据request在handlerMappings中获取HandlerExecutionChain
				mappedHandler = getHandler(processedRequest, false);
				if (mappedHandler == null || mappedHandler.getHandler() == null) {
					noHandlerFound(processedRequest, response);
					return;
				}

				//根据handler在handlerAdapters中获取HandlerAdapter
				HandlerAdapter ha = getHandlerAdapter(mappedHandler.getHandler());

				// Process last-modified header, if supported by the handler.
				String method = request.getMethod();
				boolean isGet = "GET".equals(method);
				if (isGet || "HEAD".equals(method)) {
					long lastModified = ha.getLastModified(request, mappedHandler.getHandler());
					if (logger.isDebugEnabled()) {
						String requestUri = urlPathHelper.getRequestUri(request);
						logger.debug("Last-Modified value for [" + requestUri + "] is: " + lastModified);
					}
					if (new ServletWebRequest(request, response).checkNotModified(lastModified) && isGet) {
						return;
					}
				}

				if (!mappedHandler.applyPreHandle(processedRequest, response)) {
					return;
				}

				try {
					//适配器调用实际的handler
					mv = ha.handle(processedRequest, response, mappedHandler.getHandler());
				}
				finally {
					if (asyncManager.isConcurrentHandlingStarted()) {
						return;
					}
				}

				applyDefaultViewName(request, mv);
				mappedHandler.applyPostHandle(processedRequest, response, mv);
			}
			catch (Exception ex) {
				dispatchException = ex;
			}
            //逻辑视图名转换为物理视图名,并进行视图渲染
			processDispatchResult(processedRequest, response, mappedHandler, mv, dispatchException);
		}
		catch (Exception ex) {
			triggerAfterCompletion(processedRequest, response, mappedHandler, ex);
		}
		catch (Error err) {
			triggerAfterCompletionWithError(processedRequest, response, mappedHandler, err);
		}
		finally {
			if (asyncManager.isConcurrentHandlingStarted()) {
				// Instead of postHandle and afterCompletion
				mappedHandler.applyAfterConcurrentHandlingStarted(processedRequest, response);
				return;
			}
			// Clean up any resources used by a multipart request.
			if (multipartRequestParsed) {
				cleanupMultipart(processedRequest);
			}
		}
	}
首先获取HandlerExecutionChain(入口:mappedHandler = getHandler(processedRequest, false);),方法如下:
	protected HandlerExecutionChain getHandler(HttpServletRequest request) throws Exception {
		for (HandlerMapping hm : this.handlerMappings) {
			if (logger.isTraceEnabled()) {
				logger.trace(
						"Testing handler map [" + hm + "] in DispatcherServlet with name '" + getServletName() + "'");
			}
			HandlerExecutionChain handler = hm.getHandler(request);
			if (handler != null) {
				return handler;
			}
		}
		return null;
	}
之后就是根据handler获取HandlerAdapter(入口:HandlerAdapter ha = getHandlerAdapter(mappedHandler.getHandler())):
	protected HandlerAdapter getHandlerAdapter(Object handler) throws ServletException {
		for (HandlerAdapter ha : this.handlerAdapters) {
			if (logger.isTraceEnabled()) {
				logger.trace("Testing handler adapter [" + ha + "]");
			}
			if (ha.supports(handler)) {
				return ha;
			}
		}
		throw new ServletException("No adapter for handler [" + handler +
				"]: The DispatcherServlet configuration needs to include a HandlerAdapter that supports this handler");
	}
handler适配器调用handler的方法(入口:mv = ha.handle(processedRequest, response, mappedHandler.getHandler())):
protected ModelAndView invokeHandlerMethod(HttpServletRequest request, HttpServletResponse response, Object handler)
			throws Exception {

		ServletHandlerMethodResolver methodResolver = getMethodResolver(handler);
		Method handlerMethod = methodResolver.resolveHandlerMethod(request);
		ServletHandlerMethodInvoker methodInvoker = new ServletHandlerMethodInvoker(methodResolver);
		ServletWebRequest webRequest = new ServletWebRequest(request, response);
		ExtendedModelMap implicitModel = new BindingAwareModelMap();

		Object result = methodInvoker.invokeHandlerMethod(handlerMethod, handler, webRequest, implicitModel);
		ModelAndView mav =
				methodInvoker.getModelAndView(handlerMethod, handler.getClass(), result, implicitModel, webRequest);
		methodInvoker.updateModelAttributes(handler, (mav != null ? mav.getModel() : null), implicitModel, webRequest);
		return mav;
	}
通过Object result = methodInvoker.invokeHandlerMethod(handlerMethod, handler, webRequest, implicitModel)会调用底层的方法:
![]()
红框中,通过反射调用UserController的register方法。这样请求就被传递到了实际的controller方法了。
四、响应返回
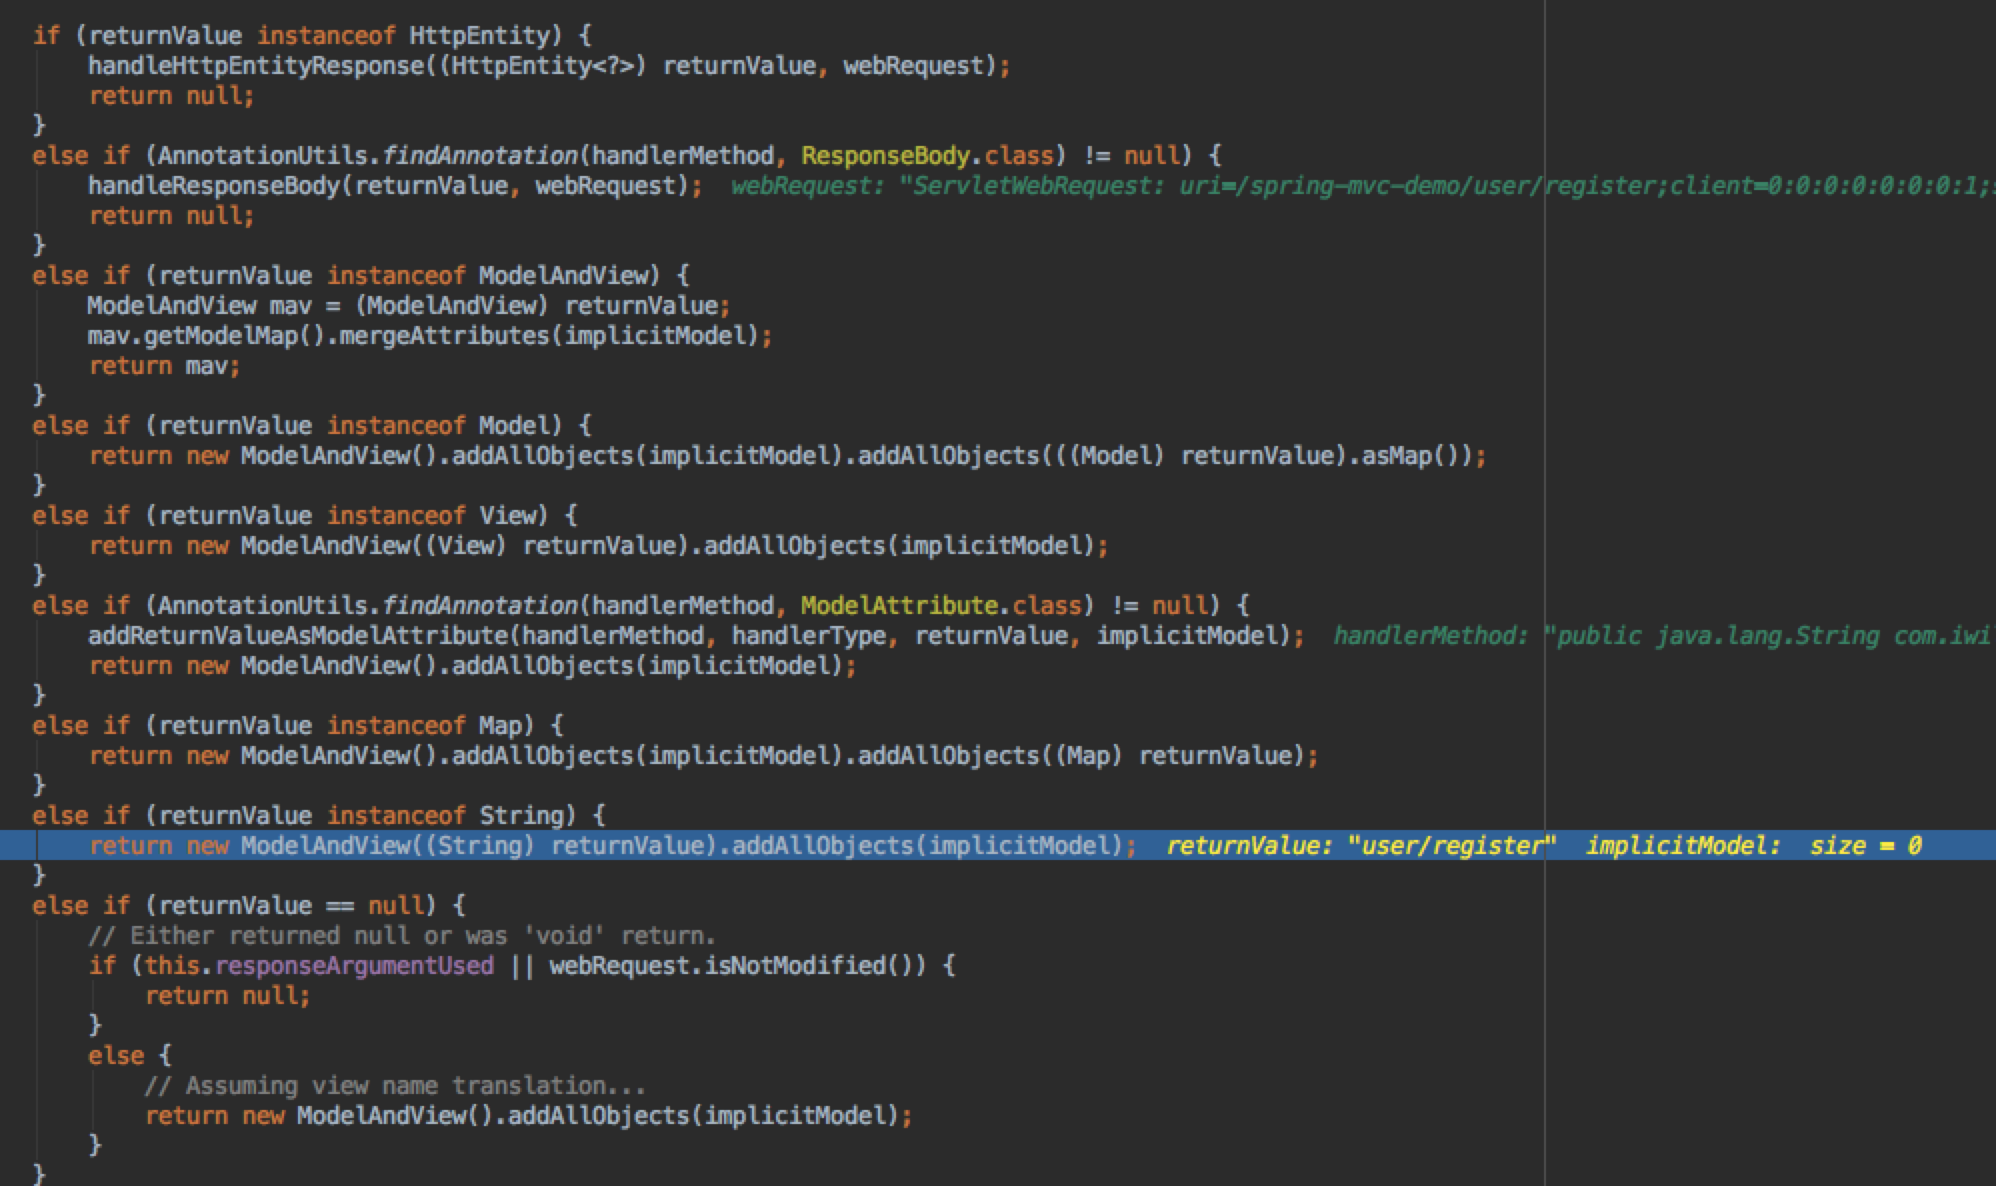
UserController#register处理后,就返回逻辑视图名:user/register。在org.springframework.web.servlet.mvc.annotation.AnnotationMethodHandlerAdapter.ServletHandlerMethodInvoker#getModelAndView中,就会将String转化为ModelAndView:
![]()
在org.springframework.web.servlet.DispatcherServlet#render中,就会将逻辑视图ModelAndView转化物理视图。
![]() resolveViewName就是使用ViewResolver来获取物理视图名:
resolveViewName就是使用ViewResolver来获取物理视图名:
	protected View resolveViewName(String viewName, Map<String, Object> model, Locale locale,
			HttpServletRequest request) throws Exception {

		for (ViewResolver viewResolver : this.viewResolvers) {
			View view = viewResolver.resolveViewName(viewName, locale);
			if (view != null) {
				return view;
			}
		}
		return null;
	}
![]()
物理视图名会被缓存,不需要重复解析,提高性能。
![]()
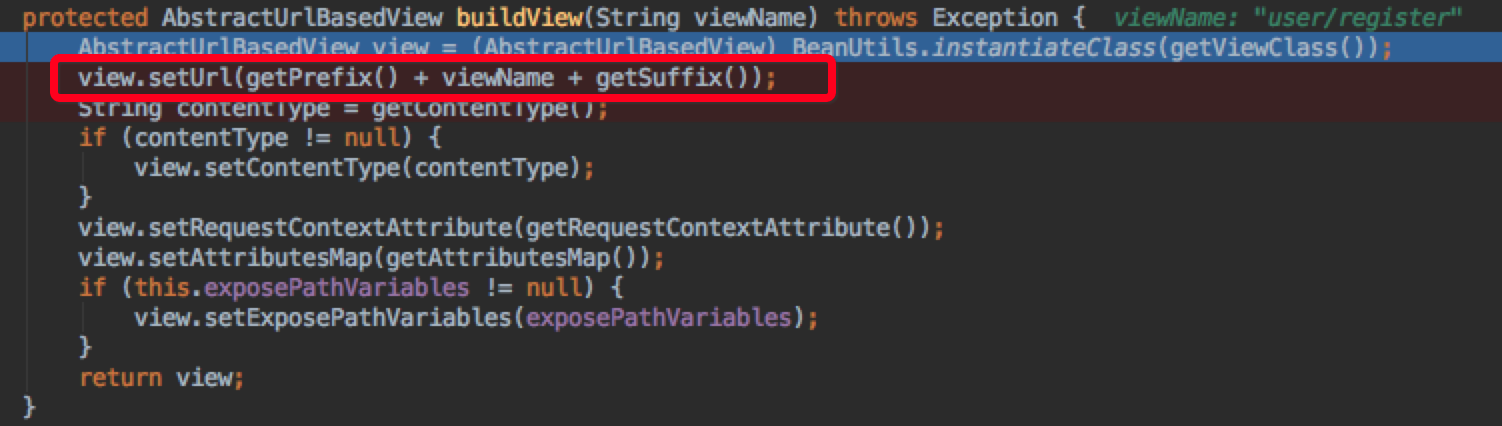
这里就是prefix和suffix的用途了,用于定位实际视图。
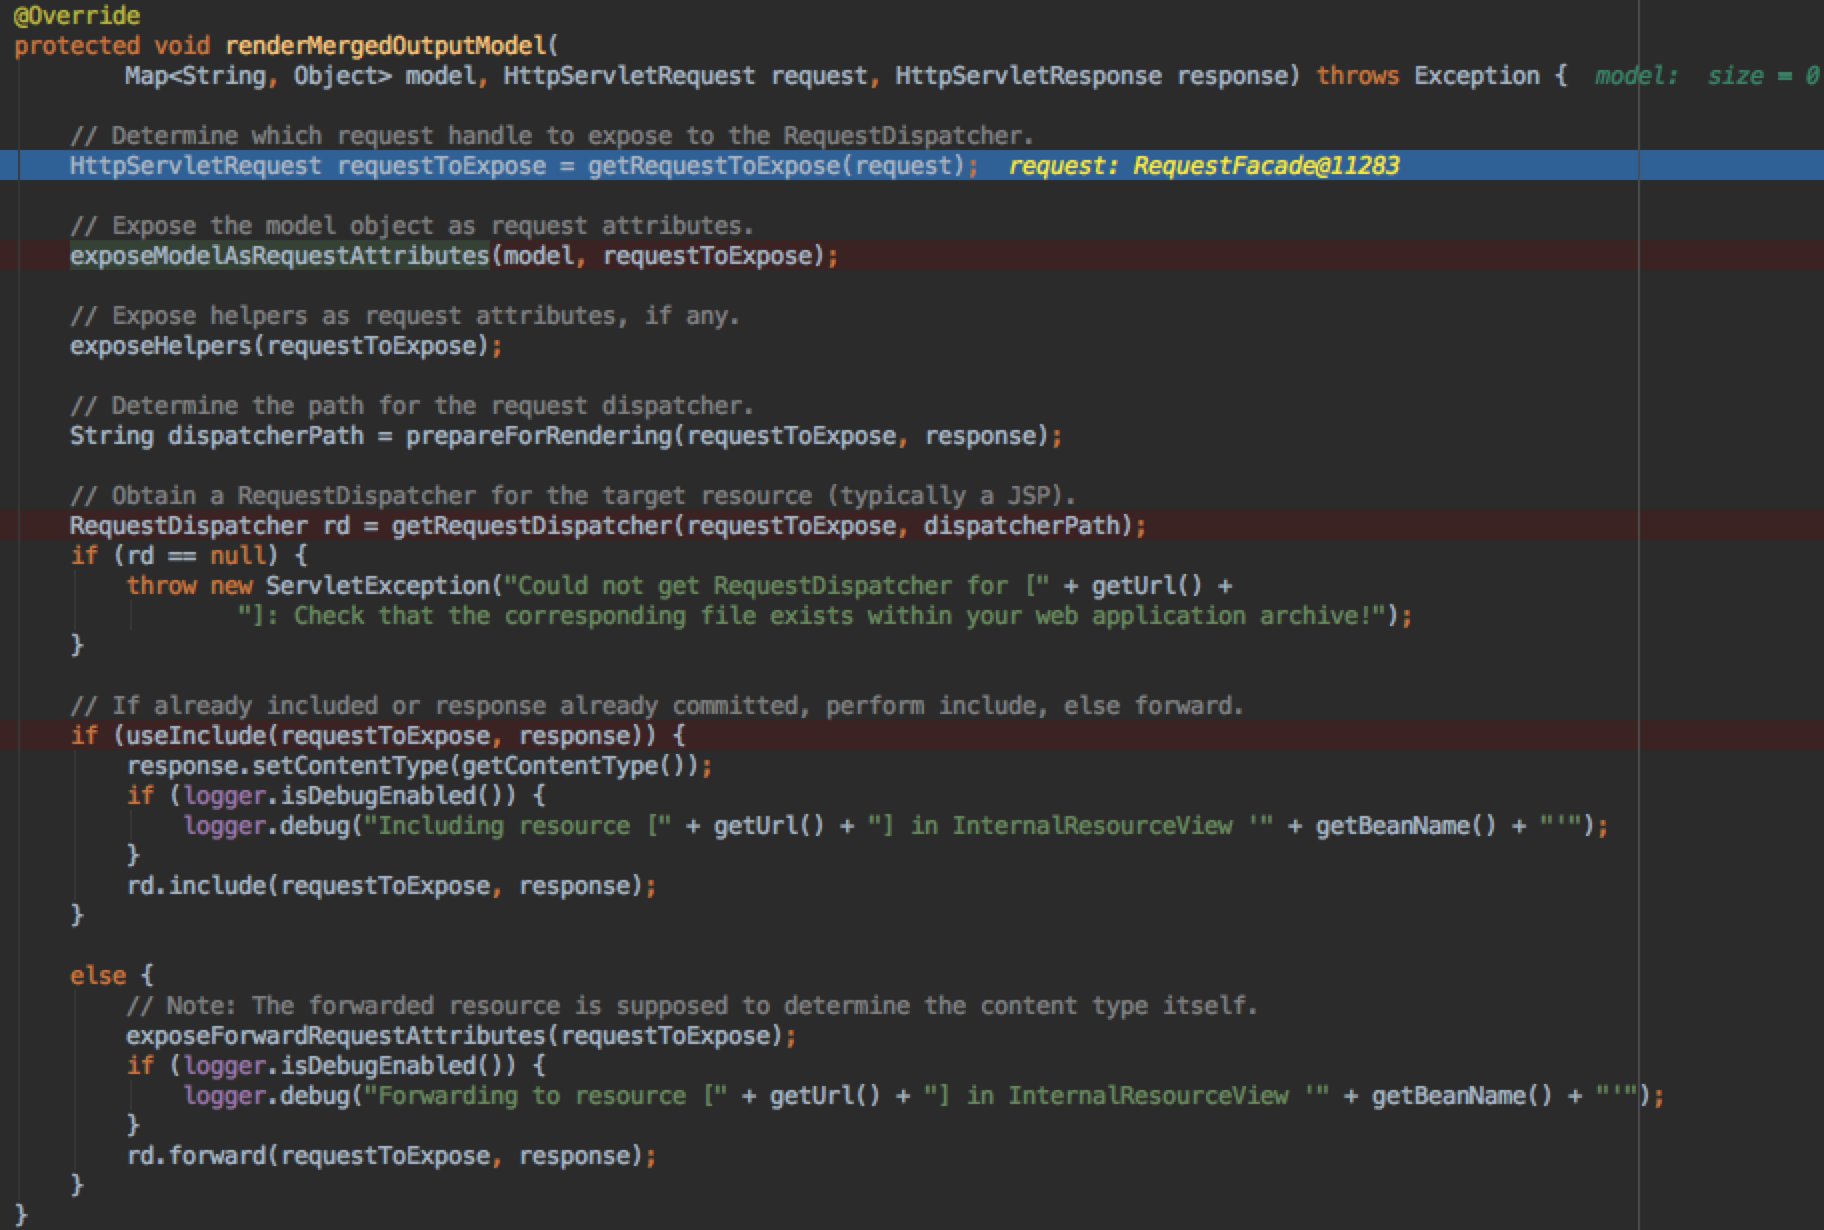
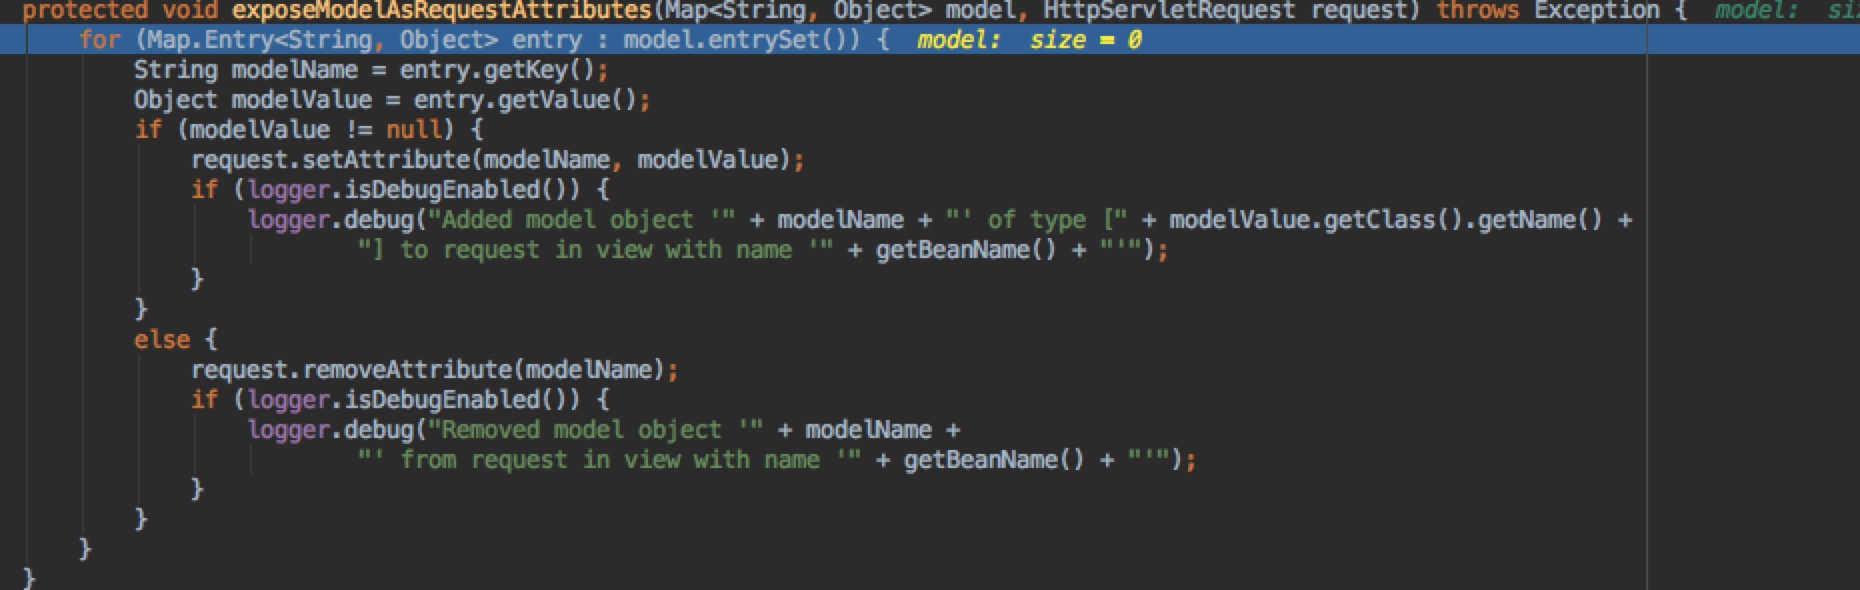
获取到了物理视图之后,就进行视图渲染了。
![]()
![]()
针对jsp格式的视图,我们配置的view是org.springframework.web.servlet.view.JstlView,渲染过程就是将model中的值set到request的attribute中,之后就是使用jsp自己的规则来显示jsp文件就好。


 resolveViewName就是使用ViewResolver来获取物理视图名: