![]()
PlatformView 提供了在 Flutter 的 Widget 层级中嵌入原生视图 (iOS/Android 等), PlatformView 在用来描述 iOS 平台是视图用的是 UIKitView,Android 平台的视图是 AndoirdView,本文所有描述都是针对 iOS 平台,按官方的描述该功能还是在发布预览阶段,并且是非常昂贵的操作;以下是官方 API 文档原文注释:
Embedding UIViews is still in release preview, to enable the preview for an iOS app add a boolean field with the key 'io.flutter.embeddedviewspreview' and the value set to 'YES' to the application's Info.plist file. A list of open issued with embedding UIViews is available on Github. Embedding iOS views is an expensive operation and should be avoided when a Flutter equivalent is possible.
场景
每个技术点的出现必然有它的价值所在,所以即便 PlatfromView 目前存在一些问题,并且 Flutter 本身就是一个 UI 框架,一些业务场景下只能依赖于它完成,例如:地图、原生广告、WebView等等;所以 Flutter 开发者还是得点亮 PlatformView 技能树;
问题
在 Flutter1.12 版本中遇到过在 PageView、ListView 等容器视图中将 PlatformView 移动到屏幕外,并且 Widget 没销毁的场景会引起引擎崩溃,由于问题出在 Flutter 引擎内部,遇到问题的时候可以做这三件事:
Flutter GitHub 仓库提 issue,等待官方解决;
定制引擎,编译 Flutter 引擎找到问题并解决;
曲线规避问题发生场景;
当然在业务迭代中通常优先选择第三点曲线规避当前问题,然后给官方提 issue,定制引擎这个选项最好在有足够把握的时候选择,不严谨的改动可能会引起一系列问题;
使用流程
需求:创建一个可以将黄色的 UIView 显示到窗口的插件;
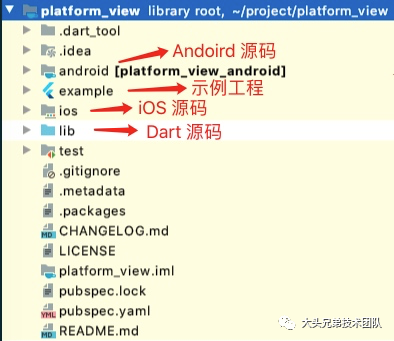
1. 创建 Flutter 插件
创建插件可以通过命令行生成插件模板工程, 工程名只能用小写:
这里创建的是 iOS 端使用 OC 语言 Android 端使用 Java 语言的插件,创建成功后可以看到这样的目录结构:
![]()
2.封装 UIKitView
在 lib 目录下创建 color_view.dart 存放 UIKitView 的一些操作,Flutter 可以利用平台通道 MethodChannel 与原生平台进行数据交互,方法调用在发送之前被编码为二进制,接收到的二进制结果被解码为 Dart 值。
import 'package:flutter/material.dart';import 'package:flutter/services.dart';
const String singleColor = "singleColor";
class ColorView extends StatefulWidget { @override _ColorViewState createState() => _ColorViewState();}
class _ColorViewState extends State<ColorView> { MethodChannel _channel;
@override Widget build(BuildContext context) { return UiKitView( viewType: singleColor, creationParams: "yellow", creationParamsCodec: StandardMessageCodec(), onPlatformViewCreated: _onPlatformViewCreated, ); }
void _onPlatformViewCreated(int id) { _channel = MethodChannel('singleColor_$id'); _channel.setMethodCallHandler(_handleMethod); }
Future<void> _handleMethod(MethodCall call) async { if (!mounted) { return Future.value(); } switch (call.method) { default: throw UnsupportedError("Unrecognized method"); } }}
3.添加 iOS 平台代码
使用 Xcode 编辑 iOS 平台代码之前,首先确保代码至少被构建过一次,即从 IDE/编辑器执行示例程序,或在终端中执行以下命令:
cd platform_view/example; flutter build ios --debug --no-codesign
打开 Platform_view/example/ios/Runner.xcworkspace iOS 工程,插件的 iOS 平台代码位于项目导航中的这个位置:
Pods/Development Pods/platform_view/../../example/ios/.symlinks/plugins/platform_view/ios/Classes
PlatformViewPlugin
此文件创建插件工程时生成的,在程序启动的时候会将 AppDeleage 注册进来, 这里的 AppDeleage 继承自 FlutterAppDelegate 遵守了 FlutterPluginRegistry, FlutterAppLifeCycleProvider 协议,前者为了提供应用程序上下文和注册回调的方法,后者为了方便后续在插件中获取应用生命周期事件;
#import "PlatformViewPlugin.h"#import "PlatfromViewFactory.h"
@implementation PlatformViewPlugin
+ (void)registerWithRegistrar:(NSObject<FlutterPluginRegistrar>*)registrar { [registrar registerViewFactory:[[PlatfromViewFactory alloc] initWithMessenger:[registrar messenger]] withId:@"singleColor"];}
@end
PlatfromViewFactory
#import <Foundation/Foundation.h>#import <Flutter/Flutter.h>
NS_ASSUME_NONNULL_BEGIN
@interface PlatfromViewFactory : NSObject<FlutterPlatformViewFactory>
- (instancetype)initWithMessenger:(NSObject<FlutterBinaryMessenger> *)messager;
@end
NS_ASSUME_NONNULL_END
#import "PlatfromViewFactory.h"#import "PlatformView.h"
@interface PlatfromViewFactory ()
@property (nonatomic, strong) NSObject<FlutterBinaryMessenger> *messenger;
@end
@implementation PlatfromViewFactory
- (instancetype)initWithMessenger:(NSObject<FlutterBinaryMessenger> *)messager { self = [super init]; if (self) { self.messenger = messager; } return self;}
#pragma mark - FlutterPlatformViewFactory
- (nonnull NSObject<FlutterPlatformView> *)createWithFrame:(CGRect)frame viewIdentifier:(int64_t)viewId arguments:(id _Nullable)args { PlatformView *platformView = [[PlatformView alloc] initWithWithFrame:frame viewIdentifier:viewId arguments:args binaryMessenger:self.messenger]; return platformView;}
- (NSObject<FlutterMessageCodec> *)createArgsCodec { return [FlutterStandardMessageCodec sharedInstance];}
@end
Flutter 端 UIKitView 的 viewType 与 工厂 ID 相同才能建立关联,工厂的核心方法 createWithFrame,这里三个参数都是由 Flutter 端传递过来的,UIKitView 的大小是由父 Widget 决定的,frame也就是 Flutter 通过其布局 widget 来计算得来, viewId 是创建一个 UIKitView 该值会+1,并且是唯一的,args 对应 Flutter端 UIKitView 的 creationParams 参数;
PlatformView
PlatformView 继承自 FlutterPlatformView 协议,工厂调用 PlatformView 对象来创建真正的 view 实例:
#import <Foundation/Foundation.h>#import <Flutter/Flutter.h>
NS_ASSUME_NONNULL_BEGIN
@interface PlatformView : NSObject<FlutterPlatformView>
- (instancetype)initWithWithFrame:(CGRect)frame                   viewIdentifier:(int64_t)viewId                        arguments:(id _Nullable)args                  binaryMessenger:(NSObject<FlutterBinaryMessenger>*)messenger;
@end
NS_ASSUME_NONNULL_END
#import "PlatformView.h"
@interface PlatformView ()
@property (nonatomic, strong) UIView *yellowView;
@property (nonatomic, strong) FlutterMethodChannel *channel;
@end
@implementation PlatformView
- (instancetype)initWithWithFrame:(CGRect)frame viewIdentifier:(int64_t)viewId arguments:(id _Nullable)args binaryMessenger:(NSObject<FlutterBinaryMessenger>*)messenger { if ([super init]) { self.yellowView = [[UIView alloc] init]; self.yellowView.backgroundColor = UIColor.yellowColor; NSString *channelName = [NSString stringWithFormat:@"singleColor_%lld", viewId]; self.channel = [FlutterMethodChannel methodChannelWithName:channelName binaryMessenger:messenger]; [self.channel setMethodCallHandler:^(FlutterMethodCall *call, FlutterResult result) { if ([call.method isEqualToString:@""]) { } }]; } return self;}
#pragma mark - FlutterPlatformView- (UIView *)view { return self.yellowView;}
@end
4.使用
在 example工程中的 lib/main.dart 中使用封装好的 ColorView:
import 'package:flutter/material.dart';import 'package:platform_view/color_view.dart';
void main() => runApp(MyApp());
class MyApp extends StatefulWidget {  @override  _MyAppState createState() => _MyAppState();}
class _MyAppState extends State<MyApp> {  @override  Widget build(BuildContext context) {    return MaterialApp(      home: Scaffold(        appBar: AppBar(          title: const Text('PlatformView Plugin'),        ),        body: Center(          // 由于原生视图的大小由父 Widget 决定,          // 这里添加 Container 作为父 Widget 并设置宽高为 100          child: Container(            width: 100.0,            height: 100.0,            child: ColorView(),          ),        ),      ),    );  }}
5.开启嵌入原生视图功能
由于嵌入 UIViews 仍在版本预览中,默认此功能是关闭的,需要在 info.pilst 进行配置,开启嵌入原生视图:
<key>io.flutter.embedded_views_preview</key><true/>
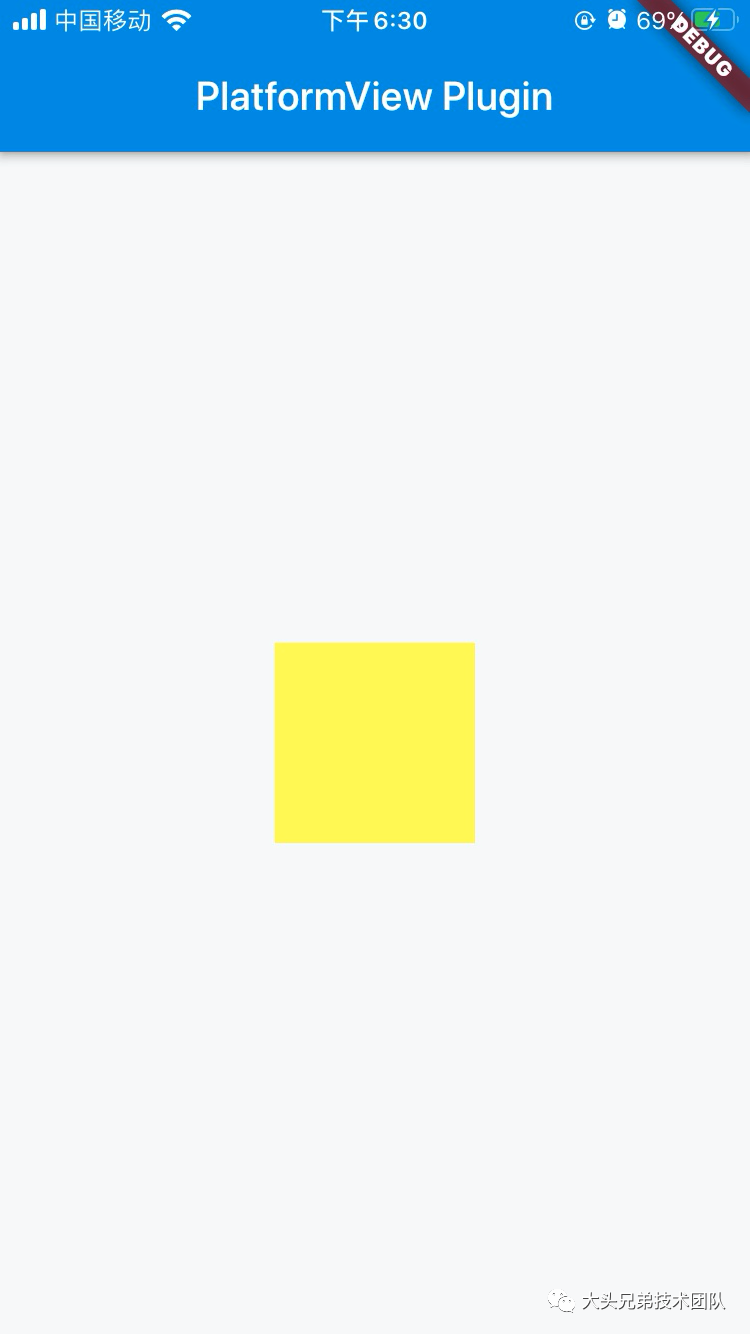
6.运行结果
宽高各 100 的黄色 UIView 就显示出来了,这里只是举了个最简单的场景,可以根据业务需求定制和原生平台的交互。
![]()
源码解析
1.原生视图功能开关
刚刚我们运行应用前在 info.plist 配置了开启原生视图预览,可以看到源码中获取了开启状态,在没开启的时候返回 nullptr ,嵌入式视图要求 GPU 和平台视图的线程相同,即主线程;不开启则是由 GPU 线程绘制画布上的 UI;
const char* const kEmbeddedViewsPreview = "io.flutter.embedded_views_preview";
bool IsIosEmbeddedViewsPreviewEnabled() { return [[[NSBundle mainBundle] objectForInfoDictionaryKey:@(kEmbeddedViewsPreview)] boolValue];}
ExternalViewEmbedder* IOSSurfaceSoftware::GetExternalViewEmbedder() { if (IsIosEmbeddedViewsPreviewEnabled()) { return this; } else { return nullptr; }}
if (flutter::IsIosEmbeddedViewsPreviewEnabled()) {
flutter::TaskRunners task_runners(threadLabel.UTF8String, fml::MessageLoop::GetCurrent().GetTaskRunner(), fml::MessageLoop::GetCurrent().GetTaskRunner(), _threadHost.ui_thread->GetTaskRunner(), _threadHost.io_thread->GetTaskRunner() ); _shell = flutter::Shell::Create(std::move(task_runners), std::move(settings), on_create_platform_view, on_create_rasterizer ); } else { flutter::TaskRunners task_runners(threadLabel.UTF8String, fml::MessageLoop::GetCurrent().GetTaskRunner(), _threadHost.gpu_thread->GetTaskRunner(), _threadHost.ui_thread->GetTaskRunner(), _threadHost.io_thread->GetTaskRunner() ); _shell = flutter::Shell::Create(std::move(task_runners), std::move(settings), on_create_platform_view, on_create_rasterizer ); }
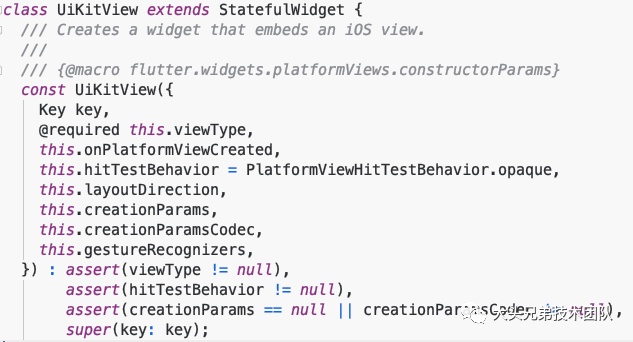
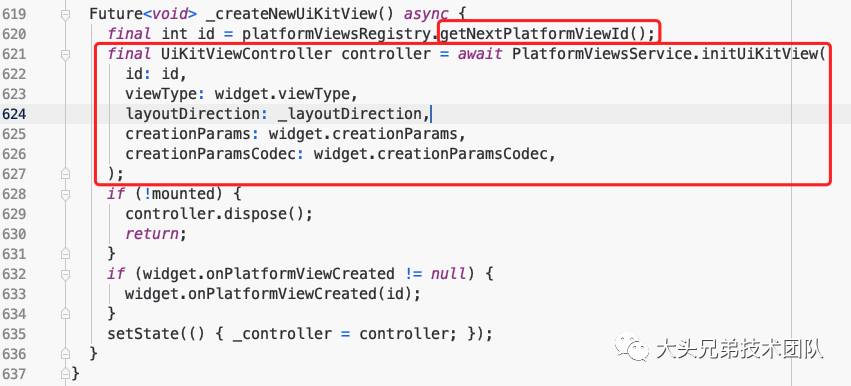
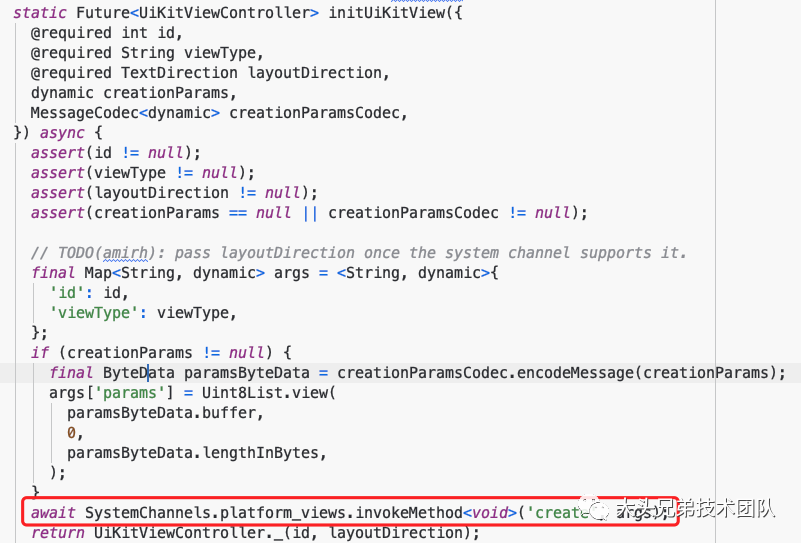
2.创建流程
接着来看看 UIKitView 创建后是怎么到 iOS 端侧的:
![]()
![]()
![]()
![]()
void FlutterPlatformViewsController::OnCreate(FlutterMethodCall* call, FlutterResult& result) { ... NSDictionary<NSString*, id>* args = [call arguments]; long viewId = [args[@"id"] longValue]; std::string viewType([args[@"viewType"] UTF8String]); ... NSObject<FlutterPlatformViewFactory>* factory = factories_[viewType].get(); ... id params = nil; if ([factory respondsToSelector:@selector(createArgsCodec)]) { NSObject<FlutterMessageCodec>* codec = [factory createArgsCodec]; if (codec != nil && args[@"params"] != nil) { FlutterStandardTypedData* paramsData = args[@"params"]; params = [codec decode:paramsData.data]; } } NSObject<FlutterPlatformView>* embedded_view = [factory createWithFrame:CGRectZero viewIdentifier:viewId arguments:params]; views_[viewId] = fml::scoped_nsobject<NSObject<FlutterPlatformView>>([embedded_view retain]);
FlutterTouchInterceptingView* touch_interceptor = [[[FlutterTouchInterceptingView alloc] initWithEmbeddedView:embedded_view.view flutterViewController:flutter_view_controller_.get()] autorelease];
touch_interceptors_[viewId] = fml::scoped_nsobject<FlutterTouchInterceptingView>([touch_interceptor retain]); root_views_[viewId] = fml::scoped_nsobject<UIView>([touch_interceptor retain]);
result(nil);}
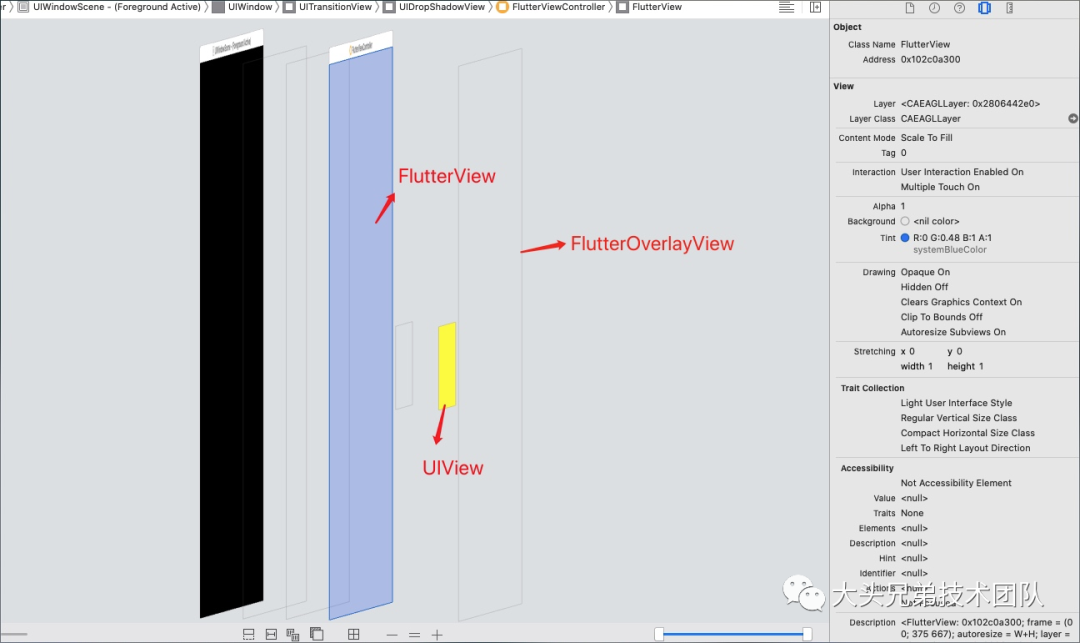
3. 视图分析
在创建视图流程中引擎还默认添加了 FlutterOverlayView,目的是防止原生视图遮挡 Flutter 视图,原生视图层级之上 Flutter 视图都会绘制在 FlutterOverlayView 上,同一层级的视图还是绘制在 FlutterView 上面,这里 FlutterView 和 FlutterOverlayView 都是 CAEAGLLayer,用于渲染 Flutter 视图。
![]()
参考链接
1. Flutter Packages 的开发和提交 (https://flutter.cn/docs/development/packages-and-plugins/developing-packages)
2. 撰写双端平台代码(插件编写实现) (https://flutter.cn/docs/development/platform-integration/platform-channels)
3. UIKitView api 文档 (https://api.flutter-io.cn/flutter/widgets/UiKitView-class.html)
4. Github Flutter Engine (https://github.com/flutter/engine)