![]()
今天主要介绍常用的 SQL ,包括对元数据和数据的增删改查,本文的sql都是基于 0.10.0 的,这个大版本马上发布!
正文 11018 字(大部分是 sql 和打印信息,汉字不多),预计阅读时间 10 分钟。
目前 IoTDB 的接口主要有 SQL 和 NoSQL 两种,今天介绍 SQL 接口,为了方便理解,大家可以可以在下面链接下载 0.10.0 预发布版,一边看一边试:
二进制版下载链接:
https://pan.baidu.com/s/1KWnEIIE0Duwr9TZVugib6w
密码:dmrg
也可以源代码编译:
git clone https://github.com/apache/incubator-iotdb.git
cd incubator-iotdb
git fetch origin rel/0.10:rel/0.10
git checkout rel/0.10
mvn clean package -pl distribution -am -DskipTests
二进制发布包位置:
distribution/target/apache-iotdb-0.10.0-SNAPSHOT-incubating-bin.zip
好,开始!
DDL 数据定义语言
参考文档:
http://iotdb.apache.org/UserGuide/Master/Operation%20Manual/DDL%20Data%20Definition%20Language.html
存储组操作
# 创建存储组
IoTDB> set storage group to root.turbine


# 查询存储组
IoTDB> SHOW STORAGE GROUP
+-------------+
|storage group|
+-------------+
| root.turbine|
+-------------+


# 删除存储组
IoTDB> delete storage group root.turbine
创建时间序列
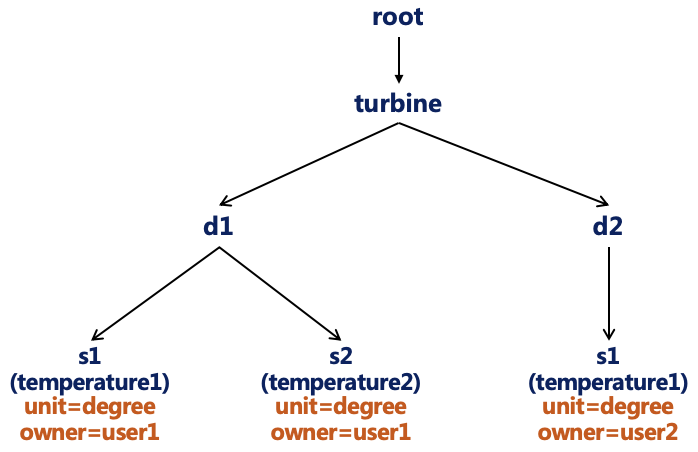
create timeseries root.turbine.d1.s1(temperature1) with datatype=FLOAT, encoding=GORILLA, compression=SNAPPY tags(unit=degree, owner=user1) attributes(description=mysensor1, location=BeiJing)
create timeseries root.turbine.d1.s2(temperature2) with datatype=FLOAT, encoding=GORILLA, compression=SNAPPY tags(unit=degree, owner=user1) attributes(description=mysensor2, location=TianJin)
create timeseries root.turbine.d2.s1(temperature1) with datatype=FLOAT, encoding=GORILLA, compression=SNAPPY tags(unit=degree, owner=user2) attributes(description=mysensor3, location=HeBei)
上边注册的序列可视化就是下边这个图了(手画的。。目前没可视化功能)
![]()
为了实际应用中使用更方便,除了时间序列的路径和编码等基本信息外,我们增加了测点别名、标签、属性三个概念。标签和属性总大小在配置文件中 tag_attribute_total_size 设置。
别名:测点的别名,可以和测点名一样用来读写,可以不设置。
标签:key=value 形式,可以通过标签反向查询时间序列元数据,比如,单位和拥有者,标签会常驻内存。目前只能给定一个 tag 查询条件,可精确查询和模糊查询。
属性:key=value 形式,只能根据时间序列路径展示出属性信息,如描述信息和位置。如果没有反向查询的需求,建议定义成属性。
# 插入更新 别名、标签、属性
ALTER timeseries root.turbine.d1.s1 UPSERT ALIAS=newAlias TAGS(unit=Degree, owner=me) ATTRIBUTES(description=ha, newAttr=v1)
# 删除时间序列
delete timeseries root.turbine.d2.s1
根据路径和标签查询序列元数据
# 查询所有时间序列数据
IoTDB> show timeseries
+------------------+------------+-------------+--------+--------+-----------+-----------+--------+-----+------+
|        timeseries|       alias|storage group|dataType|encoding|compression|description|location|owner|  unit|
+------------------+------------+-------------+--------+--------+-----------+-----------+--------+-----+------+
|root.turbine.d1.s1|temperature1| root.turbine|   FLOAT| GORILLA|     SNAPPY|  mysensor1| BeiJing|user1|degree|
|root.turbine.d1.s2|temperature2| root.turbine|   FLOAT| GORILLA|     SNAPPY|  mysensor2| TianJin|user1|degree|
|root.turbine.d2.s1|temperature1| root.turbine|   FLOAT| GORILLA|     SNAPPY|  mysensor3|   HeBei|user2|degree|
+------------------+------------+-------------+--------+--------+-----------+-----------+--------+-----+------+


# 查询 root.turbine.d1 前缀路径下的时间序列
# 根据 tag 精确查询 owner 为 user1 的序列
IoTDB> show timeseries root.turbine.d1
IoTDB> show timeseries root.turbine where owner=user1
+------------------+------------+-------------+--------+--------+-----------+-----------+--------+-----+------+
|        timeseries|       alias|storage group|dataType|encoding|compression|description|location|owner|  unit|
+------------------+------------+-------------+--------+--------+-----------+-----------+--------+-----+------+
|root.turbine.d1.s1|temperature1| root.turbine|   FLOAT| GORILLA|     SNAPPY|  mysensor1| BeiJing|user1|degree|
|root.turbine.d1.s2|temperature2| root.turbine|   FLOAT| GORILLA|     SNAPPY|  mysensor2| TianJin|user1|degree|
+------------------+------------+-------------+--------+--------+-----------+-----------+--------+-----+------+


# 根据 tag 模糊查询 owner 的 value 中包含 'user' 的序列
IoTDB> show timeseries where owner contains 'user'
+------------------+------------+-------------+--------+--------+-----------+-----------+--------+-----+------+
|        timeseries|       alias|storage group|dataType|encoding|compression|description|location|owner|  unit|
+------------------+------------+-------------+--------+--------+-----------+-----------+--------+-----+------+
|root.turbine.d1.s1|temperature1| root.turbine|   FLOAT| GORILLA|     SNAPPY|  mysensor1| BeiJing|user1|degree|
|root.turbine.d1.s2|temperature2| root.turbine|   FLOAT| GORILLA|     SNAPPY|  mysensor2| TianJin|user1|degree|
|root.turbine.d2.s1|temperature1| root.turbine|   FLOAT| GORILLA|     SNAPPY|  mysensor3|   HeBei|user2|degree|
+------------------+------------+-------------+--------+--------+-----------+-----------+--------+-----+------+
查看某个路径的孩子节点
IoTDB> show child paths root.turbine
+---------------+
|    child paths|
+---------------+
|root.turbine.d1|
|root.turbine.d2|
+---------------+
统计时间序列数量
# 统计所有时间序列数量
IoTDB> count timeseries
+-----+
|count|
+-----+
|    3|
+-----+


# 分组统计时间序列,root 为第 0 层
IoTDB> count timeseries group by level=2
+---------------+-----+
|         column|count|
+---------------+-----+
|root.turbine.d1|    2|
|root.turbine.d2|    1|
+---------------+-----+
查询所有设备
也就是查询倒数第二层节点的路径
IoTDB> show devices
+---------------+
|        devices|
+---------------+
|root.turbine.d1|
|root.turbine.d2|
+---------------+
DML 数据操作语言
参考文档:
http://iotdb.apache.org/UserGuide/Master/Operation%20Manual/DML%20Data%20Manipulation%20Language.html
数据写入
一次可以写入一个设备、一个时间戳、多个测点的值。
insert into root.turbine.d1(timestamp,s1,s2) values(1,1,2);
insert into root.turbine.d1(timestamp,s1,s2) values(2,1,2);
insert into root.turbine.d1(timestamp,s1,s2) values(3,1,2);
insert into root.turbine.d1(timestamp,s1,s2) values(4,1,2);
insert into root.turbine.d1(timestamp,s1,s2) values(5,1,2);
insert into root.turbine.d1(timestamp,s1,s2) values(6,1,2);
insert into root.turbine.d1(timestamp,s1,s2) values(10,1,2);
数据删除
目前只支持删除一个时间点之前的数据,之后会支持删除任意一段时间的数据。
delete from root.turbine.d2.s1 where time <= 10
原始数据查询
接下来就到各种查询啦,最常用的是原始数据查询。
IoTDB> select s1, s2 from root.turbine.d1
+-----------------------------+------------------+------------------+
|                         Time|root.turbine.d1.s1|root.turbine.d1.s2|
+-----------------------------+------------------+------------------+
|1970-01-01T08:00:00.001+08:00|               1.0|               2.0|
|1970-01-01T08:00:00.002+08:00|               1.0|               2.0|
|1970-01-01T08:00:00.003+08:00|               1.0|               2.0|
|1970-01-01T08:00:00.004+08:00|               1.0|               2.0|
|1970-01-01T08:00:00.005+08:00|               1.0|               2.0|
|1970-01-01T08:00:00.006+08:00|               1.0|               2.0|
|1970-01-01T08:00:00.010+08:00|               1.0|               2.0|
+-----------------------------+------------------+------------------+
单点补空值查询
传感器采集的数据很多时间戳有偏差,时间戳精确查询容易查不到数据,可以用 previous 或者 linear 方式补空值
IoTDB> select s1 from root.turbine.d1 where time = 8
+----+------------------+
|Time|root.turbine.d1.s1|
+----+------------------+
+----+------------------+


# 用前边最近的值填过来
IoTDB> select s1 from root.turbine.d1 where time = 8 fill(float[previous])
+-----------------------------+------------------+
|                         Time|root.turbine.d1.s1|
+-----------------------------+------------------+
|1970-01-01T08:00:00.008+08:00|               1.0|
+-----------------------------+------------------+


# 如果想限制补值的范围,超过这个范围就不补了,可以再加个参数,要带单位
IoTDB> select s1 from root.turbine.d1 where time = 8 fill(float[previous,1ms])
+-----------------------------+------------------+
|                         Time|root.turbine.d1.s1|
+-----------------------------+------------------+
|1970-01-01T08:00:00.008+08:00|              null|
+-----------------------------+------------------+
最新数据查询
为了实时的可视化最新数据,我们单独做了一个最新数据点查询功能。用 select last 关键字作为前缀,其他语法和原始数据一样,不能加谓词过滤。
IoTDB> select last * from root
+-----------------------------+------------------+-----+
|                         Time|        timeseries|value|
+-----------------------------+------------------+-----+
|1970-01-01T08:00:00.010+08:00|root.turbine.d1.s1|  1.0|
|1970-01-01T08:00:00.010+08:00|root.turbine.d1.s2|  2.0|
+-----------------------------+------------------+-----+
聚合查询
统计时间序列的聚合值,我们目前把各个时间序列都当做独立的序列看待,聚合也是分序列做。下个版本会加上聚合一个路径下所有序列的功能。
IoTDB> select count(*) from root where time <= 10
+-------------------------+-------------------------+-------------------------+
|count(root.turbine.d1.s1)|count(root.turbine.d1.s2)|count(root.turbine.d2.s1)|
+-------------------------+-------------------------+-------------------------+
|                        7|                        7|                        0|
+-------------------------+-------------------------+-------------------------+
0.10.0 降频聚合查询
降频聚合0.10的语法和0.9 的不一样了。首先介绍 0.10.0 版本的降频聚合查询语法,先举个例子,查一个序列今年5月份每天早上9点到12点的平均值,结果应该类似这样的:
5月1日 9点-12点:聚合值
5月2日 9点-12点:聚合值
...
5月31日 9点-12点:聚合值
为了实现这个灵活的查询,需要一个滑动窗口,窗口从5月1日9点开始,长度是3小时,每次往前滑动24小时,滑到5月31日为止,每个窗口内计算一个平均值。
因此我们主要设计了三个参数:
(1)滑动窗口的起始和终止范围,左闭右开区间:5月1日到31日
(2)滑动窗口的长度:3小时
(3)滑动步长:24小时
语句如下(我没写这么多数据,目前查出来都是空):
select avg(s1) from root.turbine.d1 group by([2020-05-01T09:00:00, 2020-05-31T12:00:00), 3h, 24h)
再举一个更简单的例子:查5月份每天的平均值
这个例子里,滑动窗口的长度和滑动步长相等,就可以省掉第三个参数啦:
select avg(s1) from root.turbine.d1 group by([2020-05-01T00:00:00, 2020-06-01T00:00:00), 1d)
0.10.0 采样补空值
0.10.0 新增的查询功能,在 group by 查询的基础上,如果我们使用 last_value 聚合函数,就是个采样功能了,如果某个时间区间没有值,也可以使用前值补空。
# 正常降采样,没数据的区间会填充 null
IoTDB> select last_value(s1) from root.turbine.d1 group by([1,10), 2ms)
+-----------------------------+------------------------------+
|                         Time|last_value(root.turbine.d1.s1)|
+-----------------------------+------------------------------+
|1970-01-01T08:00:00.001+08:00|                           1.0|
|1970-01-01T08:00:00.003+08:00|                           1.0|
|1970-01-01T08:00:00.005+08:00|                           1.0|
|1970-01-01T08:00:00.007+08:00|                          null|
|1970-01-01T08:00:00.009+08:00|                          null|
+-----------------------------+------------------------------+


# 降采样,如果某个区间没值,可以用前一个聚合值补空,填充函数为 previous
IoTDB> select last_value(s1) from root.turbine.d1 group by([1,10), 2ms) fill(float[previous])
+-----------------------------+------------------------------+
|                         Time|last_value(root.turbine.d1.s1)|
+-----------------------------+------------------------------+
|1970-01-01T08:00:00.001+08:00|                           1.0|
|1970-01-01T08:00:00.003+08:00|                           1.0|
|1970-01-01T08:00:00.005+08:00|                           1.0|
|1970-01-01T08:00:00.007+08:00|                           1.0|
|1970-01-01T08:00:00.009+08:00|                           1.0|
+-----------------------------+------------------------------+
此外,还支持另一种补空值方式,previousuntillast,使用前值补空,直到补到最新点的时间值为止,就不再补了,比如这里最新点时间戳是10,11和13这两个点就不再补了。
IoTDB> select last_value(s1) from root.turbine.d1 group by((1,15], 2ms) fill(float[previousuntillast])
+-----------------------------+------------------------------+
|                         Time|last_value(root.turbine.d1.s1)|
+-----------------------------+------------------------------+
|1970-01-01T08:00:00.003+08:00|                           1.0|
|1970-01-01T08:00:00.005+08:00|                           1.0|
|1970-01-01T08:00:00.007+08:00|                           1.0|
|1970-01-01T08:00:00.009+08:00|                           1.0|
|1970-01-01T08:00:00.011+08:00|                           1.0|
|1970-01-01T08:00:00.013+08:00|                          null|
|1970-01-01T08:00:00.015+08:00|                          null|
+-----------------------------+------------------------------+
不知道大家注意到没,这句话区间是前开后闭,填出来的结果集也是用的闭区间的时间点。这样就通过 group by fill 语句实现了采样补空值查询。
0.9.x 降频聚合查询
0.9 老版本的降频聚合语法和 0.10 的不一样。主要有这样几个参数
(1)分段间隔,把时间轴按这个长度分成一段一段的
(2)分割原点,从哪个点开始分,可以采用任意一段的端点,默认以 1970年1月1日0点0时0分0秒为切割原点,也就是时间戳的 0
(3)结果集的展示范围
前两个参数固定之后,时间轴的分段就确定了,之后第三个参数指定结果集。
比如,查询5月每天的平均值
select avg(s1) from root.turbine.d1 group by (1d, 2020-05-01 00:00:00, [2020-05-01 00:00:00, 2020-05-31 23:59:59]);
按设备对齐查询
通过上边的例子我们可以看到,IoTDB 查询的默认表结构是【time,序列1,序列2,...,序列n】,所有序列会按照 time 对齐,如果存在某个序列在一个时间点不存在,会补空值,在做值过滤时候,这种表结构的过滤也会很严格。
为了使得各个设备查询时不互相影响,我们支持按 time 和设备对齐查询,表结构为【time,设备ID,测点1,测点2,...,测点n】,这种就和关系表结构比较像了,只需要在查询语句后加 align by device
IoTDB> select * from root align by device
+-----------------------------+---------------+---+---+
|                         Time|         Device| s1| s2|
+-----------------------------+---------------+---+---+
|1970-01-01T08:00:00.001+08:00|root.turbine.d1|1.0|2.0|
|1970-01-01T08:00:00.002+08:00|root.turbine.d1|1.0|2.0|
|1970-01-01T08:00:00.003+08:00|root.turbine.d1|1.0|2.0|
|1970-01-01T08:00:00.004+08:00|root.turbine.d1|1.0|2.0|
|1970-01-01T08:00:00.005+08:00|root.turbine.d1|1.0|2.0|
|1970-01-01T08:00:00.006+08:00|root.turbine.d1|1.0|2.0|
|1970-01-01T08:00:00.010+08:00|root.turbine.d1|1.0|2.0|
+-----------------------------+---------------+---+---+
总结
今天的基本操作就先介绍到这,具体的sql 语法可以参考官网,本文的 sql 可以粘到 CLI 里自己玩一玩~ 祝大家周末快乐!
欢迎点在看!赞赏!转发!
![]()