随着时间的发展,Serverless 架构越来越火热,其按量付费、弹性伸缩等诸多优质特性,让人眼前一亮,不得不惊叹云计算为我们带来的便利。
本实践通过一个博客系统的开发,和大家简单地体验一下基于 Serverless 架构的博客系统是什么样的。
开发前的思考
-
博客系统需要哪些功能?本文仅仅是 demo 性质,所以功能比较少,只有两个页面。具有文章管理、分类管理、标签管理以及留言管理等功能。同时为了方便用户管理,要有前台和后台两部分。
-
前台如何做?前台可能是用户流量比较大的(相对后台而言),所以这部分就是用单独的函数。每个功能一个函数,初步判断前台可能需要:获取文章分类,获取文章列表,获取评论列表,增加评论,获取标签列表等接口。
-
后台如何做?后台理论上是管理员的专属地盘,所以这一部分流量比较小,可以通过 flask-admin,放入到一个函数中来解决。
-
为什么前台要那么多函数,后台用一个框架?整个项目就用一个框架不好么?首先要回答,整个项目用一个框架也是可以的,但是并不好。例如这个项目的后台,使用的是 Flask 框架,用了 flask-admin 来做后台管理,这个开发过程很简单,可能整个后台就一百来行代码就搞定了,但是这涉及到:
- 网页的返回,需要 APIGW 开启响应集成,响应集成的性能其实很差,所以相对来说,不太适合放在前端;
- 一个完整项目比较大,可能需要的资源也会更多,那么我们就需要给这个函数更多的资源内存,可能会导致收费的增加,例如我的后台给的资源是 1024,我的前端每个函数给的内存资源是 128/256,在执行同样时间的时候,明显后者的费用降低了 4~8 倍。同样,函数可能涉及大冷启动,冷启动一个函数和冷启动函数中的一个完整的框架/项目,前者的速度和性能可能会更好一下;
- 函数都有并发上限的,如果所有的资源全都请求到一个函数,那么很可能实际用户并发几个的时候,对用的函数并发就可能是几十几百,这很可能在用户稍微多一点的情况下,就会触及用户实例的上限限制,后台功能是非频繁功能,前台相对来说是更频繁的,所以前台是用单独接口更合理。
- 登陆功能怎么做?非常抱歉,函数并不能像传统开发,将客户的一些登录信息缓存到机器上,但是客户端依旧可以使用 cookie,所以利用这个方法,可以做以下流程:
-
后台登录入口处,拉取 APIGW 传过来的 APIGW Event,看其中 headers/cookie 是否存在,不存在就会返回登录页面;
-
如果 headers/cookie 存在,取 cookie 中的 token 字段,判断 token 字段是否和服务端的 token 字段吻合,吻合进入系统后台,不吻合返回登录页面
-
用户登录,请求后台的登陆功能,如果账号密码正确,则返回给用户一个 token,客户端将 token 记录到 cookie 中
-
问题来了:
- token 是什么?Token 可以认为是一个登录凭证,生成方法可以按照自己设计升级,本实践比较简单,就直接用账号密码组合,然后 md5。
- token 存在那里?下次如何获取?Token 可以存在 Mysql 数据库中,也可以存在 Redis 中,甚至可以存在 COS 中,例如 Redis 和 COS,都可以利用其自身的一些特性做一些额外的操作,例如数据有效期(用来做登录过期等)。当然本文不想做的那么麻烦,所以每次用户请求过来,都是单独计算 token,然后进行的对比。
- 这种 token 登陆方法可以用于其他项目么?还是仅适用于这种博客系统。可以适用其他项目,很多项目都可以通过这种方法来做,例如我自己的 Anycodes,也是通过 Token 进行鉴权,只不过在 Serverless 架构下,Token 如何存储是一个问题,但是我个人推荐有钱就用 redis,没钱就用 cos,不想额外花钱就像我,每次是用单独对比。
- token 存在 redis 可以理解,但是存在 cos 是为什么?cos 本身是对象存储,用来存储文件的,其实完全可以用来存储 token,例如我们每次生成一个新的 token,都把这个 token 设置为一个文件,文件内容就是这个 token 对应的用户信息或者是权限信息,或者其他的信息,然后存储桶策略设置成文件过期时间,例如文件存入 1 天自动删除,那么 1 天之后,你存储的这个 token 文件就会被删除。等用户带着 token 过来的时候,直接通过内网请求 cos(没有流量费)获取指定文件名,如果获取到了就下载回来(文件一般也就 1K 或者以下),然后进行其他操作,不存在就证明用户已过期,或者 token 错误,让他重新登录就好了。当然,这种方法可能不是最优解,但是确实是在 Serverless 条件下的一个有趣的做法。可以在小项目中尝试使用。
- 项目本地开发如何进行调试?众所周知 Serverless 架构的本地调试很难。确实如此,虽然说本地调试很困难,但也不是不能越过去的,可以根据项目自己的需求,来做一些调试策略。
项目开发
项目开发过程主要就是数据库的增删改查,为了更加适应 Serverless 架构下的项目开发,也为了提高项目的开发效率特总结了相关的开发技巧和经验。
数据库设计
由于是做一个简单的博客,所以数据库相对设计比较简单,只有文章表、分类表以及标签表、评论表等,整体的 ER 图如下所示:
![ER 图]()
本地开发与调试
对于开发调试,我在每个函数后面增加了对应触发器的调试方案,例如 APIGW 触发器,我增加了以下代码:
def test():
    event = {
        "requestContext": {
            "serviceId": "service-f94sy04v",
            "path": "/test/{path}",
            "httpMethod": "POST",
            "requestId": "c6af9ac6-7b61-11e6-9a41-93e8deadbeef",
            "identity": {
                "secretId": "abdcdxxxxxxxsdfs"
            },
            "sourceIp": "14.17.22.34",
            "stage": "release"
        },
        "headers": {
            "Accept-Language": "en-US,en,cn",
            "Accept": "text/html,application/xml,application/json",
            "Host": "service-3ei3tii4-251000691.ap-guangzhou.apigateway.myqloud.com",
            "User-Agent": "User Agent String"
        },
        "body": json.dumps({"id": 1}),
         .... ....
    }
    print(main_handler(event, None))


if __name__ == "__main__":
    test()
在实际上,我每次想要看一下运行效果,我都会执行这个文件:
{'id': 1, 'title': '', 'watched': 1, 'category': '热点新闻', 'publish': '2020-02-13 00:45:52', 'tags': [], 'next': {}, 'pre': {}}
{'uuid': '749ca9f6-4dfb-11ea-9c5b-acde48001122', 'error': False, 'message': ''}
可以认为,是在通过本地模拟一些线上环境。当然,如果有 redis 等一些需要内网资源的函数,就比较麻烦,但是我这做法,可以用于绝大部分函数。包括后台的 Flaks 框架部分:
def test():
    event = {'body': 'name=sdsadasdsadasd&remark=', 'headerParameters': {}, 'headers': {
        'accept': 'text/html,application/xhtml+xml,application/xml;q=0.9,image/webp,image/apng,*/*;q=0.8,application/signed-exchange;v=b3;q=0.9',
        'accept-encoding': 'gzip, deflate', 'accept-language': 'zh-CN,zh;q=0.9', 'cache-control': 'no-cache',
        'connection': 'keep-alive', 'content-length': '27', 'content-type': 'application/x-www-form-urlencoded',
        'cookie': 'Hm_lvt_a0c900918361b31d762d9cf4dc81ee5b=1574491278,1575257377', 'endpoint-timeout': '15',
        'host': 'blog.0duzhan.com', 'origin': 'http://blog.0duzhan.com', 'pragma': 'no-cache',
        'proxy-connection': 'keep-alive', 'referer': 'http://blog.0duzhan.com/admin/tag/new/?url=%2Fadmin%2Ftag%2F',
        'upgrade-insecure-requests': '1',
        'user-agent': 'Mozilla/5.0 (Macintosh; Intel Mac OS X 10_14_4) AppleWebKit/537.36 (KHTML, like Gecko) Chrome/79.0.3945.130 Safari/537.36',
        'x-anonymous-consumer': 'true', 'x-api-requestid': '656622f3b008a0d406a376809b03b52c',
        'x-b3-traceid': '656622f3b008a0d406a376809b03b52c', 'x-qualifier': '$LATEST'}, 'httpMethod': 'POST',
             'path': '/admin/tag/new/', 'pathParameters': {}, 'queryString': {'url': '/admin/tag/'},
             'queryStringParameters': {},
             'requestContext': {'httpMethod': 'ANY', 'identity': {}, 'path': '/admin', 'serviceId': 'service-23ybmuq7',
                                'sourceIp': '119.123.224.87', 'stage': 'release'}}
    print(main_handler(event, None))


if __name__ == "__main__":
    test()
index 执行结果:
{'body': 'name=sdsadasdsadasd&remark=', 'headerParameters': {}, 'headers': {'accept': 'text/html,application/xhtml+xml,application/xml;q=0.9,image/webp,image/apng,*/*;q=0.8,application/signed-exchange;v=b3;q=0.9', 'accept-encoding': 'gzip, deflate', 'accept-language': 'zh-CN,zh;q=0.9', 'cache-control': 'no-cache', 'connection': 'keep-alive', 'content-length': '27', 'content-type': 'application/x-www-form-urlencoded', 'cookie': 'Hm_lvt_a0c900918361b31d762d9cf4dc81ee5b=1574491278,1575257377', 'endpoint-timeout': '15', 'host': 'blog.0duzhan.com', 'origin': 'http://blog.0duzhan.com', 'pragma': 'no-cache', 'proxy-connection': 'keep-alive', 'referer': 'http://blog.0duzhan.com/admin/tag/new/?url=%2Fadmin%2Ftag%2F', 'upgrade-insecure-requests': '1', 'user-agent': 'Mozilla/5.0 (Macintosh; Intel Mac OS X 10_14_4) AppleWebKit/537.36 (KHTML, like Gecko) Chrome/79.0.3945.130 Safari/537.36', 'x-anonymous-consumer': 'true', 'x-api-requestid': '656622f3b008a0d406a376809b03b52c', 'x-b3-traceid': '656622f3b008a0d406a376809b03b52c', 'x-qualifier': '$LATEST'}, 'httpMethod': 'POST', 'path': '/admin/tag/new/', 'pathParameters': {}, 'queryString': {'url': '/admin/tag/'}, 'queryStringParameters': {}, 'requestContext': {'httpMethod': 'ANY', 'identity': {}, 'path': '/admin', 'serviceId': 'service-23ybmuq7', 'sourceIp': '119.123.224.87', 'stage': 'release'}}
{'isBase64Encoded': False, 'statusCode': 200, 'headers': {'Content-Type': 'text/html'}, 'body': '<!DOCTYPE html>n<html lang="en">n<head>n    <meta charset="UTF-8">n    <title>Title</title>n    <script>n        var url = window.location.hrefn        url = url.split("admin")[0] + "admin"n        String.prototype.endWith = function (s) {n            var d = this.length - s.length;n            return (d >= 0 && this.lastIndexOf(s) == d)n        }n        if (window.location.href != url) {n            if (!window.location.href.endsWith("admin") || !window.location.href.endsWith("admin/"))n                window.location = urln        }nn        function doLogin() {n            var xmlhttp = window.XMLHttpRequest ? (new XMLHttpRequest()) : (new ActiveXObject("Microsoft.XMLHTTP"))n            xmlhttp.onreadystatechange = function () {n                if (xmlhttp.readyState == 4 && xmlhttp.status == 200) {n                    if (JSON.parse(xmlhttp.responseText)["token"]) {n                        document.cookie = "token=" + JSON.parse(xmlhttp.responseText)["token"];n                        window.location = `http://${window.location.host}/admin`n                    } else {n                        alert(JSON.parse(xmlhttp.responseText)["message"])n                    }n                }n            }n            xmlhttp.open("POST", window.location.pathname, true);n            xmlhttp.setRequestHeader("Content-type", "application/json");n            xmlhttp.send(JSON.stringify({n                "username": document.getElementById("username").value,n                "password": document.getElementById("password").value,n            }));n        }n    </script>n</head>n<body>nn<center><h1>Serverless Blog 后台管理</h1>n    管理账号:<input type="text" id="username"><br>n    管理密码:<input type="password" id="password"><br>n    <input type="reset"><input type="submit" onclick="doLogin()"><br>n</center>n</body>n</html>'}
Flask部署
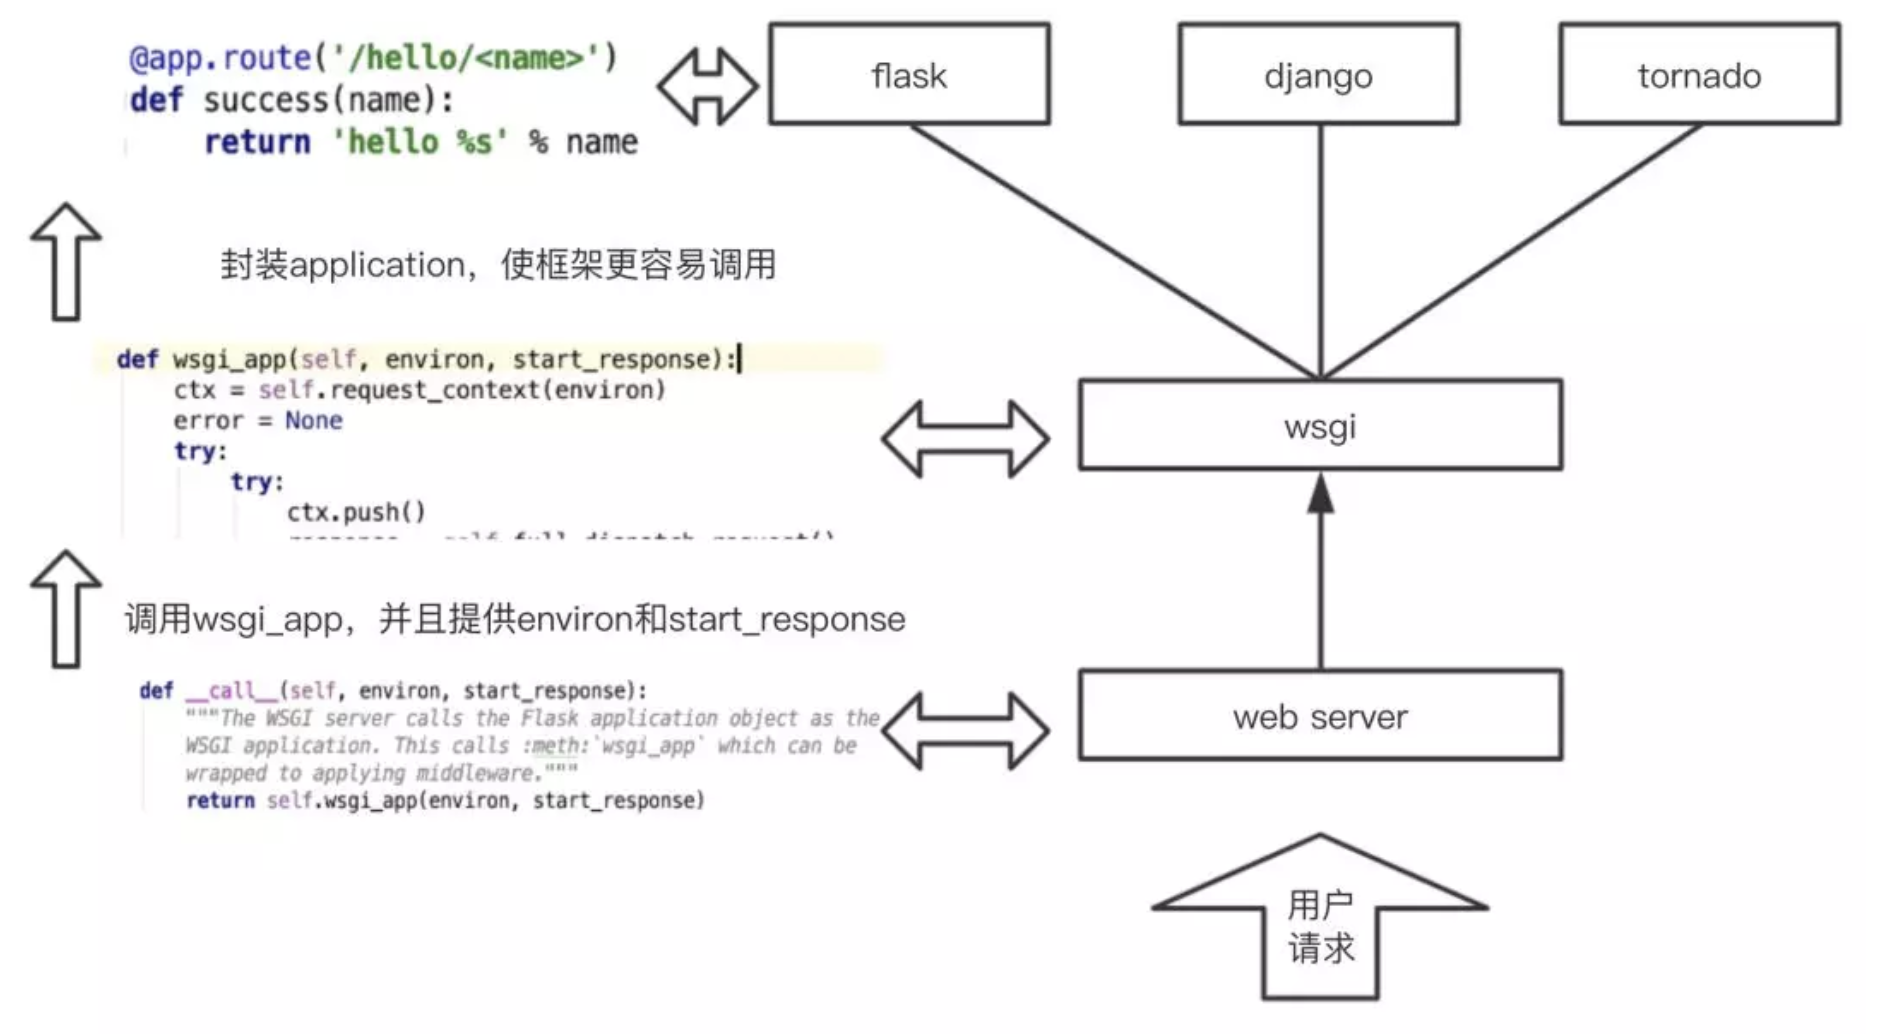
Flask 部署到 Serverless 架构可以用 @serverless/tencent-flask,但是这里为了更加深入了解传统框架如何部署到 Serverless 架构,所以此处自行「造轮子」实现,先来看一张图:
![]()
在通常情况下,我们使用 Flask 等框架实际上要通过 web_server,进入到下一个环节,而我们云函数更多是一个函数,本不需要启动 web server,所以我们就可以直接调用 wsgi_app 这个方法,其中这里的 environ 就是我们刚才的通过对 event/context 等进行处理后的对象,start_response 可以认为是我们的一种特殊的数据结构,例如我们的 response 结构形态等。所以,如果我们自己想要实现这个过程,不使用腾讯云 flask-component,可以这样做:
# -*- coding: utf-8 -*-
# Copyright 2016 Matt Martz
# All Rights Reserved.
#
#    Licensed under the Apache License, Version 2.0 (the "License"); you may
#    not use this file except in compliance with the License. You may obtain
#    a copy of the License at
#
#         http://www.apache.org/licenses/LICENSE-2.0
#
#    Unless required by applicable law or agreed to in writing, software
#    distributed under the License is distributed on an "AS IS" BASIS, WITHOUT
#    WARRANTIES OR CONDITIONS OF ANY KIND, either express or implied. See the
#    License for the specific language governing permissions and limitations
#    under the License.

import sys
import json

try:
    from urllib import urlencode
except ImportError:
    from urllib.parse import urlencode

from flask import Flask

try:
    from cStringIO import StringIO
except ImportError:
    try:
        from StringIO import StringIO
    except ImportError:
        from io import StringIO

from werkzeug.wrappers import BaseRequest

__version__ = '0.0.4'


def make_environ(event):
    environ = {}

    for hdr_name, hdr_value in event['headers'].items():
        hdr_name = hdr_name.replace('-', '_').upper()
        if hdr_name in ['CONTENT_TYPE', 'CONTENT_LENGTH']:
            environ[hdr_name] = hdr_value
            continue

        http_hdr_name = 'HTTP_%s' % hdr_name
        environ[http_hdr_name] = hdr_value

    apigateway_qs = event['queryStringParameters']
    request_qs = event['queryString']
    qs = apigateway_qs.copy()
    qs.update(request_qs)

    body = ''
    if 'body' in event:
        body = event['body']

    environ['REQUEST_METHOD'] = event['httpMethod']
    environ['PATH_INFO'] = event['path']
    environ['QUERY_STRING'] = urlencode(qs) if qs else ''
    environ['REMOTE_ADDR'] = 80
    environ['HOST'] = event['headers']['host']
    environ['SCRIPT_NAME'] = ''

    environ['SERVER_PORT'] = 80
    environ['SERVER_PROTOCOL'] = 'HTTP/1.1'

    environ['CONTENT_LENGTH'] = str(len(body))

    environ['wsgi.url_scheme'] = ''
    environ['wsgi.input'] = StringIO(body)
    environ['wsgi.version'] = (1, 0)
    environ['wsgi.errors'] = sys.stderr
    environ['wsgi.multithread'] = False
    environ['wsgi.run_once'] = True
    environ['wsgi.multiprocess'] = False

    BaseRequest(environ)

    return environ


class LambdaResponse(object):
    def __init__(self):
        self.status = None
        self.response_headers = None

    def start_response(self, status, response_headers, exc_info=None):
        self.status = int(status[:3])
        self.response_headers = dict(response_headers)


class FlaskLambda(Flask):
    def __call__(self, event, context):
        if 'httpMethod' not in event:
            print('httpMethod not in event')
            # In this "context" `event` is `environ` and
            # `context` is `start_response`, meaning the request didn't
            # occur via API Gateway and Lambda
            return super(FlaskLambda, self).__call__(event, context)

        response = LambdaResponse()
        # print response.start_response

        body = next(self.wsgi_app(
            make_environ(event),
            response.start_response
        ))

        # return {
        # "isBase64Encoded": False,
        # "statusCode": 200,
        # "headers": {'Content-Type': 'text/html'},
        # "body": body
        # }

        return {
            'statusCode': response.status,
            'headers': response.response_headers,
            'body': body
        }
这个代码,可以将 APIGW 过来的请求,变成请求集成的形式,传送给 Flask 框架,用户可以通过 request.form 来获取 post 内容,通过 request.args 获取 get 内容等。
全局变量
全局变量可能包括用户账号,密码,云的密钥信息,数据库信息等,为了统一配置和修改,可以使用我自己写的全局变量组件:
# 函数们的整体配置信息
Conf:
  component: "serverless-global"
  inputs:
    region: ap-shanghai
    runtime: Python3.6
    handler: index.main_handler
    include_common: ./common
    blog_user: Dfounder
    blog_email: service@anycodes.cn
    blog_about_me: 这就是我的博客
    blog_host: blog.0duzhan.com
    website_title: Serverless Blog System
    website_keywords: Serverless, Serverless Framework, Tencent Cloud, SCF
    website_description: 一款基于腾讯云Serverless架构,并且采用Serverless Framework构建的Serverless博客系统。
    website_bucket: serverless-blog-1256773370
    mysql_host:
    mysql_user: root
    mysql_password:
    mysql_port: 60510
    mysql_db: serverless_blog_system
    admin_user: mytest
    admin_password: mytestabc
    tencent_secret_id:
    tencent_secret_key:
    tencent_appid:
在使用的时候,可以直接用,例如函数:
Blog_Web_addComment:
  component: "@serverless/tencent-scf"
  inputs:
    name: Blog_Web_addComment
    description: 添加评论
    codeUri: ./cloudFunctions/addComment
    handler: ${Conf.handler}
    runtime: ${Conf.runtime}
    region:  ${Conf.region}
    include:
      - ${Conf.include_common}
    environment:
      variables:
        mysql_host: ${Conf.mysql_host}
        mysql_port: ${Conf.mysql_port}
        mysql_user: ${Conf.mysql_user}
        mysql_password: ${Conf.mysql_password}
        mysql_db: ${Conf.mysql_db}
项目初始化
为了让项目更容易初始化,例如我修改网站的名字,描述,关键词,或者我需要建立数据库等。所以这个时候我单独做了一个 init 文件:
# -*- coding: utf8 -*-
import pymysql
import shutil
import yaml
import os


def setEnv():
    try:
        file = open("./serverless.yaml", 'r', encoding="utf-8")
        file_data = file.read()
        file.close()

        data = yaml.load(file_data)
        for eveKey, eveValue in data['Conf']['inputs'].items():
            os.environ[eveKey] = str(eveValue)
        return True
    except Exception as e:
        raise e


def initDb():
    try:
        conn = pymysql.connect(host=os.environ.get('mysql_host'),
                               user=os.environ.get('mysql_user'),
                               password=os.environ.get('mysql_password'),
                               port=int(os.environ.get('mysql_port')),
                               charset='utf8')
        cursor = conn.cursor()
        sql = "CREATE DATABASE IF NOT EXISTS {db_name}".format(db_name=os.environ.get('mysql_db'))
        cursor.execute(sql)
        cursor.close()
        conn.close()
        return True
    except Exception as e:
        raise e


def initTable():
    try:
        conn = pymysql.connect(host=os.environ.get('mysql_host'),
                               user=os.environ.get('mysql_user'),
                               password=os.environ.get('mysql_password'),
                               port=int(os.environ.get('mysql_port')),
                               db=os.environ.get('mysql_db'),
                               charset='utf8',
                               cursorclass=pymysql.cursors.DictCursor,
                               autocommit=1)
        cursor = conn.cursor()
        createTags = "CREATE TABLE `tags` ( `tid` INT NOT NULL AUTO_INCREMENT , `name` VARCHAR(255) NOT NULL , `remark` TEXT NULL , PRIMARY KEY (`tid`), UNIQUE (`name`)) ENGINE = InnoDB;"
        createCategory = "CREATE TABLE `category` ( `cid` INT NOT NULL AUTO_INCREMENT , `name` VARCHAR(255) NOT NULL , `sorted` INT NOT NULL DEFAULT '1' , `remark` TEXT NULL , PRIMARY KEY (`cid`), UNIQUE (`name`)) ENGINE = InnoDB;"
        createComments = "CREATE TABLE `comments` ( `cid` INT NOT NULL AUTO_INCREMENT , `content` TEXT NOT NULL , `publish` TIMESTAMP NOT NULL DEFAULT CURRENT_TIMESTAMP , `user` VARCHAR(255) NOT NULL , `email` VARCHAR(255) NULL , `photo` INT NOT NULL DEFAULT '0' ,  `article` INT NOT NULL , `remark` TEXT NULL , `uni_mark` VARCHAR(255) NOT NULL , `is_show` INT NOT NULL DEFAULT '0' , PRIMARY KEY (`cid`), UNIQUE (`uni_mark`)) ENGINE = InnoDB;"
        createArticle = "CREATE TABLE `article` ( `aid` INT NOT NULL AUTO_INCREMENT , `title` VARCHAR(255) NOT NULL , `content` TEXT NOT NULL , `description` TEXT NOT NULL , `publish` TIMESTAMP NOT NULL DEFAULT CURRENT_TIMESTAMP , `watched` INT NOT NULL DEFAULT '0' , `category` INT NOT NULL , `remark` TEXT NULL , PRIMARY KEY (`aid`)) ENGINE = InnoDB;"
        createArticleTags = "CREATE TABLE `article_tags` ( `atid` INT NOT NULL AUTO_INCREMENT , `aid` INT NOT NULL , `tid` INT NOT NULL , PRIMARY KEY (`atid`)) ENGINE = InnoDB;"
        alertArticleTagsArticle = "ALTER TABLE `article_tags` ADD CONSTRAINT `article` FOREIGN KEY (`aid`) REFERENCES `article`(`aid`) ON DELETE CASCADE ON UPDATE CASCADE; "
        alertArticleTagsTags = "ALTER TABLE `article_tags` ADD CONSTRAINT `tags` FOREIGN KEY (`tid`) REFERENCES `tags`(`tid`) ON DELETE CASCADE ON UPDATE CASCADE;"
        alertArticleCategory = "ALTER TABLE `article` ADD CONSTRAINT `category` FOREIGN KEY (`category`) REFERENCES `category`(`cid`) ON DELETE CASCADE ON UPDATE CASCADE;"
        alertCommentsArticle = "ALTER TABLE `comments` ADD CONSTRAINT `article_comments` FOREIGN KEY (`article`) REFERENCES `article`(`aid`) ON DELETE CASCADE ON UPDATE CASCADE;"
        cursor.execute(createTags)
        cursor.execute(createCategory)
        cursor.execute(createComments)
        cursor.execute(createArticle)
        cursor.execute(createArticleTags)
        cursor.execute(alertArticleTagsArticle)
        cursor.execute(alertArticleTagsTags)
        cursor.execute(alertArticleCategory)
        cursor.execute(alertCommentsArticle)
        cursor.close()
        conn.close()
        return True
    except Exception as e:
        raise e


def initHTML():
    try:
        tempPath = "website"
        tempDist = os.path.join(tempPath, "dist")
        if os.path.exists(tempDist):
            shutil.rmtree(tempDist)
        tempFileList = []
        for eve in os.walk(tempPath):
            if eve[2]:
                for eveFile in eve[2]:
                    tempFileList.append(os.path.join(eve[0], eveFile))
        os.mkdir(tempDist)
        for eve in tempFileList:
            temp = os.path.split(eve.replace(tempPath, tempDist))
            if not os.path.exists(temp[0]):
                os.makedirs(temp[0])
            if eve.endswith(".html") or eve.endswith(".htm"):
                with open(eve) as readData:
                    with open(eve.replace(tempPath, tempDist), "w") as writeData:
                        writeData.write(readData.read().
                                        replace('{{ user }}', os.environ.get('blog_user')).
                                        replace('{{ email }}', os.environ.get('blog_email')).
                                        replace('{{ title }}', os.environ.get('website_title')).
                                        replace('{{ keywords }}', os.environ.get('website_keywords')).
                                        replace('{{ about_me }}', os.environ.get('blog_about_me')).
                                        replace('{{ host }}', os.environ.get('blog_host')).
                                        replace('{{ description }}', os.environ.get('website_description')))
            else:
                shutil.copy(eve, eve.replace(tempPath, tempDist))
        return True
    except Exception as e:
        raise e


if __name__ == "__main__":
    print("获取Yaml数据: ", setEnv())
    print("建立数据库:", initDb())
    print("建立数据库:", initTable())
    print("初始化HTML:", initHTML())
公共组件的开发
在项目中会有很多公共组件,例如数据库的部分,所以我把数据库的代码,统一放到了一起:common/mysqlCommon.py:
# -*- coding: utf8 -*-

import os
import re
import pymysql
import hashlib
from random import choice


class mysqlCommon:
    def __init__(self):
        self.getConnection({
            "host": os.environ.get('mysql_host'),
            "user": os.environ.get('mysql_user'),
            "port": int(os.environ.get('mysql_port')),
            "db": os.environ.get('mysql_db'),
            "password": os.environ.get('mysql_password')
        })

    def getDefaultPic(self):
        return choice([
            'http://t8.baidu.com/it/u=1484500186,1503043093&fm=79&app=86&f=JPEG?w=1280&h=853',
            'http://t8.baidu.com/it/u=2247852322,986532796&fm=79&app=86&f=JPEG?w=1280&h=853',
            'http://t7.baidu.com/it/u=3204887199,3790688592&fm=79&app=86&f=JPEG?w=4610&h=2968',
            'http://t9.baidu.com/it/u=3363001160,1163944807&fm=79&app=86&f=JPEG?w=1280&h=830',
            'http://t9.baidu.com/it/u=583874135,70653437&fm=79&app=86&f=JPEG?w=3607&h=2408',
            'http://t9.baidu.com/it/u=583874135,70653437&fm=79&app=86&f=JPEG?w=3607&h=2408',
            'http://t9.baidu.com/it/u=1307125826,3433407105&fm=79&app=86&f=JPEG?w=5760&h=3240',
            'http://t9.baidu.com/it/u=2268908537,2815455140&fm=79&app=86&f=JPEG?w=1280&h=719',
            'http://t7.baidu.com/it/u=1179872664,290201490&fm=79&app=86&f=JPEG?w=1280&h=854',
            'http://t9.baidu.com/it/u=3949188917,63856583&fm=79&app=86&f=JPEG?w=1280&h=875',
            'http://t9.baidu.com/it/u=2266751744,4253267866&fm=79&app=86&f=JPEG?w=1280&h=854',
            'http://t8.baidu.com/it/u=4100756023,1345858297&fm=79&app=86&f=JPEG?w=1280&h=854',
            'http://t7.baidu.com/it/u=1355385882,1155324943&fm=79&app=86&f=JPEG?w=1280&h=854',
            'http://t9.baidu.com/it/u=2292037961,3689236171&fm=79&app=86&f=JPEG?w=1280&h=854',
            'http://t9.baidu.com/it/u=4241966675,2405819829&fm=79&app=86&f=JPEG?w=1280&h=854',
            'http://t8.baidu.com/it/u=2857883419,1187496708&fm=79&app=86&f=JPEG?w=1280&h=763',
            'http://t8.baidu.com/it/u=198337120,441348595&fm=79&app=86&f=JPEG?w=1280&h=732'
        ])

    def getConnection(self, conf):
        self.connection = pymysql.connect(host=conf['host'],
                                          user=conf['user'],
                                          password=conf['password'],
                                          port=int(conf['port']),
                                          db=conf['db'],
                                          charset='utf8',
                                          cursorclass=pymysql.cursors.DictCursor,
                                          autocommit=1)

    def doAction(self, stmt, data):
        try:
            self.connection.ping(reconnect=True)
            cursor = self.connection.cursor()
            cursor.execute(stmt, data)
            result = cursor
            cursor.close()
            return result
        except Exception as e:
            print(e)
            try:
                cursor.close()
            except:
                pass
            return False

    def getCategoryList(self):
        search_stmt = (
            "SELECT * FROM `category` ORDER BY `sorted`"
        )
        result = self.doAction(search_stmt, ())
        if result == False:
            return False
        return [{"id": eveCategory['cid'], "name": eveCategory['name']} for eveCategory in result.fetchall()]

    def getArticleList(self, category, tag, page=1):
        if category:
            search_stmt = (
                "SELECT article.*,category.name FROM `article` LEFT JOIN `category` ON article.category=category.cid WHERE article.category=%s ORDER BY -article.aid LIMIT %s,%s;"
            )
            count_stmt = (
                "SELECT COUNT(*) FROM `article` LEFT JOIN `category` ON article.category=category.cid WHERE article.category=%s;"
            )
            data = (category, 10 * (int(page) - 1), 10 * int(page))
            count_data = (category,)
        elif tag:
            search_stmt = (
                "SELECT article.* FROM `article` LEFT JOIN `article_tags` ON article.aid=article_tags.aid WHERE article_tags.tid=%s ORDER BY -article.aid LIMIT %s,%s;"
            )
            count_stmt = (
                "SELECT COUNT(*) FROM `article`LEFT JOIN `article_tags` ON article.aid=article_tags.aid WHERE article_tags.tid=%s;"
            )
            data = (tag, 10 * (int(page) - 1), 10 * int(page))
            count_data = (tag,)
        else:
            search_stmt = (
                "SELECT article.*,category.name FROM `article` LEFT JOIN `category` ON article.category=category.cid ORDER BY -article.aid LIMIT %s,%s;"
            )
            count_stmt = (
                "SELECT COUNT(*) FROM `article` LEFT JOIN `category` ON article.category=category.cid; "
            )
            data = (10 * (int(page) - 1), 10 * int(page))
            count_data = ()
        result = self.doAction(search_stmt, data)
        if result == False:
            return False

        return {"data": [{"id": eveArticle['aid'],
                          "title": eveArticle['title'],
                          "description": eveArticle['description'],
                          "watched": eveArticle['watched'],
                          "category": eveArticle['category'],
                          "publish": str(eveArticle['publish']),
                          "picture": self.getPicture(eveArticle['content'])}
                         for eveArticle in result.fetchall()],
                "count": self.doAction(count_stmt, count_data).fetchone()["COUNT(*)"]}

    def getHotArticleList(self):
        search_stmt = (
            "SELECT article.*,category.name FROM `article` LEFT JOIN `category` ON article.category=category.cid ORDER BY article.watched LIMIT 0,5"
        )
        result = self.doAction(search_stmt, ())
        if result == False:
            return False
        return [{"id": eveArticle['aid'],
                 "title": eveArticle['title'],
                 "description": eveArticle['description'],
                 "watched": eveArticle['watched'],
                 "category": eveArticle['category'],
                 "publish": str(eveArticle['publish']),
                 "picture": self.getPicture(eveArticle['content'])}
                for
                eveArticle in result.fetchall()]

    def getTagsArticle(self, aid):
        search_stmt = (
            "SELECT tags.name, tags.tid FROM `article_tags` LEFT JOIN `tags` ON article_tags.tid=tags.tid WHERE article_tags.aid=%s;"
        )
        result = self.doAction(search_stmt, (aid,))
        if result == False:
            return False
        return [{"id": eveTag["tid"], "name": eveTag["name"]} for eveTag in result.fetchall()]

    def getTagsList(self):
        search_stmt = (
            "SELECT * FROM tags ORDER BY RAND() LIMIT 20; "
        )
        result = self.doAction(search_stmt, ())
        if result == False:
            return False
        return [{"id": eveTag['tid'], "name": eveTag['name']} for eveTag in result.fetchall()]

    def getArticleContent(self, aid):
        search_stmt = (
            "SELECT article.*, category.name FROM `category` LEFT JOIN `article` ON category.cid=article.category WHERE article.aid=%s;"
        )
        result = self.doAction(search_stmt, (aid))
        if result == False:
            return False
        article = result.fetchone()
        return {
            "id": article["aid"],
            "title": article["title"],
            "content": article["content"],
            "description": article["description"],
            "watched": article["watched"],
            "category": article["name"],
            "publish": str(article["publish"]),
            "tags": self.getTagsArticle(article["aid"]),
            "next": self.getOtherArticle(aid, "next"),
            "pre": self.getOtherArticle(aid, "pre")
        } if article else {}

    def getOtherArticle(self, aid, articleType):
        search_stmt = (
            "SELECT * FROM `article` WHERE aid=(select max(aid) from `article` where aid>%s)"
        ) if articleType == "next" else (
            "SELECT * FROM `article` WHERE aid=(select max(aid) from `article` where aid<%s)"
        )
        result = self.doAction(search_stmt, (aid))
        if result == False:
            return False
        article = result.fetchone()
        return {
            "id": article["aid"],
            "title": article["title"]
        } if article else {}

    def getComments(self, aid):
        search_stmt = (
            "SELECT * FROM `comments` WHERE article=%s AND is_show=1 ORDER BY -cid LIMIT 100;"
        )
        result = self.doAction(search_stmt, (aid))
        if result == False:
            return False
        return [{"content": eveComment['content'],
                 "publish": str(eveComment['publish']),
                 "user": eveComment['user'],
                 "remark": eveComment['remark']} for eveComment in result.fetchall()]

    def addComment(self, content, user, email, aid):
        insert_stmt = (
            "INSERT INTO `comments` (`cid`, `content`, `publish`, `user`, `email`, `article`, `uni_mark`) "
            "VALUES (NULL, %s, CURRENT_TIMESTAMP, %s, %s, %s, %s)"
        )
        result = self.doAction(insert_stmt, (content, user, email, aid, hashlib.md5(
            ("%s----%s----%s----%s" % (str(content), str(user), str(email), str(aid))).encode("utf-8")).hexdigest()))
        return False if result == False else True

    def updateArticleWatched(self, wid):
        update_stmt = (
            "UPDATE `article` SET `watched`=`watched`+1 WHERE `aid` = %s"
        )
        return False if self.doAction(update_stmt, (wid)) == False else True

    def getPicture(self, content):
        resultList =[eve[1] for eve in re.findall('<img(.*?)src="(.*?)"(.*?)>', content)]
        return resultList[0] if resultList else self.getDefaultPic()


    def getTag(self, tag):
        search_stmt = (
            "SELECT * FROM `tags` WHERE name=%s;"
        )
        result = self.doAction(search_stmt, (tag,))
        return False if not result or result.rowcount == 0 else result.fetchone()['tid']

    def addTag(self, tag):
        insert_stmt = (
            "INSERT INTO `tags` (`tid`, `name`, `remark`) "
            "VALUES (NULL, %s, NULL)"
        )
        result = self.doAction(insert_stmt, (tag))
        return False if result == False else result.lastrowid

    def addArticleTag(self, article, tag):
        insert_stmt = (
            "INSERT INTO `article_tags` (`atid`, `aid`, `tid`) "
            "VALUES (NULL, %s, %s)"
        )
        result = self.doAction(insert_stmt, (article, tag))
        return False if result == False else True
这里基本上是,这个项目需要的数据库增删改查的全部功能(admin 除外),在使用的时候,分为本地和线上:
try:
    import returnCommon
    from mysqlCommon import mysqlCommon
except:
    import common.testCommon

    common.testCommon.setEnv()

    import common.returnCommon as returnCommon
    from common.mysqlCommon import mysqlCommon

mysql = mysqlCommon()
通过 python 的异常,如果导入没找到,那就说明是本地测试,如果 from mysqlCommon import mysqlCommon 找到了,那就说明是线上环境。除了数据库的公共组件,我还有 returnCommon 等公共文件。当然, 这些文件,在使用的时候也需要打包进入,可以在 yaml 中增加 include,例如:
Blog_Web_addComment:
  component: "@serverless/tencent-scf"
  inputs:
    name: Blog_Web_addComment
    description: 添加评论
    codeUri: ./cloudFunctions/addComment
    handler: ${Conf.handler}
    runtime: ${Conf.runtime}
    region:  ${Conf.region}
    include:
      - ${Conf.include_common}
功能展示
前台功能
-
列表页 ![列表页]()
-
内容页 ![内容页]()
后台功能
项目部署
# 函数们的整体配置信息
Conf:
  component: "serverless-global"
  inputs:
    region: ap-shanghai
    runtime: Python3.6
    handler: index.main_handler
    include_common: ./common
    blog_user: Dfounder
    blog_email: service@anycodes.cn
    website_title: Serverless Blog System
    website_keywords: Serverless, Serverless Framework, Tencent Cloud, SCF
    website_description: 一款基于腾讯云Serverless架构,并且采用Serverless Framework构建的Serverless博客系统。
    website_bucket: serverless-blog-1256773370
    mysql_host:
    mysql_password:
    mysql_port:
    mysql_db:
    admin_user: mytest
    admin_password: mytest
除了上面的内容,还要看一下域名问题(例如 CosBucket):
# 网站
CosBucket:
  component: '@serverless/tencent-website'
  inputs:
    code:
      root: website/dist
      src: ./
      index: list.html
    region:  ${Conf.region}
    bucketName: ${Conf.website_bucket}
    hosts:
      - host: 0duzhan.com
        https:
          certId: awPsOIHY
          forceSwitch: -1
      - host: www.0duzhan.com
        https:
          certId: awPsOIHY
          forceSwitch: -1

    env:
      apiUrl: ${APIService.subDomain}
以及 API 网关内容:
# 创建 API 网关 Service
APIService:
  component: "@serverless/tencent-apigateway"
  inputs:
    region: ${Conf.region}
    customDomain:
      - domain: api.0duzhan.com
        isDefaultMapping: 'FALSE'
        pathMappingSet:
          - path: /
            environment: release
        protocols:
          - http
    protocols:
      - http
      - https
    ........
这两部分域名可以修改成自己的,或者删除掉这两个 key
这里要注意,我是在 macOS 下开发的,init.py 可以在 macOS/Linux 运行,Windows 用户可能要适当修改一下。还有这里面需要一个依赖:pyyaml,需要自行安装一下。
获取Yaml数据:  True
建立数据库: True
建立数据库: True
初始化HTML: True
- 部署资源,执行
serverless --debug
(venv) ServerlessBlog:ServerlessBlog dfounderliu$ sls --debug

  DEBUG ─ Resolving the template's static variables.
  DEBUG ─ Collecting components from the template.
  DEBUG ─ Downloading any NPM components found in the template.
  DEBUG ─ Analyzing the template's components dependencies.
  DEBUG ─ Creating the template's components graph.
  DEBUG ─ Syncing template state.
  DEBUG ─ Executing the template's components graph.
  DEBUG ─ Preparing website Tencent COS bucket serverless-blog-1256773370.
  DEBUG ─ Starting API-Gateway deployment with name APIService in the ap-shanghai region
  DEBUG ─ Using last time deploy service id service-23ybmuq7
  DEBUG ─ Updating service with serviceId service-23ybmuq7.
  DEBUG ─ Bucket "serverless-blog-1256773370" in the "ap-shanghai" region alrea

  ………………

     -
        path:   /web/article/watched/update
        method: POST
        apiId:  api-gnvnrbyk
      -
        path:   /web/sentence/get
        method: POST
        apiId:  api-msvadsau
      -
        path:   /web/article/list/hot/get
        method: POST
        apiId:  api-kfkrjhim
      -
        path:   /web/tags/list/get
        method: POST
        apiId:  api-avydagem
      -
        path:   /admin
        method: ANY
        apiId:  api-4tnz5tc4

  176s › APIService › done
项目总结
传统博客已经有很多了,无论是基于 PHP 的 zblog 还是 wp 等开源项目,都可以帮助我们快速搭建一个博客系统。除了这些博客系统之外,还有很多静态博客系统。但是就目前而言,基于 Serverless 架构的博客系统还是比较少见的。
本文通过原生的 Serverless 项目开发与 Flask 框架的部署上 Serverless 实现了一个基于 Python 语言的博客系统。通过该博客系统,用户可以发布文章,自动撰写文章的关键词和摘要,还可以进行留言评论的管理。当然,这个博客系统仅作为工程实践使用,实际上还是有一些设计不合理的地方,但是我相信,随着时间的发展,Serverless 架构越来越成熟,基于 Serverless 的开源 Blog 项目或 CMS 项目也会越来越多,期待那一天的到来!
Serverless Framework 30 天试用计划
我们诚邀您来体验最便捷的 Serverless 开发和部署方式。在试用期内,相关联的产品及服务均提供免费资源和专业的技术支持,帮助您的业务快速、便捷地实现 Serverless!
详情可查阅:Serverless Framework 试用计划
One More Thing
3 秒你能做什么?喝一口水,看一封邮件,还是 —— 部署一个完整的 Serverless 应用?
复制链接至 PC 浏览器访问:https://serverless.cloud.tencent.com/deploy/express
3 秒极速部署,立即体验史上最快的 Serverless HTTP 实战开发!
传送门:
欢迎访问:Serverless 中文网,您可以在 最佳实践 里体验更多关于 Serverless 应用的开发!
推荐阅读:《Serverless 架构:从原理、设计到项目实战》