前言
    NS_CLASS_AVAILABLE_IOS(2_0) @interface UITableView : UIScrollView <NSCoding>
    @available(iOS 2.0, *)       public class UITableView : UIScrollView, NSCoding
1、tableView 的创建
-
Objective-C
遵守 UITableViewDelegate, UITableViewDataSource 协议
-
数据源 初始化
    // 声明数据源,必须声明为全局变量
    @property(nonatomic, retain)NSMutableArray *myDataArray;

    // 数据源数组初始化,定义一个可变数组做为表格的数据源
    myDataArray = [[NSMutableArray alloc] init];

    NSArray *array1 = @[@"UIWindow", @"UIApplication", @"UIView", @"UILabel",
                        @"UIProgressView", @"UIAlertView", @"UIActionSheet", @"UIPickerView"];
    NSArray *array2 = @[@"窗口", @"应用", @"视图", @"标签", @"进度条", @"警告框",
                        @"操作表", @"选择框", @"风火轮", @"图像视图", @"网页视图", @"滚动视图",
                        @"多行文本视图"];

    // 向数据源中添加数据
    [myDataArray addObject:array1];
    [myDataArray addObject:array2];
-
tableView 初始化
    // 声明表格视图对象,头标题和脚标题悬浮显示,默认类型
    UITableView *myTableView = [[UITableView alloc] initWithFrame:self.view.bounds];

    // 设置 tableView 的代理
    myTableView.delegate = self;
    myTableView.dataSource = self;

    // 将 tableView 添加到窗口中
    [self.view addSubview:myTableView];
-
协议方法
    // 设置分段数
    - (NSInteger)numberOfSectionsInTableView:(UITableView *)tableView {

        // 数据源数组为多维数组时,用数组计算
        return myDataArray.count;
    }

    // 设置行数
    - (NSInteger)tableView:(UITableView *)tableView numberOfRowsInSection:(NSInteger)section {

        // section 段,返回每段中有多少行
        return [[myDataArray objectAtIndex:section] count];
    }

    // 设置每一行显示的内容
    - (UITableViewCell *)tableView:(UITableView *)tableView cellForRowAtIndexPath:(NSIndexPath *)indexPath {

        // 创建标识词,随意设置,但不能和其它 tableView 的相同
        static NSString *indentifier = @"testIdentifier";

        // 根据标志词先从复用队列里查找
        UITableViewCell *cell = [tableView dequeueReusableCellWithIdentifier:indentifier];

        // 复用队列中没有时再创建
        if (cell == nil) {

            // 创建新的 cell,默认为主标题模式
            cell = [[UITableViewCell alloc] initWithStyle:UITableViewCellStyleDefault reuseIdentifier:indentifier];
        }

        // 设置每一行显示的文字内容
        cell.textLabel.text = [[myDataArray objectAtIndex:indexPath.section] objectAtIndex:indexPath.row];

        // indexPath.section 分段数,indexPath.row 行数,设置图片内容,图片在 Cell 的左端,图片大小自动压缩
        cell.imageView.image = [UIImage imageNamed:@"HQ_0003"];

        return cell;
    }
-
Swift
遵守 UITableViewDelegate, UITableViewDataSource 协议
-
数据源 初始化
    // 声明数据源,必须声明为全局变量
    var myDataArray:[[String]] = Array()

    let array1:[String] = ["UIWindow", "UIApplication", "UIView", "UILabel", "UIProgressView",
                          "UIAlertView", "UIActionSheet", "UIPickerView"]
    let array2:[String] = ["窗口", "应用", "视图", "标签", "进度条", "警告框", "操作表", "选择框",
                          "风火轮", "图像视图", "网页视图", "滚动视图", "多行文本视图", "工具条"]

    // 向数据源中添加数据
    myDataArray.append(array1)
    myDataArray.append(array2)
-
tableView 初始化
    // 声明表格视图对象,头标题和脚标题悬浮显示,默认类型
    let myTableView:UITableView = UITableView(frame: self.view.bounds)

    // 设置 tableView 的代理
    myTableView.delegate = self
    myTableView.dataSource = self

    // 将 tableView 添加到窗口中
    self.view.addSubview(myTableView)
-
协议方法
    // 设置分段数
    func numberOfSectionsInTableView(tableView: UITableView) -> Int {

        // 数据源数组为多维数组时,用数组计算
        return myDataArray.count
    }

    // 设置行数
    func tableView(tableView: UITableView, numberOfRowsInSection section: Int) -> Int {

        // section 段,返回每段中有多少行
        return myDataArray[section].count
    }

    // 设置每一行显示的内容
    func tableView(tableView: UITableView, cellForRowAtIndexPath indexPath: NSIndexPath) -> UITableViewCell {

        // 创建标识词,随意设置,但不能和其它 tableView 的相同
        let indentifier = "testIdentifier"

        // 根据标志词先从复用队列里查找
        var cell = tableView.dequeueReusableCellWithIdentifier(indentifier)

        // 复用队列中没有时再创建
        if cell == nil {

            // 创建新的 cell,默认为主标题模式
            cell = UITableViewCell(style: .Default, reuseIdentifier: indentifier)
        }

        // 设置每一行显示的文字内容
        cell!.textLabel?.text = myDataArray[indexPath.section][indexPath.row]

        // indexPath.section 分段数,indexPath.row 行数,设置图片内容,图片在 Cell 的左端,图片大小自动压缩
        cell!.imageView?.image = UIImage(named: "HQ_0003")

        return cell!
    }
2、tableView 的设置
-
Objective-C
-
设置数据源初始化方式
    // 将数组指向新的空间,可以不提前申请空间(不初始化)
    myDataArray = @[array1, array2];

    // 将数组里的所有数据替换成新的,必须提前申请空间
    myDataArray.array = @[array1, array2];
-
设置分段的头标题和脚标题
    // 设置分段的头标题和脚标题的类型
    /*
        UITableViewStylePlain,     // 简单模式,每个分段之间紧密连接,头脚标题悬浮显示,默认类型
        UITableViewStyleGrouped    // 分组模式,每个分段之间分开,头脚标题跟随移动,头标题英文自动大写
    */

        // 头标题和脚标题悬浮显示,默认类型
        UITableView *myTableView = [[UITableView alloc] init];

        UITableView *myTableView = [[UITableView alloc] initWithFrame:frame];

        // 带显示类型的设置
        UITableView *myTableView = [[UITableView alloc] initWithFrame:frame style:UITableViewStyleGrouped];

    // 设置分段的头标题高度,UITableViewDelegate 协议方法
    - (CGFloat)tableView:(UITableView *)tableView heightForHeaderInSection:(NSInteger)section {

        return 40;
    }

    // 设置分段的脚标题高度,UITableViewDelegate 协议方法
    - (CGFloat)tableView:(UITableView *)tableView heightForFooterInSection:(NSInteger)section {

        return 30;
    }

    // 设置分段的头标题内容,UITableViewDataSource 协议方法
    - (NSString *)tableView:(UITableView *)tableView titleForHeaderInSection:(NSInteger)section {

        if (0 == section) {
            return @"English Header";
        }
        else {
            return @"中文 Header";
        }
    }

    // 设置分段的脚标题内容,UITableViewDataSource 协议方法
    - (NSString *)tableView:(UITableView *)tableView titleForFooterInSection:(NSInteger)section {

        if (0 == section) {
            return @"English Footer";
        }
        else {
            return @"中文 Footer";
        }
    }

    // 分段头标题视图,UITableViewDelegate 协议方法,返回自定义的标题视图
    - (UIView *)tableView:(UITableView *)tableView viewForHeaderInSection:(NSInteger)section {

        if (!section) {
            label.text = @"English Header";
        }
        else{
            label.text = @"中文 Header";
        }

        return label;
    }

    // 分段脚标题视图,UITableViewDelegate 协议方法
    - (UIView *)tableView:(UITableView *)tableView viewForFooterInSection:(NSInteger)section {

        if (!section) {
            label.text = @"English Footer";
        }
        else{
            label.text = @"中文 Footer";
        }

        // 返回自定义的标题视图
        return label;
   }
-
设置表格的表头和表尾视图
    // 设置表格的表头视图
    /*
        只有视图的高度设置起作用
    */
    myTableView.tableHeaderView = myHeaderView;

    // 设置表格的表尾视图
    /*
        只有视图的高度设置起作用
    */
    myTableView.tableFooterView = myFooterView;
-
设置表格的背景
    // 设置表格的背景视图
    myTableView.backgroundView = myImageView;

    // 设置表格的背景颜色
    myTableView.backgroundColor = [UIColor blueColor];
-
设置表格的分割线
    // 设置表格的分割线颜色
    /*
        设置为 clearColor 时即可隐藏(不显示)所有分割线
    */
    myTableView.separatorColor = [UIColor redColor];

    // 设置表格的分割线类型
    /*
        UITableViewCellSeparatorStyleNone,         // 没有分割线
        UITableViewCellSeparatorStyleSingleLine,   // 单线型,默认

        // 嵌刻线型,This separator style is only supported for grouped style
        UITableViewCellSeparatorStyleSingleLineEtched
    */
    myTableView.separatorStyle = UITableViewCellSeparatorStyleSingleLine;

    // 设置表格的分割线边距
    /*
        上、左、下、右,只有左、右设置有效
        设置左边距时会使标题相应的右移
        左边距设置为 0 时,分割线不会紧靠左边框
    */
    myTableView.separatorInset = UIEdgeInsetsMake(0, 10, 0, 10);

    // 清除表格多余的分割线
    /*
        表格为 UITableViewStylePlain 类型时,若表格的内容没有占满屏幕时,没有设置内容的部分表格也会有分割线
        创建自定义的 view,将该 view 的背景颜色清空(默认为透明),并添加到表格的脚视图上
    */
    myTableView.tableFooterView = [[UIView alloc] init];

    // 设置表格分割线左边距为零
    [myTableView setSeparatorInset:UIEdgeInsetsZero];
    [myTableView setLayoutMargins:UIEdgeInsetsZero];

    - (void)tableView:(UITableView *)tableView willDisplayCell:(UITableViewCell *)cell forRowAtIndexPath:(NSIndexPath *)indexPath{
        // UITableViewDelegate 协议方法

        [cell setSeparatorInset:UIEdgeInsetsZero];
        [cell setLayoutMargins:UIEdgeInsetsZero];
    }

    // 自定义表格分割线
    /*
        系统分割线的左边无法紧靠表格左边框,隐藏系统分割线,自定义视图,添加到 Cell 的下边实现
        同时可以清除表格在 UITableViewStylePlain 类型时的多余分割线
    */

    myTableView.separatorStyle = UITableViewCellSeparatorStyleNone;

    if (cell == nil) {

        // 创建新的 cell
        cell = [[UITableViewCell alloc] initWithStyle:UITableViewCellStyleDefault reuseIdentifier:indentifier];

        // 添加自定义分割线视图
        CGRect frame = CGRectMake(0, cell.contentView.bounds.size.height, self.view.bounds.size.width, 1);
        UIView *mySeparatorView = [[UIView alloc] initWithFrame:frame];
        mySeparatorView.backgroundColor = [[UIColor lightGrayColor] colorWithAlphaComponent:0.5];
        [cell.contentView addSubview:mySeparatorView];
    }
-
设置表格的行高
    // 属性设置
    /*
        设置全部行的高度,默认为 44
    */
    myTableView.rowHeight = 60;

    // 协议方法设置
    /*
        可单独设置每一行的高度,默认为 44
    */
    - (CGFloat)tableView:(UITableView *)tableView heightForRowAtIndexPath:(NSIndexPath *)indexPath {

        return 60;
    }

    // 设置估计行高
    /*
        设置全部行的高度
    */
    self.tableView.estimatedRowHeight = 80;

    // 协议方法设置估计行高
    /*
        可单独设置每一行的估计行高
    */
    - (CGFloat)tableView:(UITableView *)tableView estimatedHeightForRowAtIndexPath:(NSIndexPath *)indexPath {

        return 80;
    }

    // 设置自动计算行高
    self.tableView.rowHeight = UITableViewAutomaticDimension;
-
设置表格的编辑开关状态
    // 打开表格的编辑模式
    /*
        default is NO. setting is not animated
    */
    myTableView.editing = YES;

    // 翻转表格的编辑模式
    myTableView.editing = !myTableView.editing;

    // 翻转表格的编辑模式
    [myTableView setEditing:!myTableView.editing animated:YES];
-
设置表格选择状态
    // 设置表格普通模式下是否允许单选
    /*
        default is YES. Controls whether rows can be selected when not in editing mode
    */
    myTableView.allowsSelection = YES;

    // 设置表格在编辑模式下是否允许单选
    /*
        default is NO. Controls whether rows can be selected when in editing mode
    */
    myTableView.allowsSelectionDuringEditing = YES;

    // 设置表格普通模式下是否允许多选
    /*
        default is NO. Controls whether multiple rows can be selected simultaneously
    */
    myTableView.allowsMultipleSelection = YES;

    // 设置表格在编辑模式下是否允许多选
    /*
        default is NO. Controls whether multiple rows can be selected simultaneously in editing mode
    */
    myTableView.allowsMultipleSelectionDuringEditing = YES;

    // 取消表格选择
    /*
        在表格选中协议方法中设置,表格点击变色后恢复原来颜色,设置后无法实现表格多选
    */
    [tableView deselectRowAtIndexPath:indexPath animated:YES];
-
重载表格视图
    // 重载表格视图
    /*
        重走所有的表格视图方法,刷新所有的表格
    */
    [tableView reloadData];

    // 重载某一分段
    [tableView reloadSections:[NSIndexSet indexSetWithIndex:indexPath.section]
             withRowAnimation:UITableViewRowAnimationAutomatic];
    // 重载某一个行
    [tableView reloadRowsAtIndexPaths:[NSArray arrayWithObject:indexPath]
                     withRowAnimation:UITableViewRowAnimationAutomatic];

    // 删除一个 cell
    /*
        只刷新删除的 cell
    */
    [tableView deleteRowsAtIndexPaths:[NSArray arrayWithObject:indexPath]
                     withRowAnimation:UITableViewRowAnimationAutomatic];

    // 插入一个 cell
    /*
        只刷新插入的 cell
    */
    [tableView insertRowsAtIndexPaths:[NSArray arrayWithObject:indexPath]
                     withRowAnimation:UITableViewRowAnimationAutomatic];
-
Swift
-
设置分段的头标题和脚标题
    // 设置分段的头标题和脚标题的类型
    /*
        case Plain       // 简单模式,每个分段之间紧密连接,头脚标题悬浮显示,默认类型
        case Grouped     // 分组模式,每个分段之间分开,头脚标题跟随移动,头标题英文自动大写
    */

        // 头标题和脚标题悬浮显示,默认类型
        let myTableView:UITableView = UITableView()

        let myTableView:UITableView = UITableView(frame: frame)

        // 带显示类型的设置
        let myTableView:UITableView = UITableView(frame: frame, style: .Grouped)

    // 设置分段的头标题高度,UITableViewDelegate 协议方法
    func tableView(tableView: UITableView, heightForHeaderInSection section: Int) -> CGFloat {

        return  40
    }

    // 设置分段的脚标题高度,UITableViewDelegate 协议方法
    func tableView(tableView: UITableView, heightForFooterInSection section: Int) -> CGFloat {

        return 30
    }

    // 设置分段的头标题内容,UITableViewDataSource 协议方法
    func tableView(tableView: UITableView, titleForHeaderInSection section: Int) -> String? {

        if 0 == section {
            return "English Header"
        }
        else {
            return "中文 Header"
        }
    }

    // 设置分段的脚标题内容,UITableViewDataSource 协议方法
    func tableView(tableView: UITableView, titleForFooterInSection section: Int) -> String? {

        if 0 == section {
            return "English Footer"
        }
        else {
            return "中文 Footer"
        }
    }

    // 分段头标题视图,UITableViewDelegate 协议方法,返回自定义的标题视图
    func tableView(tableView: UITableView, viewForHeaderInSection section: Int) -> UIView? {

        if 0 == section {
            label.text = "English Header"
        }
        else {
            label.text = "中文 Header"
        }

        return label
    }

    // 分段脚标题视图,UITableViewDelegate 协议方法,返回自定义的标题视图
    func tableView(tableView: UITableView, viewForFooterInSection section: Int) -> UIView? {

        if 0 == section {
            label.text = "English Footer"
        }
        else {
            label.text = "中文 Footer"
        }

        return label
    }
-
设置表格的表头和表尾视图
    // 设置表格的表头视图
    /*
        只有视图的高度设置起作用
    */
    myTableView.tableHeaderView = myHeaderView

    // 设置表格的表尾视图
    /*
        只有视图的高度设置起作用
    */
    myTableView.tableFooterView = myFooterView
-
设置表格的背景
    // 设置表格的背景视图
    myTableView.backgroundView = myImageView

    // 设置表格的背景颜色
    myTableView.backgroundColor = UIColor.blueColor()
-
设置表格的分割线
    // 设置表格的分割线颜色
    /*
        设置为 clearColor 时即可隐藏(不显示)所有分割线
    */
    myTableView.separatorColor = UIColor.redColor()

    // 设置表格分割线的类型
    /*
        case None                // 没有分割线
        case SingleLine          // 单线型,默认
        case SingleLineEtched    // 嵌刻线型,This separator style is only supported for grouped style
    */
    myTableView.separatorStyle = .SingleLine

    // 设置表格的分割线边距
    /*
        上、左、下、右,只有左、右设置有效
        设置左边距时会使标题相应的右移
        左边距设置为 0 时,分割线不会紧靠左边框
    */
    myTableView.separatorInset = UIEdgeInsetsMake(0, 10, 0, 10)

    // 清除表格多余的分割线
    /*
        表格为 Plain 类型时,若表格的内容没有占满屏幕时,没有设置内容的部分表格也会有分割线
        创建自定义的 view,将该 view 的背景颜色清空(默认为透明),并添加到表格的脚视图上
    */
    myTableView.tableFooterView = UIView()

    // 自定义表格分割线
    /*
        系统分割线的左边无法紧靠表格左边框,隐藏系统分割线,自定义视图,添加到 Cell 的下边实现
        同时可以清除表格在 Plain 类型时的多余分割线
    */

    myTableView.separatorStyle = .None

    if cell == nil {

        // 创建新的 cell
        cell = UITableViewCell(style: .Default, reuseIdentifier: indentifier)

        // 添加自定义分割线视图
        let frame:CGRect = CGRectMake(0, cell!.contentView.bounds.size.height, self.view.bounds.size.width, 1)
        let mySeparatorView:UIView = UIView(frame: frame)
        mySeparatorView.backgroundColor = UIColor.lightGrayColor().colorWithAlphaComponent(0.5)
        cell!.contentView.addSubview(mySeparatorView)
    }
-
设置表格的行高
    // 属性设置
    /*
        设置全部行的高度,默认为 44
    */
    myTableView.rowHeight = 60

    // 协议方法设置
    /*
        可单独设置每一行的高度,默认为 44
    */
    func tableView(tableView: UITableView, heightForRowAtIndexPath indexPath: NSIndexPath) -> CGFloat {

        return 60
    }

    // 设置估计行高
    /*
        设置全部行的高度
    */
    self.tableView.estimatedRowHeight = 80

    // 协议方法设置估计行高
    /*
        可单独设置每一行的估计行高
    */
    func tableView(tableView: UITableView, estimatedHeightForRowAtIndexPath indexPath: NSIndexPath) -> CGFloat {

        return 80
    }

    // 设置自动计算行高
    self.tableView.rowHeight = UITableViewAutomaticDimension
-
设置表格的编辑开关状态
    // 打开表格的编辑模式
    myTableView.editing = true

    // 翻转表格的编辑模式,直接出现
    myTableView.editing = !myTableView.editing

    // 翻转表格的编辑模式,带动画效果
    myTableView.setEditing(!myTableView.editing, animated: true)
-
设置表格选择状态
    // 设置表格普通模式下是否允许单选
    /*
        default is YES. Controls whether rows can be selected when not in editing mode
    */
    myTableView.allowsSelection = false

    // 设置表格在编辑模式下是否允许单选
    /*
        default is NO. Controls whether rows can be selected when in editing mode
    */
    myTableView.allowsSelectionDuringEditing = true

    // 设置表格普通模式下是否允许多选
    /*
        default is NO. Controls whether multiple rows can be selected simultaneously
    */
    myTableView.allowsMultipleSelection = true

    // 设置表格在编辑模式下是否允许多选
    /*
        default is NO. Controls whether multiple rows can be selected simultaneously in editing mode
    */
    myTableView.allowsMultipleSelectionDuringEditing = true

    // 取消表格选择
    /*
        在表格选中协议方法中设置,表格点击变色后恢复原来颜色,设置后无法实现表格多选
    */
    tableView.deselectRowAtIndexPath(indexPath, animated: true)
-
重载表格视图
    // 重载表格视图
    /*
        重走所有的表格视图方法,刷新所有的表格
    */
    tableView.reloadData()

    // 重载某一分段
    tableView.reloadSections(NSIndexSet(index: indexPath.section), withRowAnimation: .Automatic)

    // 重载某一个行
    tableView.reloadRowsAtIndexPaths(Array(arrayLiteral: indexPath), withRowAnimation: .Automatic)

    // 删除一个 cell
    /*
        只刷新删除的 cell
    */
    tableView.deleteRowsAtIndexPaths(NSArray(object: indexPath) as! [NSIndexPath],
                    withRowAnimation: .Automatic)

    // 插入一个 cell
    /*
        只刷新插入的 cell
    */
    tableView.insertRowsAtIndexPaths(NSArray(object: indexPath) as! [NSIndexPath],
                    withRowAnimation: .Automatic)
3、Cell 的创建(系统类型 Cell)
3.1 创建 Cell
可以设置创建的 Cell 的类型。
-
Objective-C
    // 设置每一行显示的内容
    - (UITableViewCell *)tableView:(UITableView *)tableView cellForRowAtIndexPath:(NSIndexPath *)indexPath {

        // 创建标识词,标识词随意设置,但不能和其它 tableView 的相同
        static NSString *resumeID = @"testIdentifier";

        // 根据标识词先从复用队列里查找
        UITableViewCell *cell = [tableView dequeueReusableCellWithIdentifier:resumeID];

        // 复用队列中没有时再创建
        if (cell == nil) {

           // 创建新的 cell,默认为主标题模式
           cell = [[UITableViewCell alloc] initWithStyle: UITableViewCellStyleDefault reuseIdentifier:resumeID];
        }

        // 设置每一行显示的文字内容,覆盖数据
        cell.textLabel.text = [[myDataArray objectAtIndex:indexPath.section] objectAtIndex:indexPath.row];
        cell.imageView.image = [UIImage imageNamed:@"HQ_0003"];

        return cell;
    }
-
Swift
    // 设置每一行显示的内容
    func tableView(tableView: UITableView, cellForRowAtIndexPath indexPath: NSIndexPath) -> UITableViewCell {

        // 创建标识词,标识词随意设置,但不能和其它 tableView 的相同
        let resumeID = "testIdentifier"

        // 根据标识词先从复用队列里查找
        var cell = tableView.dequeueReusableCellWithIdentifier(resumeID)

        // 复用队列中没有时再创建
        if cell == nil {

            // 创建新的 cell,默认为主标题模式
            cell = UITableViewCell(style: .Default, reuseIdentifier: resumeID)
        }

        // 设置每一行显示的文字内容,覆盖数据
        cell!.textLabel?.text = myDataArray[indexPath.section][indexPath.row]
        cell!.imageView?.image = UIImage(named: "HQ_0003")

        return cell!
    }
3.2 注册 Cell
在 tableView 创建时,从 iOS7 开始多了一种创建 cell 的方式(注册),让 tableView 注册一种 cell,需要设置复用标志。
创建的 Cell 为 UITableViewCellStyleDefault 默认类型,无法修改。
-
Objective-C
    // 定义重用标识,定义为全局变量
    NSString *resumeID = @"testIdentifier";

    // 注册 cell
    - (void)viewDidLoad {
        [super viewDidLoad];

        // 注册某个标识对应的 cell 类型
        [myTableView registerClass:[UITableViewCell class] forCellReuseIdentifier:resumeID];
    }

    // 设置每一行显示的内容
    - (UITableViewCell *)tableView:(UITableView *)tableView cellForRowAtIndexPath:(NSIndexPath *)indexPath {

        // 根据标识词先从复用队列里查找,复用队列中没有时根据注册的 cell 自动创建
        UITableViewCell *cell = [tableView dequeueReusableCellWithIdentifier:resumeID forIndexPath:indexPath];

        // 设置每一行显示的文字内容,覆盖数据
        cell.textLabel.text = [[myDataArray objectAtIndex:indexPath.section] objectAtIndex:indexPath.row];
        cell.imageView.image = [UIImage imageNamed:@"HQ_0003"];

        return cell;
    }
-
Swift
    // 定义重用标识,定义为全局变量
    let resumeID = "testIdentifier"

    // 注册 cell
    override func viewDidLoad() {
        super.viewDidLoad()

        // 注册某个标识对应的 cell 类型
        myTableView.registerClass(UITableViewCell.self, forCellReuseIdentifier: resumeID)
    }

    // 设置每一行显示的内容
    func tableView(tableView: UITableView, cellForRowAtIndexPath indexPath: NSIndexPath) -> UITableViewCell {

        // 根据标识词先从复用队列里查找,复用队列中没有时根据注册的 cell 自动创建
        var cell = tableView.dequeueReusableCellWithIdentifier(resumeID, forIndexPath: indexPath)

        // 设置每一行显示的文字内容,覆盖数据
        cell!.textLabel?.text = myDataArray[indexPath.section][indexPath.row]
        cell!.imageView?.image = UIImage(named: "HQ_0003")

        return cell!
    }
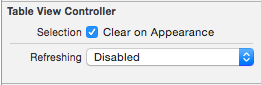
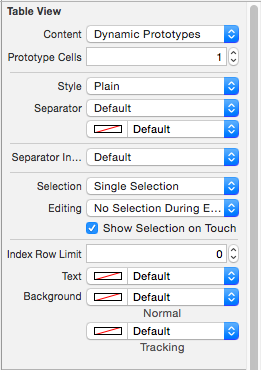
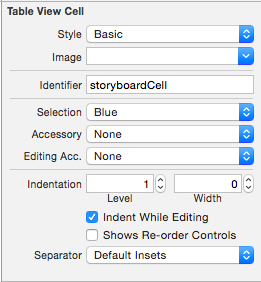
3.3 StoryBoard 加载 Cell
4、Cell 的设置
UITableView 的每一行都是一个 UITableViewCell,通过 dataSource的tableView:cellForRowAtIndexPath: 方法来初始化每一行。
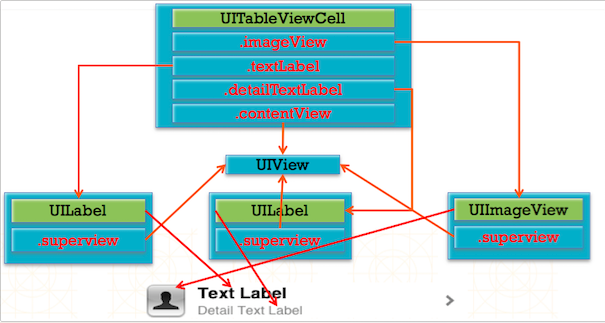
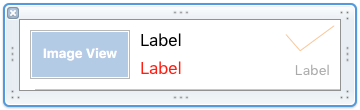
UITableViewCell 内部有个默认的子视图 contentView,contentView 是 UITableViewCell 所显示内容的父视图,可显示一些辅助指示视图。辅助指示视图的作用是显示一个表示动作的图标,可以通过设置 UITableViewCell 的 accessoryType 来显示,默认是 UITableViewCellAccessoryNone (不显示辅助指示视图)。
- contentView 下默认有 3 个子视图
- 其中 2 个是 UILabel (通过 UITableViewCell 的 textLabel 和 detailTextLabel 属性访问)。
- 第 3 个是 UIImageView (通过 UITableViewCell 的 imageView 属性访问)。
-
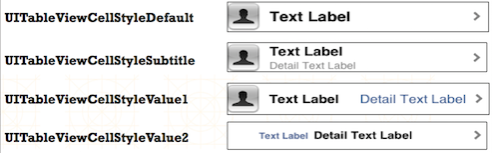
UITableViewCell 还有一个 UITableViewCellStyle 属性,用于决定使用 contentView 的哪些子视图,以及这些子视图在 contentView 中的位置。
![TableView11]()
-
UITableViewCell 结构
![TableView12]()
-
Objective-C
-
设置 Cell 的类型
    /*
        UITableViewCellStyleDefault,  // 可选图片 + 主标题模式,默认
        UITableViewCellStyleValue1,   // 可选图片 + 左右主副标题模式,两端对齐
        UITableViewCellStyleValue2,   // 左右主副标题模式,中间对齐
        UITableViewCellStyleSubtitle  // 可选图片 + 上下主副标题模式
    */

    // 主标题模式,默认类型
    cell = [[UITableViewCell alloc] init];

    // 设置类型
    cell = [[UITableViewCell alloc] initWithStyle:UITableViewCellStyleSubtitle reuseIdentifier:@"testIdentifier"];
-
设置 Cell 的显示内容
// 主标题模式
// 设置主标题内容
cell.textLabel.text = [[myDataArray objectAtIndex:indexPath.section] objectAtIndex:indexPath.row];
// 设置图片内容,图片在 Cell 的左端,图片大小自动压缩
cell.imageView.image = [UIImage imageNamed:@"HQ_0003"];
// 主副标题模式
// 设置主标题内容
cell.textLabel.text = [[myDataArray objectAtIndex:indexPath.section] objectAtIndex:indexPath.row];
// 设置副标题内容
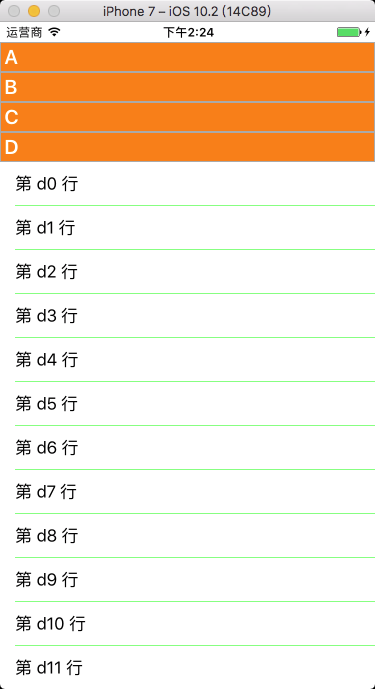
cell.detailTextLabel.text = [NSString stringWithFormat:@"第 %li 行", indexPath.row];
// 设置图片内容,图片在 Cell 的左端,图片大小自动压缩
cell.imageView.image = [UIImage imageNamed:@"HQ_0003"];
-
往 cell 上添加自定义 view
- 不是直接添加在 cell 上,cell 给我们提供了一个专门用来添加子 view 的东西,当 cell 被复用的时候,不允许创建对象,如果想给系统的 cell 上添加一些子 view,需要在创建 cell 的时候添加,然后在复用的时候修改子 view 显示的内容。
    // 添加 cell 自定义 view 视图
    UILabel *myCellView = [[UILabel alloc] initWithFrame:CGRectMake(0, 0, 300, 44)];
    myCellView.tag = 100;

    // 在创建新的 cell 后添加
    [cell.contentView addSubview:myCellView];
    // 设置 cell 自定义 view 显示内容,在 cell 复用的时候设置

    UILabel *myCellView = (id)[self.view viewWithTag:100];
    myCellView.text = [NSString stringWithFormat:@"自定义 Cell View %@",
                     [[myDataArray objectAtIndex:indexPath.section]
                                   objectAtIndex:indexPath.row]];
-
设置 Cell 的背景视图
    // Cell 的背景视图设置
    /*
        设置自定义视图为 Cell 背景视图
        图片大小自动压缩填充
    */
    cell.backgroundView = myBackgroundView;


    // Cell 选中时的背景视图设置
    cell.selectedBackgroundView = myBackgroundView;
-
设置 Cell 的颜色
    // Cell 背景颜色的设置
    cell.backgroundColor = [UIColor yellowColor];

    // 设置 cell 被点击时的颜色
    /*
        UITableViewCellSelectionStyleNone,     // 无色,表格点击时无颜色变化
        UITableViewCellSelectionStyleBlue,     // 灰色
        UITableViewCellSelectionStyleGray,     // 灰色
        UITableViewCellSelectionStyleDefault   // 灰色,默认
    */
    cell.selectionStyle = UITableViewCellSelectionStyleDefault;

    // 取消表格选择变色
    /*
        在表格选中协议方法中设置,表格点击变色后恢复原来颜色,设置后无法实现表格多选
    */
    [tableView deselectRowAtIndexPath:indexPath animated:YES];
-
设置 Cell 的附属控件
    // Cell 附属控件类型的设置
    /*
        如果附属控件里有 button ,这个 button 会独立出来

        UITableViewCellAccessoryNone,                    // 无附属控件,默认
        UITableViewCellAccessoryDisclosureIndicator,     // 箭头,不能点击
        UITableViewCellAccessoryDetailDisclosureButton,  // 详情按钮和箭头,可以点击
        UITableViewCellAccessoryCheckmark,               // 对号,不能点击
        UITableViewCellAccessoryDetailButton             // 详情按钮,可以点击
    */
    cell.accessoryType = UITableViewCellAccessoryCheckmark;

    // Cell 附属控件视图的设置
    /*
        设置自定义视图为 Cell 的附属控件,需设置 view 的大小
    */
    cell.accessoryView = myAccessoryView;
-
获取 cell
    // 获取指定行的 cell
    UITableViewCell *cell = [tableView cellForRowAtIndexPath:[NSIndexPath indexPathForRow:3 inSection:0]];

    // 获取所有被选中的行
    NSArray *indexPaths = [tableView indexPathsForSelectedRows];
-
Swift
-
设置 Cell 的类型
    /*
        case Default   // 可选图片 + 主标题模式
        case Value1    // 可选图片 + 左右主副标题模式,两端对齐
        case Value2    // 左右主副标题模式,中间对齐
        case Subtitle  // 可选图片 + 上下主副标题模式
    */

    // 主标题模式,默认类型
    cell = UITableViewCell()

    // 设置类型
    cell = UITableViewCell(style: .Subtitle, reuseIdentifier: "testIdentifier")
-
设置 Cell 的显示内容
    // 主标题模式

        // 设置主标题内容
        cell!.textLabel?.text = myDataArray[indexPath.section][indexPath.row]

        // 设置图片内容,图片在 Cell 的左端,图片大小自动压缩
        cell!.imageView?.image = UIImage(named: "HQ_0003")

    // 主副标题模式

        // 设置主标题内容
        cell!.textLabel?.text = myDataArray[indexPath.section][indexPath.row]

        // 设置副标题内容
        cell!.detailTextLabel?.text = "第 \(indexPath.row) 行"

        // 设置图片内容,图片在 Cell 的左端,图片大小自动压缩
        cell!.imageView?.image = UIImage(named: "HQ_0003")
-
往 cell 上添加自定义 view
- 不是直接添加在 cell 上,cell 给我们提供了一个专门用来添加子 view 的东西,当 cell 被复用的时候,不允许创建对象,如果想给系统的 cell 上添加一些子 view,需要在创建 cell 的时候添加,然后在复用的时候修改子 view 显示的内容。
    // 添加 cell 自定义 view 视图
    let myCellView:UILabel = UILabel(frame: CGRectMake(0, 0, 300, 44))
    myCellView.tag = 100

    // 在创建新的 cell 后添加
    cell!.contentView.addSubview(myCellView)

    // 设置 cell 自定义 view 显示内容,在 cell 复用的时候设置

    if (self.view.viewWithTag(100) != nil) {

        let myCellView = self.view.viewWithTag(100) as! UILabel
        myCellView.text = String("自定义 Cell View \(myDataArray[indexPath.section][indexPath.row])")
    }
-
设置 Cell 的背景视图
    // Cell 的背景视图设置
    /*
        设置自定义视图为 Cell 背景视图
        图片大小自动压缩填充
    */
    cell!.backgroundView = myBackgroundView


    // Cell 选中时的背景视图设置
    cell!.selectedBackgroundView = myBackgroundView
-
设置 Cell 的颜色
    // Cell 背景颜色的设置
    cell!.backgroundColor = UIColor.yellowColor()

    // 设置 cell 被点击时的颜色
    /*
        case None     // 无色,表格点击时无颜色变化
        case Blue     // 灰色
        case Gray     // 灰色
        case Default  // 灰色,默认
    */
    cell!.selectionStyle = UITableViewCellSelectionStyle.Default

    // 取消表格选择变色
    /*
        在表格选中协议方法中设置,表格点击变色后恢复原来颜色,设置后无法实现表格多选
    */
    tableView.deselectRowAtIndexPath(indexPath, animated: true)
-
设置 Cell 的附属控件
    // Cell 附属控件类型的设置
    /*
        如果附属控件里有 button ,这个 button 会独立出来

        case None                      // 无附属控件,默认
        case DisclosureIndicator       // 箭头,不能点击
        case DetailDisclosureButton    // 详情按钮和箭头,可以点击
        case Checkmark                 // 对号,不能点击
        case DetailButton              // 详情按钮,可以点击
    */
    cell!.accessoryType = UITableViewCellAccessoryType.DetailButton

    // Cell 附属控件视图的设置
    /*
        设置自定义视图为 Cell 的附属控件,需设置 view 的大小
    */
    cell!.accessoryView = myAccessoryView
-
获取 cell
    // 获取指定行的 cell
    let cell:UITableViewCell = tableView.cellForRowAtIndexPath(NSIndexPath(forItem: 3, inSection: 0))!

    // 获取所有被选中的行
    let indexPaths:[NSIndexPath] = tableView.indexPathsForVisibleRows!
5、自定义数据模型的创建与引用
-
Objective-C
-
BookModel.h
    @interface BookModel : NSObject

    // 根据需要使用的数据创建数据模型属性变量

    @property(nonatomic, copy)NSString *title;
    @property(nonatomic, copy)NSString *detail;
    @property(nonatomic, copy)NSString *icon;
    @property(nonatomic, copy)NSString *price;

    + (instancetype)bookModelWithDict:(NSDictionary *)dict;

    @end
-
BookModel.m
    + (instancetype)bookModelWithDict:(NSDictionary *)dict {

        BookModel *model = [[self alloc] init];

        // KVC - Key Value Coding
        [model setValuesForKeysWithDictionary:dict];

        return model;
    }
-
ViewController.m
    // 向数据源中添加数据

        // 定义数据源
        @property(nonatomic, retain)NSArray *myDataArray;

        // 懒加载
        - (NSArray *)myDataArray {
            if (_myDataArray == nil) {

                // 加载 plist 中的字典数组
                NSString *filePath = [[NSBundle mainBundle] pathForResource:@"bookData" ofType:@"plist"];
                NSArray *bookDataArray = [NSArray arrayWithContentsOfFile:filePath];

                // 字典数组 -> 模型数组
                NSMutableArray *dataArrayM = [NSMutableArray arrayWithCapacity:bookDataArray.count];
                for (NSDictionary *bookInfoDic in bookDataArray) {
                    BookModel *bookModel = [BookModel bookModelWithDict:bookInfoDic];
                    [dataArrayM addObject:bookModel];
                }

                // 将从文件中取出的数据添加到数据源数组中
                _myDataArray = [dataArrayM copy];
            }
            return _myDataArray;
        }

    // 从数据源中取出数据

        // UITableViewDataSource 协议方法
        - (UITableViewCell *)tableView:(UITableView *)tableView cellForRowAtIndexPath:(NSIndexPath *)indexPath {

            // 从数据源数组中取出数据
            BookModel *bookModel = [self.myDataArray objectAtIndex:indexPath.row];

            // 配置自定义 Cell 子视图上显示的内容
            cell.book = bookModel;
        }
-
Swift
-
BookModel.swift
    class BookModel: NSObject {

        // 根据需要使用的数据创建数据模型属性变量

        var title:String?
        var detail:String?
        var icon:String?
        var price:String?

        class func bookModelWithDict(dict:[String : AnyObject]) -> AnyObject {

            let model = BookModel()

            // KVC - Key Value Coding
            model.setValuesForKeysWithDictionary(dict)

            return model
        }
    }
-
ViewController.swift
    // 向数据源中添加数据

        // 定义数据源,懒加载
        lazy var myDataArray:[BookModel] = {

            // 加载 plist 中的字典数组
            let filePath:String = NSBundle.mainBundle().pathForResource("bookData", ofType: "plist")!
            let bookDataArray:NSArray = NSArray(contentsOfFile: filePath)!

            // 字典数组 -> 模型数组
            var dataArrayM:NSMutableArray = NSMutableArray(capacity: bookDataArray.count)
            for bookInfoDic in bookDataArray {
                let bookModel:BookModel = BookModel.bookModelWithDict(bookInfoDic as! NSDictionary)
                dataArrayM.addObject(bookModel)
            }

            // 将从文件中取出的数据添加到数据源数组中
            return dataArrayM.copy() as! [BookModel]
        }()

    // 从数据源中取出数据

        // UITableViewDataSource 协议方法
        func tableView(tableView: UITableView, cellForRowAtIndexPath indexPath: NSIndexPath) -> UITableViewCell {

            // 从数据源数组中取出数据
            let bookModel:BookModel = self.myDataArray[indexPath.row]

            // 配置自定义 Cell 子视图上显示的内容
            cell!.configWithModel(bookModel)
        }
6、自定义等高 Cell
6.1 StoryBoard 自定义 cell
6.2 xib 自定义 cell
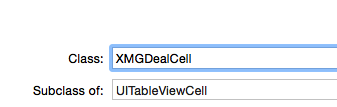
- 创建一个继承自 UITableViewCell 的子类,比如 BookCell2。
- 创建一个 xib 文件(文件名建议跟 cell 的类名一样),比如 BookCell2.xib。
- 拖拽一个 UITableViewCell 出来。
- 修改 cell 的 class 为 BookCell2。
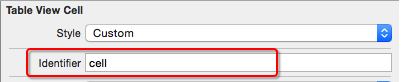
- 设置 cell 的重用标识。
- 往 cell 中添加需要用到的子控件。
- 在 BookCell2 中
- 将 xib 中的子控件连线到类扩展中。
- 需要提供一个模型属性,重写模型的 set 方法,在这个方法中设置模型数据到子控件上。
- 也可以将创建获得 cell 的代码封装起来(比如 cellWithTableView: 方法)。
- 在控制器中
- 手动加载 xib 文件,或者利用 registerNib... 方法注册 xib 文件。
- 利用重用标识找到 cell。
- 给 cell 传递模型数据。
6.2.1 xib 创建 cell
6.2.2 xib 注册 cell
6.3 代码自定义 Cell
6.3.1 代码创建 cell - frame
-
Objective-C
-
BookCell1.h
@class BookModel;
@interface BookCell1 : UITableViewCell
// 定义 Cell 的数据模型
@property (nonatomic, retain)BookModel *book;
@end
-
BookCell1.m
#import "BookCell1.h"
#import "BookModel.h"
@interface BookCell1()
// 创建自定义 Cell 视图包含的内容
@property(nonatomic, retain)UIImageView *iconView;
@property(nonatomic, retain)UILabel *titleLabel;
@property(nonatomic, retain)UILabel *detailLabel;
@property(nonatomic, retain)UILabel *priceLabel;
@end
@implementation BookCell1
// 重写初 Cell 始化方法,创建自定义 Cell
- (instancetype)initWithStyle:(UITableViewCellStyle)style reuseIdentifier:(NSString *)reuseIdentifier {
if (self = [super initWithStyle:style reuseIdentifier:reuseIdentifier]) {
// 创建子视图
// 创建 iconView 视图,并添加到自定义 Cell 上
self.iconView = [[UIImageView alloc] init];
self.iconView.layer.borderColor = [[UIColor greenColor] CGColor];
self.iconView.layer.borderWidth = 2;
[self.contentView addSubview:self.iconView];
// 创建 titleLabel 视图
self.titleLabel = [[UILabel alloc] init];
self.titleLabel.font = [UIFont boldSystemFontOfSize:14];
self.titleLabel.textColor = [UIColor redColor];
[self.contentView addSubview:self.titleLabel];
// 创建 detailLabel 视图
self.detailLabel = [[UILabel alloc] init];
self.detailLabel.font = [UIFont systemFontOfSize:12];
[self.contentView addSubview:self.detailLabel];
// 创建 priceLabel 视图
self.priceLabel = [[UILabel alloc] init];
self.priceLabel.font = [UIFont systemFontOfSize:12];
[self.contentView addSubview:self.priceLabel];
}
return self;
}
// 布局子视图
- (void)layoutSubviews {
[super layoutSubviews];
// 布局子视图
self.iconView.frame = CGRectMake(10, 10, 60, 60);
self.titleLabel.frame = CGRectMake(90, 5, 200, 25);
self.detailLabel.frame = CGRectMake(90, 30, 200, 25);
self.priceLabel.frame = CGRectMake(90, 55, 200, 25);
}
// 设置显示的数据
- (void)setBook:(BookModel *)book {
_book = book;
// 设置数据,设置 cell 视图上显示的内容 内容
self.iconView.image = [UIImage imageNamed:book.icon];
self.titleLabel.text = book.title;
self.detailLabel.text = book.detail;
self.priceLabel.text = book.price;
}
@end
-
ViewController.m
// 使用自定义 Cell 创建,UITableViewDataSource 协议方法
- (UITableViewCell *)tableView:(UITableView *)tableView cellForRowAtIndexPath:(NSIndexPath *)indexPath {
// 使用自定义的 Cell 定义
BookCell1 *cell = [tableView dequeueReusableCellWithIdentifier:@"testIdentifier"];
if (cell == nil) {
// 使用自定义的 Cell 创建
cell = [[BookCell1 alloc] initWithStyle:UITableViewCellStyleDefault reuseIdentifier:@"testIdentifier"];
}
BookModel *bookModel = [self.myDataArray objectAtIndex:indexPath.row];
cell.book = bookModel;
return cell;
}
-
Swift
-
BookCell1.swift
class BookCell1: UITableViewCell {
// 创建自定义 Cell 视图包含的内容
var iconView:UIImageView?
var titleLabel:UILabel?
var detailLabel:UILabel?
var priceLabel:UILabel?
// 重写初 Cell 始化方法,创建自定义 Cell
override init(style: UITableViewCellStyle, reuseIdentifier: String?) {
super.init(style: style, reuseIdentifier: reuseIdentifier)
// 创建子视图
// 创建 _iconView 视图,并添加到自定义 Cell 上
iconView = UIImageView()
iconView!.layer.borderColor = UIColor.greenColor().CGColor
iconView!.layer.borderWidth = 2
self.contentView.addSubview(iconView!)
// 创建 _titleLabel 视图
titleLabel = UILabel()
titleLabel!.font = UIFont.boldSystemFontOfSize(14)
titleLabel!.textColor = UIColor.redColor()
self.contentView.addSubview(titleLabel!)
// 创建 _detailLabel 视图
detailLabel = UILabel()
detailLabel!.font = UIFont.systemFontOfSize(12)
self.contentView.addSubview(detailLabel!)
// 创建 _priceLabel 视图
priceLabel = UILabel()
priceLabel!.font = UIFont.systemFontOfSize(12)
self.contentView.addSubview(priceLabel!)
}
// 布局子视图
override func layoutSubviews() {
super.layoutSubviews()
// 布局子视图
iconView?.frame = CGRectMake(10, 10, 60, 60)
titleLabel?.frame = CGRectMake(90, 5, 200, 25)
detailLabel?.frame = CGRectMake(90, 30, 200, 25)
priceLabel?.frame = CGRectMake(90, 55, 200, 25)
}
// 设置显示的数据
func configWithModel(bookModel:BookModel){
// 设置数据,设置 cell 视图上显示的内容 内容
iconView?.image = UIImage(named: bookModel.icon!)
titleLabel?.text = bookModel.title
detailLabel?.text = bookModel.detail
priceLabel?.text = bookModel.price
}
required init?(coder aDecoder: NSCoder) {
fatalError("init(coder:) has not been implemented")
}
}
-
ViewController.swift
// 使用自定义 Cell 创建,UITableViewDataSource 协议方法
func tableView(tableView: UITableView, cellForRowAtIndexPath indexPath: NSIndexPath) -> UITableViewCell {
// 使用自定义的 Cell 定义
var cell:BookCell1? = tableView.dequeueReusableCellWithIdentifier("testIdentifier") as? BookCell1
if cell == nil {
// 使用自定义的 Cell 创建
cell = BookCell1(style: UITableViewCellStyle.Default, reuseIdentifier: "testIdentifier")
}
let bookModel:BookModel = self.myDataArray[indexPath.row]
cell!.configWithModel(bookModel)
return cell!
}
6.3.2 代码注册 cell - frame
6.3.3 代码创建 cell - autolayout
7、自定义非等高 Cell
7.1 StoryBoard / Xib 自定义 cell
7.2 代码自定义 cell
7.2.1 代码自定义(frame)
- 新建一个继承自 UITableViewCell 的类。
- 重写 initWithStyle:reuseIdentifier: 方法。
- 添加所有需要显示的子控件(不需要设置子控件的数据和 frame, 子控件要添加到 contentView 中)。
- 进行子控件一次性的属性设置(有些属性只需要设置一次, 比如字体\固定的图片)。
- 提供 2 个模型。
- 数据模型: 存放文字数据\图片数据。
- frame 模型: 存放数据模型\所有子控件的 frame\cell 的高度。
- cell 拥有一个 frame 模型(不要直接拥有数据模型)。
- 重写 cell frame 模型属性的 setter 方法: 在这个方法中设置子控件的显示数据和 frame。
- frame 模型数据的初始化已经采取懒加载的方式(每一个 cell 对应的 frame 模型数据只加载一次)。
7.2.2 代码自定义(Autolayout)
7.3 其它设置方式
7.3.1 计算方式
-
Objective-C
-
BookModel.h
@property(nonatomic, copy)NSString *title;
@property(nonatomic, copy)NSString *detail;
@property(nonatomic, copy)NSString *icon;
@property(nonatomic, copy)NSString *price;
-
BookCell.h
@property(nonatomic, retain)UILabel *titleLabel;
@property(nonatomic, retain)UILabel *detailLabel;
@property(nonatomic, retain)UIImageView *iconView;
@property(nonatomic, retain)UILabel *priceLabel;
-
设置行高
- (CGFloat)tableView:(UITableView *)tableView heightForRowAtIndexPath:(NSIndexPath *)indexPath {
// 从数据源数组中取出数据
BookModel *bookModel = [myDataArray objectAtIndex:indexPath.row];
// 计算 detailLabel 占用的高度
CGFloat detialHeight = [bookModel.detail boundingRectWithSize:CGSizeMake(self.view.bounds.size.width - 40, CGFLOAT_MAX)
options:NSStringDrawingUsesLineFragmentOrigin
attributes:@{NSFontAttributeName: [UIFont systemFontOfSize:14]}
context:nil].size.height;
// 判断是否有图片
if (bookModel.icon.length) {
// 60 为图片的高度
return 30 + detialHeight + 60 + 30;
}
else {
return 30 + detialHeight + 30;
}
}
-
设置每一行显示的内容
// 设置每一行显示的内容
- (UITableViewCell *)tableView:(UITableView *)tableView cellForRowAtIndexPath:(NSIndexPath *)indexPath {
BookCell3 *cell = [tableView dequeueReusableCellWithIdentifier:@"test" forIndexPath:indexPath];
BookModel *bookModel = [myDataArray objectAtIndex:indexPath.row];
// 设置 titleLabel
cell.titleLabel.text = bookModel.title;
// 设置 detailLabel
// 计算 detailLabel 的高度
CGSize detialSize = [bookModel.detail boundingRectWithSize:CGSizeMake(self.view.bounds.size.width - 40, CGFLOAT_MAX)
options:NSStringDrawingUsesLineFragmentOrigin
attributes:@{NSFontAttributeName: [UIFont systemFontOfSize:14]}
context:nil].size;
CGRect detialFrame = cell.detailLabel.frame;
detialFrame.size.height = detialSize.height + 5; // 加偏移量 5,适应标点无法换行
detialFrame.size.width = detialSize.width + 5;
cell.detailLabel.frame = detialFrame; // 设置 detailLabel 的 frame
cell.detailLabel.text = bookModel.detail;
// 判断是否有图片
if (bookModel.icon.length) {
// 设置 iconView
CGRect iconFrame = cell.iconView.frame;
iconFrame.origin.y = detialFrame.origin.y + detialFrame.size.height;
cell.iconView.frame = iconFrame;
cell.iconView.image = [UIImage imageNamed: bookModel.icon];
// 设置 priceLabel
CGRect priceFrame = cell.priceLabel.frame;
priceFrame.origin.y = iconFrame.origin.y + iconFrame.size.height;
cell.priceLabel.frame = priceFrame;
cell.priceLabel.text = bookModel.price;
}
else {
// 设置 priceLabel
CGRect priceFrame = cell.priceLabel.frame;
priceFrame.origin.y = detialFrame.origin.y + detialFrame.size.height;
cell.priceLabel.frame = priceFrame;
cell.priceLabel.text = bookModel.price;
}
return cell;
}
-
Swift
-
BookModel.swift
var title:String?
var detail:String?
var icon:String?
var price:String?
-
BookCell.swift
var titleLabel:UILabel?
var detailLabel:UILabel?
var iconView:UIImageView?
var priceLabel:UILabel?
-
设置行高
func tableView(tableView: UITableView, heightForRowAtIndexPath indexPath: NSIndexPath) -> CGFloat {
// 从数据源数组中取出数据
let bookModel:BookModel = myDataArray.objectAtIndex(indexPath.row) as! BookModel
// 计算 detailLabel 占用的高度
let detialHeight:CGFloat = NSString(string: bookModel.detail!)
.boundingRectWithSize(CGSizeMake(self.view.bounds.size.width - 40, CGFloat.max),
options: .UsesLineFragmentOrigin,
attributes: [NSFontAttributeName : (UIFont.systemFontOfSize(14) as AnyObject)],
context: nil).size.height
// 判断是否有图片
if bookModel.icon?.characters.count != 0 {
return 30 + detialHeight + 60 + 30 // 60 为图片的高度
}
else {
return 30 + detialHeight + 30
}
}
-
设置每一行显示的内容
func tableView(tableView: UITableView, cellForRowAtIndexPath indexPath: NSIndexPath) -> UITableViewCell {
let cell = tableView.dequeueReusableCellWithIdentifier("test", forIndexPath: indexPath) as! BookCell3
let bookModel:BookModel = myDataArray.objectAtIndex(indexPath.row) as! BookModel
// 设置 titleLabel
cell.titleLabel!.text = bookModel.title
// 设置 detailLabel
// 计算 detailLabel 的高度
let detialSize:CGSize = NSString(string: bookModel.detail!)
.boundingRectWithSize(CGSizeMake(self.view.bounds.size.width - 40, CGFloat.max),
options: .UsesLineFragmentOrigin,
attributes: [NSFontAttributeName : (UIFont.systemFontOfSize(14) as AnyObject)],
context: nil).size
var detialFrame:CGRect = cell.detailLabel!.frame
detialFrame.size.height = detialSize.height + 5 // 加偏移量 5,适应标点无法换行
detialFrame.size.width = detialSize.width + 5
cell.detailLabel!.frame = detialFrame // 设置 detailLabel 的 frame
cell.detailLabel!.text = bookModel.detail
// 判断是否有图片
if bookModel.icon?.characters.count != 0 {
// 设置 iconView
var iconFrame:CGRect = cell.iconView!.frame
iconFrame.origin.y = detialFrame.origin.y + detialFrame.size.height
cell.iconView!.frame = iconFrame
cell.iconView!.image = UIImage(named: bookModel.icon!)
// 设置 priceLabel
var priceFrame:CGRect = cell.priceLabel!.frame
priceFrame.origin.y = iconFrame.origin.y + iconFrame.size.height
cell.priceLabel!.frame = priceFrame
cell.priceLabel!.text = bookModel.price
}
else {
// 设置 priceLabel
var priceFrame:CGRect = cell.priceLabel!.frame
priceFrame.origin.y = detialFrame.origin.y + detialFrame.size.height
cell.priceLabel!.frame = priceFrame
cell.priceLabel!.text = bookModel.price
}
return cell;
}
7.3.2 系统自动布局方式
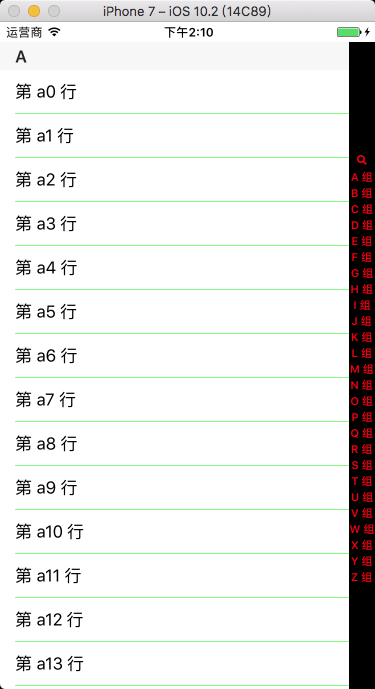
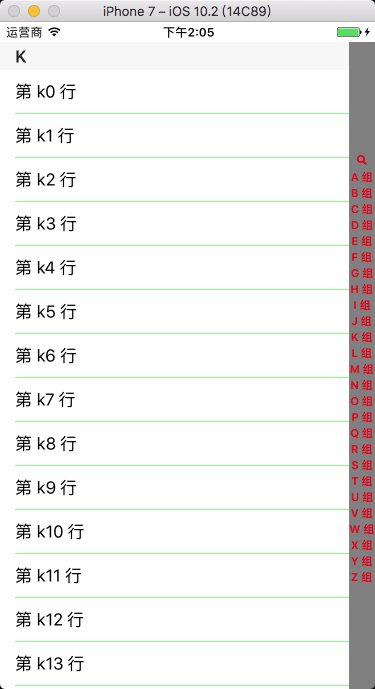
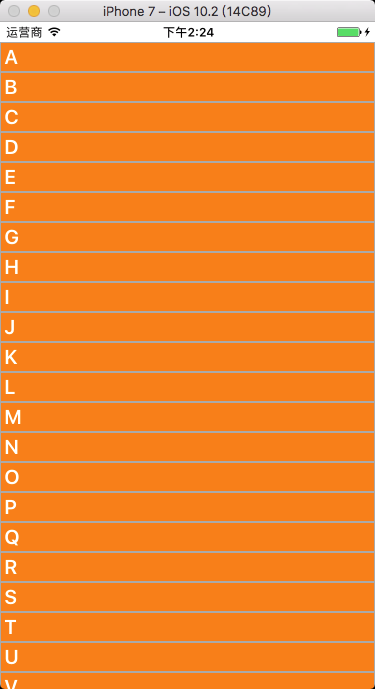
8、分段索引条的创建
-
Objective-C
-
创建索引条
// UITableViewDataSource 协议方法
- (NSArray *)sectionIndexTitlesForTableView:(UITableView *)tableView {
// 索引条数据源数组初始化,实例化索引条上的字符存放的数组对象
NSMutableArray *titleIndexArray = [NSMutableArray array];
// 向数组中添加系统自带放大镜图标,会被处理成一个放大镜
[titleIndexArray addObject:UITableViewIndexSearch];
// 向数据源中添加数据
for (int i = 'A'; i<='Z'; i++) {
// 点击索引条上第几个图标,tableView 就会跳到第几段
[titleIndexArray addObject:[NSString stringWithFormat:@"%c 组 ", i]];
}
// 索引条上字符颜色,默认为蓝色
tableView.sectionIndexColor = [UIColor redColor];
// 索引条上常规时背景颜色,默认为白色
tableView.sectionIndexBackgroundColor = [UIColor blackColor];
// 索引条上点击时背景颜色,默认为白色
tableView.sectionIndexTrackingBackgroundColor = [UIColor grayColor];
return titleIndexArray;
}
-
设置索引条偏移量
// UITableViewDataSource 协议方法
/*
默认索引条与分段一一对应时,可以不写该方法。如果索引条的前面加了个搜索小图标等,需要重写这个方法。A 所在的分段在 tableView 中为第 0 段
*/
- (NSInteger)tableView:(UITableView *)tableView sectionForSectionIndexTitle:(NSString *)title atIndex:(NSInteger)index {
return index - 1;
}
-
Swift
-
创建索引条
// UITableViewDataSource 协议方法
func sectionIndexTitlesForTableView(tableView: UITableView) -> [String]? {
// 索引条数据源数组初始化,实例化索引条上的字符存放的数组对象
var titleIndexArray:[String] = Array()
// 向数组中添加系统自带放大镜图标,会被处理成一个放大镜
titleIndexArray.append(UITableViewIndexSearch)
// 向数据源中添加数据
for i in 65...90 {
// 点击索引条上第几个图标,tableView 就会跳到第几段
titleIndexArray.append("\(Character(UnicodeScalar(i))) 组 ")
}
// 索引条上索引条上字符颜色,默认为蓝色
tableView.sectionIndexColor = UIColor.redColor()
// 索引条上常规时背景颜色,默认为白色
tableView.sectionIndexBackgroundColor = UIColor.blackColor()
// 索引条上点击时背景颜色,默认为白色
tableView.sectionIndexTrackingBackgroundColor = UIColor.grayColor()
return titleIndexArray
}
-
设置索引条偏移量
// UITableViewDataSource 协议方法
/*
默认索引条与分段一一对应时,可以不写该方法。如果索引条的前面加了个搜索小图标等,需要重写这个方法。A 所在的分段在 tableView 中为第 0 段
*/
func tableView(tableView: UITableView, sectionForSectionIndexTitle title: String, atIndex index: Int) -> Int {
return index - 1
}
-
运行效果
![TableView25]()
![TableView26]()
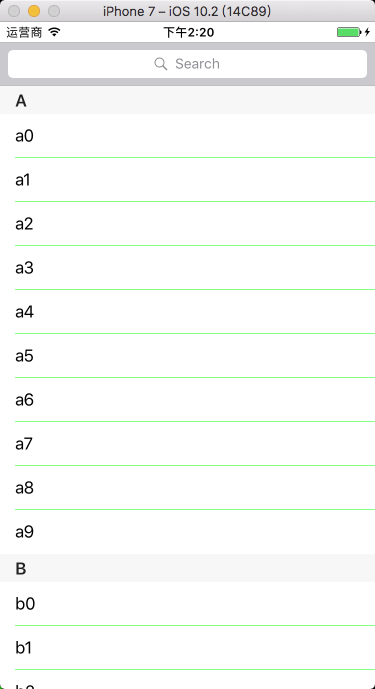
9、搜索框的创建
在 iOS 8.0 以上版本中, 我们可以使用 UISearchController 来非常方便地在 UITableView 中添加搜索框. 而在之前版本中, 我们还是必须使用 UISearchDisplayController + UISearchBar 的组合方式。
我们创建的 tableView 和搜索控制器创建的 tableView 都会走代理方法,需要在代理方法中判断响应代理方法的 tableView 是哪一个,如果响应代理方法的 tableView 不是我创建的,说明一定是搜索控制器创建的。在 iOS 8.0 以下版本中需使用 tableView == myTableView 判断,在 iOS 8.0 以上版本中需使用 mySearchController.active 判断。
9.1 在 iOS 8.0 以下版本中
-
Objective-C
遵守协议 UISearchDisplayDelegate
-
搜索结果数组初始化
// 声明搜索结果存放数组
@property(nonatomic, retain)NSMutableArray *mySearchResultArray;
// 初始化搜索结果存放数组
mySearchResultArray = [[NSMutableArray alloc] init];
-
searchDisplayController 初始化
// 声明搜索控制器,自带一个表格视图,用来展示搜索结果,必须设置为全局变量
@property(nonatomic, retain)UISearchDisplayController *mySearchDisplayController;
// 实例化搜索条
UISearchBar *searchBar = [[UISearchBar alloc] initWithFrame:CGRectMake(0, 0, self.view.frame.size.width, 44)];
// 实例化搜索控制器对象
mySearchDisplayController = [[UISearchDisplayController alloc] initWithSearchBar:searchBar contentsController:self];
// 设置搜索控制器的代理
mySearchDisplayController.delegate = self;
// 为搜索控制器自带 tableView 指定代理
mySearchDisplayController.searchResultsDelegate = self;
mySearchDisplayController.searchResultsDataSource = self;
// 将搜索条设置为 tableView 的表头
myTableView.tableHeaderView = searchBar;
-
UISearchDisplayDelegate 协议方法
// 更新搜索结果
/*
只要搜索框的文字发生了改变,这个方法就会触发。searchString 为搜索框内输入的内容。
*/
- (BOOL)searchDisplayController:(UISearchDisplayController *)controller shouldReloadTableForSearchString:(NSString *)searchString {
// 清空上一次搜索的内容
[mySearchResultArray removeAllObjects];
for (NSArray *subArray in myDataArray) {
// 将搜索的结果存放到数组中
for (NSString *str in subArray) {
NSRange range = [str rangeOfString:searchString];
if (range.length) {
[mySearchResultArray addObject:str];
}
}
}
return YES;
}
-
UITableView 协议方法
// 设置分段头标题
- (NSString *)tableView:(UITableView *)tableView titleForHeaderInSection:(NSInteger)section {
if (tableView == myTableView) {
return [NSString stringWithFormat:@"%c", (char)('A' + section)];
}
return @"搜索结果";
}
// 设置分段数
- (NSInteger)numberOfSectionsInTableView:(UITableView *)tableView {
if (tableView == myTableView) {
return myDataArray.count;
}
return 1;
}
// 设置行数
- (NSInteger)tableView:(UITableView *)tableView numberOfRowsInSection:(NSInteger)section {
if (tableView == myTableView) {
return [[myDataArray objectAtIndex:section] count];
}
return mySearchResultArray.count;
}
// 设置每段显示的内容
- (UITableViewCell *)tableView:(UITableView *)tableView cellForRowAtIndexPath:(NSIndexPath *)indexPath {
UITableViewCell *cell = [tableView dequeueReusableCellWithIdentifier:@"testIdentifier"];
if (!cell) {
cell = [[UITableViewCell alloc] initWithStyle:UITableViewCellStyleDefault reuseIdentifier:@"testIdentifier"];
}
if (tableView == myTableView) {
cell.textLabel.text = [[myDataArray objectAtIndex:indexPath.section] objectAtIndex:indexPath.row];
}
else {
cell.textLabel.text = [mySearchResultArray objectAtIndex:indexPath.row];
}
return cell;
}
-
Swift
遵守协议 UISearchDisplayDelegate
-
搜索结果数组初始化
// 初始化搜索结果存放数组
var mySearchResultArray:[String] = Array()
-
searchDisplayController 初始化
// 声明搜索控制器,自带一个表格视图,用来展示搜索结果,必须设置为全局变量
var mySearchDisplayController:UISearchDisplayController!
// 实例化搜索条
let searchBar:UISearchBar = UISearchBar(frame: CGRectMake(0, 0, self.view.frame.size.width, 44))
// 实例化搜索控制器对象
mySearchDisplayController = UISearchDisplayController(searchBar: searchBar, contentsController: self)
// 设置搜索控制器的代理
mySearchDisplayController.delegate = self
// 为搜索控制器自带 tableView 指定代理
mySearchDisplayController.searchResultsDelegate = self
mySearchDisplayController.searchResultsDataSource = self
// 将搜索条设置为 tableView 的表头
myTableView.tableHeaderView = searchBar
-
UISearchDisplayDelegate 协议方法
// 更新搜索结果
/*
只要搜索框的文字发生了改变,这个方法就会触发。searchString 为搜索框内输入的内容
*/
func searchDisplayController(controller: UISearchDisplayController, shouldReloadTableForSearchString searchString: String?) -> Bool {
// 清空上一次搜索的内容
mySearchResultArray.removeAll()
// 将搜索的结果存放到数组中
for subArray in myDataArray {
for str in subArray {
let range:NSRange = (str as NSString).rangeOfString(searchString!)
if range.length != 0 {
mySearchResultArray.append(str)
}
}
}
return true
}
-
UITableView 协议方法
// 设置分段头标题
func tableView(tableView: UITableView, titleForHeaderInSection section: Int) -> String? {
if tableView == myTableView {
return "\(Character(UnicodeScalar(65 + section)))"
}
return "搜索结果"
}
// 设置分段数
func numberOfSectionsInTableView(tableView: UITableView) -> Int {
if tableView == myTableView {
return myDataArray.count
}
return 1
}
// 设置行数
func tableView(tableView: UITableView, numberOfRowsInSection section: Int) -> Int {
if tableView == myTableView {
return myDataArray[section].count
}
return mySearchResultArray.count
}
// 设置每段显示的内容
func tableView(tableView: UITableView, cellForRowAtIndexPath indexPath: NSIndexPath) -> UITableViewCell {
var cell = tableView.dequeueReusableCellWithIdentifier("testIdentifier")
if cell == nil {
cell = UITableViewCell(style: .Default, reuseIdentifier: "testIdentifier")
}
if tableView == myTableView {
cell!.textLabel?.text = myDataArray[indexPath.section][indexPath.row]
}
else {
cell!.textLabel?.text = mySearchResultArray[indexPath.row]
}
return cell!
}
9.2 在 iOS 8.0 及以上版本中
-
Objective-C
遵守协议 UISearchResultsUpdating
-
搜索结果数组初始化
// 声明搜索结果存放数组
@property(nonatomic, retain)NSMutableArray *mySearchResultArray;
// 初始化搜索结果存放数组
mySearchResultArray = [[NSMutableArray alloc] init];
-
searchController 初始化
// 声明搜索控制器,自带一个表格视图控制器,用来展示搜索结果,必须设置为全局变量
@property(nonatomic, retain)UISearchController *mySearchController;
// 实例化搜索控制器
mySearchController = [[UISearchController alloc] initWithSearchResultsController:nil];
// 设置搜索代理
mySearchController.searchResultsUpdater = self;
// 设置搜索条大小
[mySearchController.searchBar sizeToFit];
// 设置搜索期间背景视图是否取消操作,default is YES
mySearchController.dimsBackgroundDuringPresentation = NO;
// 设置搜索期间是否隐藏导航条,default is YES
mySearchController.hidesNavigationBarDuringPresentation = NO;
// 将 searchBar 添加到表格的开头
myTableView.tableHeaderView = mySearchController.searchBar;
-
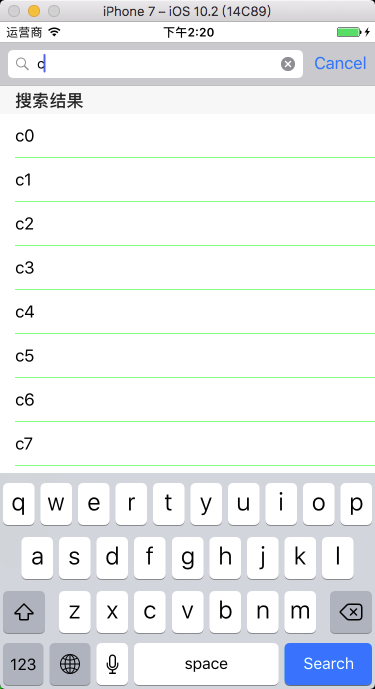
UISearchResultsUpdating 协议方法
// 更新搜索结果
/*
只要搜索框的文字发生了改变,这个方法就会触发。searchController.searchBar.text 为搜索框内输入的内容
*/
- (void)updateSearchResultsForSearchController:(UISearchController *)searchController {
// 清除上一次的搜索结果
[mySearchResultArray removeAllObjects];
// 将搜索的结果存放到数组中
for (NSArray *subArray in myDataArray) {
for (NSString *str in subArray) {
NSRange range = [str rangeOfString:searchController.searchBar.text];
if (range.length) {
[mySearchResultArray addObject:str];
}
}
}
// 重新加载表格视图,不加载的话将不会显示搜索结果
[myTableView reloadData];
}
-
UITableView 协议方法
// 设置分段头标题
- (NSString *)tableView:(UITableView *)tableView titleForHeaderInSection:(NSInteger)section {
if (mySearchController.active) {
return @"搜索结果";
}
return [NSString stringWithFormat:@"%c", (char)('A' + section)];
}
// 设置分段数
- (NSInteger)numberOfSectionsInTableView:(UITableView *)tableView {
if (mySearchController.active) {
return 1;
}
return myDataArray.count;
}
// 设置行数
- (NSInteger)tableView:(UITableView *)tableView numberOfRowsInSection:(NSInteger)section {
if (mySearchController.active) {
return mySearchResultArray.count;
}
return [[myDataArray objectAtIndex:section] count];
}
// 设置每段显示的内容
- (UITableViewCell *)tableView:(UITableView *)tableView cellForRowAtIndexPath:(NSIndexPath *)indexPath {
UITableViewCell *cell = [tableView dequeueReusableCellWithIdentifier:@"testIdentifier"];
if (!cell) {
cell = [[UITableViewCell alloc] initWithStyle:UITableViewCellStyleDefault reuseIdentifier:@"testIdentifier"];
}
if (mySearchController.active) {
cell.textLabel.text = [mySearchResultArray objectAtIndex:indexPath.row];
}
else {
cell.textLabel.text = [[myDataArray objectAtIndex:indexPath.section] objectAtIndex:indexPath.row];
}
return cell;
}
-
Swift
遵守协议 UISearchResultsUpdating
-
搜索结果数组初始化
// 初始化搜索结果存放数组
var searchResultArray:[String] = Array()
-
searchController 初始化
// 声明搜索控制器,自带一个表格视图控制器,用来展示搜索结果,必须设置为全局变量
var mySearchController:UISearchController!
// 实例化搜索控制器
mySearchController = UISearchController(searchResultsController: nil)
// 设置搜索代理
mySearchController.searchResultsUpdater = self
// 设置搜索条大小
mySearchController.searchBar.sizeToFit()
// 设置搜索期间背景视图是否取消操作,default is YES
mySearchController.dimsBackgroundDuringPresentation = false
// 设置搜索期间是否隐藏导航条,default is YES
mySearchController.hidesNavigationBarDuringPresentation = false
// 将 searchBar 添加到表格的开头
myTableView.tableHeaderView = mySearchController.searchBar
-
UISearchResultsUpdating 协议方法
// 更新搜索结果
/*
只要搜索框的文字发生了改变,这个方法就会触发。searchController.searchBar.text 为搜索框内输入的内容
*/
func updateSearchResultsForSearchController(searchController: UISearchController) {
// 清除上一次的搜索结果
searchResultArray.removeAll()
// 将搜索的结果存放到数组中
for subArray in myDataArray {
for str in subArray {
let range:NSRange = (str as NSString).rangeOfString(searchController.searchBar.text!)
if range.length != 0 {
searchResultArray.append(str)
}
}
}
// 重新加载表格视图,不加载的话将不会显示搜索结果
myTableView.reloadData()
}
-
UITableView 协议方法
// 设置分段头标题
func tableView(tableView: UITableView, titleForHeaderInSection section: Int) -> String? {
if mySearchController.active {
return "搜索结果"
}
return "\(Character(UnicodeScalar(65 + section)))"
}
// 设置分段数
func numberOfSectionsInTableView(tableView: UITableView) -> Int {
if mySearchController.active {
return 1
}
return myDataArray.count
}
// 设置行数
func tableView(tableView: UITableView, numberOfRowsInSection section: Int) -> Int {
if mySearchController.active {
return searchResultArray.count
}
return myDataArray[section].count
}
// 设置每段显示的内容
func tableView(tableView: UITableView, cellForRowAtIndexPath indexPath: NSIndexPath) -> UITableViewCell {
var cell = tableView.dequeueReusableCellWithIdentifier("testIdentifier")
if cell == nil {
cell = UITableViewCell(style: .Default, reuseIdentifier: "testIdentifier")
}
if mySearchController.active {
cell!.textLabel?.text = searchResultArray[indexPath.row]
}
else {
cell!.textLabel?.text = myDataArray[indexPath.section][indexPath.row]
}
return cell!
}
-
运行效果
![TableView27]()
![TableView28]()
10、表格折叠
11、表格编辑
-
Objective-C
-
设置表格编辑开关状态
// 设置表格的编辑状态
myTableView.editing = YES;
// 翻转表格的编辑状态
myTableView.editing = !myTableView.editing;
// 带动画翻转表格的编辑状态
[myTableView setEditing:!myTableView.editing animated:YES];
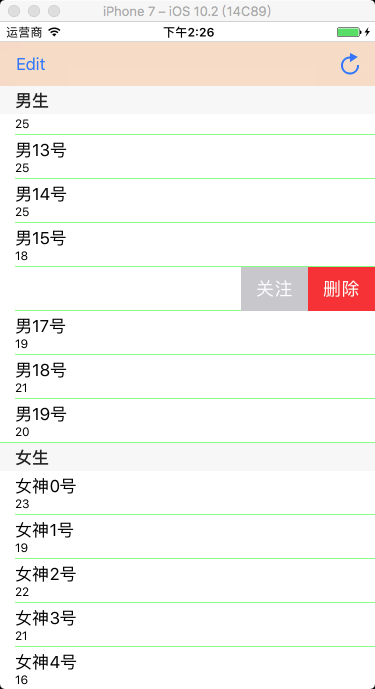
-
修改左滑删除按钮的内容
// UITableViewDelegate 协议方法
/*
默认为 Delete
*/
- (NSString *)tableView:(UITableView *)tableView titleForDeleteConfirmationButtonForRowAtIndexPath:(NSIndexPath *)indexPath {
return @"删除";
}
-
设置左滑多按钮
- (NSArray *)tableView:(UITableView *)tableView editActionsForRowAtIndexPath:(NSIndexPath *)indexPath {
UITableViewRowAction *action0 = [UITableViewRowAction rowActionWithStyle:UITableViewRowActionStyleNormal
title:@"关注"
handler:^(UITableViewRowAction *action, NSIndexPath *indexPath) {
NSLog(@"点击了关注");
// 收回左滑出现的按钮(退出编辑模式)
tableView.editing = NO;
}];
UITableViewRowAction *action1 = [UITableViewRowAction rowActionWithStyle:UITableViewRowActionStyleDefault
title:@"删除"
handler:^(UITableViewRowAction *action, NSIndexPath *indexPath) {
[[myDataArray objectAtIndex:indexPath.section] removeObjectAtIndex:indexPath.row];
[tableView deleteRowsAtIndexPaths:@[indexPath] withRowAnimation:UITableViewRowAnimationAutomatic];
}];
// 按钮从右向左的顺序排列
return @[action1, action0];
}
-
设置编辑模式
/*
UITableViewCellEditingStyleNone; // 无
UITableViewCellEditingStyleDelete; // 删除模式,默认
UITableViewCellEditingStyleInsert; // 插入模式
UITableViewCellEditingStyleDelete | UITableViewCellEditingStyleInsert; // 多选模式
*/
// UITableViewDelegate 协议方法
- (UITableViewCellEditingStyle)tableView:(UITableView *)tableView editingStyleForRowAtIndexPath:(NSIndexPath *)indexPath {
// 删除、插入、多选删除,不设置默认时为删除
if (0 == indexPath.section) {
return UITableViewCellEditingStyleDelete;
}
else {
return UITableViewCellEditingStyleInsert;
}
}
-
表格删除、插入
表格删除:
1. 先将数据从数据源里删除,
2. 再从 tableView 里删除 cell:
[tableView deleteRowsAtIndexPaths:[NSArray arrayWithObject:indexPath]
withRowAnimation:UITableViewRowAnimationAutomatic];
或者再直接重载整个表格:
[tableView reloadData];
或者在直接重载分段:
[tableView reloadSections:[NSIndexSet indexSetWithIndex:indexPath.section]
withRowAnimation:UITableViewRowAnimationAutomatic];
表格插入:
1. 先将数据插入到数据源中,
2. 然后再插入一个 cell:
[tableView insertRowsAtIndexPaths:[NSArray arrayWithObject:indexPath]
withRowAnimation:UITableViewRowAnimationAutomatic];
或者再直接重载整个表格:
[tableView reloadData];
或者在直接重载分段:
[tableView reloadSections:[NSIndexSet indexSetWithIndex:indexPath.section]
withRowAnimation:UITableViewRowAnimationAutomatic];
// 表格删除或插入,默认为删除模式,写入该方法即表示允许删除
// UITableViewDataSource 协议方法
- (void)tableView:(UITableView *)tableView commitEditingStyle:(UITableViewCellEditingStyle)editingStyle forRowAtIndexPath:(NSIndexPath *)indexPath {
// 判断编辑风格,默认是删除
if (editingStyle == UITableViewCellEditingStyleDelete) {
// 表格删除
// 从数据源里删除
[[myDataArray objectAtIndex:indexPath.section] removeObjectAtIndex:indexPath.row];
// 从 tableView 里删除 cell
[tableView deleteRowsAtIndexPaths:[NSArray arrayWithObject:indexPath] withRowAnimation:UITableViewRowAnimationAutomatic];
}
else if (editingStyle == UITableViewCellEditingStyleInsert) {
Person *person = [[Person alloc] init]; person.name = @"xiao bai";
person.age = 18;
// 表格插入
// 插入到数据源中
[[myDataArray objectAtIndex:indexPath.section] insertObject:person atIndex:indexPath.row];
// 插入一个 cell
[tableView insertRowsAtIndexPaths:[NSArray arrayWithObject:indexPath] withRowAnimation:UITableViewRowAnimationAutomatic];
}
}
-
表格移动
表格移动:
1. 先在数据源中找到需要移动的对象。
2. 然后在数据源数组中从原始位置删掉。
3. 再在数据源数组中插入到新位置。
4. 最后重新加载表格:
[tableView reloadData];
或者在直接重载分段:
[tableView reloadSections:[NSIndexSet indexSetWithIndex:indexPath.section]
withRowAnimation:UITableViewRowAnimationAutomatic];
// 写入该方法即表示允许移动
// UITableViewDataSource 协议方法
- (void)tableView:(UITableView *)tableView moveRowAtIndexPath:(NSIndexPath *)sourceIndexPath toIndexPath:(NSIndexPath *)destinationIndexPath {
// 找到需要移动的对象
Person *person = [[myDataArray objectAtIndex:sourceIndexPath.section] objectAtIndex:sourceIndexPath.row];
// 从原始位置删掉
[[myDataArray objectAtIndex:sourceIndexPath.section] removeObjectAtIndex:sourceIndexPath.row];
// 插入到新位置
[[myDataArray objectAtIndex:destinationIndexPath.section] insertObject:person atIndex:destinationIndexPath.row];
// 刷新 tableView
[tableView reloadData];
}
-
Swift
-
设置表格编辑开关状态
// 设置表格的编辑状态
myTableView.editing = true
// 翻转表格的编辑状态
myTableView.editing = !myTableView.editing
// 带动画翻转表格的编辑状态
myTableView.setEditing(!myTableView.editing, animated: true)
-
修改左滑删除按钮的内容
// UITableViewDelegate 协议方法
func tableView(tableView: UITableView, titleForDeleteConfirmationButtonForRowAtIndexPath indexPath: NSIndexPath) -> String? {
// 默认为 Delete
return "删除"
}
-
设置左滑多按钮
func tableView(tableView: UITableView, editActionsForRowAt indexPath: IndexPath) -> [UITableViewRowAction]? {
let action0:UITableViewRowAction = UITableViewRowAction(style: .normal, title: "关注")
{ (action:UITableViewRowAction, indexPath:IndexPath) in
print("点击了关注")
// 收回左滑出现的按钮(退出编辑模式)
tableView.isEditing = false
}
let action1:UITableViewRowAction = UITableViewRowAction(style: .normal, title: "删除")
{ (action:UITableViewRowAction, indexPath:IndexPath) in
myDataArray[indexPath.section].remove(at: indexPath.row)
tableView.deleteRows(at: NSArray(object: indexPath) as! [IndexPath], with: .automatic)
}
// 按钮从右向左的顺序排列
return [action1, action0]
}
-
设置编辑模式
/*
删除、插入,不设置默认时为删除,不能设置多选删除模式,
若要实现多选删除,需设置 myTableView.allowsMultipleSelectionDuringEditing = true
UITableViewCellEditingStyle.None // 无
UITableViewCellEditingStyle.Delete // 删除模式,默认
UITableViewCellEditingStyle.Insert // 插入模式
*/
// UITableViewDelegate 协议方法
func tableView(tableView: UITableView, editingStyleForRowAtIndexPath indexPath: NSIndexPath) -> UITableViewCellEditingStyle {
if 0 == indexPath.section {
return .Delete
}
else {
return .Insert
}
}
-
表格删除、插入
表格删除:
1. 先将数据从数据源里删除,
2. 再从 tableView 里删除 cell:
tableView.deleteRowsAtIndexPaths(NSArray(object: indexPath) as! [NSIndexPath],
withRowAnimation: .Automatic)
或者再直接重载整个表格:
tableView.reloadData()
或者在直接重载分段:
tableView.reloadSections(NSIndexSet(index: indexPath.section) ,
withRowAnimation: .Automatic)
表格插入:
1. 先将数据插入到数据源中,
2. 然后再插入一个 cell:
tableView.insertRowsAtIndexPaths(NSArray(object: indexPath) as! [NSIndexPath],
withRowAnimation: .Automatic)
或者再直接重载整个表格:
tableView.reloadData()
或者在直接重载分段:
tableView.reloadSections(NSIndexSet(index: indexPath.section) ,
withRowAnimation: .Automatic)
// 表格删除或插入,默认为删除模式,写入该方法即表示允许删除
// UITableViewDataSource 协议方法
func tableView(tableView: UITableView, commitEditingStyle editingStyle: UITableViewCellEditingStyle, forRowAtIndexPath indexPath: NSIndexPath) {
// 判断编辑风格,默认是删除
if editingStyle == UITableViewCellEditingStyle.Delete {
// 表格删除
// 从数据源里删除
myDataArray[indexPath.section].removeAtIndex(indexPath.row)
// 从 tableView 里删除 cell
tableView.deleteRowsAtIndexPaths(NSArray(object: indexPath) as! [NSIndexPath], withRowAnimation: .Automatic)
}
else if editingStyle == UITableViewCellEditingStyle.Insert {
let person:Person = Person()
person.name = "xiao bai”
person.age = 18
// 表格插入
// 插入到数据源中
myDataArray[indexPath.section].insert(person, atIndex: indexPath.row)
// 插入一个 cell
tableView.insertRowsAtIndexPaths(NSArray(object: indexPath) as! [NSIndexPath], withRowAnimation: .Automatic)
}
}
-
表格移动
表格移动:
1. 先在数据源中找到需要移动的对象。
2. 然后在数据源数组中从原始位置删掉。
3. 再在数据源数组中插入到新位置。
4. 最后重新加载表格:
tableView.reloadData()
或者在直接重载分段:
tableView.reloadSections(NSIndexSet(index: indexPath.section) ,
withRowAnimation: .Automatic)
// 写入该方法即表示允许移动
// UITableViewDataSource 协议方法
func tableView(tableView: UITableView, moveRowAtIndexPath sourceIndexPath: NSIndexPath, toIndexPath destinationIndexPath: NSIndexPath) {
// 找到需要移动的对象
let person:Person = myDataArray[sourceIndexPath.section][sourceIndexPath.row]
// 从原始位置删掉
myDataArray[sourceIndexPath.section].removeAtIndex(sourceIndexPath.row)
// 插入到新位置
myDataArray[destinationIndexPath.section].insert(person, atIndex: destinationIndexPath.row)
tableView.reloadData()
}
-
运行效果
![TableView31]()
![TableView32]()
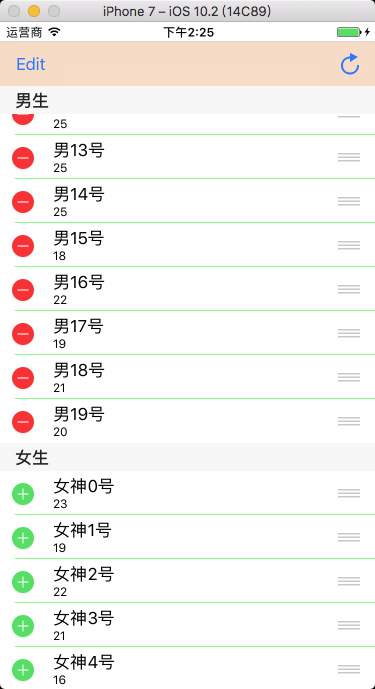
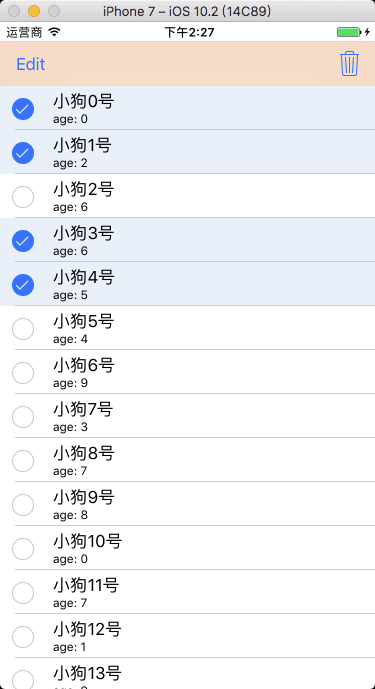
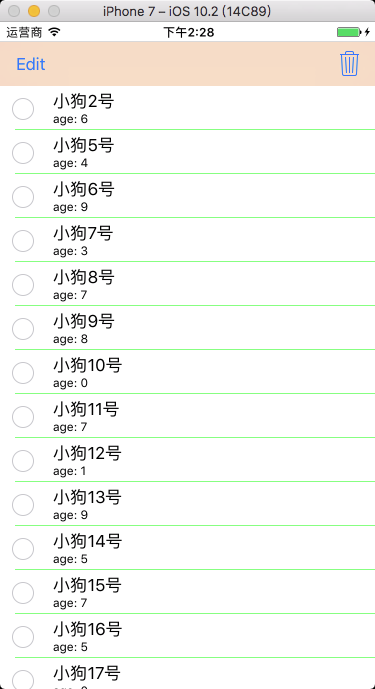
12、表格多选删除
12.1 系统方式
将要删除的数据添加到待删数组中,从数据源中删除待删数组中包含的数据,刷新表格。
OC 中可设置编辑模式为 UITableViewCellEditingStyleDelete | UITableViewCellEditingStyleInsert; 或者设置 myTableView.allowsMultipleSelectionDuringEditing = YES; 进入多选模式。
Swift 需设置 myTableView.allowsMultipleSelectionDuringEditing = true 进入多选模式。
-
Objective-C
-
待删数据数组初始化
// 声明待删数据数组
@property(nonatomic, retain)NSMutableArray *tempDeleteArray;
// 初始化待删数据数组
tempDeleteArray = [[NSMutableArray alloc] init];
-
自定义方法
// 编辑按钮点击响应事件
- (void)editClick:(UIButton *)button {
// 改变编辑开关状态
[myTableView setEditing:!myTableView.editing animated:YES];
// 设置编辑模式,允许编辑时多选,或者在协议方法中设置
myTableView.allowsMultipleSelectionDuringEditing = YES;
// 当编辑状态发生改变的时候,清空待删数组
[tempDeleteArray removeAllObjects];
[myTableView reloadData];
}
// 删除按钮点击响应事件
- (void)deleteClick:(UIButton *)button {
// 从数据源中删除待选数组中包含的数据
[myDataArray removeObjectsInArray:tempDeleteArray];
// 清空待删数组
[tempDeleteArray removeAllObjects];
[myTableView reloadData];
}
-
UITableView 协议方法
// 设置编辑模式
/*
删除、插入、多选删除,不设置默认时为删除,
或者在编辑按钮点击事件中直接设置 myTableView.allowsMultipleSelectionDuringEditing = YES;
*/
- (UITableViewCellEditingStyle)tableView:(UITableView *)tableView editingStyleForRowAtIndexPath:(NSIndexPath *)indexPath {
// 多选删除
return UITableViewCellEditingStyleDelete | UITableViewCellEditingStyleInsert;
}
// 表格选中点击响应事件
- (void)tableView:(UITableView *)tableView didSelectRowAtIndexPath:(NSIndexPath *)indexPath {
// 判断 tableView 的编辑状态,表格处于编辑状态
if (tableView.isEditing) {
// 选中 cell 的时候,将对应的数据源模型添加到待删除数组中
[tempDeleteArray addObject:[myDataArray objectAtIndex:indexPath.row]];
}
else {
// 恢复未选中状态时的颜色
[tableView deselectRowAtIndexPath:indexPath animated:YES];
}
}
// 表格取消选中点击响应事件
- (void)tableView:(UITableView *)tableView didDeselectRowAtIndexPath:(NSIndexPath *)indexPath {
// 判断 tableView 的编辑状态,表格处于编辑状态
if (tableView.isEditing) {
// 将对应的数据模型从待删除数组中移除
[tempDeleteArray removeObject:[myDataArray objectAtIndex:indexPath.row]];
}
}
-
Swift
-
待删数据数组初始化
// 初始化待删数据数组
var tempDeleteArray:[Dog] = Array()
-
自定义方法
// 编辑按钮点击响应事件
func editClick(button:UIButton){
// 改变编辑开关状态
myTableView.setEditing(!myTableView.editing, animated: true)
// 设置编辑模式,允许编辑时多选
myTableView.allowsMultipleSelectionDuringEditing = true
// 当编辑状态发生改变的时候,清空待删数组
tempDeleteArray.removeAll()
myTableView.reloadData()
}
// 删除按钮点击响应事件
func deleteClick(button:UIButton){
// 从数据源中删除待选数组中包含的数据
myDataArray.removeObjectsInArray(tempDeleteArray)
// 清空待删数组
tempDeleteArray.removeAll()
myTableView.reloadData()
}
-
UITableView 协议方法
// 表格被选中
func tableView(tableView: UITableView, didSelectRowAtIndexPath indexPath: NSIndexPath) {
// 判断 tableView 的编辑状态,表格处于编辑状态
if tableView.editing {
// 选中 cell 的时候,将对应的数据源模型添加到待删除数组中
tempDeleteArray.append(myDataArray.objectAtIndex(indexPath.row) as! Dog)
}
else {
// 恢复未选中状态时的颜色
tableView.deselectRowAtIndexPath(indexPath, animated: true)
}
}
// 表格被取消选中
func tableView(tableView: UITableView, didDeselectRowAtIndexPath indexPath: NSIndexPath) {
// 判断 tableView 的编辑状态,表格处于编辑状态
if tableView.editing {
// 将对应的数据模型从待删除数组中移除
tempDeleteArray.append(myDataArray.objectAtIndex(indexPath.row) as! Dog)
}
}
-
运行效果
![TableView33]()
![TableView34]()
12.2 自定义方式 1
-
Objective-C
-
XMGDeal.h
#import <Foundation/Foundation.h>
@interface XMGDeal : NSObject
@property (strong, nonatomic) NSString *buyCount;
@property (strong, nonatomic) NSString *price;
@property (strong, nonatomic) NSString *title;
@property (strong, nonatomic) NSString *icon;
/** 状态量标识有无被打钩 */
@property (assign, nonatomic, getter=isChecked) BOOL checked;
+ (instancetype)dealWithDict:(NSDictionary *)dict;
@end
-
XMGDeal.m
#import "XMGDeal.h"
@implementation XMGDeal
+ (instancetype)dealWithDict:(NSDictionary *)dict {
XMGDeal *deal = [[self alloc] init];
[deal setValuesForKeysWithDictionary:dict];
return deal;
}
@end
-
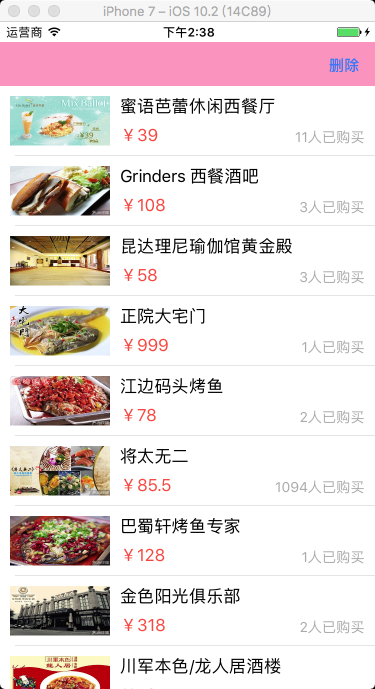
XMGDealCell.xib
![TableView15]()
-
XMGDealCell.h
#import <UIKit/UIKit.h>
@class XMGDeal;
@interface XMGDealCell : UITableViewCell
/** 团购模型数据 */
@property (nonatomic, strong) XMGDeal *deal;
+ (instancetype)cellWithTableView:(UITableView *)tableView;
@end
-
XMGDealCell.m
#import "XMGDealCell.h"
#import "XMGDeal.h"
@interface XMGDealCell()
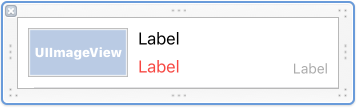
@property (weak, nonatomic) IBOutlet UIImageView *iconView;
@property (weak, nonatomic) IBOutlet UILabel *titleLabel;
@property (weak, nonatomic) IBOutlet UILabel *buyCountLabel;
@property (weak, nonatomic) IBOutlet UIImageView *checkView;
@property (weak, nonatomic) IBOutlet UILabel *priceLabel;
@end
@implementation XMGDealCell
+ (instancetype)cellWithTableView:(UITableView *)tableView {
static NSString *ID = @"deal";
XMGDealCell *cell = [tableView dequeueReusableCellWithIdentifier:ID];
if (cell == nil) {
cell = [[[NSBundle mainBundle] loadNibNamed:NSStringFromClass([XMGDealCell class])
owner:nil
options:nil] lastObject];
}
return cell;
}
- (void)setDeal:(XMGDeal *)deal {
_deal = deal;
// 设置数据
self.iconView.image = [UIImage imageNamed:deal.icon];
self.titleLabel.text = deal.title;
self.priceLabel.text = [NSString stringWithFormat:@"¥%@", deal.price];
self.buyCountLabel.text = [NSString stringWithFormat:@"%@人已购买", deal.buyCount];
// 设置打钩控件的显示和隐藏
self.checkView.hidden = !deal.isChecked;
}
@end
-
XMGDealsViewController.m
#import "XMGDealsViewController.h"
#import "XMGDeal.h"
#import "XMGDealCell.h"
@interface XMGDealsViewController () <UITableViewDataSource, UITableViewDelegate>
@property (weak, nonatomic) IBOutlet UITableView *tableView;
/** 所有的团购数据 */
@property (nonatomic, strong) NSMutableArray *deals;
@end
@implementation XMGDealsViewController
- (NSMutableArray *)deals {
if (_deals == nil) {
// 加载plist中的字典数组
NSString *path = [[NSBundle mainBundle] pathForResource:@"deals.plist" ofType:nil];
NSArray *dictArray = [NSArray arrayWithContentsOfFile:path];
// 字典数组 -> 模型数组
NSMutableArray *dealArray = [NSMutableArray array];
for (NSDictionary *dict in dictArray) {
XMGDeal *deal = [XMGDeal dealWithDict:dict];
[dealArray addObject:deal];
}
_deals = dealArray;
}
return _deals;
}
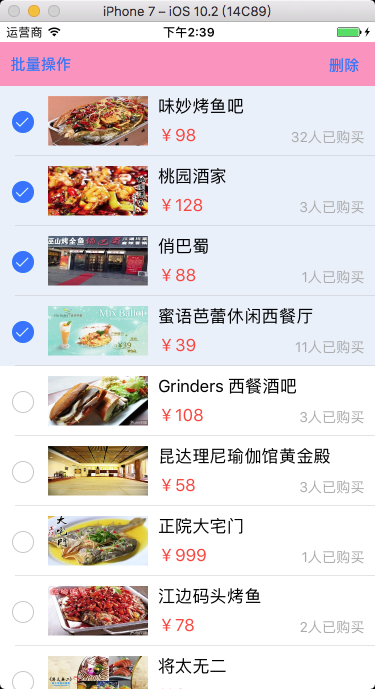
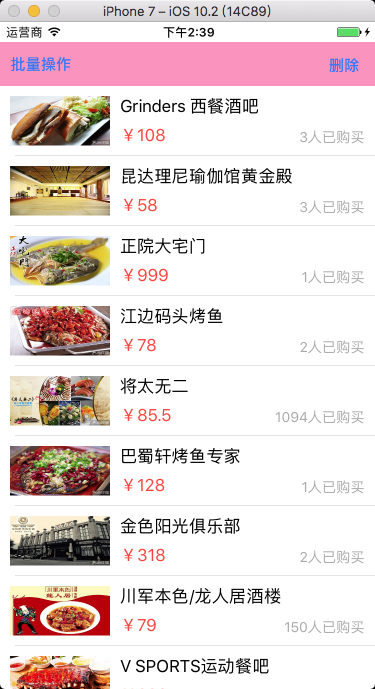
- (IBAction)remove {
// 临时数组:存放即将需要删除的团购数据
NSMutableArray *deletedDeals = [NSMutableArray array];
for (XMGDeal *deal in self.deals) {
if (deal.isChecked) [deletedDeals addObject:deal];
}
// 删除模型数据
[self.deals removeObjectsInArray:deletedDeals];
// 刷新表格
[self.tableView reloadData];
}
#pragma mark - Table view data source
- (NSInteger)tableView:(UITableView *)tableView numberOfRowsInSection:(NSInteger)section {
return self.deals.count;
}
- (UITableViewCell *)tableView:(UITableView *)tableView cellForRowAtIndexPath:(NSIndexPath *)indexPath {
XMGDealCell *cell = [XMGDealCell cellWithTableView:tableView];
// 取出模型数据
cell.deal = self.deals[indexPath.row];
return cell;
}
#pragma mark - TableView 代理方法
- (void)tableView:(UITableView *)tableView didSelectRowAtIndexPath:(NSIndexPath *)indexPath {
// 取消选中这一行
[tableView deselectRowAtIndexPath:indexPath animated:YES];
// 模型的打钩属性取反
XMGDeal *deal = self.deals[indexPath.row];
deal.checked = !deal.isChecked;
// 刷新表格
[tableView reloadData];
}
@end
-
运行效果
![TableView35]()
![TableView36]()
12.3 自定义方式 2
-
Objective-C
-
XMGDeal.h
#import <Foundation/Foundation.h>
    @interface XMGDeal : NSObject

    @property (strong, nonatomic) NSString *buyCount;
    @property (strong, nonatomic) NSString *price;
    @property (strong, nonatomic) NSString *title;
    @property (strong, nonatomic) NSString *icon;

    + (instancetype)dealWithDict:(NSDictionary *)dict;

    @end
-
XMGDeal.m
#import "XMGDeal.h"
    @implementation XMGDeal

    + (instancetype)dealWithDict:(NSDictionary *)dict {

        XMGDeal *deal = [[self alloc] init];
        [deal setValuesForKeysWithDictionary:dict];
        return deal;
    }

    @end
-
XMGDealCell.xib
![TableView39]()
-
XMGDealCell.h
    #import <UIKit/UIKit.h>

    @class XMGDeal;

    @interface XMGDealCell : UITableViewCell

    /** 团购模型数据 */
    @property (nonatomic, strong) XMGDeal *deal;

    + (instancetype)cellWithTableView:(UITableView *)tableView;

    @end
-
XMGDealCell.m
    #import "XMGDealCell.h"
    #import "XMGDeal.h"

    @interface XMGDealCell()

    @property (weak, nonatomic) IBOutlet UIImageView *iconView;
    @property (weak, nonatomic) IBOutlet UILabel *titleLabel;
    @property (weak, nonatomic) IBOutlet UILabel *buyCountLabel;
    @property (weak, nonatomic) IBOutlet UIImageView *checkView;
    @property (weak, nonatomic) IBOutlet UILabel *priceLabel;

    @end

    @implementation XMGDealCell

    + (instancetype)cellWithTableView:(UITableView *)tableView {

        static NSString *ID = @"deal";
        XMGDealCell *cell = [tableView dequeueReusableCellWithIdentifier:ID];
        if (cell == nil) {
            cell = [[[NSBundle mainBundle] loadNibNamed:NSStringFromClass([XMGDealCell class])
                                                  owner:nil
                                                options:nil] lastObject];
        }
        return cell;
    }

    - (void)setDeal:(XMGDeal *)deal {

        _deal = deal;

        // 设置数据
        self.iconView.image = [UIImage imageNamed:deal.icon];
        self.titleLabel.text = deal.title;
        self.priceLabel.text = [NSString stringWithFormat:@"¥%@", deal.price];
        self.buyCountLabel.text = [NSString stringWithFormat:@"%@人已购买", deal.buyCount];
    }

    @end
-
XMGDealsViewController.m
    #import "XMGDealsViewController.h"
    #import "XMGDeal.h"
    #import "XMGDealCell.h"

    @interface XMGDealsViewController () <UITableViewDataSource, UITableViewDelegate>

    @property (weak, nonatomic) IBOutlet UITableView *tableView;

    /** 所有的团购数据 */
    @property (nonatomic, strong) NSMutableArray *deals;

    /** 即将要删除的团购 */
    @property (nonatomic, strong) NSMutableArray *deletedDeals;

    @end

    @implementation XMGDealsViewController

    - (NSMutableArray *)deletedDeals {

        if (!_deletedDeals) {
            _deletedDeals = [NSMutableArray array];
        }
        return _deletedDeals;
    }

    - (NSMutableArray *)deals {

        if (_deals == nil) {

            // 加载plist中的字典数组
            NSString *path = [[NSBundle mainBundle] pathForResource:@"deals.plist" ofType:nil];
            NSArray *dictArray = [NSArray arrayWithContentsOfFile:path];

            // 字典数组 -> 模型数组
            NSMutableArray *dealArray = [NSMutableArray array];
            for (NSDictionary *dict in dictArray) {
                XMGDeal *deal = [XMGDeal dealWithDict:dict];
                [dealArray addObject:deal];
            }

            _deals = dealArray;
        }
        return _deals;
    }

    - (IBAction)remove {

        // 删除模型数据
        [self.deals removeObjectsInArray:self.deletedDeals];

        // 刷新表格
        [self.tableView reloadData];

        // 清空数组
        [self.deletedDeals removeAllObjects];
    }

    #pragma mark - Table view data source
    - (NSInteger)tableView:(UITableView *)tableView numberOfRowsInSection:(NSInteger)section {
        return self.deals.count;
    }

    - (UITableViewCell *)tableView:(UITableView *)tableView cellForRowAtIndexPath:(NSIndexPath *)indexPath {

        XMGDealCell *cell = [XMGDealCell cellWithTableView:tableView];

        // 取出模型数据
        cell.deal = self.deals[indexPath.row];

        cell.checkView.hidden = ![self.deletedDeals containsObject:cell.deal];

        return cell;
    }

    #pragma mark - TableView代理方法
    - (void)tableView:(UITableView *)tableView didSelectRowAtIndexPath:(NSIndexPath *)indexPath {

        // 取消选中这一行
        [tableView deselectRowAtIndexPath:indexPath animated:YES];

        // 取出模型
        XMGDeal *deal = self.deals[indexPath.row];
        if ([self.deletedDeals containsObject:deal]) {
            [self.deletedDeals removeObject:deal];
        } else {
            [self.deletedDeals addObject:deal];
        }

        // 刷新表格
        [tableView reloadData];
    }

    @end
-
运行效果
![TableView37]()
![TableView38]()
13、聊天布局
-
Objective-C
-
XMGMessage.h
    #import <UIKit/UIKit.h>

    typedef enum {
        XMGMessageTypeMe = 0,
        XMGMessageTypeOther = 1
    } XMGMessageType;

    @interface XMGMessage : NSObject

    @property (nonatomic, strong) NSString *text;
    @property (nonatomic, strong) NSString *time;
    @property (nonatomic, assign) XMGMessageType type;

    /** cell 的高度 */
    @property (nonatomic, assign) CGFloat cellHeight;

    /** 是否隐藏时间 */
    @property (nonatomic, assign, getter=isHideTime) BOOL hideTime;

    + (instancetype)messageWithDict:(NSDictionary *)dict;

    @end
-
XMGMessage.m
    #import "XMGMessage.h"

    @implementation XMGMessage

    + (instancetype)messageWithDict:(NSDictionary *)dict {

        XMGMessage *message = [[self alloc] init];
        [message setValuesForKeysWithDictionary:dict];
        return message;
    }

    @end
-
Main.storyboard
-
设置 cell
-
单 Cell 布局
![TableView16]()
-
多 Cell 布局
![TableView20]()
-
设置气泡图片拉伸
![TableView18]()
-
设置按钮边距
![TableView19]()
-
XMGMessageCell.h
    #import <UIKit/UIKit.h>

    @class XMGMessage;

    @interface XMGMessageCell : UITableViewCell

    @property (nonatomic, strong) XMGMessage *message;

    @end
-
XMGMessageCell.m
-
单 Cell 布局
    #import "XMGMessageCell.h"
    #import "XMGMessage.h"

    #define MAS_SHORTHAND
    #define MAS_SHORTHAND_GLOBALS
    #import "Masonry.h"

    @interface XMGMessageCell()

    @property (weak, nonatomic) IBOutlet UILabel *timeLabel;

    @property (weak, nonatomic) IBOutlet UIButton *textButton;
    @property (weak, nonatomic) IBOutlet UIImageView *iconView;

    @property (weak, nonatomic) IBOutlet UIButton *otherTextButton;
    @property (weak, nonatomic) IBOutlet UIImageView *otherIconView;

    @end

    @implementation XMGMessageCell

    - (void)awakeFromNib {

        self.textButton.titleLabel.numberOfLines = 0;
        self.otherTextButton.titleLabel.numberOfLines = 0;
    }

    - (void)setMessage:(XMGMessage *)message {

        _message = message;

        if (message.hideTime) { // 隐藏时间
            self.timeLabel.hidden = YES;
            [self.timeLabel updateConstraints:^(MASConstraintMaker *make) {
                make.height.equalTo(0);
            }];
        } else { // 显示时间
            self.timeLabel.text = message.time;
            self.timeLabel.hidden = NO;
            [self.timeLabel updateConstraints:^(MASConstraintMaker *make) {
                make.height.equalTo(21);
            }];
        }

        // 强制更新
        [self layoutIfNeeded];

        if (message.type == XMGMessageTypeMe) { // 右边
            [self settingShowTextButton:self.textButton
                           showIconView:self.iconView
                         hideTextButton:self.otherTextButton
                           hideIconView:self.otherIconView];
        } else { // 左边
            [self settingShowTextButton:self.otherTextButton
                           showIconView:self.otherIconView
                         hideTextButton:self.textButton
                           hideIconView:self.iconView];
        }
    }

    /**
     * 处理左右按钮、头像
     */
    - (void)settingShowTextButton:(UIButton *)showTextButton
                     showIconView:(UIImageView *)showIconView
                   hideTextButton:(UIButton *)hideTextButton
                     hideIconView:(UIImageView *)hideIconView {

        hideTextButton.hidden = YES;
        hideIconView.hidden = YES;

        showTextButton.hidden = NO;
        showIconView.hidden = NO;

        // 设置按钮的文字
        [showTextButton setTitle:self.message.text forState:UIControlStateNormal];

        // 强制更新
        [showTextButton layoutIfNeeded];

        // 设置按钮的高度就是titleLabel的高度
        [showTextButton updateConstraints:^(MASConstraintMaker *make) {
            CGFloat buttonH = showTextButton.titleLabel.frame.size.height + 30;
            make.height.equalTo(buttonH);
        }];

        // 强制更新
        [showTextButton layoutIfNeeded];

        // 计算当前 cell 的高度
        CGFloat buttonMaxY = CGRectGetMaxY(showTextButton.frame);
        CGFloat iconMaxY = CGRectGetMaxY(showIconView.frame);
        self.message.cellHeight = MAX(buttonMaxY, iconMaxY) + 10;
    }

    @end
-
多 Cell 布局
    #import "XMGMessageCell.h"
    #import "XMGMessage.h"

    #define MAS_SHORTHAND
    #define MAS_SHORTHAND_GLOBALS
    #import "Masonry.h"

    @interface XMGMessageCell()

    @property (weak, nonatomic) IBOutlet UILabel *timeLabel;
    @property (weak, nonatomic) IBOutlet UIButton *textButton;
    @property (weak, nonatomic) IBOutlet UIImageView *iconView;

    @end

    @implementation XMGMessageCell

    - (void)awakeFromNib {

        self.textButton.titleLabel.numberOfLines = 0;
    }

    - (void)setMessage:(XMGMessage *)message {

        _message = message;

        // 时间处理
        if (message.hideTime) { // 隐藏时间
            self.timeLabel.hidden = YES;
            [self.timeLabel updateConstraints:^(MASConstraintMaker *make) {
                make.height.equalTo(0);
            }];
        } else { // 显示时间
            self.timeLabel.text = message.time;
            self.timeLabel.hidden = NO;
            [self.timeLabel updateConstraints:^(MASConstraintMaker *make) {
                make.height.equalTo(21);
            }];
        }

        // 处理显示的消息文字
        // 设置按钮的文字
        [self.textButton setTitle:self.message.text forState:UIControlStateNormal];

        // 强制更新
        [self layoutIfNeeded];

        // 设置按钮的高度就是titleLabel的高度
        [self.textButton updateConstraints:^(MASConstraintMaker *make) {
            CGFloat buttonH = self.textButton.titleLabel.frame.size.height + 30;
            make.height.equalTo(buttonH);
        }];

        // 强制更新
        [self layoutIfNeeded];

        // 计算当前cell的高度
        CGFloat buttonMaxY = CGRectGetMaxY(self.textButton.frame);
        CGFloat iconMaxY = CGRectGetMaxY(self.iconView.frame);
        self.message.cellHeight = MAX(buttonMaxY, iconMaxY) + 10;
    }

    @end
-
XMGChatingViewController.m
    #import "XMGChatingViewController.h"
    #import "XMGMessage.h"
    #import "XMGMessageCell.h"

    @interface XMGChatingViewController () <UITableViewDataSource, UITableViewDelegate>

    @property (nonatomic, strong) NSArray *messages;

    @end

    @implementation XMGChatingViewController

    - (NSArray *)messages {

        if (_messages == nil) {

            // 加载plist中的字典数组
            NSString *path = [[NSBundle mainBundle] pathForResource:@"messages.plist" ofType:nil];
            NSArray *dictArray = [NSArray arrayWithContentsOfFile:path];

            // 字典数组 -> 模型数组
            NSMutableArray *messageArray = [NSMutableArray array];

            // 用来记录上一条消息模型
            XMGMessage *lastMessage = nil;
            for (NSDictionary *dict in dictArray) {
                XMGMessage *message = [XMGMessage messageWithDict:dict];

                //埋下伏笔,加载数据时,判断哪个时间值相等。
                message.hideTime = [message.time isEqualToString:lastMessage.time];
                [messageArray addObject:message];

                lastMessage = message;
            }

            _messages = messageArray;
        }
        return _messages;
    }

    #pragma mark - <UITableViewDataSource>
    - (NSInteger)tableView:(UITableView *)tableView numberOfRowsInSection:(NSInteger)section {
        return self.messages.count;
    }

    - (UITableViewCell *)tableView:(UITableView *)tableView cellForRowAtIndexPath:(NSIndexPath *)indexPath {

        XMGMessageCell *cell = [tableView dequeueReusableCellWithIdentifier:@"message"];

        cell.message = self.messages[indexPath.row];

        return cell;
    }

    #pragma mark - <UITableViewDelegate>
    - (CGFloat)tableView:(UITableView *)tableView estimatedHeightForRowAtIndexPath:(NSIndexPath *)indexPath {
        return 200;
    }

    - (CGFloat)tableView:(UITableView *)tableView heightForRowAtIndexPath:(NSIndexPath *)indexPath {

        XMGMessage *message = self.messages[indexPath.row];
        return message.cellHeight;
    }

    @end
-
效果
![TableView17]()
14、tableView 的协议方法
需遵守协议 UITableViewDataSource, UITableViewDelegate,并设置代理
-
UITableViewDelegate 继承自 UIScrollViewDelegate
@protocol UITableViewDelegate<NSObject, UIScrollViewDelegate>
14.1 UITableViewDataSource 和 UITableViewDelegate 协议方法
-
Objective-C
-
分段、行 设置
    // 设置分段数,设置 tableView 有多少个分段
    - (NSInteger)numberOfSectionsInTableView:(UITableView *)tableView {

        return myDataArray.count;
    }

    // 设置行数,设置 tableView 中每段中有多少行,section 就是第几分段
    - (NSInteger)tableView:(UITableView *)tableView numberOfRowsInSection:(NSInteger)section {

        return [[myDataArray objectAtIndex:section] count];
    }

    // 设置行高 ,默认为 44
    - (CGFloat)tableView:(UITableView *)tableView heightForRowAtIndexPath:(NSIndexPath *)indexPath {

        return 60;
    }

    // 设置估计行高
    - (CGFloat)tableView:(UITableView *)tableView estimatedHeightForRowAtIndexPath:(NSIndexPath *)indexPath {

        /*
            只要返回了估计高度,那么就会先调用 tableView:cellForRowAtIndexPath: 方法创建 cell,
            再调用 tableView:heightForRowAtIndexPath: 方法获取 cell 的真实高度,
            并且显示一个 cell,调用一次 tableView:heightForRowAtIndexPath: 方法。

            如果不返回估计高度,会先调用 tableView:heightForRowAtIndexPath: 方法,
            再调用 tableView:heightForRowAtIndexPath: 方法,
            并且一次性全部调用总 cell 数量次 tableView:heightForRowAtIndexPath: 方法。
        */

        return 60;
    }

    // 设置每一行显示的内容,每当有一个 cell 进入视野范围内就会调用
    - (UITableViewCell *)tableView:(UITableView *)tableView cellForRowAtIndexPath:(NSIndexPath *)indexPath {

        return cell;
    }
-
分段的头、脚标题 设置
    // 设置分段的头标题高度
    - (CGFloat)tableView:(UITableView *)tableView heightForHeaderInSection:(NSInteger)section {

        return 40;
    }

    // 设置分段的脚标题高度
    - (CGFloat)tableView:(UITableView *)tableView heightForFooterInSection:(NSInteger)section {

        return 30;
    }

    // 设置分段的头标题估计高度
    - (CGFloat)tableView:(UITableView *)tableView estimatedHeightForHeaderInSection:(NSInteger)section {

        return 40;
    }

    // 设置分段的脚标题估计高度
    - (CGFloat)tableView:(UITableView *)tableView estimatedHeightForFooterInSection:(NSInteger)section {

        return 30;
    }

    // 设置分段的头标题内容
    - (NSString *)tableView:(UITableView *)tableView titleForHeaderInSection:(NSInteger)section {

        if (0 == section) {
            return @"1 Header";
        }
        else{
            return @"2 rHeader";
        }
    }

    // 设置分段的脚标题内容
    - (NSString *)tableView:(UITableView *)tableView titleForFooterInSection:(NSInteger)section {

        if (0 == section) {
            return @"2 Footer";
        }
        else{
            return @"2 Footer";
        }
    }

    // 设置分段头标题视图,返回自定义的标题视图
    - (UIView *)tableView:(UITableView *)tableView viewForHeaderInSection:(NSInteger)section {

        return myView;
    }

    // 设置分段脚标题视图,返回自定义的标题视图
    - (UIView *)tableView:(UITableView *)tableView viewForFooterInSection:(NSInteger)section {

        return myView;
    }
-
分段索引条 设置
    // 创建索引条
    - (NSArray *)sectionIndexTitlesForTableView:(UITableView *)tableView {

        return array;
    }

    // 设置索引条偏移量,默认索引条与分段一一对应时,可以不写该方法
    - (NSInteger)tableView:(UITableView *)tableView sectionForSectionIndexTitle:(NSString *)title atIndex:(NSInteger)index {
        /*
             点击索引条上字符串的时候 tableView 会跳转到对应的分段,是根据位置计算的,点击索引条上第几个,tableView 就会跳到第几段。

             如果索引条的前面加了个搜索小图标等,需要重写这个方法。
         */
    }
-
表格点击 设置
    // 表格选中点击响应事件,表格被选中
    - (void)tableView:(UITableView *)tableView didSelectRowAtIndexPath:(NSIndexPath *)indexPath {

    }

    // 表格取消选中点击响应事件,表格被取消选中
    - (void)tableView:(UITableView *)tableView didDeselectRowAtIndexPath:(NSIndexPath *)indexPath {

    }

    // 附属控件 button 点击响应事件
    - (void)tableView:(UITableView *)tableView accessoryButtonTappedForRowWithIndexPath:(NSIndexPath *)indexPath {

        // 如果系统自带的附属控件里有 button ,附属控件的点击事件会独立出来
    }
-
表格编辑 设置
    // 表格删除、插入
    - (void)tableView:(UITableView *)tableView commitEditingStyle:(UITableViewCellEditingStyle)editingStyle forRowAtIndexPath:(NSIndexPath *)indexPath {

        // 表格删除或插入,默认为删除模式,写入该方法即表示允许删除。
    }

    // 设置编辑模式
    - (UITableViewCellEditingStyle)tableView:(UITableView *)tableView editingStyleForRowAtIndexPath:(NSIndexPath *)indexPath {

        // 删除、插入、多选删除,不设置默认时为删除
    }

    // 修改左滑删除按钮的内容
    - (NSString *)tableView:(UITableView *)tableView titleForDeleteConfirmationButtonForRowAtIndexPath:(NSIndexPath *)indexPath {

        return @"删除";
    }

    // 设置左滑多按钮
    - (NSArray *)tableView:(UITableView *)tableView editActionsForRowAtIndexPath:(NSIndexPath *)indexPath {

        // 按钮从右向左的顺序排列
        return @[action1, action0];
    }

    // 表格移动
    - (void)tableView:(UITableView *)tableView moveRowAtIndexPath:(NSIndexPath *)sourceIndexPath toIndexPath:(NSIndexPath *)destinationIndexPath {

    }
-
Swift
-
分段、行 设置
    // 设置分段数,设置 tableView 有多少个分段
    func numberOfSectionsInTableView(tableView: UITableView) -> Int {

        return myDataArray.count
    }

    // 设置行数,设置 tableView 中每段中有多少行,section 就是第几分段
    func tableView(tableView: UITableView, numberOfRowsInSection section: Int) -> Int {

        return myDataArray[section].count
    }

    // 设置行高,默认为 44
    func tableView(tableView: UITableView, heightForRowAtIndexPath indexPath: NSIndexPath) -> CGFloat {

        return 60
    }

    // 设置估计行高
    func tableView(tableView: UITableView, estimatedHeightForRowAtIndexPath indexPath: NSIndexPath) -> CGFloat {

        /*
            只要返回了估计高度,那么就会先调用 tableView:cellForRowAtIndexPath: 方法创建 cell,
            再调用 tableView:heightForRowAtIndexPath: 方法获取 cell 的真实高度,
            并且显示一个 cell,调用一次 tableView:heightForRowAtIndexPath: 方法。

            如果不返回估计高度,会先调用 tableView:heightForRowAtIndexPath: 方法,
            再调用 tableView:heightForRowAtIndexPath: 方法,
            并且一次性全部调用总 cell 数量次 tableView:heightForRowAtIndexPath: 方法。
        */

        return 60
    }

    // 设置每一行显示的内容,每当有一个 cell 进入视野范围内就会调用
    func tableView(tableView: UITableView, cellForRowAtIndexPath indexPath: NSIndexPath) -> UITableViewCell {

        return cell
    }
-
分段的头、脚标题 设置
    // 设置分段的头标题高度
    func tableView(tableView: UITableView, heightForHeaderInSection section: Int) -> CGFloat {

        return 40
    }

    // 设置分段的脚标题高度
    func tableView(tableView: UITableView, heightForFooterInSection section: Int) -> CGFloat {

        return 30
    }

    // 设置分段的头标题估计高度
    func tableView(tableView: UITableView, estimatedHeightForHeaderInSection section: Int) -> CGFloat {

        return 40
    }

    // 设置分段的脚标题估计高度
    func tableView(tableView: UITableView, estimatedHeightForFooterInSection section: Int) -> CGFloat {

        return 30
    }

    // 设置分段的头标题内容
    func tableView(tableView: UITableView, titleForHeaderInSection section: Int) -> String? {

        if 0 == section {
            return "1 Header"
        }
        else {
            return "2 Header"
        }
    }

    // 设置分段的脚标题内容
    func tableView(tableView: UITableView, titleForFooterInSection section: Int) -> String? {

        if 0 == section {
            return "1 Footer"
        }
        else {
            return "2 Footer"
        }
    }

    // 设置分段头标题视图,返回自定义的标题视图
    func tableView(tableView: UITableView, viewForHeaderInSection section: Int) -> UIView? {

        return myView
    }

    // 设置分段脚标题视图,返回自定义的标题视图
    func tableView(tableView: UITableView, viewForFooterInSection section: Int) -> UIView? {

        return myView
    }
-
分段索引条 设置
    // 创建索引条
    func sectionIndexTitlesForTableView(tableView: UITableView) -> [String]? {

        return array
    }

    // 设置索引条偏移量,默认索引条与分段一一对应时,可以不写该方法
    func tableView(tableView: UITableView, sectionForSectionIndexTitle title: String, atIndex index: Int) -> Int {

        /*
            点击索引条上字符串的时候 tableView 会跳转到对应的分段,是根据位置计算的,点击索引条上第几个,tableView 就会跳到第几段。

            如果索引条的前面加了个搜索小图标等,需要重写这个方法。
        */
    }
-
表格点击 设置
    // 表格选中点击响应事件,表格被选中
    func tableView(tableView: UITableView, didSelectRowAtIndexPath indexPath: NSIndexPath) {

    }

    // 表格取消选中点击响应事件,表格被取消选中
    func tableView(tableView: UITableView, didDeselectRowAtIndexPath indexPath: NSIndexPath) {

    }

    // 附属控件 button 点击响应事件
    func tableView(tableView: UITableView, accessoryButtonTappedForRowWithIndexPath indexPath: NSIndexPath) {

        // 如果系统自带的附属控件里有 button ,附属控件的点击事件会独立出来
    }
-
表格编辑 设置
    // 表格删除、插入
    func tableView(tableView: UITableView, commitEditingStyle editingStyle: UITableViewCellEditingStyle, forRowAtIndexPath indexPath: NSIndexPath) {

        // 表格删除或插入,默认为删除模式,写入该方法即表示允许删除。
    }

    // 设置编辑模式
    func tableView(tableView: UITableView, editingStyleForRowAtIndexPath indexPath: NSIndexPath) -> UITableViewCellEditingStyle {

        // 删除、插入、多选删除,不设置默认时为删除
    }

    // 修改左滑删除按钮的内容
    func tableView(tableView: UITableView, titleForDeleteConfirmationButtonForRowAtIndexPath indexPath: NSIndexPath) -> String? {

        return "删除"
    }

    // 设置左滑多按钮
    func tableView(tableView: UITableView, editActionsForRowAt indexPath: IndexPath) -> [UITableViewRowAction]? {

        // 按钮从右向左的顺序排列
        return [action1, action0]
    }

    // 表格移动
    func tableView(tableView: UITableView, moveRowAtIndexPath sourceIndexPath: NSIndexPath, toIndexPath destinationIndexPath: NSIndexPath) {

    }
14.2 UIScrollViewDelegate 协议方法
-
Objective-C
-
拖拽
    // 将要开始拖拽
    - (void)scrollViewWillBeginDragging:(UIScrollView *)scrollView {

    }

    // 将要结束拖拽
    - (void)scrollViewWillEndDragging:(UIScrollView *)scrollView withVelocity:(CGPoint)velocity targetContentOffset:(inout CGPoint *)targetContentOffset {

    }

    // 已经结束拖拽,decelerate 松手后 是否有惯性滚动 0:没有,1:有
    - (void)scrollViewDidEndDragging:(UIScrollView *)scrollView willDecelerate:(BOOL)decelerate {

    }
-
滚动
    // 滚动过程中,只要滚动就会触发
    - (void)scrollViewDidScroll:(UIScrollView *)scrollView {

    }

    // 已经结束滚动,滚动动画停止时执行,代码改变时触发,也就是 setContentOffset 改变时
    - (void)scrollViewDidEndScrollingAnimation:(UIScrollView *)scrollView {

    }
-
惯性滚动
    // 将要开始惯性滚动
    - (void)scrollViewWillBeginDecelerating:(UIScrollView *)scrollView {

    }

    // 已经结束惯性滚动
    - (void)scrollViewDidEndDecelerating:(UIScrollView *)scrollView {

    }
-
滚到顶端
    // 设置点击状态栏时是否滚到顶端
    - (BOOL)scrollViewShouldScrollToTop:(UIScrollView *)scrollView {

        return YES;
    }

    // 已经滚到顶端,点击状态栏时调用
    - (void)scrollViewDidScrollToTop:(UIScrollView *)scrollView {

    }
-
缩放
    // 设置被缩放的空间,一个 scrollView 中只能有一个子控件被缩放,如果有很多个子控件缩放时会引起错乱
    - (UIView *)viewForZoomingInScrollView:(UIScrollView *)scrollView {

        return [scrollView.subviews[0] viewWithTag:100];
    }

    // 将要开始缩放
    - (void)scrollViewWillBeginZooming:(UIScrollView *)scrollView withView:(UIView *)view {

    }

    // 已经结束缩放
    - (void)scrollViewDidEndZooming:(UIScrollView *)scrollView withView:(UIView *)view atScale:(CGFloat)scale {

    }

    // 缩放过程中,只要缩放就会触发
    - (void)scrollViewDidZoom:(UIScrollView *)scrollView {

    }
-
Swift
-
拖拽
    // 将要开始拖拽
    func scrollViewWillBeginDragging(scrollView: UIScrollView) {

    }

    // 将要结束拖拽
    func scrollViewWillEndDragging(scrollView: UIScrollView, withVelocity velocity: CGPoint, targetContentOffset: UnsafeMutablePointer<CGPoint>) {

    }

    // 已经结束拖拽,decelerate 松手后 是否有惯性滚动 0:没有,1:有
    func scrollViewDidEndDragging(scrollView: UIScrollView, willDecelerate decelerate: Bool) {

    }
-
滚动
    // 滚动过程中,只要滚动就会触发,只要滚动就会触发
    func scrollViewDidScroll(scrollView: UIScrollView) {

    }

    // 已经结束滚动,滚动动画停止时执行,代码改变时触发,也就是 setContentOffset 改变时
    func scrollViewDidEndScrollingAnimation(scrollView: UIScrollView) {

    }
-
惯性滚动
    // 将要开始惯性滚动
    func scrollViewWillBeginDecelerating(scrollView: UIScrollView) {

    }

    // 已经结束惯性滚动
    func scrollViewDidEndDecelerating(scrollView: UIScrollView) {

    }
-
滚到顶端
    // 设置点击状态栏时是否滚到顶端
    func scrollViewShouldScrollToTop(scrollView: UIScrollView) -> Bool {

        return true
    }

    // 已经滚到顶端,点击状态栏时调用
    func scrollViewDidScrollToTop(scrollView: UIScrollView) {

    }
-
缩放
    // 设置被缩放的空间,一个 scrollView 中只能有一个子控件被缩放,如果有很多个子控件缩放时会引起错乱
    func viewForZoomingInScrollView(scrollView: UIScrollView) -> UIView? {

        return scrollView.subviews[0].viewWithTag(100)
    }

    // 将要开始缩放
    func scrollViewWillBeginZooming(scrollView: UIScrollView, withView view: UIView?) {

    }

    // 已经结束缩放
    func scrollViewDidEndZooming(scrollView: UIScrollView, withView view: UIView?, atScale scale: CGFloat) {

    }

    // 缩放过程中,只要缩放就会触发
    func scrollViewDidZoom(scrollView: UIScrollView) {

    }
15、Storyboard 中设置