Shiro简介
Apache Shiro是一款功能强大、易用的轻量级开源Java安全框架,它主要提供认证、鉴权、加密和会话管理等功能。Spring Security可能是业界用的最广泛的安全框架,但是Spring Security和Spring耦合的太重,脱离了Spring框架就使用不了,所以一个轻量级的安全框架有时也是一个非常不错的选择。
Shiro主要通过安全API来提供四个方面使用:
- 认证 Authentication –提供用户身份,可以理解为登录验证。
- 授权 Authorization –访问控制,也就是通常所讲ACL(Access Control List)的RBAC(Role Base Access Control)或者ABAC(Attribute Base Access Control)。
- 加密 Cryptography –加密、保护数据,确保数据安全。
- 会话管理 Session Management –登录后的会话管理,Shiro有独立的会话管理机制,可以是J2EE的会话,也可以是普通Java应用的。
![]()
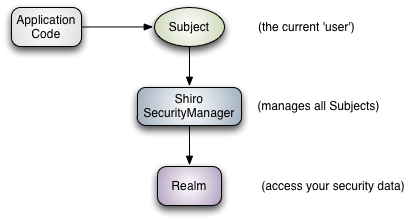
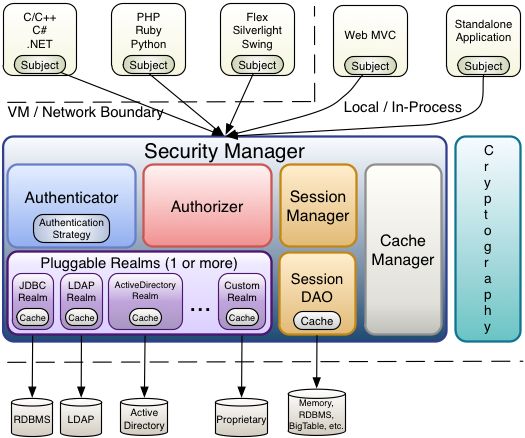
Shiro有几个关键的核心概念:Subject,SecurityManager和Realms,我们简单的介绍下这几个概念的含义:
Subject
权限责任主体,主要是让系统识别要管理的对象,比如一般系统的用户,这个也不一定是人,也可以是一台设备,Subject有登录、注销、权限检测等操作。所有的Subject都会绑定到SecurityManager上面,所有Subject的交互都会委托给SecurityManager。
SecurityManager
安全管理器,所有和安全相关的操作都会与SecurityManager打交道,它管理着所有的Subject,它就是Shiro的架构核心
Realm
领域,Shiro从Realm中获取安全数据。Realm扮演者Shiro和应用之间的桥梁,比如用户、角色列表。应用可以自定义实现不同的Realm,Shiro也提供了几个开箱即用的Realm,比如SimpleAccountRealm、IniRealm、JdbcRealm和DefaultLdapRealm、JndiRealm。通过这些简单的Realm我们可以很简单的上手Shiro,基本上所有定制化的扩展点都在实现自定义的Realm。
![]()
既然Shiro可以提供如此全面、简单易用的安全权限功能,那么ServiceComb是不是也可以非常方便的来进行集成呢?
答案当然是可以了。
简单集成
ServiceComb集成Shiro,可以使用两种方案,一种是集成Vertx-shiro,使用这种方法前提是使用Rest over Vertx的Transport方式,另外一种就是使用ServiceComb的handler或者HttpServerFilter扩展点机制。
第一种方式优点是可以使用异步的方式,完全使用vertx的扩展机制,跟ServiceComb关联不大,只需要扩展实现一个org.apache.servicecomb.transport.rest.vertx.VertxHttpDispatcher,在init方法中把认证逻辑加到要过滤的URL上。
1、 在POM中引入vertx-shiro依赖
<dependency>
    <groupId>io.vertx</groupId>
    <artifactId>vertx-auth-shiro</artifactId>
    <version>3.6.3</version>
</dependency>
2、 增加vertx-shiro的用户、角色配置文件test-auth.properties
user.root = rootPassword,administrator
user.jsmith = jsmithPassword,manager,engineer,employee
user.abrown = abrownPassword,qa,employee
user.djones = djonesPassword,qa,contractor
user.test = testPassword,qa,contractor

role.administrator = *
role.manager = "user:read,write", file:execute:/usr/local/emailManagers.sh
role.engineer = "file:read,execute:/usr/local/tomcat/bin/startup.sh"
role.employee = application:use:wiki
role.qa = "server:view,start,shutdown,restart:someQaServer", server:view:someProductionServer
role.contractor = application:use:timesheet
3、 扩展实现VertxHttpDispatcher
package com.service.servicecombshiro;

import org.apache.servicecomb.foundation.vertx.VertxUtils;
import org.apache.servicecomb.transport.rest.vertx.VertxRestDispatcher;

import io.vertx.core.Vertx;
import io.vertx.core.json.JsonObject;
import io.vertx.ext.auth.AuthProvider;
import io.vertx.ext.auth.User;
import io.vertx.ext.auth.shiro.ShiroAuth;
import io.vertx.ext.auth.shiro.ShiroAuthOptions;
import io.vertx.ext.auth.shiro.ShiroAuthRealmType;
import io.vertx.ext.web.Router;

public class AuthVertxHttpDispatcher extends VertxRestDispatcher {

  @Override
  public boolean enabled() {
    return true;
  }

  @Override
  public int getOrder() {
    return 0;
  }

  @Override
  public void init(Router router) {
    JsonObject config = new JsonObject().put("properties_path", "classpath:test-auth.properties");
    Vertx vertx = VertxUtils.getVertxMap().get("transport");
    AuthProvider authProvider = ShiroAuth
        .create(vertx, new ShiroAuthOptions().setType(ShiroAuthRealmType.PROPERTIES).setConfig(config));

    router.route().handler(rc -> {
      JsonObject authInfo = new JsonObject().put("username", "test").put("password", "testPassword");
      authProvider.authenticate(authInfo, res -> {
        if (res.failed()) {
          // Failed!
          rc.response().setStatusCode(401).end("No right!");
          return;
        }
        User user = res.result();
        System.out.println(user.principal());
        rc.next();
      });
    });
  }
}
第二种方式就是使用扩展点的机制,示例中使用HttpServerFilter扩展点机制,所有的REST请求都会走到HttpServerFilter逻辑。具体实现如下:
1、 引入shiro的依赖
<dependency>
    <groupId>org.apache.shiro</groupId>
    <artifactId>shiro-core</artifactId>
    <version>1.4.1</version>
</dependency>
2、 定义shiro的用户信息文件src\main\resources\shiro.ini文件
[users]
admin=123456
user1=Test123456
3、 使用SPI机制实现一个HttpServerFilter来做身份认证,这个简单的示例我们使用Http Basic Auth的认证方式来实现基本的身份认证。首先要初始化一个SecurityManager,并注入一个Realm,然后在afterReceiveRequest方法中获取身份信息,并且对身份信息做校验。(由于Shiro当前很多实现都是使用了线程上下文来传递SecurityManager,所以本实例只能使用同步编码的方式)
package com.service.servicecombshiro.auth;

import org.apache.servicecomb.common.rest.filter.HttpServerFilter;
import org.apache.servicecomb.core.Invocation;
import org.apache.servicecomb.foundation.vertx.http.HttpServletRequestEx;
import org.apache.servicecomb.swagger.invocation.Response;
import org.apache.shiro.SecurityUtils;
import org.apache.shiro.authc.AuthenticationException;
import org.apache.shiro.authc.UsernamePasswordToken;
import org.apache.shiro.codec.Base64;
import org.apache.shiro.mgt.DefaultSecurityManager;
import org.apache.shiro.realm.Realm;
import org.apache.shiro.realm.text.IniRealm;
import org.apache.shiro.subject.Subject;

public class HttpAuthFilter implements HttpServerFilter {

  private org.apache.shiro.mgt.SecurityManager securityManager;

  public HttpAuthFilter() {
    Realm realm = new IniRealm("classpath:shiro.ini");  //使用ini的配置方法来初始化Realm
    this.securityManager = new DefaultSecurityManager(realm);        //初始化SecurityManager
  }

  @Override
  public int getOrder() {
    return -10000;  // 确保这个Filter在一般的filter之前先执行
  }

  @Override
  public Response afterReceiveRequest(Invocation invocation, HttpServletRequestEx httpServletRequestEx) {
    SecurityUtils.setSecurityManager(securityManager);  // 因为用到了线程上下文,只支持同步编码方式
    Subject user = SecurityUtils.getSubject();
    String userInfo = httpServletRequestEx.getHeader("Authorization");
    if (userInfo == null || userInfo.isEmpty()) {
      return Response.create(401, "Unauthorized",
          "WWW-Authenticate: Basic realm=protected_docs");
    }
    if (userInfo.length() < 5 || !userInfo.startsWith("Basic")) {
      return Response.create(401, "Unauthorized",
          "Header is wrong!");
    }
    String authInfo = userInfo.substring(5).trim();
    String[] authInfos = Base64.decodeToString(authInfo).split(":");
    if (authInfos.length != 2) {
      return Response.create(401, "Unauthorized",
          "Header is wrong!");
    }
    UsernamePasswordToken token = new UsernamePasswordToken(authInfos[0], authInfos[1]); // 获取到请求的用户名和密码
    String path = httpServletRequestEx.getPathInfo();
    if (path.startsWith("/auth")) { // 只对特定的资源检测
      try {
        user.login(token);  // 登录不报异常表示成功了
      } catch (AuthenticationException e) {
        System.out.println("Has no right!");  // 异常表示身份认证失败
        return Response.create(401, "Unauthorized", e.getMessage());
      }
    }
    return null;
  }
}
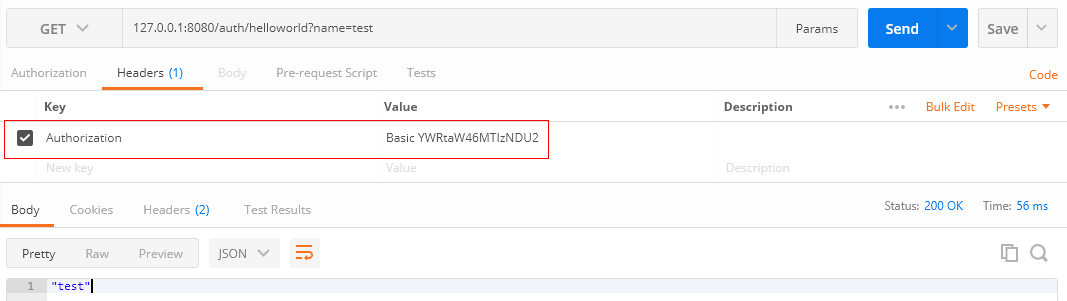
4、 发送请求进行验证
curl -X GET 'http://127.0.0.1:8080/auth/helloworld?name=test' -H 'authorization: Basic YWRtaW46MTIzNDU2'
![]()
分布式集成
微服务化的系统中,应用一般都是无状态的,所以服务器端一般不会实现传统的J2EE容器的会话机制,而是使用外置会话、Oath2协议,也可以使用无会话方案,每次请求客户端都带上身份信息,服务端都对客户端的身份进行识别,这种方案典型实现就是JWT。
![]()
1、 引入JWT和Shiro依赖
<dependency>
    <groupId>org.apache.shiro</groupId>
    <artifactId>shiro-core</artifactId>
    <version>1.4.1</version>
</dependency>
<dependency>
    <groupId>com.auth0</groupId>
    <artifactId>java-jwt</artifactId>
    <version>3.8.2</version>
</dependency>
2、 定义shiro的用户配置文件src\main\resources\shiro.ini
[users]
admin=123456
user1=Test123456
3、 实现一个JWTUtils,主要用来做JWT Token的签名和校验
package com.service.servicecombshiro.auth;

import java.util.Date;

import org.slf4j.Logger;
import org.slf4j.LoggerFactory;

import com.auth0.jwt.JWT;
import com.auth0.jwt.algorithms.Algorithm;
import com.auth0.jwt.exceptions.JWTCreationException;
import com.auth0.jwt.exceptions.JWTDecodeException;
import com.auth0.jwt.exceptions.JWTVerificationException;
import com.auth0.jwt.interfaces.DecodedJWT;
import com.auth0.jwt.interfaces.JWTVerifier;

public class JWTUtils {
  private static final Logger LOGGER = LoggerFactory.getLogger(JWTUtils.class);

  private static final int TOKEN_VALID_TIME = 5 * 60 * 1000;

  public static boolean verify(String username, String secret, String token) {
    try {
      Algorithm algorithm = Algorithm.HMAC256(secret);
      JWTVerifier verifier = JWT.require(algorithm)
          .withClaim("username", username)
          .build();
      DecodedJWT decodedJWT = verifier.verify(token);
      System.out.println(decodedJWT.getExpiresAt());
      return true;
    } catch (JWTVerificationException exception) {
      return false;
    }
  }

  public static String sign(String username, String secret) {
    try {
      Algorithm algorithm = Algorithm.HMAC256(secret);
      String token = JWT.create().withClaim("username", username)
          .withExpiresAt(new Date(System.currentTimeMillis() + TOKEN_VALID_TIME))
          .sign(algorithm);
      return token;
    } catch (JWTCreationException exception) {
      return null;
    }
  }

  public static String decodeToken(String token) {

    try {
      DecodedJWT jwt = JWT.decode(token);
      return jwt.getClaim("username").asString();
    } catch (JWTDecodeException e) {
      LOGGER.error("token is error", e);
      return null;
    }
  }
}
4、 实现一个JWTSubjectFactory,用来生成Subject,JWT认证不需要会话信息,需要设置不创建会话。
package com.service.servicecombshiro.auth;

import org.apache.shiro.mgt.DefaultSubjectFactory;
import org.apache.shiro.subject.Subject;
import org.apache.shiro.subject.SubjectContext;

public class JWTSubjectFactory extends DefaultSubjectFactory {
  @Override
  public Subject createSubject(SubjectContext context) {
    context.setSessionCreationEnabled(false);  // 不创建会话
    return super.createSubject(context);
  }
}
5、 创建一个JWTToken,保存JWT请求的token信息。
package com.service.servicecombshiro.auth;

import org.apache.shiro.authc.AuthenticationToken;

public class JWTToken implements AuthenticationToken {
  private String token;

  public JWTToken(String token) {
    this.token = token;
  }
  @Override
  public Object getPrincipal() {
    return token;
  }

  @Override
  public Object getCredentials() {
    return token;
  }
}
6、 实现一个JWTRealm,直接继承IniRealm,这样就可以直接使用配置文件来配置用户信息了,非常简单。主要的就是要实现JWT的token解码和认证。
package com.service.servicecombshiro.auth;

import org.apache.shiro.authc.AuthenticationException;
import org.apache.shiro.authc.AuthenticationInfo;
import org.apache.shiro.authc.AuthenticationToken;
import org.apache.shiro.authc.ExpiredCredentialsException;
import org.apache.shiro.authc.LockedAccountException;
import org.apache.shiro.authc.SimpleAccount;
import org.apache.shiro.authc.SimpleAuthenticationInfo;
import org.apache.shiro.authz.AuthorizationInfo;
import org.apache.shiro.realm.text.IniRealm;
import org.apache.shiro.subject.PrincipalCollection;

public class JWTRealm extends IniRealm {

  public JWTRealm(String resourcePath) {
    super(resourcePath);
  }

  @Override
  public boolean supports(AuthenticationToken token) {
    return token != null && token instanceof JWTToken;
  }

  @Override
  protected AuthorizationInfo doGetAuthorizationInfo(PrincipalCollection principals) {
    String username = JWTUtils.decodeToken(principals.toString());
    USERS_LOCK.readLock().lock();
    try {
      return this.users.get(username);
    } finally {
      USERS_LOCK.readLock().unlock();
    }
  }

  @Override
  protected AuthenticationInfo doGetAuthenticationInfo(AuthenticationToken token) throws AuthenticationException {
    JWTToken jwtToken = (JWTToken) token;
    String username = JWTUtils.decodeToken(jwtToken.getCredentials().toString()); //解token,获取用户名信息
    SimpleAccount account = getUser(username);
    if (account != null) {
      if (account.isLocked()) {
        throw new LockedAccountException("Account [" + account + "] is locked.");
      }
      if (account.isCredentialsExpired()) {
        String msg = "The credentials for account [" + account + "] are expired";
        throw new ExpiredCredentialsException(msg);
      }
    }
    // token校验,根据用户、密码和token,验证token是否有效
    if (!JWTUtils.verify(username, account.getCredentials().toString(), jwtToken.getCredentials().toString())) {
      throw new AuthenticationException("the token is error, please renew one!");
    }
    // 校验成功,返回认证完的身份信息
    SimpleAuthenticationInfo simpleAuthenticationInfo = new SimpleAuthenticationInfo(username,
        jwtToken.getCredentials(), getName());
    return simpleAuthenticationInfo;
  }

  public boolean canLogin(String username, String password) {
    SimpleAccount account = getUser(username);
    if (account == null) {
      return false;
    }
    if (account.getCredentials().toString().equals(password)) {
      return true;
    }
    return false;
  }
}
7、 最后就是在HTTPServerFilter里面对请求做身份认证,因为是无状态的,所以不需要生成会话。
package com.service.servicecombshiro.auth;

import org.apache.servicecomb.common.rest.filter.HttpServerFilter;
import org.apache.servicecomb.core.Invocation;
import org.apache.servicecomb.foundation.vertx.http.HttpServletRequestEx;
import org.apache.servicecomb.swagger.invocation.Response;
import org.apache.shiro.SecurityUtils;
import org.apache.shiro.authc.AuthenticationException;
import org.apache.shiro.authc.UsernamePasswordToken;
import org.apache.shiro.codec.Base64;
import org.apache.shiro.mgt.DefaultSecurityManager;
import org.apache.shiro.mgt.DefaultSessionStorageEvaluator;
import org.apache.shiro.mgt.DefaultSubjectDAO;
import org.apache.shiro.realm.Realm;
import org.apache.shiro.session.mgt.DefaultSessionManager;
import org.apache.shiro.session.mgt.SessionManager;
import org.apache.shiro.subject.Subject;

public class HttpAuthFilter implements HttpServerFilter {

  private DefaultSecurityManager securityManager;
  private JWTRealm realm;

  public HttpAuthFilter() {
    realm = new JWTRealm("classpath:shiro.ini");  //使用ini的配置方法来初始化Realm
    this.securityManager = new DefaultSecurityManager(realm);        //初始化SecurityManager
    this.securityManager.setSubjectFactory(new JWTSubjectFactory());
    DefaultSessionManager sm = new DefaultSessionManager();
    // 关闭会话校验任务
    sm.setSessionValidationSchedulerEnabled(false);
    // 关闭会话存储,否则会报异常
    ((DefaultSessionStorageEvaluator) ((DefaultSubjectDAO) this.securityManager.getSubjectDAO())
        .getSessionStorageEvaluator()).setSessionStorageEnabled(false);
    this.securityManager.setSessionManager(sm);
  }

  @Override
  public int getOrder() {
    return -10000;  // 确保这个Filter在一般的filter之前先执行
  }

  @Override
  public Response afterReceiveRequest(Invocation invocation, HttpServletRequestEx httpServletRequestEx) {
    SecurityUtils.setSecurityManager(securityManager);  // 因为用到了线程上下文,只支持同步编码方式
    String path = httpServletRequestEx.getPathInfo();
    String userInfo = httpServletRequestEx.getHeader("Authorization");
    if (userInfo == null || userInfo.isEmpty()) {
      return tryLogin(httpServletRequestEx, path);
    }
    JWTToken token = new JWTToken(userInfo);

    if (path.startsWith("/auth")) { // 只对特定的资源检测
      try {
        Subject user = SecurityUtils.getSubject();
        user.login(token);  // 登录不报异常表示成功了
      } catch (AuthenticationException e) {
        System.out.println("Has no right!");  // 异常表示身份认证失败
        return Response.create(401, "Unauthorized", e.getMessage());
      }
    }
    return null;
  }

  private Response tryLogin(HttpServletRequestEx httpServletRequestEx, String path) {
    if (path.equals("/login/login")) {
      // 这里只是简单的获取用户密码,使用form表单的方式来提交
      String username = httpServletRequestEx.getParameter("username");
      String secret = httpServletRequestEx.getParameter("password");
      boolean login = realm.canLogin(username, secret);
      if (!login) {
        return Response.create(401, "Unauthorized",
            "User/Password is not right!");
      }
      String token = JWTUtils.sign(username, secret);
      return Response.createSuccess(token);
    }
    return Response.create(401, "Unauthorized",
        "JWT Token is missing, please login first!");
  }
}
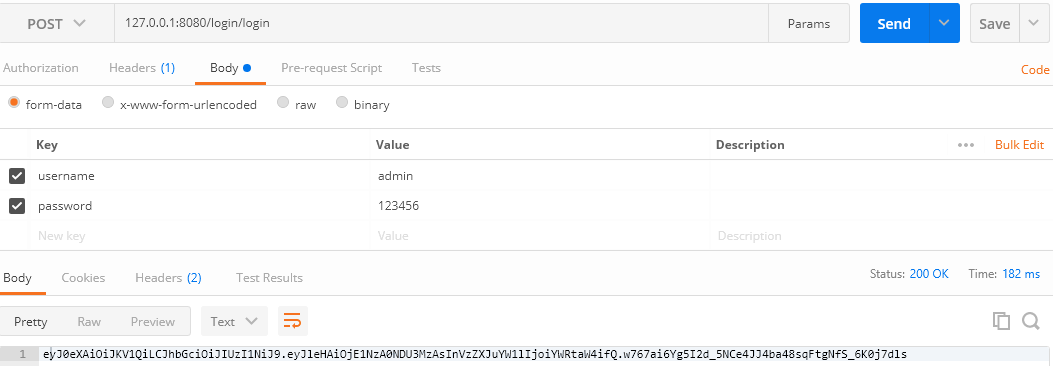
查看下效果,首先请求登录,生成一个JWT Token
![]()
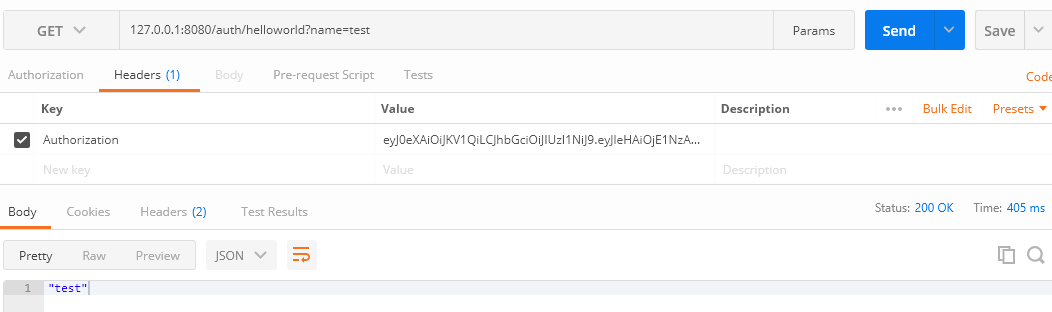
再使用token请求下正常接口
![]()
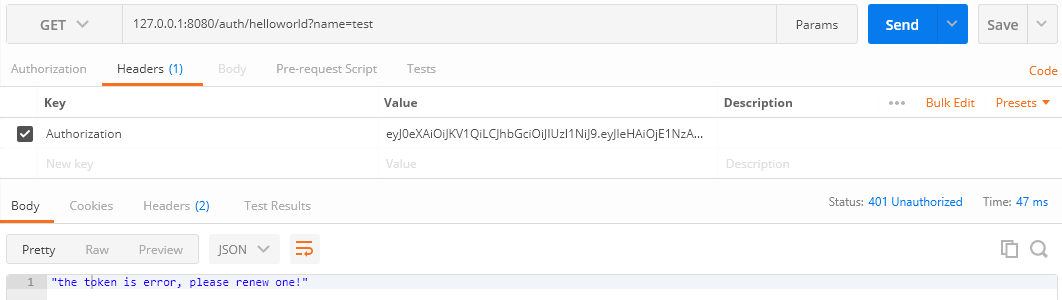
如果不带上token或者错误token以及token失效等时,返回401未授权
![]()
授权
上面已经实现了身份认证,有时候还需要对资源进行细粒度控制,比如有些方法只能是管理员才能调用。Shiro提供了三种授权方式:
编码的方式,使用硬编码的方式检查用户是否有角色或者权限,这种通常用于基于配置文件或者复杂的应用。比如角色权限都配置在配置文件或者数据库里面,需要修改后动态生效,我们可以使用自编码方式。
注解的方式,通过使用@RequiresPermissions/@RequiresRoles,这种方式一般都是通过AOP切面来实现的。
Subject currentUser = SecurityUtils.getSubject();
if (currentUser.hasRole("administrator")) {
//有权限
}
else {
//无权限
}
JSP标签,现在基本上废弃了。
ServiceComb的HttpServerFilter可以直接获取到调用方法的Method对象,所以在HttpServerFilter里面可以直接使用注解的方式来进行权限角色认证,如果是遗留应用改造先前用的是注解的方式,这样就可以直接兼容,不需要再重新设计。1、 定义shiro的用户角色配置文件src\main\resources\shiro.ini,配置文件users表示用户,比如admin=123456, administrator, viewer表示admin用户,密码是123456,具有administrator, viewer两个角色,详细的shiro配置可以参考官网https://shiro.apache.org/configuration.html
[users]
admin=123456, administrator, viewer
user1=Test123456, viewer

[roles]
administrator = *
viewer = *:get
2、 在要控制权限的方法上打上注解。
package com.service.servicecombshiro.controller;

import javax.ws.rs.core.MediaType;

import org.apache.servicecomb.provider.rest.common.RestSchema;
import org.apache.shiro.authz.annotation.RequiresRoles;
import org.springframework.beans.factory.annotation.Autowired;
import org.springframework.web.bind.annotation.RequestMapping;
import org.springframework.web.bind.annotation.RequestMethod;
import org.springframework.web.bind.annotation.RequestParam;

@RestSchema(schemaId = "auth")
@RequestMapping(path = "/auth", produces = MediaType.APPLICATION_JSON)
public class ServicecombshiroImpl {

  @Autowired
  private ServicecombshiroDelegate userServicecombshiroDelegate;


  @RequestMapping(value = "/helloworld",
      produces = {"application/json"},
      method = RequestMethod.GET)
  @RequiresRoles(value = {"viewer"})
  public String helloworld(@RequestParam(value = "name", required = true) String name) {
    return userServicecombshiroDelegate.helloworld(name);
  }

  @RequestMapping(value = "/helloworld/admin",
      produces = {"application/json"},
      method = RequestMethod.POST)
  @RequiresRoles("administrator")
  public String admin(@RequestParam(value = "name", required = true) String name) {

    return "admin " + userServicecombshiroDelegate.helloworld(name);
  }
}
3、 在HttpAuthFilter里面加上角色权限校验逻辑,这里只是简单的实现,详细的实现需要覆盖所有的shiro的注解。
SwaggerProducerOperation swaggerProducerOperation = invocation.getOperationMeta().getExtData(Const.PRODUCER_OPERATION);
      RequiresRoles requiresRoles = swaggerProducerOperation.getProducerMethod().getAnnotation(RequiresRoles.class);
      if (requiresRoles != null) {
        String[] roles = requiresRoles.value();
        try {
          user.checkRoles(roles);
        } catch (AuthorizationException e) {
          System.out.println("Has no required roles!");  // 异常表示权限认证失败
          return Response.create(401, "Unauthorized", e.getMessage());
        }
      }
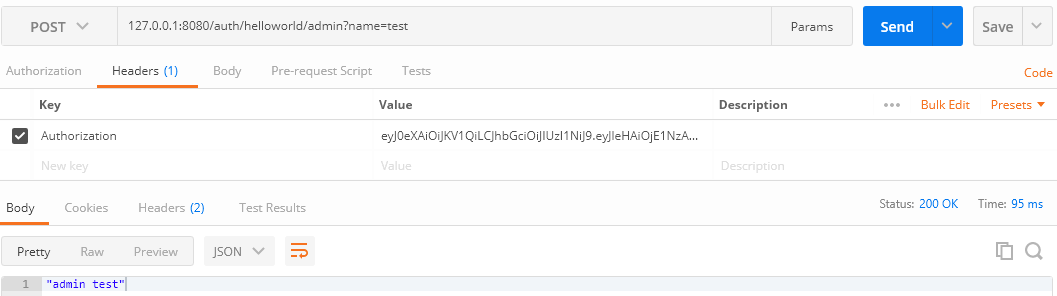
查看下效果,需要管理员的接口,使用admin的JWTToken来访问,正常返回:
![]()
使用普通用户的JWTToken来访问管理员的接口,返回没有权限:
![]()
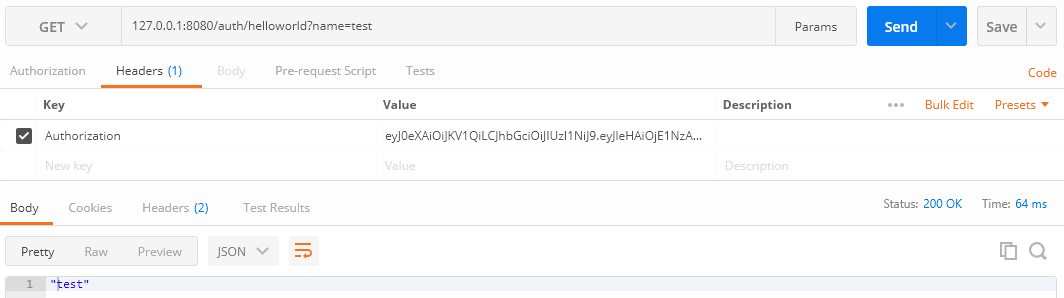
使用普通用户的JWTToken来访问查询接口,正常返回:
![]()
总结
Apache Shiro是一款功能强大的安全框架,ServiceComb集成使用相对来说也比较简单,通过这个简单的实践,能让ServiceComb用户知道怎样集成Shiro和大概的实现原理,也希望后续作为一个子项目,直接支持Shiro集成,方便用户使用。
项目托管地址:https://github.com/servicestage-demo/servicecomb-shiro-samples
关注公号:微服务蜂巢 更多微服务干货等你get!