首页 文章 精选 留言 我的

精选列表

搜索[知识管理],共10000篇文章
优秀的个人博客,低调大师

Android学习笔记(二)基础知识(1)

更改文字颜色 文字色: TextView.setTextColor(Color.***); 背景色: Resources resources = getBaseContext().getResources(); Drawable HippoDrawable = resources.getDrawable(R.drawable.white); TextView.setBackgroundDrawable(HippoDrawable); 获取手机分辨率 import android.util.DisplayMetrics DisplayMetrics dm = new DisplayMetrics(); getWindowManager().getDefaultDisplay().getMetrics(dm); String x,y; x=dm.widthPixels; y=dm.heightPixels; 页面转换 在Android应用中,是通过setContentView来实现页面的转换处理的,也就是在不同的layout之间进行切换。 setContentView(R.layout.****); 例子: package com.example.test4; import android.os.Bundle; import android.app.Activity; import android.view.Menu; import android.view.MenuItem; import android.view.View; import android.widget.Button; import android.support.v4.app.NavUtils; public class MainActivity extends Activity { @Override public void onCreate(Bundle savedInstanceState) { super.onCreate(savedInstanceState); setContentView(R.layout.activity_main); Button b1=(Button)findViewById(R.id.button1); b1.setOnClickListener(new Button.OnClickListener() { public void onClick(View v) { // TODO Auto-generated method stub jumpToMylayout(); } }); } @Override public boolean onCreateOptionsMenu(Menu menu) { getMenuInflater().inflate(R.menu.activity_main, menu); return true; } public void jumpToMylayout(){ setContentView(R.layout.mylayout); Button b2 = (Button)findViewById(R.id.button1); b2.setOnClickListener(new Button.OnClickListener() { public void onClick(View v) { // TODO Auto-generated method stub jumpToLayout(); } }); } public void jumpToLayout(){ setContentView(R.layout.activity_main); Button b1=(Button)findViewById(R.id.button1); b1.setOnClickListener(new Button.OnClickListener() { public void onClick(View v) { // TODO Auto-generated method stub jumpToMylayout(); } }); } } 调用其他Activity 与上面在不同layout之间转换不同,这里我们需要移交主权到另外一个Activity。 //一个Activity Intent intent=new Intent(); intent.setClass(MainActivity.this,replace.class); startActivity(intent); MainActivity.this.finish(); //另外一个Activity Intent intent=new Intent(); intent.setClass(replace.this, MainActivity.class); startActivity(intent); replace.this.finish(); 不同Activity之间的数据转换 利用Android.os.Bundle对象封装数据的能力,将欲传递的数据或参数,通过Bundle来传递不同Intent之间的数据。 发送: Intent intent=new Intent(); intent.setClass(MainActivity.this,display.class); Bundle bundle = new Bundle(); bundle.putString("num",et1.getText().toString()); bundle.putString("name",et2.getText().toString()); intent.putExtras(bundle); startActivity(intent); 接收: Bundle bundle = this.getIntent().getExtras(); String num = bundle.getString("num"); String name = bundle.getString("name"); 返回数据到前一个Activity 唤起一个Activity: startActivityForResult(intent,0) 重载onActivityResult: protected voidonActivityResult(int requestCode,int resultCode,Intent data){ switch(resultCode){ case RESULT_OK: Bundle bundle=data.getExtras(); //code there break; default: break; } } 返回数据: input.this.setResult(RESULT_OK, intent); 部分代码: //main_activity package com.example.test7; import android.os.Bundle; import android.app.Activity; import android.content.Intent; import android.view.Menu; import android.view.MenuItem; import android.view.View; import android.widget.Button; import android.widget.TextView; import android.support.v4.app.NavUtils; public class MainActivity extends Activity { TextView tx; @Override public void onCreate(Bundle savedInstanceState) { super.onCreate(savedInstanceState); setContentView(R.layout.activity_main); Button bt=(Button)findViewById(R.id.button1); tx=(TextView)findViewById(R.id.textView1); bt.setOnClickListener(new Button.OnClickListener() { public void onClick(View v) { // TODO Auto-generated method stub Intent intent = new Intent(); intent.setClass(MainActivity.this, input.class); startActivityForResult(intent,0); } }); } @Override public boolean onCreateOptionsMenu(Menu menu) { getMenuInflater().inflate(R.menu.activity_main, menu); return true; } @Override protected void onActivityResult(int requestCode,int resultCode,Intent data){ switch(resultCode){ case RESULT_OK: Bundle bundle=data.getExtras(); String str=bundle.getString("str").toString(); tx.setText(str); break; default: break; } } } /** * input.java */ package com.example.test7; import android.app.Activity; import android.content.Intent; import android.os.Bundle; import android.view.View; import android.widget.Button; import android.widget.EditText; public class input extends Activity { Intent intent; Bundle bundle; EditText et; @Override public void onCreate(Bundle savedInstanceState) { super.onCreate(savedInstanceState); setContentView(R.layout.input); Button bt=(Button)findViewById(R.id.button1); et=(EditText)findViewById(R.id.editText1); intent = this.getIntent(); bundle= new Bundle(); bt.setOnClickListener(new Button.OnClickListener() { public void onClick(View v) { // TODO Auto-generated method stub bundle.putString("str", et.getText().toString()); intent.putExtras(bundle); input.this.setResult(RESULT_OK, intent); input.this.finish(); } }); } } 本文转自cococo点点博客园博客,原文链接:http://www.cnblogs.com/coder2012/archive/2013/05/13/3075259.html,如需转载请自行联系原作者

优秀的个人博客,低调大师

Android——SeekBar(拖动条)相关知识总结贴

Android进度条(ProgressBar)拖动条(SeekBar)星级滑块(RatingBar)的例子 http://www.apkbus.com/android-51326-1-1.html Android 中文 API (26) —— SeekBar http://www.apkbus.com/android-18339-1-1.html android用户界面之SeekBar教程实例汇总 http://www.apkbus.com/android-51333-1-1.html Android 中文 API (27) —— SeekBar.OnSeekBarChangeListener http://www.apkbus.com/android-18340-1-1.html Android之SeekBar,RatingBar控件 http://www.apkbus.com/android-14871-1-1.html Android 音量seekbar制作 http://www.apkbus.com/android-51327-1-1.html android 拖动条(SeekBar) http://www.apkbus.com/android-1749-1-1.html Android中SeekBar - 可拖动的进度条控件 http://www.apkbus.com/android-51325-1-1.html Android 基本控件 之 SeekBar(一) 个性你的视图 http://www.apkbus.com/android-19093-1-1.html Android 自定义SeekBar http://www.apkbus.com/android-1056-1-1.html Android SeekBar自定义使用图片和颜色显示 http://www.apkbus.com/android-83484-1-1.html Android 竖着的SeekBar http://www.apkbus.com/android-82748-1-1.html Android 让你的SeekBar 也支持长按事件 http://www.apkbus.com/android-17505-1-1.html SeekBar的基本使用方法 http://www.apkbus.com/android-20203-1-1.html 竖着自定义的seekbar返回五种状态 http://www.apkbus.com/android-84630-1-1.html 自定义SeekBar的背景颜色,进度条颜色,以及滑块的图片 http://www.apkbus.com/android-51324-1-1.html 本文转自qianqianlianmeng博客园博客,原文链接:http://www.cnblogs.com/aimeng/p/3305880.html ,如需转载请自行联系原作者

优秀的个人博客,低调大师

Android——RatingBar(评价条)相关知识总结贴

android用户界面之RatingBar教程实例汇总 http://www.apkbus.com/android-51346-1-1.html Android 中文 API (40) —— RatingBar http://www.apkbus.com/android-18356-1-1.html android 中文 API (41) —— RatingBar.OnRatingBarChangeListener http://www.apkbus.com/android-18357-1-1.html Android 控件之RatingBar评分条 http://www.apkbus.com/android-1345-1-1.html Android 的 RatingBar 扩展 http://www.apkbus.com/android-51341-1-1.html Android 自定义RatingBar,重载RatingBar的样式 http://www.apkbus.com/android-1316-1-1.html Android 自定义RatingBar http://www.apkbus.com/android-14817-1-1.html 图片修改之RatingBar http://www.apkbus.com/android-51340-1-1.html 组件篇---SeekBar,RatingBar,Chronometer http://www.apkbus.com/android-14206-1-1.html android 星级滑块 http://www.apkbus.com/android-4069-1-1.html 用户界面 View(六) http://www.apkbus.com/android-651-1-1.html 分类: Android开发 本文转自qianqianlianmeng博客园博客,原文链接:http://www.cnblogs.com/aimeng/p/3310744.html ,如需转载请自行联系原作者

优秀的个人博客,低调大师

Flex学习记录(一)——MXML基本知识

我们使用两种语言来编写Flex程序:MXML和ActionScript。MXML是用来布局用户界面组件的XML标识语言,我们也可以使用MXML来定义一个程序的不可见部分,例如:到服务器数据源的访问以及用户界面组件和服务器数据源的数据绑定。一.简单的MXML 新建一个HellowWorld.mxml文件,并拷贝下面的内容,看一下运行结果。 <?xml version="1.0"?> <!-- mxml\HellowWorld.mxml --> <s:Application xmlns:fx="http://ns.adobe.com/mxml/2009" xmlns:mx="library://ns.adobe.com/flex/mx" xmlns:s="library://ns.adobe.com/flex/spark"> <s:layout> <s:VerticalLayout/> </s:layout> <s:Panel title="My Application"> <s:Label text="Hello World" fontWeight="bold" fontSize="24"/> </s:Panel> </s:Application> 这是一个最简单的MXML程序,从这个例子,我们可以学到如下几点: 1.<s:Application>是一个程序的root tag,代表一个Spark应用容器。一个项目应该只有一个root tag. 2.xmlns:fx="http://ns.adobe.com/mxml/2009是ActionScript元素所在的命名空间 xmlns:mx="library://ns.adobe.com/flex/mx是MX控件集所在的命名空间 xmlns:s="library://ns.adobe.com/flex/spark是Spark控件集所在的命名空间 MX和Spark控件集有很多相同的控件,Spark是为Flex4新出的,尽量使用Spark控件集中的控件,在Spark控件集里没有相应的控件时再用MX控件集的控件 3.MXML 中的每个tag都和ActionScript中的类或属性对应,ActionScript中的类在MXML中用节点表示,属性可以用attribute表 示,也可以用property表示。比如Panel和Label都是Spark控件集中的类。text,fontSize等都是Label类的属性 4.MXML的文件名不能和ActionScript里面的类和控件名相同,不能和MXML里的tag相同,也不能是application,且后缀必须是小写的mxml。二.MXML中属性的赋值 MXML中的属性可以用attribute表示,也可以用property表示。如果属性的类型是简单的类型,用两种方式都能表示,如果是复杂的类型,则只能用属性的方式表示,其通用格式如下: <s:property> <s:propertytype> ...用property的形式列出属性对象里面的各个变量 </s:propertytype> </s:property> 下面对于几种常见的复杂类型,举例说明一下 1.MXML中数组的表示 MXML中可以用tag<fx:Array>和</fx:Array>来表示一个数组,且该tag可以省略。 <mynamespace:nameOfObjectProperty> <fx:Array> <fx:Number>94062</fx:Number> <fx:Number>14850</fx:Number> <fx:Number>53402</fx:Number> </fx:Array> </mynamespace:nameOfObjectProperty> 2.MXML中Vector的表示 <fx:Declarations> <fx:Vector type="String"> <fx:String>one</fx:String> <fx:String>two</fx:String> <fx:String>three</fx:String> </fx:Vector> </fx:Declarations> 3.MXML中XML对象的表示 <mynamespace:value xmlns:a="http://www.example.com/myschema"> <fx:XML> <a:purchaseorder> <a:billingaddress> ... </a:billingaddress> </a:purchaseorder> </fx:XML> </mynamespace:value> 4.MXML中property的值可以用{静态变量}表示,也可以直接用常量表示。例如下面两种方式都可以 <s:Wipe direction="{spark.effects.WipeDirection.LEFT}"> ... </s:Wipe> <s:Wipe direction="left"> ... </s:Wipe> 5.MXML中用\来转义特殊字符,用{\n}或&#13来表示换行符,用&lt;String&gt;来表示<String>三.定制Application的外观 1.控件库里有一些容器控件,可以进行控制应用的外观,比如HGroup和VGroup控制控件的排列方式,TabNavigator添加Tab查看方式等 2.用CSS控制外观,需要用<fx:Style>tag来包含CSS的定义,且该定义必须是root tag的子节点。 <?xml version="1.0"?> <!-- mxml/CSSExample.mxml --> <s:Application xmlns:fx="http://ns.adobe.com/mxml/2009" xmlns:mx="library://ns.adobe.com/flex/mx" xmlns:s="library://ns.adobe.com/flex/spark"> <fx:Style> @namespace s "library://ns.adobe.com/flex/spark"; @namespace mx "library://ns.adobe.com/flex/mx"; /* class selector */ .myClass { color: Red } /* type selector */ s|Button { font-size: 18pt } </fx:Style> <s:Panel title="My Application"> <s:Button styleName="myClass" label="This is red 18 point text."/> </s:Panel> </s:Application> 3.用skin控制控件外观 <s:Button skinClass="com.mycompany.skins.MyButtonSkin" />四.ActionScript和MXML的交互 1.在MXML的事件中可以用简单的ActionScript语句 <s:Button label="Click Me" click="textarea1.text='Hello World';" /> 2.在MXML中插入ActionScript语句 <fx:Script> <![CDATA[ public var s:Boolean; public function doSomething():void { // The following statements must be inside a function. s = label1.visible; label1.text = "label1.visible = " + String(s); } ]]> </fx:Script> <fx:Script source="includes/IncludedFile.as"/> 3.使用{}进行数据绑定 <fx:Script> <![CDATA[ [Bindable] public var myText:String = "Display" + "\n" + "Content"; ]]> </fx:Script> <s:TextArea width="100%" text="{myText}"/> 4.对MXML中的tag增加id attribute,这样可以在ActionScript语句中直接访问该对象。 5.用ActionScript创建可以在MXML中使用的控件。 <?xml version="1.0"?> <!-- mxml/CustomMXMLComponent.mxml --> <s:Application xmlns:fx="http://ns.adobe.com/mxml/2009" xmlns:mx="library://ns.adobe.com/flex/mx" xmlns:s="library://ns.adobe.com/flex/spark" xmlns:MyComps="myComponents.boxes.*"> <s:Panel title="My Application" height="150"> <MyComps:MyComboBox/> </s:Panel> </s:Application> 注:文中给出的例子均来自adobe 本文转自左正博客园博客,原文链接:http://www.cnblogs.com/soundcode/archive/2013/05/05/3061134.html,如需转载请自行联系原作者

优秀的个人博客,低调大师

swift:入门知识之枚举和结构体

枚举: swift中的枚举有些类似于类这个概念,它有自己的属性,也可以有自己的方法 枚举中的成员有原始值和实际值之分,原始值用来枚举成员的排序次序,默认从0开始 枚举出来的成员值就是实际值 可以通过toRaw和fromRaw函数转换原始值和枚举值 也可以使用字符处或浮点数作为枚举的原始值 枚举: 匹配枚举值和Switch语句(Matching Enumeration Values with a Switch Statement) 具体举例如下: //给扑克牌内容声明一个枚举(A、2、3、4、5、6、7、8、9、10、J、Q、K) enum Rank:Int{ case Ace case Two,Three,Four,Five,Six,Seven,Eight,Nine,Ten case Jack,Queen,King func simpleDescription()->String{ switch self{ case .Ace:return "ace" case .Jack:return "Jack" case .Queen:return "Queen" case .King:return "King" default:return String(self.toRaw()) } } } //创建枚举实例,获取枚举元素的原始值和实际值 let ace = Rank.Jack //获取一个枚举元素 let originValue = ace.toRaw() //该元素的原始值 10 let factvalue = ace.simpleDescription() //该元素的实际值 Jack //将一个原始值转换为实际值 if let origin = Rank.fromRaw(10){ // 10 let fact = origin.simpleDescription() // Jack } //给扑克牌的花色声明一个枚举 enum Suit{ case Spades,Hearts,Diamonds,Clubs func simpleDescription()->String{ switch self{ case .Spades : return "spades" case .Hearts : return "hearts" case .Diamonds:return "diamonds" case .Clubs : return "clubs" } } } //创建枚举实例,获取枚举元素的值 let heart = Suit.Hearts //获取一个枚举元素 let heartsDescription = heart.simpleDescription() //元素的实际值 hearts 结构体: swift中使用struct创建结构体。结构体支持多个与类相同的行为,包括方法和构造器。 一大重要的区别是结构体(以及枚举)代码之间的传递总是用拷贝(值传递),而类则是传递引用(地址传递)。 对于传值调用,是把实参户值传递给形参,此时形参是要被分配空间的,而对形参做的任何操作是不会改变实参的值的; 对于传址调用,是指传递实参的地址,即形参和实参的指针指向同一块内存区域,任何一方对数据做修改,值都会改变。 类和结构体对比 Swift 中类和结构体有很多共同点。共同处在于: 定义属性用于储存值 定义方法用于提供功能 定义下标用于通过下标语法访问值 定义初始化器用于生成初始化值 通过扩展以增加默认实现的功能 符合协议以对某类提供标准功能 //结合上面的枚举的使用,现在声明一个扑克牌结构体,它有扑克牌内容和花色这两个枚举类型的成员变量 struct Card { //成员属性 var rank:Rank var suit:Suit //成员方法 func simpleDescription()->String{ return "The \(rank.simpleDescription()) of \(suit.simpleDescription())" } } //创建结构体成员实例,并调用成员方法 //传入两个枚举类型的引用创建一个结构体成员变量 let threeOfShapes = Card(rank: .Three, suit: .Spades) //结构体成员变量调用成员方法 let threeOfShapesDescription = threeOfShapes.simpleDescription() //“The 2 of shpades” 总结:结构体和枚举是值类型 值类型被赋予给一个变量,常数或者本身被传递给一个函数的时候,实际上操作的是其的拷贝。 在之前的章节中,我们已经大量使用了值类型。实际上,在 Swift 中,所有的基本类型:整数(Integer)、浮点数(floating-point)、布尔值(Booleans)、字符串(string)、数组(array)和字典(dictionaries),都是值类型,并且都是以结构体的形式在后台所实现。 在 Swift 中,所有的结构体和枚举都是值类型。这意味着它们的实例,以及实例中所包含的任何值类型属性,在代码中传递的时候都会被复制。 程序猿神奇的手,每时每刻,这双手都在改变着世界的交互方式! 分类: Swift开发技术 本文转自当天真遇到现实博客园博客,原文链接: http://www.cnblogs.com/XYQ-208910/p/4905048.html,如需转载请自行联系原作者

优秀的个人博客,低调大师

Android基础知识之Toolbar的使用

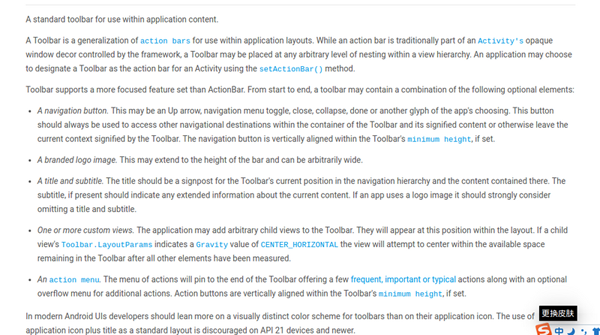
Toolbar是Android5.0推出的,用来替代ActionBar的控件.可以高度的自定义,使用灵活.官方的ToolBar是必须在5.0以上的系统才能使用,如果需要在低版本中使用.需要使用support v7包中的Toolbar。 下一是官网的Toolbar的介绍: Toolbar extendsViewGroup java.lang.Object ↳android.view.View ↳android.view.ViewGroup ↳android.support.v7.widget.Toolbar 使用前提 要使用ToolBar需要将activity的ActionBar隐藏掉.那么如何隐藏呢?有三种方法.下面分别介绍 方法一: 在res/values/styles.xml文件中修改 <stylename="AppTheme.Base"parent="Theme.AppCompat"> <itemname="windowActionBar">false</item> <itemname="android:windowNoTitle">true</item> </style> 也可以直接使用没有ActionBar的主题 <stylename="AppTheme"parent="Theme.AppCompat.Light.NoActionBar"> 方法二: 在清单文件中修改制定activity的主题,如下所示: <activityandroid:name="MainActivity" android:theme="@style/Theme.AppCompat.Light.NoActionBar"> </activity> 方法三: 直接在代码中取消. 在setContentView之前。 requestWindowFeature(Window.FEATURE_NO_TITLE); setContentView(R.layout.activity_main); //supportRequestWindowFeature(Window.FEATURE_NO_TITLE);在AppCompatActivity中 怎么使用 在布局文件中.添加如下代码. 位置不固定。 <android.support.v7.widget.Toolbar android:id="@+id/toolbar" android:layout_width="match_parent" android:layout_height="?android:attr/actionBarSize" android:background="?attr/colorPrimaryDark" app:title="Title" app:titleTextColor="#222222" app:logo="@mipmap/ic_launcher" app:subtitle="subtitle"></android.support.v7.widget.Toolbar> title 用来设置标题.subtitle设置副标题 titleTextColor用来设置标题字体颜色.background用来设置背景颜色..效果如下: 在java代码中也可以动态的设置这些值。 mToolbar.setTitle("JavaTitle"); mToolbar.setSubtitle("JavaSubTitle"); mToolbar.setLogo(R.mipmap.ic_launcher); mToolbar.setNavigationIcon(android.R.drawable.ic_input_delete); mToolbar.setOverflowIcon(ContextCompat.getDrawable(this,android.R.drawable.ic_menu_more)); /setActionBar(mToolbar);//activity中 setSupportActionBar(mToolbar);//AppCompatActivity中 添加Menu 要添加menu首先我们需要有menu,在这里我选择在res/menu/中创建main.xml来定义menu文件.代码如下 <?xmlversion="1.0"encoding="utf-8"?> <menuxmlns:android="http://schemas.android.com/apk/res/android" xmlns:app="http://schemas.android.com/apk/res-auto"> <item android:id="@+id/add" android:icon="@android:drawable/ic_menu_add" android:title="Add" app:showAsAction="never|withText"/> <item android:id="@+id/delete" android:icon="@android:drawable/ic_menu_delete" android:title="Delete" app:showAsAction="never|withText"/> <item android:id="@+id/edit" android:icon="@android:drawable/ic_menu_edit" android:title="Edit" app:showAsAction="never|withText"/> <item android:id="@+id/email" android:icon="@android:drawable/sym_action_email" android:title="Email" app:showAsAction="never|withText"/> </menu> 下面是java文件中的代码。 @Override publicbooleanonCreateOptionsMenu(Menumenu){ getMenuInflater().inflate(R.menu.main,menu); returntrue; } @Override publicbooleanonOptionsItemSelected(MenuItemitem){ switch(item.getItemId()){ caseandroid.R.id.home: Toast.makeText(MainActivity.this,"您点击了NavigationIcon",Toast.LENGTH_SHORT).show(); break; caseR.id.add: Toast.makeText(MainActivity.this,"Add",Toast.LENGTH_SHORT).show(); break; caseR.id.delete: Toast.makeText(MainActivity.this,"Delete",Toast.LENGTH_SHORT).show(); break; caseR.id.edit: Toast.makeText(MainActivity.this,"Edit",Toast.LENGTH_SHORT).show(); break; caseR.id.email: Toast.makeText(MainActivity.this,"Email",Toast.LENGTH_SHORT).show(); break; } returntrue; } 显示Menu中的Icon 在写到这里之后.我们会发现.隐藏的menu是不显示icon的,那么我们怎么设置呢: 只需要重新一下方法: 这里的activity是 AppCompatActivity @Override protectedbooleanonPrepareOptionsPanel(Viewview,Menumenu){ if(menu!=null){ if(menu.getClass()==MenuBuilder.class){ try{ Methodm=menu.getClass().getDeclaredMethod("setOptionalIconsVisible",Boolean.TYPE); m.setAccessible(true); m.invoke(menu,true); }catch(Exceptione){ Log.i("tag","onPrepareOptionsPanel:"+ getClass().getSimpleName()+ "onMenuOpened...unabletoseticonsforoverflowmenu" +e); } } } returnsuper.onPrepareOptionsPanel(view,menu); } 效果如下: 作者:Magicer 来源:51CTO

优秀的个人博客,低调大师

iOS: 并发编程的几个知识点

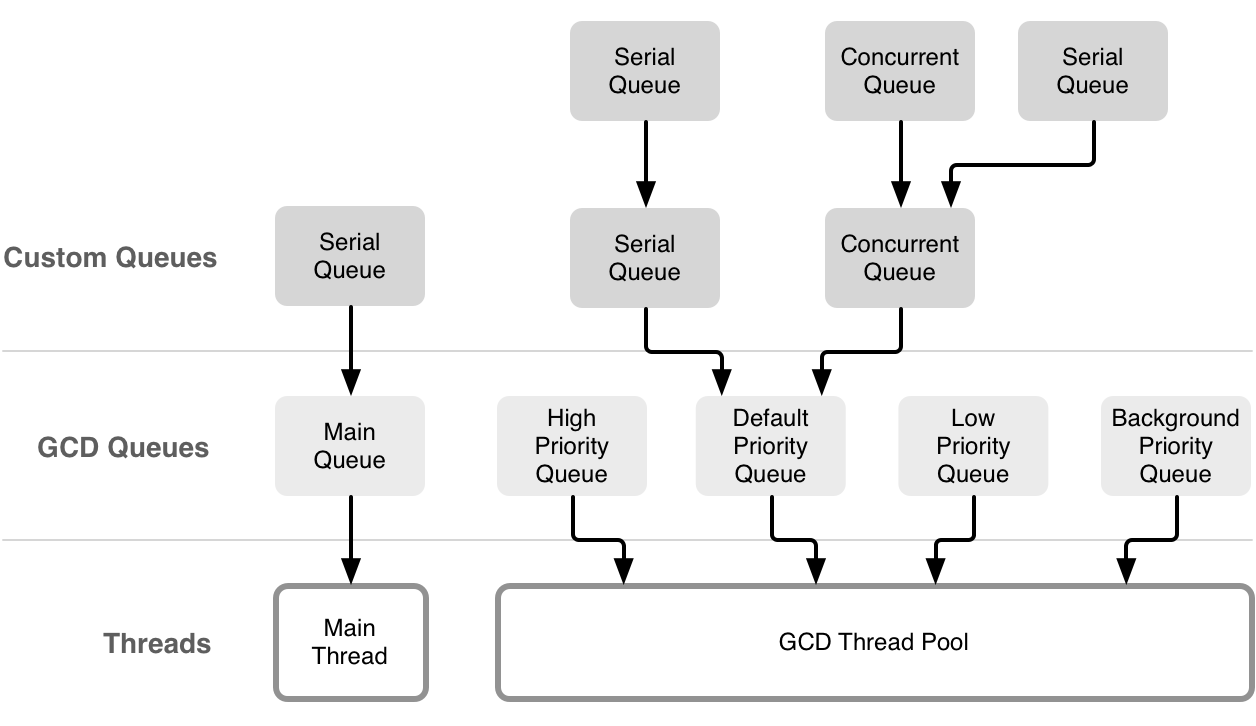
iOS 多线程问题 查阅的大部分资料都是英文的,整理完毕之后,想翻译成中文,却发现很多名字翻译成中文很难表述清楚。 所以直接把整理好的资料发出来,大家就当顺便学习学习英语。 1. Thread Safe Vs Main Thread Safe Main Thread Safe means only safe execute on main thread; Thread Safe means you can modify on any thread simultaneously; 2. ConditionLock Vs Condition NSCondition A condition variable whose semantics follow those used for POSIX-style conditions. A condition is another type of semaphore that allows threads to signal each other when a certain condition is true.Conditions are typically used to indicate the availability of a resource or to ensure that tasks are performed in a specific order.When a thread tests a condition, it blocks unless that condition is already true. It remains blocked until some other thread explicitly changes and signals the condition. The difference between acondition and a mutex lock is that multiple threads may be permitted access to the condition at the same time.The condition is more of a gatekeeper that lets different threads through the gate depending on some specified criteria. Due to the subtleties involved in implementing operating systems, condition locks are permitted to return with spurious success even if they were not actually signaled by your code.To avoid problems caused by these spurious signals, you should always use a predicate in conjunction with your condition lock. When a thread waits on a condition, the condition object unlocks its lock and blocks the thread. When the condition is signaled, the system wakes up the thread. The condition object then reacquires its lock before returning from thewaitorwaitUntilDate:method. Thus, from the point of view of the thread, it is as if it always held the lock. A boolean predicate is an important part of the semantics of using conditions because of the way signaling works. Signaling a condition does not guarantee that the condition itself is true.Using a predicate ensures that these spurious signals do not cause you to perform work before it is safe to do so. The predicate itself is simply a flag or other variable in your code that you test in order to acquire a Boolean result. Thesemanticsfor using anNSConditionobject is as follows: Lock the condition object. Test a boolean predicate. (This predicate is a boolean flag or other variable in your code that indicates whether it is safe to perform the task protected by the condition.) If the boolean predicate is false, call the condition object’swaitorwaitUntilDate:method to block the thread. Upon returning from these methods, go to step 2 to retest your boolean predicate. (Continue waiting and retesting the predicate until it is true.) If the boolean predicate is true, perform the task. Optionally update any predicates (or signal any conditions) affected by your task. When your task is done, unlock the condition object. lock the condition while (!(boolean_predicate)) { wait on condition } do protected work (optionally, signal or broadcast the condition again or change a predicate value) unlock the condition NSCondition的底层是通过pthread_mutex + pthread_cond_t来实现的。 NSConditionLock A lock that can be associated with specific, user-defined conditions. Using anNSConditionLockobject, you can ensure that a thread can acquire a lockonly if a certain condition is met. AnNSConditionLockobject defines a mutex lock that can be locked and unlocked with specific values. NSConditionLock just support condition with a int, if you want support a custom condition value, you should use NSCondition. 用互斥所能不能实现生产者,消费者模型???答案是: YES 参考资料: https://web.stanford.edu/class/cs140/cgi-bin/lecture.php?topic=locks http://blog.ibireme.com/2016/01/16/spinlock_is_unsafe_in_ios/ https://bestswifter.com/ios-lock/ 3. @synchronized Directive The object passed to the @synchronized directive is aunique identifierused to distinguish the protected block. If you execute the preceding method in two different threads, passing a different object for theanObjparameter on each thread, each would take its lock and continue processing without being blocked by the other. If you pass the same object in both cases, however, one of the threads would acquire the lock first and the other would block until the first thread completed the critical section. Several Common ways to use @synchronized wrong @synchronized(nil) @synchronized(][NSObject all] init]) Exceptions With @synchronized As a precautionary measure, the@synchronizedblock implicitly adds an exception handler to the protected code.This handler automatically releases the mutex in the event that an exception is thrown. This means that in order to use the@synchronizeddirective, you must also enable Objective-C exception handling in your code. If you do not want the additional overhead caused by the implicit exception handler, you should consider using the lock classes. 原理 OBJC_EXPORT int objc_sync_enter(id obj) OBJC_AVAILABLE(10.3, 2.0, 9.0, 1.0); OBJC_EXPORT int objc_sync_exit(id obj) OBJC_AVAILABLE(10.3, 2.0, 9.0, 1.0); @synchronized(obj) { // do work } 会被编译器转换为: @try { objc_sync_enter(obj); // do work } @finally { objc_sync_exit(obj); } Example 结论: 你调用sychronized的每个对象,Objective-C runtime 都会为其分配一个递归锁并存储在哈希表中。 如果在sychronized内部对象被释放或被设为nil看起来都 OK。 注意不要向你的sychronizedblock 传入nil!这将会从代码中移走线程安全。 参考资料 http://rykap.com/objective-c/2015/05/09/synchronized/ http://yulingtianxia.com/blog/2015/11/01/More-than-you-want-to-know-about-synchronized/ https://opensource.apple.com/source/objc4/objc4-646/runtime/objc-sync.mm 4. Runloop Perform selector on a thread 当目标线程runloop未启动时是没有效果的。 启动 Runloop If no input sources or timers are attached to the run loop, this method exits immediately; Manually removing all known input sources and timers from the run loop is not a guarantee that the run loop will exit.macOS can install and remove additional input sources as needed to process requests targeted at the receiver’s thread. Those sources could therefore prevent the run loop from exiting. The Run Loop Sequence of Events Each time you run it, your thread’s run loop processes pending events and generates notifications for any attached observers. The order in which it does this is very specific and is as follows: Notify observers that the run loop has been entered. Notify observers that any ready timers are about to fire. Notify observers that any input sources that are not port based are about to fire. Fire any non-port-based input sources that are ready to fire. If a port-based input source is ready and waiting to fire, process the event immediately. Go to step 9. Notify observers that the thread is about to sleep. Put the thread to sleep until one of the following events occurs: An event arrives for a port-based input source. A timer fires. The timeout value set for the run loop expires. The run loop is explicitly woken up. Notify observers that the thread just woke up. Process the pending event. If a user-defined timer fired, process the timer event and restart the loop. Go to step 2. If an input source fired, deliver the event. If the run loop was explicitly woken up but has not yet timed out, restart the loop. Go to step 2. Notify observers that the run loop has exited. Example: Detect Main Runloop lag with RunloopObserver 参考资料: https://developer.apple.com/library/content/documentation/Cocoa/Conceptual/Multithreading/RunLoopManagement/RunLoopManagement.html http://www.tanhao.me/code/151113.html/ 6. Queue Vs Thread Thread != Queue A queue doesn't own a thread and a thread is not bound to a queue. There are threads and there are queues. Whenever a queue wants to run a block, it needs a thread but that won't always be the same thread. It just needs any thread for it (this may be a different one each time) and when it's done running blocks (for the moment), the same thread can now be used by a different queue. There's also no guarantee that a given serial queue will always use the same thread. The only exception is the main queue: dispatch_get_main_queue will must run on main thread. While, main thread may run task at any more than one queue. 7. Dispatch Sync Vs Dispatch Async dispatch_sync dispatch_sync └──dispatch_sync_f └──_dispatch_sync_f2 └──_dispatch_sync_f_slow static void _dispatch_sync_f_slow(dispatch_queue_t dq, void *ctxt, dispatch_function_t func) { _dispatch_thread_semaphore_t sema = _dispatch_get_thread_semaphore(); struct dispatch_sync_slow_s { DISPATCH_CONTINUATION_HEADER(sync_slow); } dss = { .do_vtable = (void*)DISPATCH_OBJ_SYNC_SLOW_BIT, .dc_ctxt = (void*)sema, }; _dispatch_queue_push(dq, (void *)&dss); _dispatch_thread_semaphore_wait(sema); _dispatch_put_thread_semaphore(sema); // ... } Submits a block to a dispatch queue for synchronous execution. Unlike dispatch_async,this function does not return until the block has finished. Calling this function and targeting the current queue results in deadlock. Unlike withdispatch_async,no retain is performed on the target queue.Because calls to this function are synchronous, it "borrows" the reference of the caller. Moreover, noBlock_copyis performed on the block. As an optimization, this function invokes the block on the current thread when possible. dispatch_syncdoes two things: queue a block blocks the current thread until the block has finished running dispatch_async dispatch_async(dispatch_queue_t queue, dispatch_block_t block) { dispatch_async_f(dq, _dispatch_Block_copy(work), _dispatch_call_block_and_release); } dispatch_async_f(dispatch_queue_t queue, void *context, dispatch_function_t work); Dead Locks dispatch_sync(queueA, ^{ dispatch_sync(queueB, ^{ dispatch_sync(queueA, ^{ // DEAD LOCK // some task }); }); }); Example: dispatch_async(QueueA, ^{ someFunctionA(...); dispatch_sync(QueueB, ^{ someFunctionB(...); }); }); WhenQueueAruns the block, it will temporarily own a thread, any thread.someFunctionA(...)will execute on that thread. Now while doing the synchronous dispatch,QueueAcannot do anything else, it has to wait for the dispatch to finish.QueueBon the other hand, will also need a thread to run its block and executesomeFunctionB(...). So eitherQueueAtemporarily suspends its thread andQueueBuses some other thread to run the block orQueueAhands its thread over toQueueB(after all it won't need it anyway until the synchronous dispatch has finished) andQueueBdirectly uses the current thread ofQueueA. Needless to say that the last option is much faster as no thread switch is required. Andthisis the optimization the sentence talks about. So adispatch_sync()to a different queue may not always cause a thread switch (different queue, maybe same thread). But adispatch_sync()still cannot happen to the same queue (same thread, yes, same queue, no). That's because a queue will execute block after block and when it currently executes a block, it won't execute another one until this one is done. So it executesBlockAandBlockAdoes adispatch_sync()ofBlockBon the same queue. The queue won't runBlockBas long as it still runsBlockA, but runningBlockAwon't continue untilBlockBhas run. Important:You should never call thedispatch_syncordispatch_sync_ffunction from a task that is executing in the same queue that you are planning to pass to the function. This is particularly important for serial queues, which are guaranteed to deadlock, butshould also be avoided for concurrent queues. 8. Dispatch set target The misunderstanding here is thatdispatch_get_specificdoesn't traverse thestackof nested queues, it traverses thequeue targeting lineage. Modifying the target queue of some objects changes their behavior: Dispatch queues: A dispatch queue's priority is inherited from its target queue. If you submit a block to a serial queue, and the serial queue’s target queue is a different serial queue, that block is not invoked concurrently with blocks submitted to the target queue or to any other queue with that same target queue. Dispatch sources: A dispatch source's target queue specifies where its event handler and cancellation handler blocks are submitted. Dispatch I/O channels: A dispatch I/O channel's target queue specifies where its I/O operations are executed. By default, a newly created queue forwards into the default priority global queue. 参考资料: https://bestswifter.com/deep-gcd/?spm=5176.100239.0.0.vCv2rL https://stackoverflow.com/questions/20860997/dispatch-queue-set-specific-vs-getting-the-current-queue https://stackoverflow.com/questions/23955948/why-did-apple-deprecate-dispatch-get-current-queue https://stackoverflow.com/questions/7346929/why-do-we-use-builtin-expect-when-a-straightforward-way-is-to-use-if-else https://www.objc.io/issues/2-concurrency/concurrency-apis-and-pitfalls/?spm=5176.100239.blogcont17709.5.71pknM libdispatch 源码:https://opensource.apple.com/tarballs/libdispatch/ 9. Read-write Lock in GCD Use dispatch_barrier_async(). When the barrier block reaches the front of a private concurrent queue, it is not executed immediately. Instead, the queue waits until its currently executing blocks finish executing. At that point, the barrier block executes by itself.Any blocks submitted after the barrier block are not executed until the barrier block completes. The queue you specify should be a concurrent queue that you create yourself using thedispatch_queue_create function.If the queue you pass to this function is a serial queue or one of the global concurrent queues, this function behaves like thedispatch_asyncfunction. 附录: 测试Demo:http://files.cnblogs.com/files/smileEvday/iOSMultiThreadSample.zip 部门招人: 高级iOS、Android、前端开发,有意私聊,博主请你喝️ 如果觉得本文帮到了你,记得点赞哦,当然也可以请博主喝一杯豆浆 微信二维码 QQ二维码

资源下载

更多资源
Mario

Mario

马里奥是站在游戏界顶峰的超人气多面角色。马里奥靠吃蘑菇成长,特征是大鼻子、头戴帽子、身穿背带裤,还留着胡子。与他的双胞胎兄弟路易基一起,长年担任任天堂的招牌角色。

腾讯云软件源

腾讯云软件源

为解决软件依赖安装时官方源访问速度慢的问题,腾讯云为一些软件搭建了缓存服务。您可以通过使用腾讯云软件源站来提升依赖包的安装速度。为了方便用户自由搭建服务架构,目前腾讯云软件源站支持公网访问和内网访问。

Spring

Spring

Spring框架(Spring Framework)是由Rod Johnson于2002年提出的开源Java企业级应用框架,旨在通过使用JavaBean替代传统EJB实现方式降低企业级编程开发的复杂性。该框架基于简单性、可测试性和松耦合性设计理念,提供核心容器、应用上下文、数据访问集成等模块,支持整合Hibernate、Struts等第三方框架,其适用范围不仅限于服务器端开发,绝大多数Java应用均可从中受益。

Sublime Text

Sublime Text

Sublime Text具有漂亮的用户界面和强大的功能,例如代码缩略图,Python的插件,代码段等。还可自定义键绑定,菜单和工具栏。Sublime Text 的主要功能包括:拼写检查,书签,完整的 Python API , Goto 功能,即时项目切换,多选择,多窗口等等。Sublime Text 是一个跨平台的编辑器,同时支持Windows、Linux、Mac OS X等操作系统。

用户登录
用户注册