1. 关于Android dex文件
dex文件作为Android APK的组成部分,其主要是Android的Java代码经过编译生成class文件,再经过dx命令生成的。这里面包括了APK的源码,反编译时最主要就是对这个文件进行反编译。有人会问,知道了dex的文件结构有什么用呢?
在Android安全方面来说,dex是安全的重头戏,如果能够了解了dex文件的格式,那么对于dex文件的加固原理也就有简单的了解(关于加固应该不会写了)。
话不多说,写下dex文件解析过程吧!
2. dex文件格式
关于dex文件格式,官方的文件格式如下:
| 名称 |
格式 |
说明 |
| header |
header_item |
标头 |
| string_ids |
string_id_item[] |
字符串标识符列表。这些是此文件使用的所有字符串的标识符,用于内部命名(例如类型描述符)或用作代码引用的常量对象。此列表必须使用 UTF-16 代码点值按字符串内容进行排序(不采用语言区域敏感方式),且不得包含任何重复条目。 |
| type_ids |
type_id_item[] |
类型标识符列表。这些是此文件引用的所有类型(类、数组或原始类型)的标识符(无论文件中是否已定义)。此列表必须按 string_id 索引进行排序,且不得包含任何重复条目。 |
| proto_ids |
proto_id_item[] |
方法原型标识符列表。这些是此文件引用的所有原型的标识符。此列表必须按返回类型(按 type_id 索引排序)主要顺序进行排序,然后按参数列表(按 type_id 索引排序的各个参数,采用字典排序方法)进行排序。该列表不得包含任何重复条目。 |
| field_ids |
field_id_item[] |
字段标识符列表。这些是此文件引用的所有字段的标识符(无论文件中是否已定义)。此列表必须进行排序,其中定义类型(按 type_id 索引排序)是主要顺序,字段名称(按 string_id 索引排序)是中间顺序,而类型(按 type_id 索引排序)是次要顺序。该列表不得包含任何重复条目。 |
| method_ids |
method_id_item[] |
方法标识符列表。这些是此文件引用的所有方法的标识符(无论文件中是否已定义)。此列表必须进行排序,其中定义类型(按 type_id 索引排序)是主要顺序,方法名称(按 string_id 索引排序)是中间顺序,而方法原型(按 proto_id 索引排序)是次要顺序。该列表不得包含任何重复条目。 |
| class_defs |
class_def_item[] |
类定义列表。这些类必须进行排序,以便所指定类的超类和已实现的接口比引用类更早出现在该列表中。此外,对于在该列表中多次出现的同名类,其定义是无效的。 |
| call_site_ids |
call_site_id_item[] |
调用站点标识符列表。这些是此文件引用的所有调用站点的标识符(无论文件中是否已定义)。此列表必须按 call_site_off 的升序进行排序。 |
| method_handles |
method_handle_item[] |
方法句柄列表。此文件引用的所有方法句柄的列表(无论文件中是否已定义)。此列表未进行排序,而且可能包含将在逻辑上对应于不同方法句柄实例的重复项。 |
| data |
ubyte[] |
数据区,包含上面所列表格的所有支持数据。不同的项有不同的对齐要求;如有必要,则在每个项之前插入填充字节,以实现所需的对齐效果。 |
| link_data |
ubyte[] |
静态链接文件中使用的数据。本文档尚未指定本区段中数据的格式。此区段在未链接文件中为空,而运行时实现可能会在适当的情况下使用这些数据。 |
关于dex文件格式,可以分为三类:
- 头部信息 header
- 引用信息 string_ids(字符串索引)、type_ids(类型索引)、proto_ids(方法原型索引)、field_ids(方法原型索引)、method_ids(方法索引)、call_site_ids(根本没有找到)
- 数据信息 class_defs(类定义列表)、method_handles(方法句柄列表)、data(数据区,所有数据都在这里)、link_data(静态链接文件中使用的数据)
3. header信息
头部信息位于文件的头位置,用于表示文件的基本信息,比如文件大小、格式等等。dex文件的header格式如下:
| 名称 |
格式 |
说明 |
| magic |
ubyte[8] = DEX_FILE_MAGIC |
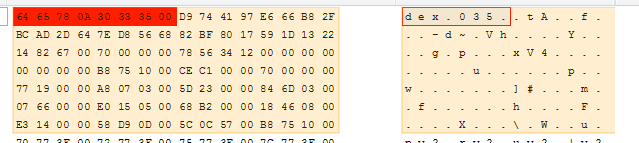
魔法值。ubyte[8] DEX_FILE_MAGIC = { 0x64 0x65 0x78 0x0a 0x30 0x33 0x38 0x00 } = "dex\n038\0" |
| checksum |
uint |
文件剩余内容(除 magic 和此字段之外的所有内容)的 adler32 校验和;用于检测文件损坏情况 |
| signature |
ubyte[20] |
文件剩余内容(除 magic、checksum 和此字段之外的所有内容)的 SHA-1 签名(哈希);用于对文件进行唯一标识 |
| file_size |
uint |
整个文件(包括标头)的大小,以字节为单位 |
| header_size |
uint = 0x70 |
标头(整个区段)的大小,以字节为单位。这一项允许至少一定程度的向后/向前兼容性,而不必让格式失效。 |
| endian_tag |
uint = ENDIAN_CONSTANT |
字节序标记。更多详情,请参阅上文中“ENDIAN_CONSTANT 和 REVERSE_ENDIAN_CONSTANT”下的讨论。 |
| link_size |
uint |
链接区段的大小;如果此文件未进行静态链接,则该值为 0 |
| link_off |
uint |
从文件开头到链接区段的偏移量;如果 link_size == 0,则该值为 0。该偏移量(如果为非零值)应该是到 link_data 区段的偏移量。本文档尚未指定此处所指的数据格式;此标头字段(和之前的字段)会被保留为钩子,以供运行时实现使用。 |
| map_off |
uint |
从文件开头到映射项的偏移量。该偏移量(必须为非零)应该是到 data 区段的偏移量,而数据应采用下文中“map_list”指定的格式。 |
| string_ids_size |
uint |
字符串标识符列表中的字符串数量 |
| string_ids_off |
uint |
从文件开头到字符串标识符列表的偏移量;如果 string_ids_size == 0(不可否认是一种奇怪的极端情况),则该值为 0。该偏移量(如果为非零值)应该是到 string_ids 区段开头的偏移量。 |
| type_ids_size |
uint |
类型标识符列表中的元素数量,最多为 65535 |
| type_ids_off |
uint |
从文件开头到类型标识符列表的偏移量;如果 type_ids_size == 0(不可否认是一种奇怪的极端情况),则该值为 0。该偏移量(如果为非零值)应该是到 type_ids 区段开头的偏移量。 |
| proto_ids_size |
uint |
原型标识符列表中的元素数量,最多为 65535 |
| proto_ids_off |
uint |
从文件开头到原型标识符列表的偏移量;如果 proto_ids_size == 0(不可否认是一种奇怪的极端情况),则该值为 0。该偏移量(如果为非零值)应该是到 proto_ids 区段开头的偏移量。 |
| field_ids_size |
uint |
字段标识符列表中的元素数量 |
| field_ids_off |
uint |
从文件开头到字段标识符列表的偏移量;如果 field_ids_size == 0,则该值为 0。该偏移量(如果为非零值)应该是到 field_ids 区段开头的偏移量。 |
| method_ids_size |
uint |
方法标识符列表中的元素数量 |
| method_ids_off |
uint |
从文件开头到方法标识符列表的偏移量;如果 method_ids_size == 0,则该值为 0。该偏移量(如果为非零值)应该是到 method_ids 区段开头的偏移量。 |
| class_defs_size |
uint |
类定义列表中的元素数量 |
| class_defs_off |
uint |
从文件开头到类定义列表的偏移量;如果 class_defs_size == 0(不可否认是一种奇怪的极端情况),则该值为 0。该偏移量(如果为非零值)应该是到 class_defs 区段开头的偏移量。 |
| data_size |
uint |
data 区段的大小(以字节为单位)。该数值必须是 sizeof(uint) 的偶数倍。 |
| data_off |
uint |
从文件开头到 data 区段开头的偏移量。 |
可以看到文件格式非常之多,这可比之前解析的resources文件庞大的多了,我们先定义下对应的实体:
class header_item(
        var magic: Array<uint8_t>,
        var checksum: uint32_t, //文件剩余内容(除 magic 和此字段之外的所有内容)的 adler32 校验和;用于检测文件损坏情况
        var signature: ByteArray, //文件剩余内容(除 magic、checksum 和此字段之外的所有内容)的 SHA-1 签名(哈希);用于对文件进行唯一标识
        var file_size: uint32_t, //    整个文件(包括标头)的大小,以字节为单位
        var header_size: uint32_t, //    标头(整个区段)的大小,以字节为单位。这一项允许至少一定程度的向后/向前兼容性,而不必让格式失效。
        var endian_tag: uint32_t, // ENDIAN_CONSTANT    字节序标记。更多详情,请参阅上文中“ENDIAN_CONSTANT 和 REVERSE_ENDIAN_CONSTANT”下的讨论。
        var link_size: uint32_t, //  链接区段的大小;如果此文件未进行静态链接,则该值为 0
        var link_off: uint32_t, //  从文件开头到链接区段的偏移量;如果 link_size == 0,则该值为 0。该偏移量(如果为非零值)应该是到 link_data 区段的偏移量。本文档尚未指定此处所指的数据格式;此标头字段(和之前的字段)会被保留为钩子,以供运行时实现使用。
        var map_off: uint32_t, //  从文件开头到映射项的偏移量。该偏移量(必须为非零)应该是到 data 区段的偏移量,而数据应采用下文中“map_list”指定的格式。
        var string_ids_size: uint32_t, //   字符串标识符列表中的字符串数量
        var string_ids_off: uint32_t, //   从文件开头到字符串标识符列表的偏移量;如果 string_ids_size == 0(不可否认是一种奇怪的极端情况),则该值为 0。该偏移量(如果为非零值)应该是到 string_ids 区段开头的偏移量。
        var type_ids_size: uint32_t, //  类型标识符列表中的元素数量,最多为 65535
        var type_ids_off: uint32_t, //  从文件开头到类型标识符列表的偏移量;如果 type_ids_size == 0(不可否认是一种奇怪的极端情况),则该值为 0。该偏移量(如果为非零值)应该是到 type_ids 区段开头的偏移量。
        var proto_ids_size: uint32_t, //    原型标识符列表中的元素数量,最多为 65535
        var proto_ids_off: uint32_t, //  从文件开头到原型标识符列表的偏移量;如果 proto_ids_size == 0(不可否认是一种奇怪的极端情况),则该值为 0。该偏移量(如果为非零值)应该是到 proto_ids 区段开头的偏移量。
        var field_ids_size: uint32_t, //   字段标识符列表中的元素数量
        var field_ids_off: uint32_t, //  从文件开头到字段标识符列表的偏移量;如果 field_ids_size == 0,则该值为 0。该偏移量(如果为非零值)应该是到 field_ids 区段开头的偏移量。
        var method_ids_size: uint32_t, //   方法标识符列表中的元素数量
        var method_ids_off: uint32_t, //   从文件开头到方法标识符列表的偏移量;如果 method_ids_size == 0,则该值为 0。该偏移量(如果为非零值)应该是到 method_ids 区段开头的偏移量。
        var class_defs_size: uint32_t, //   类定义列表中的元素数量
        var class_defs_off: uint32_t, //   从文件开头到类定义列表的偏移量;如果 class_defs_size == 0(不可否认是一种奇怪的极端情况),则该值为 0。该偏移量(如果为非零值)应该是到 class_defs 区段开头的偏移量。
        var data_size: uint32_t, // data 区段的大小(以字节为单位)。该数值必须是 sizeof(uint) 的偶数倍。
        var data_off: uint32_t //从文件开头到 data 区段开头的偏移量。
) : base_item() {
    override fun toString(): String {
        super.toString()
        val b = ByteArray(magic.size, { i -> magic[i].getValue() })
        val string = java.lang.String(b)
        return "magic = $string\n" +
                "checksum = ${getHexValue(checksum)},value = ${getUUnitValue(checksum)}\n" +
                "checksum = ${getHexValue(checksum)},value = ${getUUnitValue(checksum)}\n" +
                "file_size = ${getHexValue(file_size)},value = ${getUUnitValue(file_size)}\n" +
                "header_size = ${getHexValue(header_size)},value = ${getUUnitValue(header_size)}\n" +
                "endian_tag = ${getHexValue(endian_tag)},value = ${getUUnitValue(endian_tag)}\n" +
                "link_size = ${getHexValue(link_size)},value = ${getUUnitValue(link_size)}\n" +
                "link_off = ${getHexValue(link_off)},value = ${getUUnitValue(link_off)}\n" +
                "map_off = ${getHexValue(map_off)},value = ${getUUnitValue(map_off)}\n" +
                "string_ids_size = ${getHexValue(string_ids_size)},value = ${getUUnitValue(string_ids_size)}\n" +
                "string_ids_off = ${getHexValue(string_ids_off)},value = ${getUUnitValue(string_ids_off)}\n" +
                "type_ids_size = ${getHexValue(type_ids_size)},value = ${getUUnitValue(type_ids_size)}\n" +
                "type_ids_off = ${getHexValue(type_ids_off)},value = ${getUUnitValue(type_ids_off)}\n" +
                "proto_ids_size = ${getHexValue(proto_ids_size)},value = ${getUUnitValue(proto_ids_size)}\n" +
                "proto_ids_off = ${getHexValue(proto_ids_off)},value = ${getUUnitValue(proto_ids_off)}\n" +
                "field_ids_size = ${getHexValue(field_ids_size)},value = ${getUUnitValue(field_ids_size)}\n" +
                "field_ids_off = ${getHexValue(field_ids_off)},value = ${getUUnitValue(field_ids_off)}\n" +
                "method_ids_size = ${getHexValue(method_ids_size)},value = ${getUUnitValue(method_ids_size)}\n" +
                "method_ids_off = ${getHexValue(method_ids_off)},value = ${getUUnitValue(method_ids_off)}\n" +
                "class_defs_size = ${getHexValue(class_defs_size)},value = ${getUUnitValue(class_defs_size)}\n" +
                "class_defs_off = ${getHexValue(class_defs_off)},value = ${getUUnitValue(class_defs_off)}\n" +
                "data_size = ${getHexValue(data_size)},value = ${getUUnitValue(data_size)}\n" +
                "data_off = ${getHexValue(data_off)},value = ${getUUnitValue(data_off)}\n"
    }
}
接着我们先解析一波,这里要清楚下源码中都是采用的小端顺序(自行百度):
val stream = File(File("").absolutePath + "//..//dexAnalyzer//src//com//nick//classes.dex").inputStream()
    val os = ByteArrayOutputStream()
    var bytes = ByteArray(1024)
    var len = stream.read(bytes)
    while (len != -1) {
        os.write(bytes, 0, len)
        len = stream.read(bytes)
    }
    // 将文件转成二进制字节数组操作
    bytes = os.toByteArray()
    // 创建header_item
    val header_item = header_item(
            Array(8, { i -> read_uint8_t(bytes, i) }), // 1
            read_uint32_t(bytes, 8), // 4
            kotlin.ByteArray(20, { // 20
                b ->
                bytes[b + 12]
            }),
            read_uint32_t(bytes, 32), // 4
            read_uint32_t(bytes, 32 + 4), // 4
            read_uint32_t(bytes, 32 + 4 * 2), // 4
            read_uint32_t(bytes, 32 + 4 * 3), // 4
            read_uint32_t(bytes, 32 + 4 * 4), // 4
            read_uint32_t(bytes, 32 + 4 * 5), // 4
            read_uint32_t(bytes, 32 + 4 * 6), // 4
            read_uint32_t(bytes, 32 + 4 * 7), // 4
            read_uint32_t(bytes, 32 + 4 * 8), // 4
            read_uint32_t(bytes, 32 + 4 * 9), // 4
            read_uint32_t(bytes, 32 + 4 * 10), // 4
            read_uint32_t(bytes, 32 + 4 * 11), // 4
            read_uint32_t(bytes, 32 + 4 * 12), // 4
            read_uint32_t(bytes, 32 + 4 * 13), // 4
            read_uint32_t(bytes, 32 + 4 * 14), // 4
            read_uint32_t(bytes, 32 + 4 * 15), // 4
            read_uint32_t(bytes, 32 + 4 * 16), // 4
            read_uint32_t(bytes, 32 + 4 * 17), // 4
            read_uint32_t(bytes, 32 + 4 * 18), // 4
            read_uint32_t(bytes, 32 + 4 * 19) // 4
    )
    println(header_item)
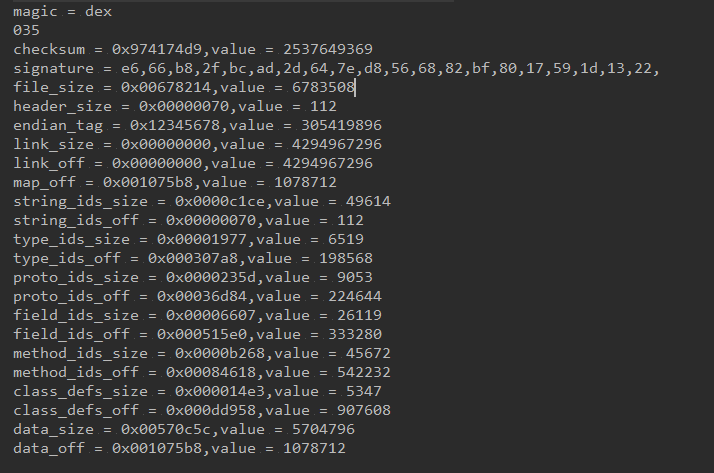
这里说明下read_uint32_t()方法是用于读取四个字节的byte,并将其转为uint32_t格式,其实也就是int。看下打印结果:
我们可以对比下,结果完全是OK的!
4 string_ids信息
上面看完了头部的信息,下面看下很重要的一部分信息string_ids信息,还是先看下格式:
string_id_item
| 名称 |
格式 |
说明 |
| string_data_off |
uint |
从文件开头到此项的字符串数据的偏移量。该偏移量应该是到 data 区段中某个位置的偏移量,而数据应采用下文中“string_data_item”指定的格式。没有偏移量对齐要求。 |
string_data_item
| 名称 |
格式 |
说明 |
| utf16_size |
uleb128 |
此字符串的大小;以 UTF-16 代码单元(在许多系统中为“字符串长度”)为单位。也就是说,这是该字符串的解码长度(编码长度隐含在 0 字节的位置)。 |
| data |
ubyte[] |
一系列 MUTF-8 代码单元(又称八位字节),后跟一个值为 0 的字节。 |
这里又有问题了:
- uleb128格式如何获取?
从Android源码中获取
    /**
     * Gets the number of bytes in the unsigned LEB128 encoding of the
     * given value.
     *
     * @param value the value in question
     * @return its write size, in bytes
     */
    public static int unsignedLeb128Size(int value) {
        // TODO: This could be much cleverer.

        int remaining = value >> 7;
        int count = 0;

        while (remaining != 0) {
            remaining >>= 7;
            count++;
        }

        return count + 1;
    }

    /**
     * Gets the number of bytes in the signed LEB128 encoding of the
     * given value.
     *
     * @param value the value in question
     * @return its write size, in bytes
     */
    public static int signedLeb128Size(int value) {
        // TODO: This could be much cleverer.

        int remaining = value >> 7;
        int count = 0;
        boolean hasMore = true;
        int end = ((value & Integer.MIN_VALUE) == 0) ? 0 : -1;

        while (hasMore) {
            hasMore = (remaining != end)
                || ((remaining & 1) != ((value >> 6) & 1));

            value = remaining;
            remaining >>= 7;
            count++;
        }

        return count;
    }
- MUTF-8又是怎样的?
可以看下这篇博客,解释的很清楚。
格式分析完了,下面来解析吧:
    // 偏移量
    var offset = header_item.header_size.getValue()
    // 字符串偏移量的数组
    string_ids = Array(header_item.string_ids_size.getValue(), {
        i ->
        string_id_item(read_uint32_t(bytes, offset + i * 4))
    })

    // 字符串数组数组
    string_ids?.forEach {
        val value = it.string_data_off.getValue()
        val unsignedLeb128 = readUnsignedLeb128(bytes, value)

        val string_data_item = string_data_item(it.string_data_off, uleb128(unsignedLeb128.second), coypByte(bytes, unsignedLeb128.first, unsignedLeb128.second))
        list.add(string_data_item)
        println(string_data_item)
    }
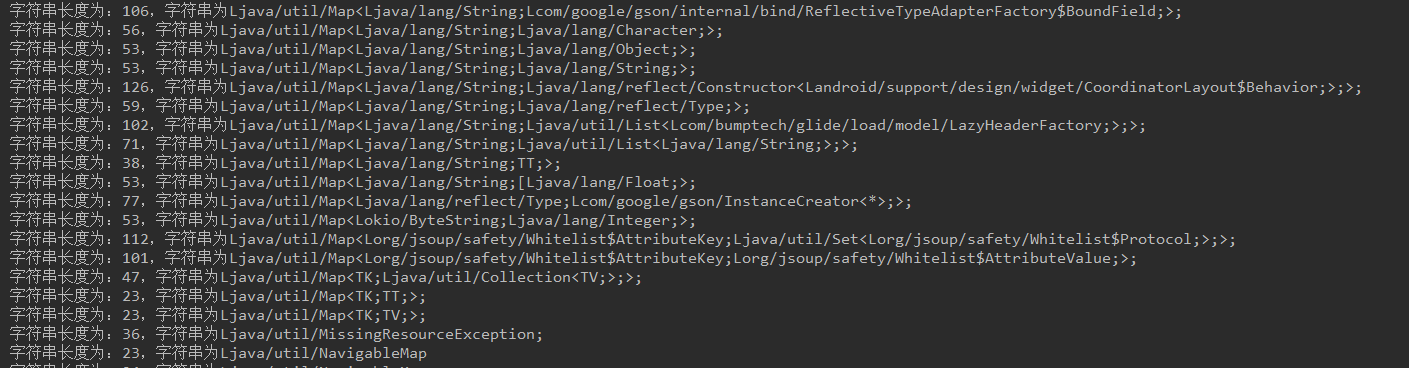
部分结果如下:
5 已解析部分
header
string_ids
type_ids
proto_ids
field_ids
method_ids
class_defs
6 未解析部分
call_site_ids
method_handles
link_data
源码就在这里
7 总结
解析这个dex文件大概花了一个星期的时间,从Android官网看文档、查资料。一点点从零到大部分解析完成,感觉还是挺有趣的。