spring boot 源码解析2-SpringApplication初始化
前⾔
我们⽣成⼀个spring boot 项⽬时,会⾃带⼀个启动类. 代码如下:
@SpringBootApplication public class SpringBootAnalysisApplication { public static void main(String[] args) { SpringApplication.run(SpringBootAnalysisApplication.class, args); } } 就是这么简单的代码,构成了spring boot的世界. 那么代码中只有⼀个@SpringBootApplication 注解 和 调⽤了SpringApplication#run
⽅法.那么我们先来解析SpringApplication的run⽅法.
解析
⾸先调⽤了org.springframework.boot.SpringApplication#run(Object, String...) ⽅法.代码如下:
public static ConfigurableApplicationContext run(Object source, String... args) { return run(new Object[] { source }, args); } 接着调⽤如下代码:
public static ConfigurableApplicationContext run(Object[] sources, String[] args) { return new SpringApplication(sources).run(args); } 可以发现 ⾸先初始化了SpringApplication,然后调⽤其实例⽅法:run.
2. 在 SpringApplication 的构造器中,调⽤了 initialize ⽅法.
public SpringApplication(Object... sources) { initialize(sources); } 3. SpringApplication#initialize⽅法代码如下:
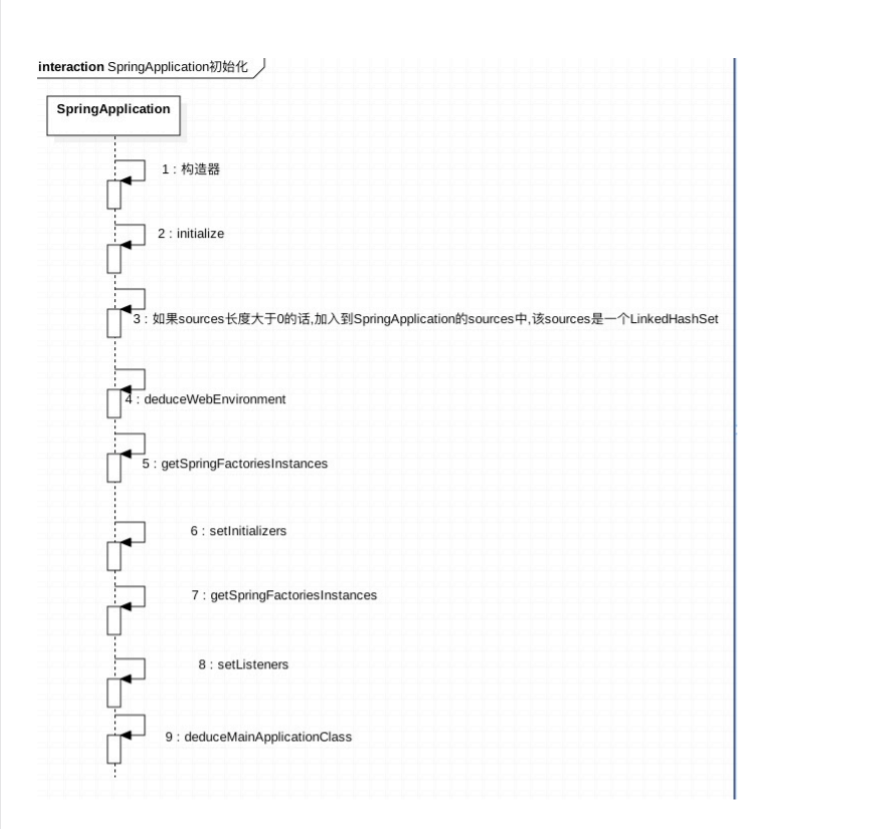
private void initialize(Object[] sources) { if (sources != null && sources.length > 0) { this.sources.addAll(Arrays.asList(sources)); } this.webEnvironment = deduceWebEnvironment(); setInitializers((Collection) getSpringFactoriesInstances( ApplicationContextInitializer.class)); setListeners((Collection) getSpringFactoriesInstances(ApplicationListener.class)); this.mainApplicationClass = deduceMainApplicationClass(); } 可以看到做了如下5件事:
1. 如果sources⻓度⼤于0的话,加⼊到SpringApplication的sources中,该sources是⼀个LinkedHashSet.
2. 调⽤deduceWebEnvironment⽅法判断是否是web环境
3. 设置initializers.
4. 设置Listeners.
5. 设置mainApplicationClass.
4. deduceWebEnvironment代码如下:
private static final String[] WEB_ENVIRONMENT_CLASSES = { "javax.servlet.Servlet", "org.springframework.web.context.ConfigurableWebApplicationContext" }; private boolean deduceWebEnvironment() { for (String className : WEB_ENVIRONMENT_CLASSES) { if (!ClassUtils.isPresent(className, null)) { return false; } } return true; } 可以发现会调⽤ClassUtils类的isPresent⽅法,检查classpath中是否存在javax.servlet.Servlet类和
org.springframework.web.context.ConfigurableWebApplicationContext类,如果存在的话,返回true.否则返回false.
5. 在设置Initializers时⾸先调⽤getSpringFactoriesInstances⽅法加载ApplicationContextInitializer.然后直接赋值给initializers.代码如下:
private <T> Collection<? extends T> getSpringFactoriesInstances(Class<T> type) { return getSpringFactoriesInstances(type, new Class<?>[] {}); } 转⽽调⽤如下代码:
private <T> Collection<? extends T> getSpringFactoriesInstances(Class<T> type, Class<?>[] parameterTypes, Object... args) { ClassLoader classLoader = Thread.currentThread().getContextClassLoader(); // Use names and ensure unique to protect against duplicates // 使⽤Set保存names来避免重复元素 Set<String> names = new LinkedHashSet<String>( SpringFactoriesLoader.loadFactoryNames(type, classLoader)); // 根据names来进⾏实例化 List<T> instances = createSpringFactoriesInstances(type, parameterTypes, classLoader, args, names); // 对实例进⾏排序 AnnotationAwareOrderComparator.sort(instances); return instances; } 该⽅法逻辑如下:
1. ⾸先获得ClassLoader.
2. 调⽤SpringFactoriesLoader#loadFactoryNames进⾏加载,然后放⼊到LinkedHashSet进⾏去重.
3. 调⽤createSpringFactoriesInstances进⾏初始化
4. 排序
其中SpringFactoriesLoader#loadFactoryNames代码如下:
public static List<String> loadFactoryNames(Class<?> factoryClass, ClassLoader classLoader) { String factoryClassName = factoryClass.getName(); try { Enumeration<URL> urls = (classLoader != null ? classLoader.getResources(FACTORIES_RESOURC E_LOCATION) : ClassLoader.getSystemResources(FACTORIES_RESOURCE_LOCATION)); List<String> result = new ArrayList<String>(); while (urls.hasMoreElements()) { URL url = urls.nextElement(); Properties properties = PropertiesLoaderUtils.loadProperties(new UrlResource(url)); String factoryClassNames = properties.getProperty(factoryClassName); result.addAll(Arrays.asList(StringUtils.commaDelimitedListToStringArray(factoryClassN ames))); } return result; } catch (IOException ex) { throw new IllegalArgumentException("Unable to load [" + factoryClass.getName() + "] factories from location [" + FACTORIES_RESOURCE_LOCATION + "]", ex); } } 逻辑如下:
1. 获得factoryClassName,对于当前来说factoryClassName =org.springframework.context.ApplicationContextInitializer.
2. 通过传⼊的classLoader加载META-INF/spring.factories⽂件.
3. 通过调⽤PropertiesLoaderUtils#loadProperties将其转为Properties.
4. 获得factoryClassName对应的值进⾏返回.
对于当前来说,由于我们只加⼊了spring-boot-starter-web的依赖,因此会加载如下的配置:
1. 在spring-boot/META-INF/spring.factories中.org.springframework.context.ApplicationContextInitializer值如下:
org.springframework.context.ApplicationContextInitializer=\ org.springframework.boot.context.ConfigurationWarningsApplicationContextInitializer,\ org.springframework.boot.context.ContextIdApplicationContextInitializer,\ org.springframework.boot.context.config.DelegatingApplicationContextInitializer,\ org.springframework.boot.context.embedded.ServerPortInfoApplicationContextInitializer
2. 在spring-boot-autoconfigure/src/main/resources/META-INF/spring.factories
中.org.springframework.context.ApplicationContextInitializer值如下:
org.springframework.context.ApplicationContextInitializer=\ org.springframework.boot.autoconfigure.SharedMetadataReaderFactoryContextInitializer,\ org.springframework.boot.autoconfigure.logging.AutoConfigurationReportLoggingInitializer
因此会加载6个.
SpringApplication#createSpringFactoriesInstances⽅法如下:
private <T> List<T> createSpringFactoriesInstances(Class<T> type, Class<?>[] parameterTypes, ClassLoader classLoader, Object[] args, Set<String> names) { List<T> instances = new ArrayList<T>(names.size()); for (String name : names) { try { Class<?> instanceClass = ClassUtils.forName(name, classLoader); Assert.isAssignable(type, instanceClass); Constructor<?> constructor = instanceClass .getDeclaredConstructor(parameterTypes); T instance = (T) BeanUtils.instantiateClass(constructor, args); instances.add(instance); } catch (Throwable ex) { throw new IllegalArgumentException( "Cannot instantiate " + type + " : " + name, ex); } } return instances; } 逻辑如下:遍历传⼊的names,也就是之前通过SpringFactoriesLoader加载的类名.通过遍历,依次调⽤其构造器进⾏初始化.加⼊到
instances.然后进⾏返回.
对于当前场景来说:
ConfigurationWarningsApplicationContextInitializer,DelegatingApplicationContextInitializer,ServerPortInfoApplicationContextInitializer
初始化没有做任何事.
ContextIdApplicationContextInitializer在初始化时.会获得spring boot的应⽤名.搜索路径如下:
1. spring.application.name
2. vcap.application.name
3. spring.config.name
4. 如果都没有配置的话,返回application.
代码如下:
private static final String NAME_PATTERN = "${spring.application.name:${vcap.application.name:${s pring.config.name:application}}}"; public ContextIdApplicationContextInitializer() { this(NAME_PATTERN); } public ContextIdApplicationContextInitializer(String name) { this.name = name; } 6. 设置SpringApplication#setListeners时,还是同样的套路.调⽤getSpringFactoriesInstances加载META-INF/spring.factories中配置
的org.springframework.context.ApplicationListener. 对于当前来说.加载的类如下:
org.springframework.context.ApplicationListener=\ org.springframework.boot.ClearCachesApplicationListener,\ org.springframework.boot.builder.ParentContextCloserApplicationListener,\ org.springframework.boot.context.FileEncodingApplicationListener,\ org.springframework.boot.context.config.AnsiOutputApplicationListener,\ org.springframework.boot.context.config.ConfigFileApplicationListener,\ org.springframework.boot.context.config.DelegatingApplicationListener,\ org.springframework.boot.liquibase.LiquibaseServiceLocatorApplicationListener,\ org.springframework.boot.logging.ClasspathLoggingApplicationListener,\ org.springframework.boot.logging.LoggingApplicationListener
这些类在构造器中都没有做任何事.
7. 调⽤SpringApplication#deduceMainApplicationClass⽅法.获得应⽤的启动类.该⽅法通过获取当前⽅法调⽤栈,找到main函数的
类.代码如下:
private Class<?> deduceMainApplicationClass() { try { StackTraceElement[] stackTrace = new RuntimeException().getStackTrace(); for (StackTraceElement stackTraceElement : stackTrace) { if ("main".equals(stackTraceElement.getMethodName())) { return Class.forName(stackTraceElement.getClassName()); } } } catch (ClassNotFoundException ex) { // Swallow and continue } return null; } 流程图如下:
参考视频教程:Spring Boot源码解析
小程序
Spring Boot源码解析
 关注公众号
关注公众号 低调大师中文资讯倾力打造互联网数据资讯、行业资源、电子商务、移动互联网、网络营销平台。
持续更新报道IT业界、互联网、市场资讯、驱动更新,是最及时权威的产业资讯及硬件资讯报道平台。
转载内容版权归作者及来源网站所有,本站原创内容转载请注明来源。
- 上一篇

Redission分布式锁源码解析
Redission锁继承Implements Reentrant Lock,所以具备 Reentrant Lock 锁中的一些特性:超时,重试,可中断等。加上Redission中Redis具备分布式的特性,所以非常适合用来做Java中的分布式锁。 下面我们对其加锁、解锁过程中的源码细节进行一一分析。 锁的接口定义了一下方法: 分布式锁当中加锁,我们常用的加锁接口: booleantryLock(longwaitTime,longleaseTime,TimeUnitunit)throwsInterruptedException; 下面我们来看一下方法的具体实现: publicbooleantryLock(longwaitTime,longleaseTime,TimeUnitunit)throwsInterruptedException{ longtime=unit.toMillis(waitTime); longcurrent=System.currentTimeMillis(); finallongthreadId=Thread.currentThread().getId(); Lon...
- 下一篇

日处理20亿数据,实时用户行为服务系统架构实践【转】
携程实时用户行为服务作为基础服务,目前普遍应用在多个场景中,比如猜你喜欢(携程的推荐系统)、动态广告、用户画像、浏览历史等等。 以猜你喜欢为例,猜你喜欢为应用内用户提供潜在选项,提高成交效率。旅行是一项综合性的需求,用户往往需要不止一个产品。作为一站式的旅游服务平台,跨业务线的推荐,特别是实时推荐,能实际满足用户的需求,因此在上游提供打通各业务线之间的用户行为数据有很大的必要性。 携程原有的实时用户行为系统存在一些问题,包括:1)数据覆盖不全;2)数据输出没有统一格式,对众多使用方提高了接入成本;3)日志处理模块是web service,比较难支持多种数据处理策略和实现方便扩容应对流量洪峰的需求等。 而近几年旅游市场高速增长,数据量越来越大,并且会持续快速增长。有越来越多的使用需求,对系统的实时性,稳定性也提出了更高的要求。总的来说,当前需求对系统的实时性/可用性/性能/扩展性方面都有很高的要求。 一、架构 这样的背景下,我们按照如下结构重新设计了系统: 图1:实时用户行为系统逻辑视图 新的架构下,数据有两种流向,分别是处理流和输出流。 在处理流,行为日志会从客户端(App/Onlin...
相关文章
文章评论
共有0条评论来说两句吧...
文章二维码
点击排行
推荐阅读
最新文章
- Windows10,CentOS7,CentOS8安装MongoDB4.0.16
- SpringBoot2初体验,简单认识spring boot2并且搭建基础工程
- CentOS6,CentOS7官方镜像安装Oracle11G
- Red5直播服务器,属于Java语言的直播服务器
- SpringBoot2更换Tomcat为Jetty,小型站点的福音
- SpringBoot2整合Thymeleaf,官方推荐html解决方案
- SpringBoot2整合Redis,开启缓存,提高访问速度
- CentOS8安装MyCat,轻松搞定数据库的读写分离、垂直分库、水平分库
- CentOS7安装Docker,走上虚拟化容器引擎之路
- CentOS7设置SWAP分区,小内存服务器的救世主


 微信收款码
微信收款码 支付宝收款码