环境说明:SpringBoot版本2.0.3.RELEASE(不同版本可能有些差异),Gradle版本4.5.1(这个版本不太关键)
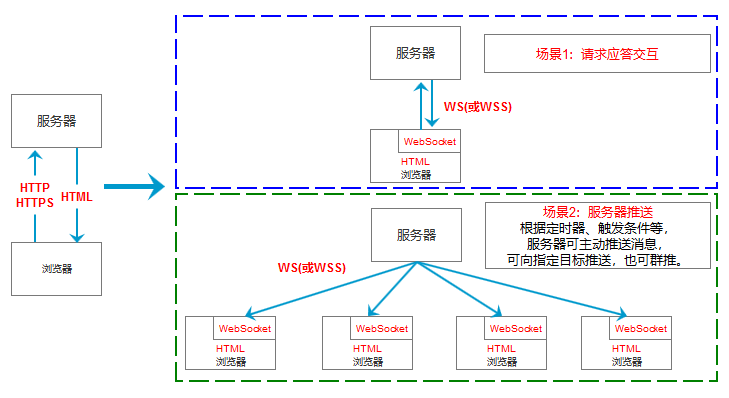
WebSocket是微信小程序的基础,是应用广泛、前景很好的新技术,目前大热。这里简要介绍一下使用SpringBoot框架开发WebSocket应用的基础代码。基本原理不讲了,代码原理见函数注释,画个简单的图说明基本流程,如下图所示。
![images/cePYEeNyzEzFdpZBA7wMT3jypyCCHfAS.png images/cePYEeNyzEzFdpZBA7wMT3jypyCCHfAS.png]()
一、引用支撑包
compile('org.springframework.boot:spring-boot-starter-websocket')
二、WebSocket服务端
package com.wallimn.iteye.sp.asset.bus.websocket;

import java.io.IOException;
import java.util.concurrent.CopyOnWriteArraySet;
import java.util.concurrent.atomic.AtomicInteger;

import javax.websocket.OnClose;
import javax.websocket.OnError;
import javax.websocket.OnMessage;
import javax.websocket.OnOpen;
import javax.websocket.Session;
import javax.websocket.server.ServerEndpoint;

import org.slf4j.Logger;
import org.slf4j.LoggerFactory;
import org.springframework.stereotype.Component;

/**
 * WebSocket服务端示例
 * @author wallimn,http://wallimn.iteye.com
 *
 */
@ServerEndpoint(value = "/ws/asset")
@Component
public class WebSocketServer {

    private static Logger log = LoggerFactory.getLogger(WebSocketServer.class);
    private static final AtomicInteger OnlineCount = new AtomicInteger(0);
    // concurrent包的线程安全Set,用来存放每个客户端对应的Session对象。
    private static CopyOnWriteArraySet<Session> SessionSet = new CopyOnWriteArraySet<Session>();


    /**
     * 连接建立成功调用的方法
     */
    @OnOpen
    public void onOpen(Session session) {
        SessionSet.add(session);
        int cnt = OnlineCount.incrementAndGet(); // 在线数加1
        log.info("有连接加入,当前连接数为:{}", cnt);
        SendMessage(session, "连接成功");
    }

    /**
     * 连接关闭调用的方法
     */
    @OnClose
    public void onClose(Session session) {
        SessionSet.remove(session);
        int cnt = OnlineCount.decrementAndGet();
        log.info("有连接关闭,当前连接数为:{}", cnt);
    }

    /**
     * 收到客户端消息后调用的方法
     *
     * @param message
     *            客户端发送过来的消息
     */
    @OnMessage
    public void onMessage(String message, Session session) {
        log.info("来自客户端的消息:{}",message);
        SendMessage(session, "收到消息,消息内容:"+message);

    }

    /**
     * 出现错误
     * @param session
     * @param error
     */
    @OnError
    public void onError(Session session, Throwable error) {
        log.error("发生错误:{},Session ID: {}",error.getMessage(),session.getId());
        error.printStackTrace();
    }

    /**
     * 发送消息,实践表明,每次浏览器刷新,session会发生变化。
     * @param session
     * @param message
     */
    public static void SendMessage(Session session, String message) {
        try {
            session.getBasicRemote().sendText(String.format("%s (From Server,Session ID=%s)",message,session.getId()));
        } catch (IOException e) {
            log.error("发送消息出错:{}", e.getMessage());
            e.printStackTrace();
        }
    }

    /**
     * 群发消息
     * @param message
     * @throws IOException
     */
    public static void BroadCastInfo(String message) throws IOException {
        for (Session session : SessionSet) {
            if(session.isOpen()){
                SendMessage(session, message);
            }
        }
    }

    /**
     * 指定Session发送消息
     * @param sessionId
     * @param message
     * @throws IOException
     */
    public static void SendMessage(String sessionId,String message) throws IOException {
        Session session = null;
        for (Session s : SessionSet) {
            if(s.getId().equals(sessionId)){
                session = s;
                break;
            }
        }
        if(session!=null){
            SendMessage(session, message);
        }
        else{
            log.warn("没有找到你指定ID的会话:{}",sessionId);
        }
    }

}
三、服务端推送测试Controller
使用浏览器打开“/api/ws/sendOne?message=单发消息内容&id=none”群发消息(需要根据实际情况修改id值,这个值见浏览器或IDE控制台输出信息),“/api/ws/sendAll?message=单发消息内容”单发消息。
package com.wallimn.iteye.sp.asset.bus.websocket;

import java.io.IOException;

import org.springframework.web.bind.annotation.RequestMapping;
import org.springframework.web.bind.annotation.RequestMethod;
import org.springframework.web.bind.annotation.RequestParam;
import org.springframework.web.bind.annotation.RestController;

/**
 * WebSocket服务器端推送消息示例Controller
 *
 * @author wallimn,http://wallimn.iteye.com
 *
 */
@RestController
@RequestMapping("/api/ws")
public class WebSocketController {

    @RequestMapping(value="/sendAll", method=RequestMethod.GET)
    /**
     * 群发消息内容
     * @param message
     * @return
     */
    String sendAllMessage(@RequestParam(required=true) String message){
        try {
            WebSocketServer.BroadCastInfo(message);
        } catch (IOException e) {
            e.printStackTrace();
        }
        return "ok";
    }
    @RequestMapping(value="/sendOne", method=RequestMethod.GET)
    /**
     * 指定会话ID发消息
     * @param message 消息内容
     * @param id 连接会话ID
     * @return
     */
    String sendOneMessage(@RequestParam(required=true) String message,@RequestParam(required=true) String id){
        try {
            WebSocketServer.SendMessage(id,message);
        } catch (IOException e) {
            e.printStackTrace();
        }
        return "ok";
    }
}
四、页面端代码
<!DOCTYPE html>
<!--
功能:WebSocket使用示例
作者:http://wallimn.iteye.com
 -->
<html>
<head>
<meta charset="UTF-8">
<title>websocket测试</title>
<style type="text/css">
    h3,h4{
        text-align:center;
    }
</style>
</head>
<body>

    <h3>WebSocket测试,在<span style="color:red">控制台</span>查看测试信息输出!</h3>
    <h4>http://wallimn.iteye.com</h4>
    <h4>
        [url=/api/ws/sendOne?message=单发消息内容&id=none]单发消息链接[/url]
        [url=/api/ws/sendAll?message=群发消息内容]群发消息链接[/url]
    </h4>


    <script type="text/javascript">
        var socket;
        if (typeof (WebSocket) == "undefined") {
            console.log("遗憾:您的浏览器不支持WebSocket");
        } else {
            console.log("恭喜:您的浏览器支持WebSocket");

            //实现化WebSocket对象
            //指定要连接的服务器地址与端口建立连接
            //注意ws、wss使用不同的端口。我使用自签名的证书测试,
            //无法使用wss,浏览器打开WebSocket时报错
            //ws对应http、wss对应https。
            socket = new WebSocket("ws://localhost:80/ws/asset");
            //连接打开事件
            socket.onopen = function() {
                console.log("Socket 已打开");
                socket.send("消息发送测试(From Client)");
            };
            //收到消息事件
            socket.onmessage = function(msg) {
                console.log(msg.data);
            };
            //连接关闭事件
            socket.onclose = function() {
                console.log("Socket已关闭");
            };
            //发生了错误事件
            socket.onerror = function() {
                alert("Socket发生了错误");
            }

            //窗口关闭时,关闭连接
            window.unload=function() {
                socket.close();
            };
        }
    </script>

</body>
</html>


