CPU和GPU实现julia
主要目的是通过对比,学习研究如何编写CUDA程序。julia的算法还是有一定难度的,但不是重点。由于GPU实现了也是做图像识别程序,所以缺省的就是和OPENCV结合起来。
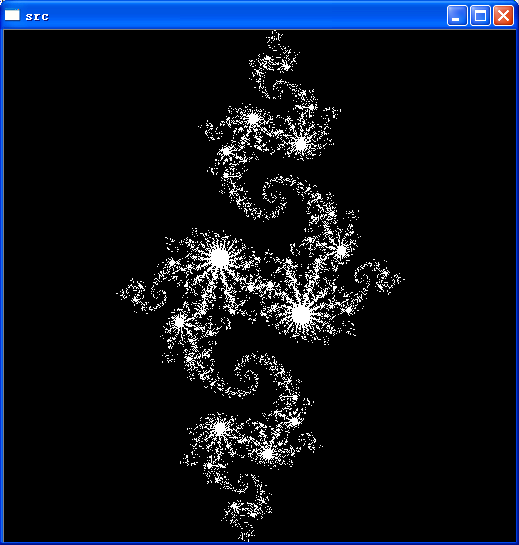
一、CPU实现(julia_cpu.cpp)
//julia_cpu 采用cpu实现julia变换
#
include
"stdafx.h"
#
include
<iostream
>
#
include
"opencv2/core/core.hpp"
#
include
"opencv2/highgui/highgui.hpp"
#
include
"opencv2/imgproc/imgproc.hpp"
using
namespace std;
using
namespace cv;
#
define DIM
512
struct cuComplex
{
float r;
float i;
cuComplex(
float a,
float b)
:r(a),i(b){}
float magnitude2(
void){
return r
*r
+i
*i;}
cuComplex
operator
*(
const cuComplex
& a)
{
return cuComplex(r
*a.r
-i
*a.i,i
*a.r
+r
*a.i);
}
cuComplex
operator
+(
const cuComplex
& a)
{
return cuComplex(r
+a.r,i
+a.i);
}
};
int julia(
int x,
int y)
{
const
float scale
=
1.
5;
float jx
= scale
*(
float)(DIM
/
2
- x)
/(DIM
/
2);
float jy
= scale
*(
float)(DIM
/
2
- y)
/(DIM
/
2);
cuComplex c(
-
0.
8,
0.
156);
cuComplex a(jx,jy);
for (
int i
=
0;i
<
200;i
++)
{
a
=a
*a
+c;
if (a.magnitude2()
>
1000)
{
return
0;
}
}
return
1;
}
int _tmain(
int argc, _TCHAR
* argv[])
{
Mat src
= Mat(DIM,DIM,CV_8UC3);
//创建画布
for (
int x
=
0;x
<src.rows;x
++)
{
for (
int y
=
0;y
<src.cols;y
++)
{
for (
int c
=
0;c
<
3;c
++)
{
src.at
<Vec3b
>(x,y)[c]
=julia(x,y)
*
255;
}
}
}
imshow(
"src",src);
waitKey();
return
0;
}
![]()
这里的实现,主要是说明julia的算法,它本身是一个递归的,而且具有一定计算复杂度的算法。
二、GPU实现
为了能够深刻理解这里的技术,我做了一系列的实验。需要注意的是GPU编译非常慢,不知道有什么办法能够加快这个速度。
此外,比较麻烦的就是矩阵的读入读出,因为现在的资料缺乏,所以很多东西还搞不清楚。
1)C
UDA和OPENCV联系起来;(test1.cu)
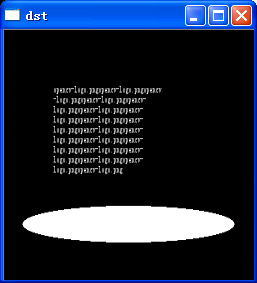
CUDA主要还是来做数学运算的,它本身和OPENCV没有必然的联系。一般来说,计算本身在CUDA中,而OPENCV编写相关转换,进行结果显示。这里实现的功能就是读入一幅单色图像,所有像素进行反转。
编写代码的话,还是基于现有的模板,进行参数的调整,这样来得最快;基于现有的数据不断地调整,这样也能够控制错误。
注意,CUDA核中,不能用任何OPENCV的函数。目前我只能实现这样的效果,因为多数组如何引入,必须要查更多的资料。
主要就是数组的操作,现在只能做单数组,一旦多维就溢出。
![]()
![]()
//1)CUDA和OPENCV联系起来;(test1.cu)
#
include
"stdafx.h"
#
include
<iostream
>
#
include
"opencv2/core/core.hpp"
#
include
"opencv2/highgui/highgui.hpp"
#
include
"opencv2/imgproc/imgproc.hpp"
#
include
<stdio.h
>
#
include
<assert.h
>
#
include
<cuda_runtime.h
>
#
include
<helper_functions.h
>
#
include
<helper_cuda.h
>
using
namespace std;
using
namespace cv;
#
define N
250
//test1的kernel
__global__
void test1kernel(
int
*t)
{
int x
= blockIdx.x;
int y
= blockIdx.y;
int offset
= x
+y
*gridDim.x;
t[offset]
=
255
-t[offset];
}
int main(
void)
{
//step0.数据和内存初始化
Mat src
= imread(
"opencv-logo.png",
0);
resize(src,src,Size(N,N));
int
*dev_t;
int t[N
*N];
Mat dst
= Mat(N,N,CV_8UC3);
for (
int i
=
0;i
<N
*N;i
++)
{
t[i]
=(
int)src.at
<
char
>(i
/N,i
%N);
}
checkCudaErrors(cudaMalloc((
void
*
*)
&dev_t,
sizeof(
int)
*N
*N));
//step1.由cpu向gpu中导入数据
checkCudaErrors(cudaMemcpy(dev_t, t,
sizeof(
int)
*N
*N, cudaMemcpyHostToDevice));
//step2.gpu运算
dim3 grid(N,N);
test1kernel
<<
<grid,
1
>>
>(dev_t);
//step3.由gpu向cpu中传输数据
checkCudaErrors(cudaMemcpy(t, dev_t,
sizeof(
int)
*N
*N, cudaMemcpyDeviceToHost));
//step4.显示结果
for (
int i
=
0;i
<N;i
++)
{
for (
int j
=
0;j
<N;j
++)
{
int offset
= i
*N
+j;
for (
int c
=
0;c
<
3;c
++)
{
dst.at
<Vec3b
>(i,j)[c]
=t[offset];
}
}
}
//step5,释放资源
checkCudaErrors(cudaFree(dev_t));
imshow(
"dst",dst);
waitKey();
return
0;
}
![]()
2)CUDA计算斐波那契数,思考CNN的实现;
CUDA是否适合
斐波那契,像julia这样的,每一个点都是独立的,它很适合;如果能够分出一些块来,应该也是适合的因此,单个的
斐波那契运算不适合,但是做到一个数组中,并且以并行化的想法来运算,还是有一定价值的。
结果报不支持递归,那么在以后运算设计的时候要注意这一点。并行设计从来都不是一个简单的问题,必然有很陡峭的学习曲线,需要分丰富的经验,也有很远大的市场。
但是,CNN的确算的上是一个典型的实现了,它不需要串行的运算,而是在大量的并行的结果之后,选择一个最好的参数,所以CNN可以作为图像领域和CUDA结合的一个典型实现。
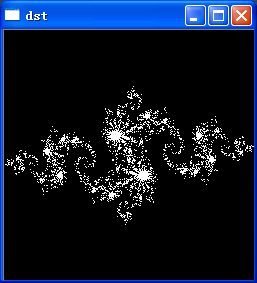
3)CUDA实现julia。
在前面的基础上,非常顺利
![]()
//3)julia
#
include
"stdafx.h"
#
include
<iostream
>
#
include
"opencv2/core/core.hpp"
#
include
"opencv2/highgui/highgui.hpp"
#
include
"opencv2/imgproc/imgproc.hpp"
#
include
<stdio.h
>
#
include
<assert.h
>
#
include
<cuda_runtime.h
>
#
include
<helper_functions.h
>
#
include
<helper_cuda.h
>
using
namespace std;
using
namespace cv;
#
define N
250
struct cuComplex
{
float r;
float i;
__device__ cuComplex(
float a,
float b)
: r(a),i(b){}
__device__
float magnitude2(
void)
{
return r
*r
+i
*i;
}
__device__ cuComplex
operator
*(
const cuComplex
& a)
{
return cuComplex(r
*a.r
- i
*a.i,i
*a.r
+ r
*a.i);
}
__device__ cuComplex
operator
+(
const cuComplex
& a)
{
return cuComplex(r
+a.r,i
+a.i);
}
};
__device__
int julia(
int x,
int y)
{
const
float scale
=
1.
5;
float jx
= scale
*(
float)(N
/
2
- x)
/(N
/
2);
float jy
= scale
*(
float)(N
/
2
- y)
/(N
/
2);
cuComplex c(
-
0.
8,
0.
156);
cuComplex a(jx,jy);
for (
int i
=
0;i
<
200;i
++)
{
a
=a
*a
+c;
if (a.magnitude2()
>
1000)
{
return
0;
}
}
return
1;
}
__device__
int fblx(
int offset)
{
if (offset
==
0
|| offset
==
1)
{
return offset;
}
else
{
return(fblx(offset
-
1)
+fblx(offset
-
2));
}
}
//test3的kernel
__global__
void juliakernel(
int
*t)
{
int x
= blockIdx.x;
int y
= blockIdx.y;
int offset
= x
+y
*gridDim.x;
int juliaValue
= julia(x,y);
t[offset]
=juliaValue
*
255;
}
int main(
void)
{
//step0.数据和内存初始化
int
*dev_t;
int t[N
*N];
Mat dst
= Mat(N,N,CV_8UC3);
for (
int i
=
0;i
<N
*N;i
++)
{
t[i]
=
0;
}
checkCudaErrors(cudaMalloc((
void
*
*)
&dev_t,
sizeof(
int)
*N
*N));
//step1.由cpu向gpu中导入数据
checkCudaErrors(cudaMemcpy(dev_t, t,
sizeof(
int)
*N
*N, cudaMemcpyHostToDevice));
//step2.gpu运算
dim3 grid(N,N);
juliakernel
<<
<grid,
1
>>
>(dev_t);
//step3.由gpu向cpu中传输数据
checkCudaErrors(cudaMemcpy(t, dev_t,
sizeof(
int)
*N
*N, cudaMemcpyDeviceToHost));
//step4.显示结果
for (
int i
=
0;i
<N;i
++)
{
for (
int j
=
0;j
<N;j
++)
{
int offset
= i
*N
+j;
printf(
"%d is %d",offset,t[offset]);
for (
int c
=
0;c
<
3;c
++)
{
dst.at
<Vec3b
>(i,j)[c]
=t[offset];
}
}
}
//step5,释放资源
checkCudaErrors(cudaFree(dev_t));
imshow(
"dst",dst);
waitKey();
return
0;
}
三、小结
CUDA编程是一个新的领域,虽然文档中都说不复杂、不复杂的,但是想要大规模应用不可能不复杂。所以先基于现有的例子,将能够跑起来的东西跑起来。然后思考融合,形成自己的东西,这就是生产率。我相信,不需要很多的时间,我就能够使用CUDA的计算功能去接触并解决一些以前无法去做的东西。
祝成功,愿回顾。
目前方向:图像拼接融合、图像识别 联系方式:jsxyhelu@foxmail.com