今天来介绍一下容器类中的另一个哈希表———》LinkedHashMap。这是HashMap的关门弟子,直接继承了HashMap的衣钵,所以拥有HashMap的全部特性,并青出于蓝而胜于蓝,有着一些HashMap没有的特性。 接下来就一起来看看这个关门弟子到底有多大能耐![]() 。
。
本文将从以下几点对LinkedHashMap进行介绍:
1、LinkedHashMap简介与简单使用
2、LinkedHashMap的结构以及与HashMap的对比
3、LinkedHashMap的插入和删除
4、LinkedHashMap的源码分析
5、基于LinkedHashMap实现LRU缓存
6、总结
本文预计需食用二十分钟,请各位食客合理分配时间。(别慌别慌![]() ,虽然LinkedHashMap也是哈希表,但跟HashMap比起来,内容还是要少很多的,因为很多内容在HashMap中已经讲解过了,2333)
,虽然LinkedHashMap也是哈希表,但跟HashMap比起来,内容还是要少很多的,因为很多内容在HashMap中已经讲解过了,2333)
LinkedHashMap简介与简单使用
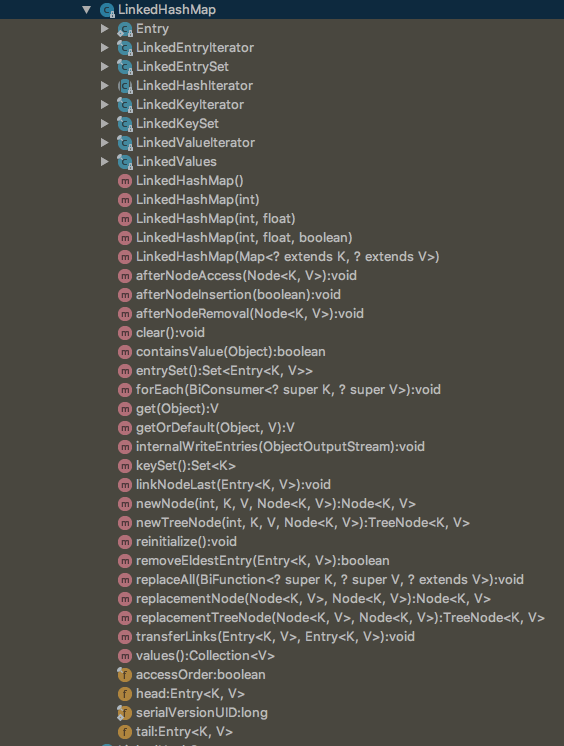
先来看看LinkedHashMap的继承结构:
![]()
LinkedHashMap属于Map大家族的一员,直接继承自HashMap,所以有着HashMap的全部特性,如高效查找元素,同时,LinkedHashMap保持了内部元素的顺序,有两种顺序模式,保持元素插入顺序或者访问顺序,因此适用于需保持元素顺序的场景。另外,由于LinkedHashMap有保持元素访问顺序的模式,所以也常被用作LRU缓存(Least-Recently-Used Cache,即最近最少使用缓存策略,后面会有介绍)。
LinkedHashMap的结构以及与HashMap的对比
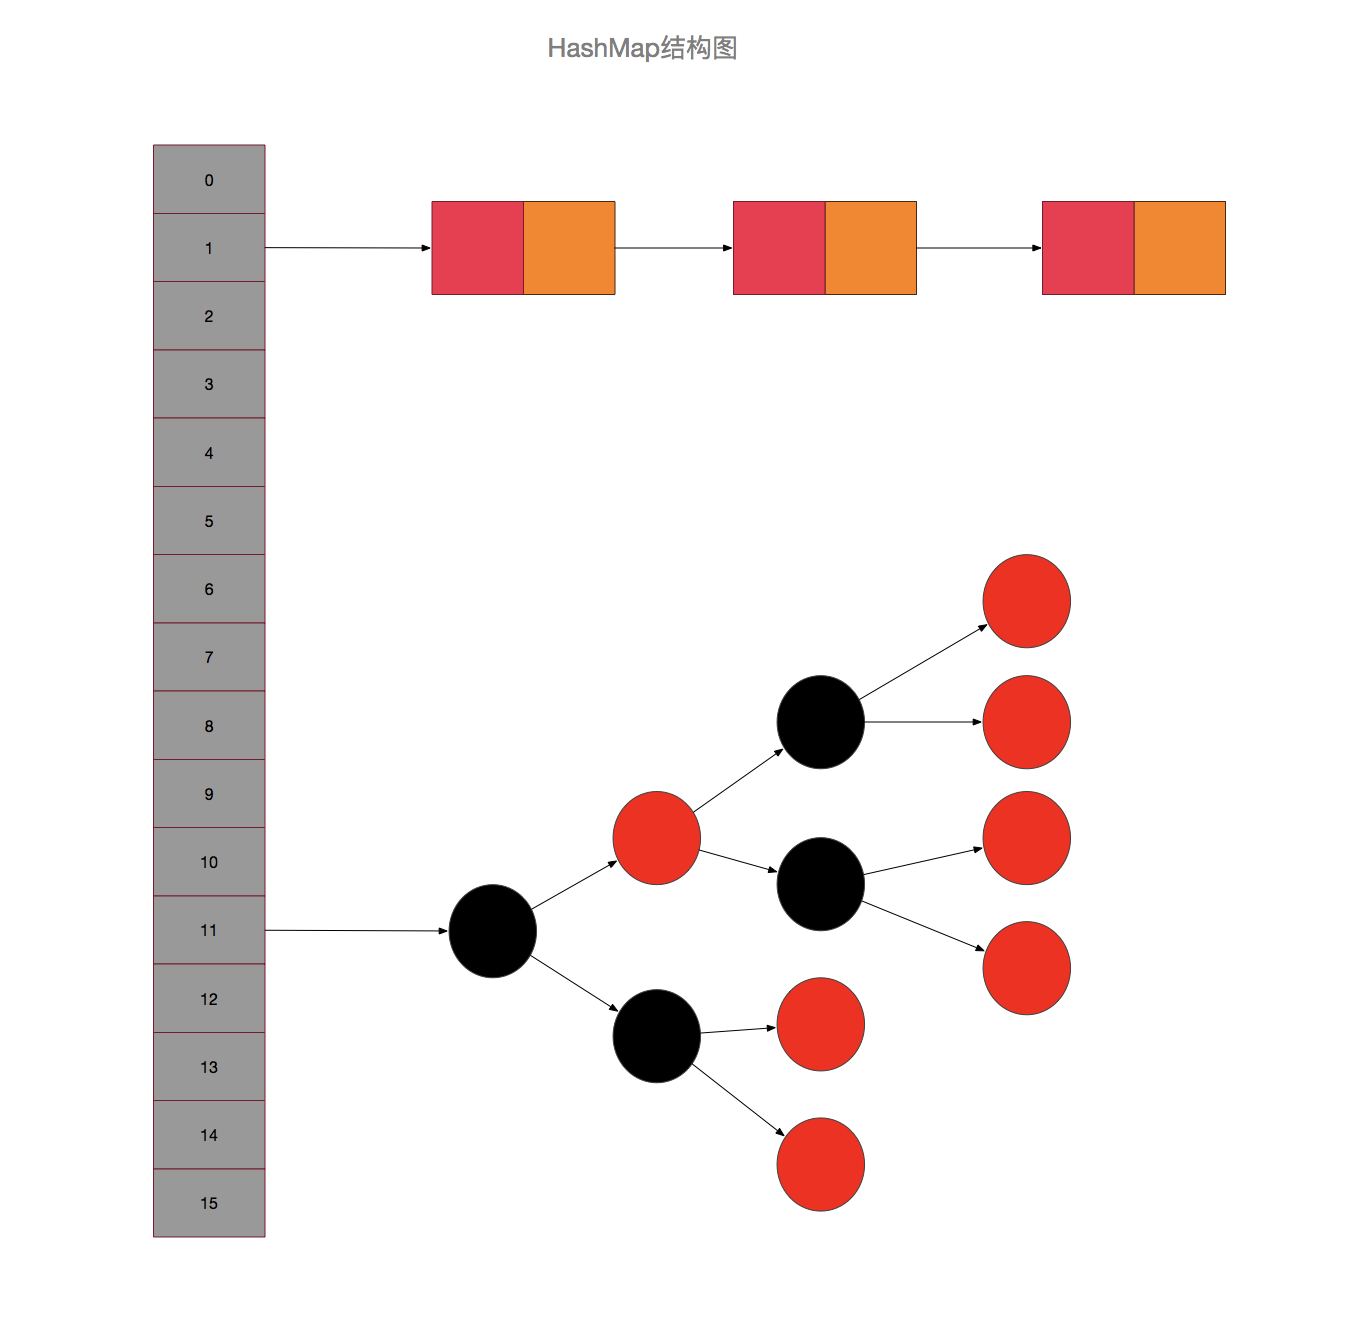
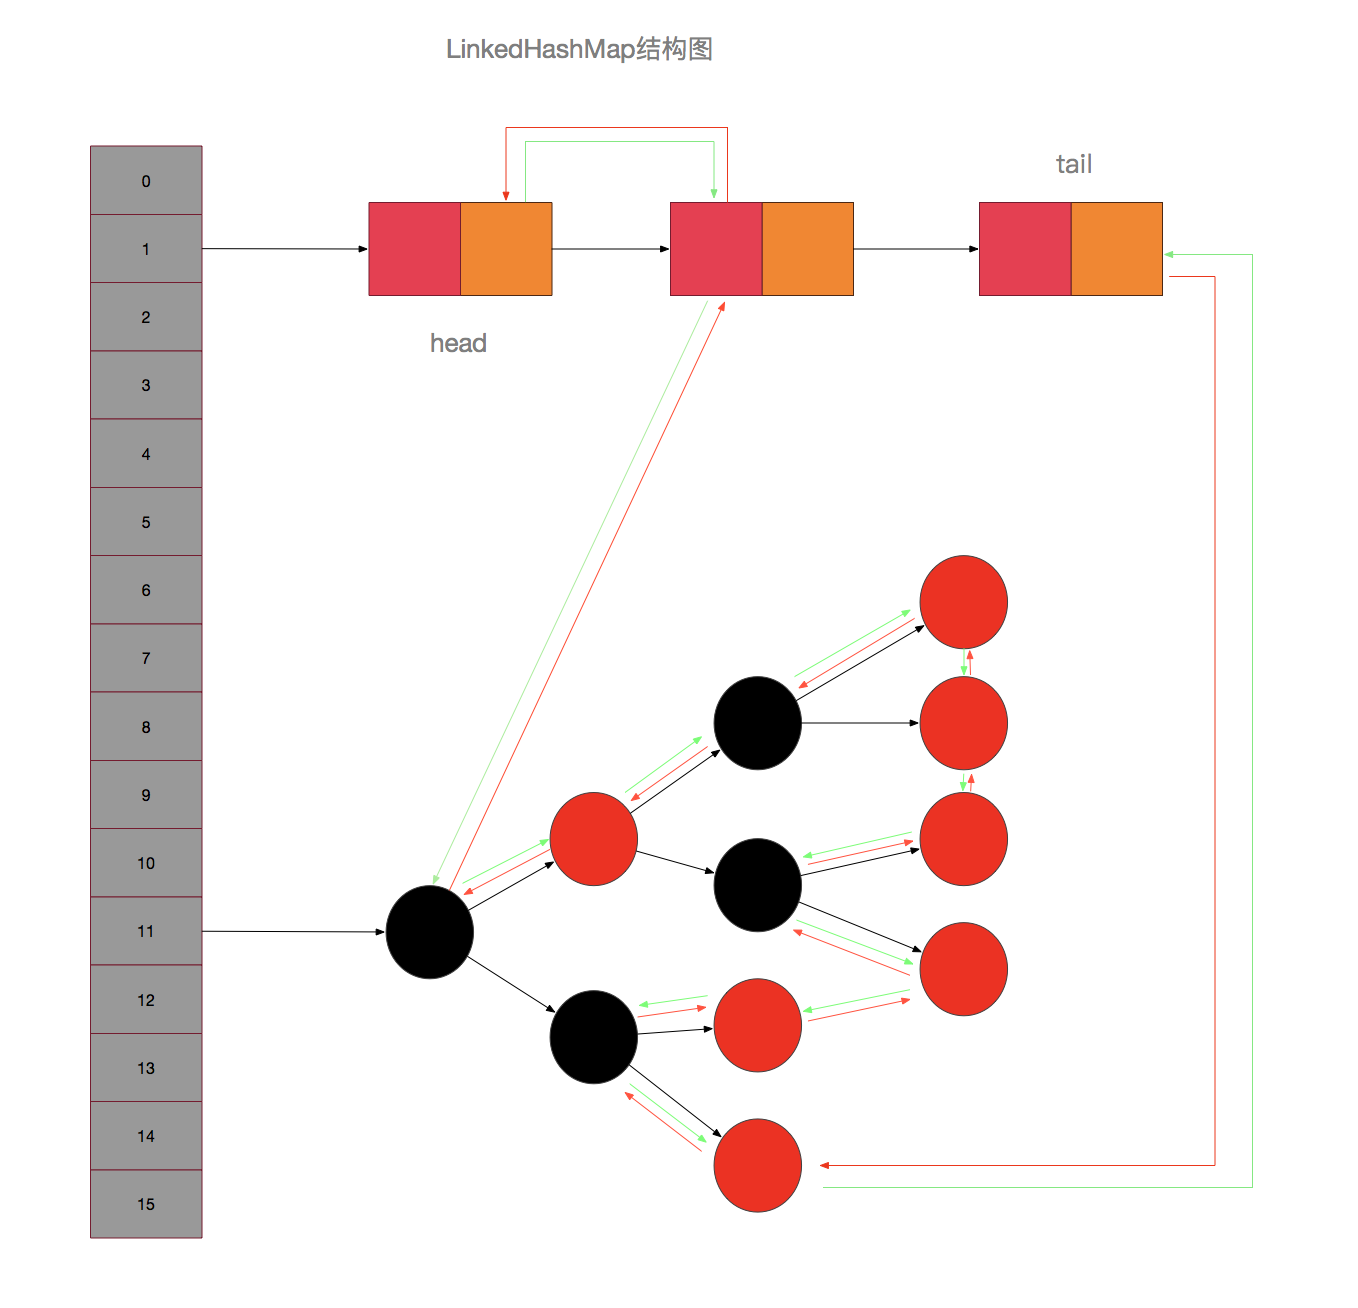
LinkedHashMap中的结构相比HashMap更加复杂,首先它有着HashMap相同的结构,元素用数组+链表的形式存储,除此之外,所有元素还使用了双链表进行连接,相当于HashMap和LinkedList两种结构的结合体,也正是因为元素之间使用了链表连接,所有才能让其中的元素可以保持某种顺序。但也增加了维护这个链表的开销,每次进行增加和删除元素时,除了需要调整HashMap的结构,还需要调整链表结构,不过链表调整的开销并不大,除了数据量特别大的场景,一般情况下可以小到忽略不计。另一方面,由于所有元素使用链表相连,所以遍历的效率略高于HashMap,因为HashMap遍历时,需要每个桶中先遍历到链表尾部,然后再遍历到下一个桶,当元素不多而空桶数量很多时,就会有很多次的无效访问,所以理论上来说,LinkedHashMap的遍历效率是要比HashMap高的。说了这么多,好像LinkedHashMap处处要比HashMap好,为啥不都用LinkedHashMap呢?![]() 这个问题就跟LinkedList和ArrayList对比一样,两者都有其适用的场景,并没有绝对的孰优孰劣之分,所以还是要具体情况具体分析。
这个问题就跟LinkedList和ArrayList对比一样,两者都有其适用的场景,并没有绝对的孰优孰劣之分,所以还是要具体情况具体分析。
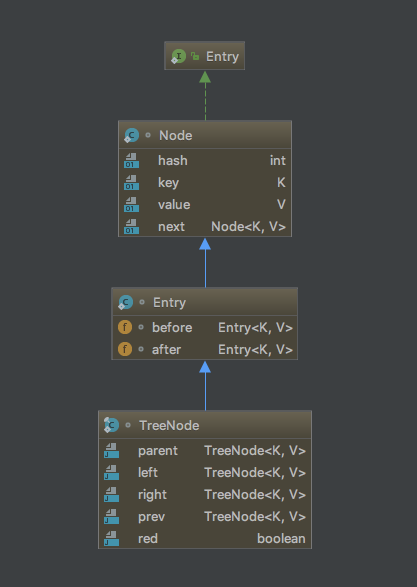
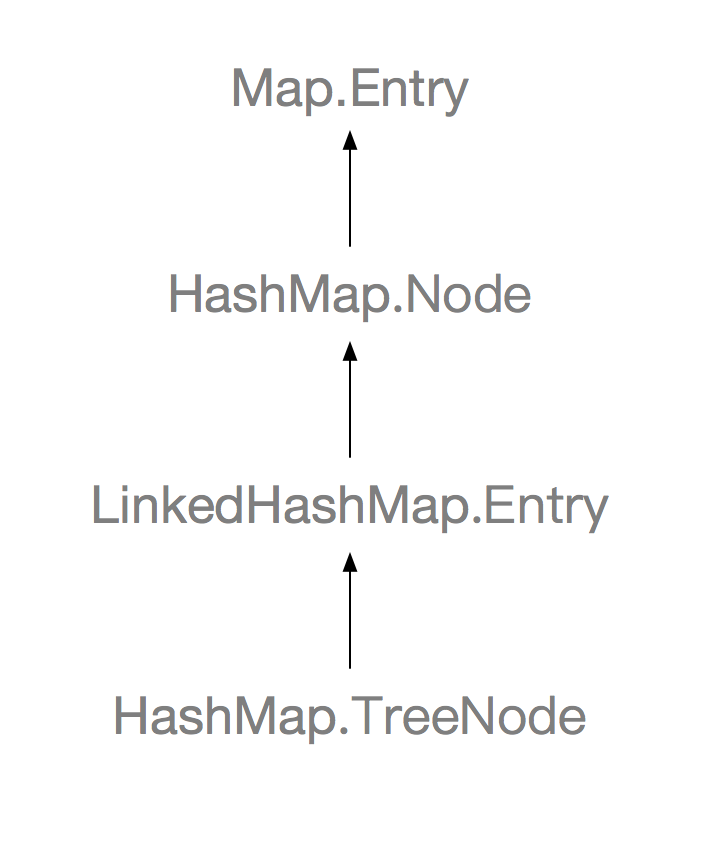
好了,先来看看LinkedHashMap中的节点:
![]()
![]()
谜一样的继承关系,看完这个图,你也许会想,贵圈真乱,父类中的TreeNode继承自子类中的Entry,子类中的Entry又继承自父类中的Node。先别慌,这样做自然有它的道理,先来回顾一下Node的结构,Node是HashMap中的普通节点类,内部结构是这样的:
    static class Node<K,V> implements Map.Entry<K,V> {
        final int hash;
        final K key;
        V value;
        /**
         * 指向下一个节点的引用
         */
        Node<K,V> next;
        ......省略部分代码
    }
最上面的那个Entry是Map接口中的一个内部接口,只是规定了Entry该有的方法,并没有成员变量。在LinkedHashMap中,Entry内部类是这样的:
    static class Entry<K,V> extends Node<K,V> {
        Entry<K,V> before, after;
        Entry(int hash, K key, V value, Node<K,V> next) {
            super(hash, key, value, next);
        }
    }
增加了before和after引用,这样便可以和其他Entry一起组成一个双链表,节点不仅存储了键值对信息,还可以使用next,before,after来链接前后节点,next引用仅用于HashMap结构中链接同一个桶中的后一个元素,而before和after引用则是用来链接LinkedHashMap中的所有元素,将其链接成一个双链表的形式。接下来看一个跟HashMap结构的对比图就很清晰了:
![]()
![]()
那再来回到之前的问题,为什么TreeNode要继承自LinkedHashMap中的Entry而不是直接继承自Node呢,毕竟在HashMap中并不需要使用到这样的链表性质,增加after和before两个引用只会浪费空间,首先,自然是为了复用代码,如果TreeNode直接继承自Node,则失去了链表的特性,LinkedHashMap继承HashMap后,则需要再使用另一个内部类来继承TreeNode来使得其具有链表特性,并且相关方法均需要重写,大大的增加了工作量,并且代码的可维护性会下降很多,另外,HashMap只会在桶中元素达到一定数量的时候才会将节点转换TreeNode,在哈希表散列良好的情况下,TreeNode是很少被使用到的,所以这一点点的空间浪费是值得的。![]()
LinkedHashMap可以看成由两部分的组成,一部分与HashMap结构完全一致,另一部分则是一个双链表,由于LinkedHashMap是直接继承自HashMap的,所以哈希表的结构维护就在HashMap中的代码里进行,在LinkedHashMap中仅进行双链表的维护。这样也能很好的划分职能,使得代码结构也更加清晰。
下面来通过代码感受一下两者的区别:
public class Test {

    public static void main(String[] args){
        Map<String,Integer> linkedHashMap = new LinkedHashMap<>();
        Map<String,Integer>  hashMap = new HashMap<>();

        for (int i = 0; i < 10; i++) {
            linkedHashMap.put("I" + i, i * i);
            hashMap.put("I" + i, i * i);
        }

        System.out.println("hashMap 遍历:");
        foreach(hashMap);
        System.out.println("linkedHashMap遍历:");
        foreach(linkedHashMap);
    }

    private static void foreach(Map map){
        for (Object key : map.keySet()){
            System.out.println("key:" + key.toString() + " value:" + map.get(key).toString());
        }
    }

}
hashMap 遍历:
key:I9 value:81
key:I0 value:0
key:I1 value:1
key:I2 value:4
key:I3 value:9
key:I4 value:16
key:I5 value:25
key:I6 value:36
key:I7 value:49
key:I8 value:64
linkedHashMap遍历:
key:I0 value:0
key:I1 value:1
key:I2 value:4
key:I3 value:9
key:I4 value:16
key:I5 value:25
key:I6 value:36
key:I7 value:49
key:I8 value:64
key:I9 value:81
两个哈希表插入同样的元素,使用同样的方式进行遍历,HashMap得到的是无序的结果,而LinkedHashMap得到的是跟插入顺序一致的结果。而产生这样区别的根源就在于LinkedHashMap中的那个双链表。
接下来我们通过LinkedHashMap的插入删除过程来了解双链表的维护过程。
LinkedHashMap的插入和删除
如果你没有看过代码,你也许会想,LinkedHashMap应该是通过重写put和remove方法来实现的,但事实上LinkedHashMap并没有覆盖插入和删除方法,这一点可以通过观察LinkedHashMap代码结构发现:
![]()
那么回到前面的栗子,既然没有覆盖put方法,调用LinkedHashMap中的put方法为什么会跟HashMap中的put方法得到的结果不一样呢?让我们再来看看put方法的实现:
    public V put(K key, V value) {
        return putVal(hash(key), key, value, false, true);
    }

    final V putVal(int hash, K key, V value, boolean onlyIfAbsent,
                   boolean evict) {
        Node<K,V>[] tab; Node<K,V> p; int n, i;
        if ((tab = table) == null || (n = tab.length) == 0)
            n = (tab = resize()).length;
        if ((p = tab[i = (n - 1) & hash]) == null)
            tab[i] = newNode(hash, key, value, null);//newNode方法在LinkedHashMap中被覆盖
        else {
            Node<K,V> e; K k;
            if (p.hash == hash &&
                ((k = p.key) == key || (key != null && key.equals(k))))
                e = p;
            else if (p instanceof TreeNode)
                e = ((TreeNode<K,V>)p).putTreeVal(this, tab, hash, key, value);
            else {
                for (int binCount = 0; ; ++binCount) {
                    if ((e = p.next) == null) {
                        p.next = newNode(hash, key, value, null);
                        if (binCount >= TREEIFY_THRESHOLD - 1) // -1 for 1st
                            treeifyBin(tab, hash);
                        break;
                    }
                    if (e.hash == hash &&
                        ((k = e.key) == key || (key != null && key.equals(k))))
                        break;
                    p = e;
                }
            }
            if (e != null) { // existing mapping for key
                V oldValue = e.value;
                if (!onlyIfAbsent || oldValue == null)
                    e.value = value;
                afterNodeAccess(e);//关键方法A
                return oldValue;
            }
        }
        ++modCount;
        if (++size > threshold)
            resize();
        afterNodeInsertion(evict);//关键方法B
        return null;
    }
put方法调用的是putVal方法,在putVal方法的最后几行里,有这么两个方法值得注意,
  afterNodeAccess(e);

  afterNodeInsertion(evict);
分别是在元素被访问之后和元素被插入之后调用,而这两个回调方法,在HashMap中并没有具体实现,只有一个空壳,留个LinkedHashMap来覆盖。![]()
    // Callbacks to allow LinkedHashMap post-actions
    void afterNodeAccess(Node<K,V> p) { }
    void afterNodeInsertion(boolean evict) { }
    void afterNodeRemoval(Node<K,V> p) { }
    //在节点被移除后进行双链表的调整,移除调整其实很简单,就是把要移除的节点前一个节点的after引用指向后一个节点,把后一个节点的before引用指向前一个节点
    void afterNodeRemoval(Node<K,V> e) {
        LinkedHashMap.Entry<K,V> p =
            (LinkedHashMap.Entry<K,V>)e, b = p.before, a = p.after;
        p.before = p.after = null;
        if (b == null)
            head = a;
        else
            b.after = a;
        if (a == null)
            tail = b;
        else
            a.before = b;
    }

    //在节点被插入后进行双链表的调整,插入节点时会判断是否需要移除链表头节点,默认实现是不移除的,可以通过继承LinkedHashMap并覆盖removeEldestEntry方法来改变该特性
    void afterNodeInsertion(boolean evict) {
        LinkedHashMap.Entry<K,V> first;
        if (evict && (first = head) != null && removeEldestEntry(first)) {
            K key = first.key;
            removeNode(hash(key), key, null, false, true);
        }
    }

    //在节点被访问之后进行双链表的调整(仅仅在accessOrder为true时进行,把当前访问的元素移动到链表尾部)
    void afterNodeAccess(Node<K,V> e) { // move node to last
        LinkedHashMap.Entry<K,V> last;
        if (accessOrder && (last = tail) != e) {
            LinkedHashMap.Entry<K,V> p =
                (LinkedHashMap.Entry<K,V>)e, b = p.before, a = p.after;
            p.after = null;
            if (b == null)
                head = a;
            else
                b.after = a;
            if (a != null)
                a.before = b;
            else
                last = b;
            if (last == null)
                head = p;
            else {
                p.before = last;
                last.after = p;
            }
            tail = p;
            ++modCount;
        }
    }
再来看看在LinkedHashMap中被覆盖的newNode方法:
    Node<K,V> newNode(int hash, K key, V value, Node<K,V> e) {
        LinkedHashMap.Entry<K,V> p =
            new LinkedHashMap.Entry<K,V>(hash, key, value, e);
        //新建节点,然后链接到双链表的尾部
        linkNodeLast(p);
        return p;
    }
    private void linkNodeLast(LinkedHashMap.Entry<K,V> p) {
        LinkedHashMap.Entry<K,V> last = tail;
        tail = p;
        if (last == null)
            head = p;
        else {
            p.before = last;
            last.after = p;
        }
    }
现在再来梳理一下逻辑,插入节点的时候,会调用覆盖过的newNode方法,将插入的元素链接的链表尾部,删除节点的时候,将该节点的前后节点相连即可,当节点被访问时,可以将其放到链表尾部(该特性后面会讲解)。如果对于双链表的插入删除还是不太了解,可以回头看看前面关于LinkedList的说明,里面有关于双链表结构调整的详细讲解。(理直气壮的偷懒)![]()
LinkedHashMap的源码分析
先来看看它的几个内部类,节点类Entry在前面已经介绍过了,剩下的几个类有四个是迭代器类,三个是键、值以及键值对的集合类。先看看迭代器类,在LinkedHashMap中,也在内部实现了自己的迭代器,内部迭代器都继承自LinkedHashIterator类,该类代码如下:
    abstract class LinkedHashIterator {
        LinkedHashMap.Entry<K,V> next;
        LinkedHashMap.Entry<K,V> current;
        int expectedModCount;

        LinkedHashIterator() {
            next = head;
            expectedModCount = modCount;
            current = null;
        }

        public final boolean hasNext() {
            return next != null;
        }

        final LinkedHashMap.Entry<K,V> nextNode() {
            LinkedHashMap.Entry<K,V> e = next;
            if (modCount != expectedModCount)
                throw new ConcurrentModificationException();
            if (e == null)
                throw new NoSuchElementException();
            current = e;
            next = e.after;
            return e;
        }

        public final void remove() {
            Node<K,V> p = current;
            if (p == null)
                throw new IllegalStateException();
            if (modCount != expectedModCount)
                throw new ConcurrentModificationException();
            current = null;
            K key = p.key;
            removeNode(hash(key), key, null, false, false);
            expectedModCount = modCount;
        }
    }
这是一个抽象类,实现了迭代器的主要方法,hashNext,remove,nextNode方法,相当于一个类模板,其他迭代器类只需要继承该类然后添加一个next方法即可。
    final class LinkedKeyIterator extends LinkedHashIterator
        implements Iterator<K> {
        public final K next() { return nextNode().getKey(); }
    }

    final class LinkedValueIterator extends LinkedHashIterator
        implements Iterator<V> {
        public final V next() { return nextNode().value; }
    }

    final class LinkedEntryIterator extends LinkedHashIterator
        implements Iterator<Map.Entry<K,V>> {
        public final Map.Entry<K,V> next() { return nextNode(); }
    }
怎么样,是不是贼简单。
剩下三个集合视图类结构基本一致,跟HashMap中的对应集合视图其实基本是一毛一样的,不信可以对比一下:
    // HashMap中的EntrySet
    final class EntrySet extends AbstractSet<Map.Entry<K,V>> {
        public final int size()                 { return size; }
        public final void clear()               { HashMap.this.clear(); }
        public final Iterator<Map.Entry<K,V>> iterator() {
            return new EntryIterator();
        }
        public final boolean contains(Object o) {
            if (!(o instanceof Map.Entry))
                return false;
            Map.Entry<?,?> e = (Map.Entry<?,?>) o;
            Object key = e.getKey();
            Node<K,V> candidate = getNode(hash(key), key);
            return candidate != null && candidate.equals(e);
        }
        public final boolean remove(Object o) {
            if (o instanceof Map.Entry) {
                Map.Entry<?,?> e = (Map.Entry<?,?>) o;
                Object key = e.getKey();
                Object value = e.getValue();
                return removeNode(hash(key), key, value, true, true) != null;
            }
            return false;
        }
        public final Spliterator<Map.Entry<K,V>> spliterator() {
            return new EntrySpliterator<>(HashMap.this, 0, -1, 0, 0);
        }
        public final void forEach(Consumer<? super Map.Entry<K,V>> action) {
            Node<K,V>[] tab;
            if (action == null)
                throw new NullPointerException();
            if (size > 0 && (tab = table) != null) {
                int mc = modCount;
                for (int i = 0; i < tab.length; ++i) {
                    for (Node<K,V> e = tab[i]; e != null; e = e.next)
                        action.accept(e);
                }
                if (modCount != mc)
                    throw new ConcurrentModificationException();
            }
        }
    }
    //LinkedHashMap中的EntrySet
    final class LinkedEntrySet extends AbstractSet<Map.Entry<K,V>> {
        public final int size()                 { return size; }
        public final void clear()               { LinkedHashMap.this.clear(); }
        public final Iterator<Map.Entry<K,V>> iterator() {
            return new LinkedEntryIterator();
        }
        public final boolean contains(Object o) {
            if (!(o instanceof Map.Entry))
                return false;
            Map.Entry<?,?> e = (Map.Entry<?,?>) o;
            Object key = e.getKey();
            Node<K,V> candidate = getNode(hash(key), key);
            return candidate != null && candidate.equals(e);
        }
        public final boolean remove(Object o) {
            if (o instanceof Map.Entry) {
                Map.Entry<?,?> e = (Map.Entry<?,?>) o;
                Object key = e.getKey();
                Object value = e.getValue();
                return removeNode(hash(key), key, value, true, true) != null;
            }
            return false;
        }
        public final Spliterator<Map.Entry<K,V>> spliterator() {
            return Spliterators.spliterator(this, Spliterator.SIZED |
                                            Spliterator.ORDERED |
                                            Spliterator.DISTINCT);
        }
        public final void forEach(Consumer<? super Map.Entry<K,V>> action) {
            if (action == null)
                throw new NullPointerException();
            int mc = modCount;
            for (LinkedHashMap.Entry<K,V> e = head; e != null; e = e.after)
                action.accept(e);
            if (modCount != mc)
                throw new ConcurrentModificationException();
        }
    }
仅仅是在迭代器方法中返回各自的内部迭代器实例而已。其余逻辑基本一致。
LinkedKeySet和LinkedValues也很简单:
    final class LinkedKeySet extends AbstractSet<K> {
        public final int size()                 { return size; }
        public final void clear()               { LinkedHashMap.this.clear(); }
        public final Iterator<K> iterator() {
            return new LinkedKeyIterator();
        }
        public final boolean contains(Object o) { return containsKey(o); }
        public final boolean remove(Object key) {
            return removeNode(hash(key), key, null, false, true) != null;
        }
        public final Spliterator<K> spliterator()  {
            return Spliterators.spliterator(this, Spliterator.SIZED |
                                            Spliterator.ORDERED |
                                            Spliterator.DISTINCT);
        }
        public final void forEach(Consumer<? super K> action) {
            if (action == null)
                throw new NullPointerException();
            int mc = modCount;
            for (LinkedHashMap.Entry<K,V> e = head; e != null; e = e.after)
                action.accept(e.key);
            if (modCount != mc)
                throw new ConcurrentModificationException();
        }
    }
    final class LinkedValues extends AbstractCollection<V> {
        public final int size()                 { return size; }
        public final void clear()               { LinkedHashMap.this.clear(); }
        public final Iterator<V> iterator() {
            return new LinkedValueIterator();
        }
        public final boolean contains(Object o) { return containsValue(o); }
        public final Spliterator<V> spliterator() {
            return Spliterators.spliterator(this, Spliterator.SIZED |
                                            Spliterator.ORDERED);
        }
        public final void forEach(Consumer<? super V> action) {
            if (action == null)
                throw new NullPointerException();
            int mc = modCount;
            for (LinkedHashMap.Entry<K,V> e = head; e != null; e = e.after)
                action.accept(e.value);
            if (modCount != mc)
                throw new ConcurrentModificationException();
        }
    }
看完内部类,我们再来看看它的几个构造函数:
    /**
     * 构造一个空的保持插入顺序的LinkedHashMap实例,使用指定的初始容量和装载因子
     */
    public LinkedHashMap(int initialCapacity, float loadFactor) {
        super(initialCapacity, loadFactor);
        accessOrder = false;
    }

    /**
     * 构造一个空的保持插入顺序的LinkedHashMap实例,使用指定的初始容量和默认的装载因子(0.75)
     */
    public LinkedHashMap(int initialCapacity) {
        super(initialCapacity);
        accessOrder = false;
    }

    /**
     * 构造一个空的保持插入顺序的LinkedHashMap实例,使用默认的初始容量(16)和默认的装载因子(0.75)
     */
    public LinkedHashMap() {
        super();
        accessOrder = false;
    }

    /**
     * 使用指定Map的所有映射构造一个保持插入顺序的LinkedHashMap实例,使用默认的装载因子和可以容纳指定map中所有映射的合适的容量。
     */
    public LinkedHashMap(Map<? extends K, ? extends V> m) {
        super();
        accessOrder = false;
        putMapEntries(m, false);
    }

    /**
     * 使用指定初始容量,指定装载因子和指定顺序模式来创建一个空的LinkedHashMap实例。
     */
    public LinkedHashMap(int initialCapacity,
                         float loadFactor,
                         boolean accessOrder) {
        super(initialCapacity, loadFactor);
        this.accessOrder = accessOrder;
    }
跟HashMap中的构造函数也几无二致,除了一点,那就是多了一个特殊的成员变量,accessOrder,这个变量是干嘛的呢,其实是一个表示LinkedHashMap中元素存储顺序的标志,前面也提到过,LinkedHashMap中元素其实是可以按两种顺序进行存储的,一种是元素的插入顺序,另一种便是元素的访问顺序,如果accessOrder为true,则使用访问顺序,即最近访问的元素位于链表最后,如果accessOrder为false,则使用插入顺序,即最后被插入的元素位于链表最后。默认是使用插入顺序,当然,也可以通过最后一个构造函数来使用指定顺序。如果你足够细心的话,还会发现有这么一个方法:
void afterNodeInsertion(boolean evict) { // possibly remove eldest
    LinkedHashMap.Entry<K,V> first;
    // 根据条件判断是否移除最近最少被访问的节点
    if (evict && (first = head) != null && removeEldestEntry(first)) {
        K key = first.key;
        removeNode(hash(key), key, null, false, true);
    }
}

// 移除最近最少被访问条件之一,通过覆盖此方法可实现不同策略的缓存
protected boolean removeEldestEntry(Map.Entry<K,V> eldest) {
    return false;
}
removeEldestEntry方法在默认情况下是返回false的,所以在插入节点的时候,默认是不会删除之前节点的,但我们可以通过继承来改变这一特性。![]()
基于LinkedHashMap实现LRU缓存
首先还是对LRU缓存做一个相对简单的介绍:
LRU(Least recently used,最近最少使用)算法根据数据的历史访问记录来进行淘汰数据,其核心思想是“如果数据最近被访问过,那么将来被访问的几率也更高”。
其实是一个缓存淘汰策略,当缓存数量达到一个阈值时,优先淘汰最近最少被访问的数据。当我们使用LinkedHashMap来实现LRU缓存时,可以通过覆写removeEldestEntry方法可以实现自定义策略的 LRU 缓存。比如我们可以根据节点数量判断是否移除最近最少被访问的节点,或者根据节点的存活时间判断是否移除该节点等。下面栗子所实现的缓存是基于判断节点数量是否超限的策略。在构造缓存对象时,传入最大节点数。当插入的节点数超过最大节点数时,移除最近最少被访问的节点。实现代码如下:
public class LRUCache<K, V> extends LinkedHashMap<K, V> {
    private static final int MAX_CACHE_SIZE = 100;

    private int limit;

    public LRUCache() {
        this(MAX_CACHE_SIZE);
    }

    public LRUCache(int cacheSize) {
        super(cacheSize, 0.75f, true);
        this.limit = cacheSize;
    }

    public V save(K key, V val) {
        return put(key, val);
    }

    public V getOne(K key) {
        return get(key);
    }

    public boolean exists(K key) {
        return containsKey(key);
    }

    /**
     * 判断节点数是否超限
     * @param eldest
     * @return 超限返回 true,否则返回 false
     */
    @Override
    protected boolean removeEldestEntry(Map.Entry eldest) {
        return size() > limit;
    }

    @Override
    public String toString() {
        StringBuilder sb = new StringBuilder();
        for (Map.Entry<K, V> entry : entrySet()) {
            sb.append(String.format("%s:%s ", entry.getKey(), entry.getValue()));
        }
        return sb.toString();
    }

    public static void main(String[] args){
        LRUCache<String, Integer> cache = new LRUCache<>(3);

        for (int i = 0; i < 10; i++) {
            cache.save("I" + i, i * i);
        }

        System.out.println("插入10个键值对后,缓存内容为:");
        System.out.println(cache + "\n");

        System.out.println("访问键值为I8的节点后,缓存内容为:");
        cache.getOne("I8");
        System.out.println(cache + "\n");

        System.out.println("插入键值为I1的键值对后,缓存内容:");
        cache.save("I1", 1);
        System.out.println(cache);
    }
}
输出如下:
插入10个键值对后,缓存内容为:
I7:49 I8:64 I9:81

访问键值为I8的节点后,缓存内容为:
I7:49 I9:81 I8:64

插入键值为I1的键值对后,缓存内容:
I9:81 I8:64 I1:1
在上述代码中,缓存大小设置为3,当在缓存中插入10个键值对后,只有最后3个被保存下来了,其他的都被移除了。然后通过访问键值为I8的节点,使得该节点被移到双向链表的最后位置。当我们再次插入一个键值对时,键值为I7的节点就会被淘汰掉。
总结
本文从 LinkedHashMap 哈希表+链表维护的角度对 LinkedHashMap 的源码进行了分析,并在文章的结尾基于 LinkedHashMap 实现了一个简单的 Cache。在日常开发中,LinkedHashMap 的使用频率虽不及 HashMap,但它也是不可或缺的重要实现。在 Java 集合框架中,HashMap、LinkedHashMap 和 TreeMap 三个映射类基于不同的数据结构,并实现了不同的功能。HashMap 底层基于拉链式的散列结构,并在 JDK 1.8 中引入红黑树优化过长链表的问题。基于这样结构,HashMap 可提供高效的增删改查操作。LinkedHashMap 在其之上,通过维护一条双向链表,实现了散列数据结构的有序遍历。TreeMap 底层基于红黑树实现,利用红黑树的性质,实现了键值对排序功能。TreeMap相关内容将会在后面的文章里进行讲解。
最后是又臭又长的源码注解,大家可以选择自己感兴趣的部分进行阅读,最好在IDE中进行阅读,这样可以很方便的进行跳转。![]()
import java.util.*;
import java.util.function.Consumer;
import java.util.function.BiConsumer;
import java.util.function.BiFunction;
import java.io.IOException;

/**
 * Map 接口的哈希表和链表实现,具有可预测的迭代顺序。此实现与 HashMap 的不同之处在于它维护了一个贯穿其所有条目的双向链表。
 * 此链接列表定义迭代排序,通常是键插入映射的顺序(插入顺序)。 请注意,如果将键重新插入到Map中,则插入顺序不会受到影响。
 * (如果在m.containsKey时调用 m.put(k,v),则将键k 重新插入到map m 中,会在调用之前立即返回true 。)
 *
 * 这种实现使客户免于{@link HashMap}(以及{@link Hashtable})提供的不确定的,通常是混乱的排序,并且不会导致类似{@link TreeMap}相关的成本增加。
 * 无论原始Map的实现如何,它都可用于生成与原始Map具有相同顺序的Map副本:
 *
 *     void foo(Map m) {
 *         Map copy = new LinkedHashMap(m);
 *         ...
 *     }
 *
 * 如果模块在输入上获取map,复制它,然后返回其顺序由副本确定的结果,则此技术特别有用。 (客户通常会欣赏按照提交的顺序返回的内容。)
 *
 * 提供了一个特殊的{@link #LinkedHashMap(int,float,boolean)构造函数}来创建一个链接的哈希映射,其迭代顺序是其条目最后一次访问的顺序,
 * 从最近最少访问到最近最多访问(按存取顺序)。这种地图非常适合构建LRU缓存。调用{@code put},{@code putIfAbsent},{@code get},
 * {@code getOrDefault},{@code compute},{@code computeIfAbsent},{@code computeIfPresent}或{@code merge}方法
 * 导致访问相应的条目(假设它在调用完成后存在)。 {@code replace}方法仅在替换值时才会访问该条目。 {@code putAll}方法为指定映射中的
 * 每个映射生成一个条目访问,按照指定映射的条目集迭代器提供键 - 值映射的顺序。没有其他方法可以生成条目访问。
 * 特别是,对集合视图的操作不会影响支持映射的迭代顺序。
 *
 * TODO LRU缓存
 *
 * 可以重写{@link #removeEldestEntry(Map.Entry)}方法,以强制在将新映射添加到Map中时自动删除过时映射的策略。
 *
 * 此类提供所有可选的Map操作,并允许null元素。 与HashMap一样,假设哈希函数在桶之间正确地分散元素,它将为基本操作(添加,包含和删除)提供了恒定时间
 * 性能,由于维护链表的额外费用,性能可能略低于HashMap的性能,但有一个例外:
 * 无论其容量如何,对LinkedHashMap的集合视图进行迭代需要与映射大小成比例的时间。而对HashMap的迭代可能更昂贵,需要与其容量成比例的时间。
 *
 * 链接的哈希映射有两个影响其性能的参数:初始容量和加载因子。它们的定义与 HashMap 完全相同。
 * 但请注意,对于此类,选择过高的初始容量值的惩罚不如 HashMap ,因为此类的迭代次数不受容量影响。
 *
 * 请注意,此实现未同步。如果多个线程同时访问链接的哈希映射,并且至少有一个线程在结构上修改了映射,则<em>必须</ em>外部同步。
 * 这通常通过在自然封装地图的某个对象上进行同步来实现。如果不存在此类对象,
 * 则应使用{@link Collections#synchronizedMap Collections.synchronizedMap}方法“包装”映射。这最好在创建时完成,
 * 以防止意外地不同步访问地图:
 *  Map m = Collections.synchronizedMap(new LinkedHashMap(...));
 *
 * 结构修改是指任何添加或删除一个或多个映射的操作,或者在访问顺序链接的哈希映射的情况下,影响迭代顺序。
 * 在插入有序链接散列映射中,仅更改与已包含在映射中的键相关联的值不是结构修改。在访问顺序链接哈希映射中,仅使用 get 查询地图是一种结构修改。
 *
 * 由该类的所有集合视图方法<tt> iterator </ tt>方法返回的迭代器是 “fail-fast” 的:
 * 如果map在创建迭代器之后的任何时候进行结构修改,(除了通过迭代器自己的<tt> remove </ tt>方法之外),
 * 迭代器将抛出{@link ConcurrentModificationException}。因此,在并发修改的情况下,迭代器快速而干净地失败,
 * 而不是在未来的未确定时间冒任意,非确定性行为的风险。
 *
 * 请注意,迭代器的快速失败行为无法得到保证,因为一般来说,在存在非同步并发修改的情况下,不可能做出任何硬性保证。
 * 失败快速的迭代器会尽最大努力抛出<tt> ConcurrentModificationException </ tt>。因此,编写依赖于此异常的程序以确保其正确性是错误的:
 * 迭代器的故障快速行为应仅用于检测错误。
 *
 * 分裂器返回的分裂器所有此类的集合视图方法返回的集合的方法是后期绑定的,失败快速的和附加报告的{@link Spliterator #OrderED}。
 *
 */
public class LinkedHashMap<K,V>
        extends HashMap<K,V>
        implements Map<K,V> {

    /**
     * 实现说明。 此类的先前版本的内部结构略有不同。 因为超类HashMap现在为其某些节点使用树节点,所以类Entry现在被视为中间节点类,
     * 也可以转换为树形式。 这个类的名称Entry在其当前上下文中以多种方式混淆,但无法更改。 否则,即使它未被导出到此包之外,
     * 已知一些现有的源代码依赖于对removeEldestEntry的调用中的符号解析角案例规则,该删除由于模糊使用而抑制了编译错误。
     * 因此,我们保留名称以保留未修改的可编译性。 节点类的更改还需要使用两个字段(头部,尾部)而不是指向标头节点的指针来维护列表之前/之后的双向链接。
     * 此类以前还在访问,插入和删除时使用了不同类型的回调方法。
     */

    /**
     * 普通 LinkedHashMap 条目的HashMap.Node子类.
     */
    static class Entry<K,V> extends Node<K,V> {
        Entry<K,V> before, after;
        Entry(int hash, K key, V value, Node<K,V> next) {
            super(hash, key, value, next);
        }
    }

    private static final long serialVersionUID = 3801124242820219131L;

    /**
     * 第一个条目
     */
    transient Entry<K,V> head;

    /**
     * 最后一个条目
     */
    transient Entry<K,V> tail;

    /**
     * 迭代顺序,true代表使用访问顺序进行迭代,false代表使用插入顺序进行迭代
     */
    final boolean accessOrder;

    // 内部工具方法

    // 链接到链表尾部
    private void linkNodeLast(Entry<K,V> p) {
        Entry<K,V> last = tail;
        tail = p;
        if (last == null)
            head = p;
        else {
            p.before = last;
            last.after = p;
        }
    }

    // 用dst条目代替src条目
    private void transferLinks(Entry<K,V> src,
                               Entry<K,V> dst) {
        Entry<K,V> b = dst.before = src.before;
        Entry<K,V> a = dst.after = src.after;
        if (b == null)
            head = dst;
        else
            b.after = dst;
        if (a == null)
            tail = dst;
        else
            a.before = dst;
    }

    // 重载 HashMap 中的方法

    void reinitialize() {
        super.reinitialize();
        head = tail = null;
    }

    // 新建条目并链接到链表尾部
    Node<K,V> newNode(int hash, K key, V value, Node<K,V> e) {
        Entry<K,V> p =
                new Entry<K,V>(hash, key, value, e);
        linkNodeLast(p);
        return p;
    }

    // 代替节点
    Node<K,V> replacementNode(Node<K,V> p, Node<K,V> next) {
        Entry<K,V> q = (Entry<K,V>)p;
        Entry<K,V> t =
                new Entry<K,V>(q.hash, q.key, q.value, next);
        transferLinks(q, t);
        return t;
    }

    TreeNode<K,V> newTreeNode(int hash, K key, V value, Node<K,V> next) {
        TreeNode<K,V> p = new TreeNode<K,V>(hash, key, value, next);
        linkNodeLast(p);
        return p;
    }

    TreeNode<K,V> replacementTreeNode(Node<K,V> p, Node<K,V> next) {
        Entry<K,V> q = (Entry<K,V>)p;
        TreeNode<K,V> t = new TreeNode<K,V>(q.hash, q.key, q.value, next);
        transferLinks(q, t);
        return t;
    }

    // 节点移除之后,将其从双链表中拆分出来
    void afterNodeRemoval(Node<K,V> e) { // unlink
        Entry<K,V> p =
                (Entry<K,V>)e, b = p.before, a = p.after;
        p.before = p.after = null;
        if (b == null)
            head = a;
        else
            b.after = a;
        if (a == null)
            tail = b;
        else
            a.before = b;
    }

    // 节点插入之后判断是否需要将最早的元素进行删除
    void afterNodeInsertion(boolean evict) { // possibly remove eldest
        Entry<K,V> first;
        // 要同时满足三个条件才能在插入元素后对最早插入条目进行删除
        if (evict && (first = head) != null && removeEldestEntry(first)) {
            K key = first.key;
            removeNode(hash(key), key, null, false, true);
        }
    }

    // 在节点被访问之后,判断是否需要将被访问过的节点移动到双链表的最末尾
    void afterNodeAccess(Node<K,V> e) { // move node to last
        Entry<K,V> last;
        // 当accessOrder成员变量为true并且该访问元素不是最后一个元素时,将其移动到双链表的末尾
        if (accessOrder && (last = tail) != e) {
            Entry<K,V> p =
                    (Entry<K,V>)e, b = p.before, a = p.after;
            p.after = null;
            if (b == null)
                head = a;
            else
                b.after = a;
            if (a != null)
                a.before = b;
            else
                last = b;
            if (last == null)
                head = p;
            else {
                p.before = last;
                last.after = p;
            }
            tail = p;
            ++modCount;
        }
    }

    // 重写hashmap的internalWriteEntries方法,进行输出流的写入
    void internalWriteEntries(java.io.ObjectOutputStream s) throws IOException {
        for (Entry<K,V> e = head; e != null; e = e.after) {
            s.writeObject(e.key);
            s.writeObject(e.value);
        }
    }

    /**
     * 构造一个空的保持插入顺序的LinkedHashMap实例,使用指定的初始容量和装载因子
     */
    public LinkedHashMap(int initialCapacity, float loadFactor) {
        super(initialCapacity, loadFactor);
        accessOrder = false;
    }

    /**
     * 构造一个空的保持插入顺序的LinkedHashMap实例,使用指定的初始容量和默认的装载因子(0.75)
     */
    public LinkedHashMap(int initialCapacity) {
        super(initialCapacity);
        accessOrder = false;
    }

    /**
     * 构造一个空的保持插入顺序的LinkedHashMap实例,使用默认的初始容量(16)和默认的装载因子(0.75)
     */
    public LinkedHashMap() {
        super();
        accessOrder = false;
    }

    /**
     * 使用指定Map的所有映射构造一个保持插入顺序的LinkedHashMap实例,使用默认的装载因子和可以容纳指定map中所有映射的合适的容量。
     */
    public LinkedHashMap(Map<? extends K, ? extends V> m) {
        super();
        accessOrder = false;
        putMapEntries(m, false);
    }

    /**
     * 使用指定初始容量,指定装载因子和指定顺序模式来创建一个空的LinkedHashMap实例。
     */
    public LinkedHashMap(int initialCapacity,
                         float loadFactor,
                         boolean accessOrder) {
        super(initialCapacity, loadFactor);
        this.accessOrder = accessOrder;
    }


    /**
     * Returns <tt>true</tt> if this map maps one or more keys to the
     * specified value.
     *
     * @param value value whose presence in this map is to be tested
     * @return <tt>true</tt> if this map maps one or more keys to the
     *         specified value
     */
    public boolean containsValue(Object value) {
        // TODO 与hashmap的遍历方式进行比较
        // LinkedHashMap中遍历元素时都是使用链表的方式进行遍历
        for (Entry<K,V> e = head; e != null; e = e.after) {
            V v = e.value;
            if (v == value || (value != null && value.equals(v)))
                return true;
        }
        return false;
    }

    /**
     * 获取指定key对应的value,不存在则返回null
     * 返回null时有两种可能,一种是该key没有对应的映射,另一种是该key对应的value是null,可以使用containsKey方法对这两种情况进行区分
     */
    public V get(Object key) {
        Node<K,V> e;
        if ((e = getNode(hash(key), key)) == null)
            return null;
        if (accessOrder)
            afterNodeAccess(e);
        return e.value;
    }

    /**
     * 获取指定key对应的value,如果不存在则返回默认值
     */
    public V getOrDefault(Object key, V defaultValue) {
        Node<K,V> e;
        if ((e = getNode(hash(key), key)) == null)
            return defaultValue;
        if (accessOrder)
            afterNodeAccess(e);
        return e.value;
    }

    /**
     * 清除元素
     */
    public void clear() {
        super.clear();
        head = tail = null;
    }

    /**
     * 如果此map应删除其最旧的条目,则返回true 。在将新条目插入Map后,put 和 putAll 将调用此方法。
     * 它为实现者提供了在每次添加新条目时删除最旧条目的机会。如果映射表示高速缓存,则此选项非常有用:它允许映射通过删除过时条目来减少内存消耗。
     *
     * 示例:此覆盖实现将允许map增长到100个条目,
     * 然后在每次添加新条目时删除最旧的条目,保持100个条目的稳定状态。
     *
     * private static final int MAX_ENTRIES = 100;
     * protected boolean removeEldestEntry(Map.Entry eldest){
     * return size(); MAX_ENTRIES;
     * }
     *
     * 此方法通常不会以任何方式修改地图,而是允许地图按其返回值的指示修改自身。 此方法直接修改map是允许的,但如果它这样做,
     * 它必须返回false(表示map不应该尝试任何进一步的修改)。在此方法中修改地图后返回 true 的效果未指定。此实现仅返回 false
     * (因此此映射的行为类似于普通映射 - 永远不会删除最旧的元素)。
     *
     * @param eldest map中最近插入的条目,或者如果这是访问顺序地图,则是最近访问的条目。这是将被删除的条目,此方法返回 true 。
     *               如果在 put 或 putAll 调用之前映射为空,从而导致此调用,则这将是刚刚插入的条目;换句话说,如果map包含单个条目,
     *               则最老的条目也是最新的。
     *
     * @return true 表示应从map中删除最年长的条目;  false 表示应该保留。
     */
    protected boolean removeEldestEntry(Map.Entry<K,V> eldest) {
        return false;
    }

    /**
     * 返回包含该map所有key的{@link Set}视图。 该集合由map支持,因此对map的更改将反映在集中,反之亦然。 如果在对集合进行迭代时修改了映射
     * (除了通过迭代器自己的remove 操作),迭代的结果是未定义的。 该集支持元素删除,它通过 Iterator.remove ,Set.remove , removeAll
     * ,从地map中删除相应的映射。 retainAll 和 clear 操作。 它不支持 add 或 addAll 操作。 它的{@link Spliterator}通常提供更快的顺序性能,
     * 但并行性能比{@code HashMap}差得多。
     */
    public Set<K> keySet() {
        Set<K> ks = keySet;
        if (ks == null) {
            ks = new LinkedKeySet();
            keySet = ks;
        }
        return ks;
    }

    final class LinkedKeySet extends AbstractSet<K> {
        public final int size()                 { return size; }
        public final void clear()               { this.clear(); }
        public final Iterator<K> iterator() {
            return new LinkedKeyIterator();
        }
        public final boolean contains(Object o) { return containsKey(o); }
        public final boolean remove(Object key) {
            return removeNode(hash(key), key, null, false, true) != null;
        }
        public final Spliterator<K> spliterator()  {
            return Spliterators.spliterator(this, Spliterator.SIZED |
                    Spliterator.ORDERED |
                    Spliterator.DISTINCT);
        }
        public final void forEach(Consumer<? super K> action) {
            if (action == null)
                throw new NullPointerException();
            int mc = modCount;
            for (Entry<K,V> e = head; e != null; e = e.after)
                action.accept(e.key);
            if (modCount != mc)
                throw new ConcurrentModificationException();
        }
    }


    public Collection<V> values() {
        Collection<V> vs = values;
        if (vs == null) {
            vs = new LinkedValues();
            values = vs;
        }
        return vs;
    }

    final class LinkedValues extends AbstractCollection<V> {
        public final int size()                 { return size; }
        public final void clear()               { this.clear(); }
        public final Iterator<V> iterator() {
            return new LinkedValueIterator();
        }
        public final boolean contains(Object o) { return containsValue(o); }
        public final Spliterator<V> spliterator() {
            return Spliterators.spliterator(this, Spliterator.SIZED |
                    Spliterator.ORDERED);
        }
        public final void forEach(Consumer<? super V> action) {
            if (action == null)
                throw new NullPointerException();
            int mc = modCount;
            for (Entry<K,V> e = head; e != null; e = e.after)
                action.accept(e.value);
            if (modCount != mc)
                throw new ConcurrentModificationException();
        }
    }

    /**
     * 返回包含该map中所有映射的Set视图,该set由map支持,因此对map的更改将反映在set中,反之亦然。 如果在对集合进行迭代时修改了映射
     * (除非通过迭代器自己的 remove 操作,或者对迭代器返回的映射条目执行 setValue 操作) )迭代的结果是未定义的。 该集支持元素删除,
     * 它通过 Iterator.remove  Set.remove , removeAll ,从地图中删除相应的映射。 retainAll 和 clear 操作。 它不支持 add 或
     *  addAll 操作。 它的{@link Spliterator}通常提供更快的顺序性能,但并行性能比{@code HashMap}差得多。
     */
    public Set<Map.Entry<K,V>> entrySet() {
        Set<Map.Entry<K,V>> es;
        return (es = entrySet) == null ? (entrySet = new LinkedEntrySet()) : es;
    }

    final class LinkedEntrySet extends AbstractSet<Map.Entry<K,V>> {
        public final int size()                 { return size; }
        public final void clear()               { this.clear(); }
        public final Iterator<Map.Entry<K,V>> iterator() {
            return new LinkedEntryIterator();
        }
        public final boolean contains(Object o) {
            if (!(o instanceof Map.Entry))
                return false;
            Map.Entry<?,?> e = (Map.Entry<?,?>) o;
            Object key = e.getKey();
            Node<K,V> candidate = getNode(hash(key), key);
            return candidate != null && candidate.equals(e);
        }
        public final boolean remove(Object o) {
            if (o instanceof Map.Entry) {
                Map.Entry<?,?> e = (Map.Entry<?,?>) o;
                Object key = e.getKey();
                Object value = e.getValue();
                return removeNode(hash(key), key, value, true, true) != null;
            }
            return false;
        }
        public final Spliterator<Map.Entry<K,V>> spliterator() {
            return Spliterators.spliterator(this, Spliterator.SIZED |
                    Spliterator.ORDERED |
                    Spliterator.DISTINCT);
        }
        public final void forEach(Consumer<? super Map.Entry<K,V>> action) {
            if (action == null)
                throw new NullPointerException();
            int mc = modCount;
            for (Entry<K,V> e = head; e != null; e = e.after)
                action.accept(e);
            if (modCount != mc)
                throw new ConcurrentModificationException();
        }
    }

    // Map overrides

    public void forEach(BiConsumer<? super K, ? super V> action) {
        if (action == null)
            throw new NullPointerException();
        int mc = modCount;
        for (Entry<K,V> e = head; e != null; e = e.after)
            action.accept(e.key, e.value);
        if (modCount != mc)
            throw new ConcurrentModificationException();
    }

    public void replaceAll(BiFunction<? super K, ? super V, ? extends V> function) {
        if (function == null)
            throw new NullPointerException();
        int mc = modCount;
        for (Entry<K,V> e = head; e != null; e = e.after)
            e.value = function.apply(e.key, e.value);
        if (modCount != mc)
            throw new ConcurrentModificationException();
    }

    // 迭代器

    abstract class LinkedHashIterator {
        Entry<K,V> next;
        Entry<K,V> current;
        int expectedModCount;

        LinkedHashIterator() {
            next = head;
            expectedModCount = modCount;
            current = null;
        }

        public final boolean hasNext() {
            return next != null;
        }

        final Entry<K,V> nextNode() {
            Entry<K,V> e = next;
            if (modCount != expectedModCount)
                throw new ConcurrentModificationException();
            if (e == null)
                throw new NoSuchElementException();
            current = e;
            next = e.after;
            return e;
        }

        public final void remove() {
            Node<K,V> p = current;
            if (p == null)
                throw new IllegalStateException();
            if (modCount != expectedModCount)
                throw new ConcurrentModificationException();
            current = null;
            K key = p.key;
            removeNode(hash(key), key, null, false, false);
            expectedModCount = modCount;
        }
    }

    final class LinkedKeyIterator extends LinkedHashIterator
            implements Iterator<K> {
        public final K next() { return nextNode().getKey(); }
    }

    final class LinkedValueIterator extends LinkedHashIterator
            implements Iterator<V> {
        public final V next() { return nextNode().value; }
    }

    final class LinkedEntryIterator extends LinkedHashIterator
            implements Iterator<Map.Entry<K,V>> {
        public final Map.Entry<K,V> next() { return nextNode(); }
    }


}
至此,本篇就算完结啦,一周一篇的小目标也算是完成了,周末要去浪浪浪了,哈哈哈哈。![]()
后续还会继续更新,欢迎继续关注!
真正重要的东西,用眼睛是看不见的。
 。
。 ,虽然LinkedHashMap也是哈希表,但跟HashMap比起来,内容还是要少很多的,因为很多内容在HashMap中已经讲解过了,2333)
 这个问题就跟LinkedList和ArrayList对比一样,两者都有其适用的场景,并没有绝对的孰优孰劣之分,所以还是要具体情况具体分析。