开篇
LinkedBlockingQueue是一个基于链表实现的可选容量的线程安全的阻塞队列。队头的元素是插入时间最早的,队尾的元素是最新插入的。新的元素将会被插入到队列的尾部。
LinkedBlockingQueue的容量限制是可选的,如果在初始化时没有指定容量,那么默认使用int的最大值作为队列容量。
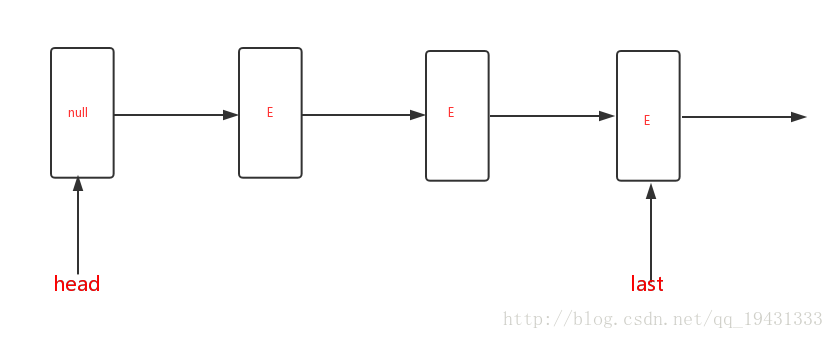
LinkedBlockingQueue的逻辑存储效果如下图:
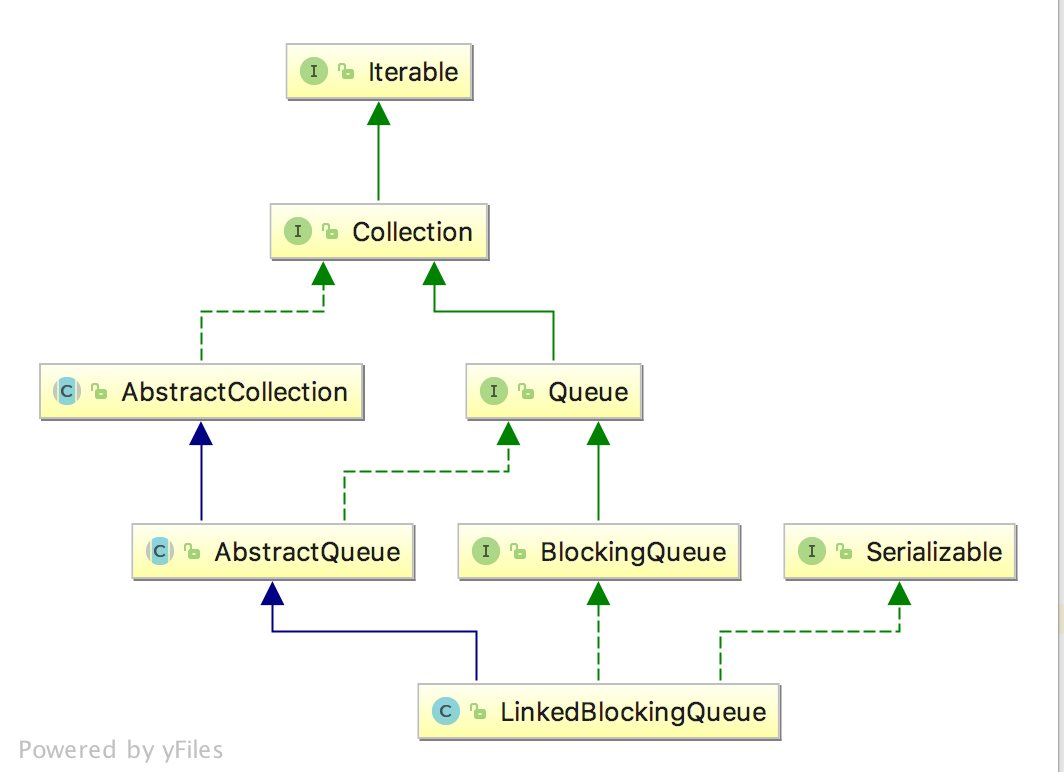
LinkedBlockingQueue类图
LinkedBlockingQueue类定义及构造函数
LinkedBlockingQueue的类定义当中有几个知识点需要注意一下:
- LinkedBlockingQueue是有容量限制的,未传参默认Integer.MAX_VALUE
- LinkedBlockingQueue当中保存的Node节点包含指向下一个节点的next指针
- LinkedBlockingQueue包含head指针和last指针,分别指向头部和尾部元素
- LinkedBlockingQueue不支持null元素,head元素不保存任何元素的,last保存最后一个元素
public class LinkedBlockingQueue<E> extends AbstractQueue<E>
        implements BlockingQueue<E>, java.io.Serializable {
    private static final long serialVersionUID = -6903933977591709194L;

    //存储节点的元素
    static class Node<E> {
        E item;
        Node<E> next;
        Node(E x) { item = x; }
    }

    //容量和当前节点的个数
    private final int capacity;
    private final AtomicInteger count = new AtomicInteger();

    //头部指针和尾部指针
    transient Node<E> head;
    private transient Node<E> last;

    // take操作的锁和对应的Condition
    private final ReentrantLock takeLock = new ReentrantLock();
    private final Condition notEmpty = takeLock.newCondition();

    // put操作的锁和对应的Condition
    private final ReentrantLock putLock = new ReentrantLock();
    private final Condition notFull = putLock.newCondition();

    public LinkedBlockingQueue() {
        this(Integer.MAX_VALUE);
    }

    public LinkedBlockingQueue(int capacity) {
        if (capacity <= 0) throw new IllegalArgumentException();
        this.capacity = capacity;
        last = head = new Node<E>(null);
    }

    // LinkedBlockingQueue不支持null元素
    public LinkedBlockingQueue(Collection<? extends E> c) {
        this(Integer.MAX_VALUE);
        final ReentrantLock putLock = this.putLock;
        putLock.lock(); // Never contended, but necessary for visibility
        try {
            int n = 0;
            for (E e : c) {
                if (e == null)
                    throw new NullPointerException();
                if (n == capacity)
                    throw new IllegalStateException("Queue full");
                enqueue(new Node<E>(e));
                ++n;
            }
            count.set(n);
        } finally {
            putLock.unlock();
        }
    }
}
LinkedBlockingQueue的take相关操作
take相关的操作逻辑按照下面的顺序执行:
- 获取锁并判断是否存在元素,如果元素个数为0则等待,否则往下执行
- 从queue中通过移动head指针获取元素并原子性的执行操作:获取当前元素个数并对元素执行减操作
- 如果减一前元素个数多于1个,那么说明还有剩余可消费元素,那么通过notEmpty.signal()通知消费
- 仔细想想上面的逻辑,因为put操作只会在从无到有的时候才会唤醒消费线程,而假设现在有10个消费线程等待消费元素,而10个put只有第一个put执行了唤醒,也就是说10-1=9个消费线程依旧没有唤醒,所以才通过执行take的时候连带唤醒消费线程,我自己个人的理解,网上米有类似资料
public E take() throws InterruptedException {
        E x;
        int c = -1;
        final AtomicInteger count = this.count;
        final ReentrantLock takeLock = this.takeLock;
        takeLock.lockInterruptibly();
        try {
            while (count.get() == 0) {
                notEmpty.await();
            }
            x = dequeue();
            c = count.getAndDecrement();
            if (c > 1)
                notEmpty.signal();
        } finally {
            takeLock.unlock();
        }
        if (c == capacity)
            signalNotFull();
        return x;
    }

    public E poll(long timeout, TimeUnit unit) throws InterruptedException {
        E x = null;
        int c = -1;
        long nanos = unit.toNanos(timeout);
        final AtomicInteger count = this.count;
        final ReentrantLock takeLock = this.takeLock;
        takeLock.lockInterruptibly();
        try {
            while (count.get() == 0) {
                if (nanos <= 0)
                    return null;
                nanos = notEmpty.awaitNanos(nanos);
            }
            x = dequeue();
            c = count.getAndDecrement();
            if (c > 1)
                notEmpty.signal();
        } finally {
            takeLock.unlock();
        }
        if (c == capacity)
            signalNotFull();
        return x;
    }

    public E poll() {
        final AtomicInteger count = this.count;
        if (count.get() == 0)
            return null;
        E x = null;
        int c = -1;
        final ReentrantLock takeLock = this.takeLock;
        takeLock.lock();
        try {
            if (count.get() > 0) {
                x = dequeue();
                c = count.getAndDecrement();
                if (c > 1)
                    notEmpty.signal();
            }
        } finally {
            takeLock.unlock();
        }
        if (c == capacity)
            signalNotFull();
        return x;
    }

    public E peek() {
        if (count.get() == 0)
            return null;
        final ReentrantLock takeLock = this.takeLock;
        takeLock.lock();
        try {
            Node<E> first = head.next;
            if (first == null)
                return null;
            else
                return first.item;
        } finally {
            takeLock.unlock();
        }
    }

private E dequeue() {
        Node<E> h = head;
        Node<E> first = h.next;
        h.next = h; // help GC
        head = first;
        E x = first.item;
        first.item = null;
        return x;
    }

private void signalNotFull() {
        final ReentrantLock putLock = this.putLock;
        putLock.lock();
        try {
            notFull.signal();
        } finally {
            putLock.unlock();
        }
    }
LinkedBlockingQueue的put相关操作
put相关的操作逻辑按照下面的顺序执行:
- 获取锁并判断Queue是否已满,如果已满就等待notFull.await()
- 如果未满那么就通过移动tail指针添加元素,获取原来元素个数后对元素个数加操作,如果元素个数加操作后仍然未达到容量上限,那么连带唤醒put线程,原因也是take线程只会在从满到不满的那一刹那才会通知,同样假设10个put线程和10个消费线程,10个消费线程阻塞在put操作当中,此时有10个线程开始消费,但是仅仅第一个消费线程会进行signalNotFull通知,其他的9个put线程只有靠put连带才能继续执行。
- enqueue的操作很简单,直接操作last指针即可
public void put(E e) throws InterruptedException {
        if (e == null) throw new NullPointerException();

        int c = -1;
        Node<E> node = new Node<E>(e);
        final ReentrantLock putLock = this.putLock;
        final AtomicInteger count = this.count;
        putLock.lockInterruptibly();
        try {
            while (count.get() == capacity) {
                notFull.await();
            }
            enqueue(node);
            c = count.getAndIncrement();
            if (c + 1 < capacity)
                notFull.signal();
        } finally {
            putLock.unlock();
        }
        if (c == 0)
            signalNotEmpty();
    }


    public boolean offer(E e, long timeout, TimeUnit unit)
        throws InterruptedException {

        if (e == null) throw new NullPointerException();
        long nanos = unit.toNanos(timeout);
        int c = -1;
        final ReentrantLock putLock = this.putLock;
        final AtomicInteger count = this.count;
        putLock.lockInterruptibly();
        try {
            while (count.get() == capacity) {
                if (nanos <= 0)
                    return false;
                nanos = notFull.awaitNanos(nanos);
            }
            enqueue(new Node<E>(e));
            c = count.getAndIncrement();
            if (c + 1 < capacity)
                notFull.signal();
        } finally {
            putLock.unlock();
        }
        if (c == 0)
            signalNotEmpty();
        return true;
    }


    public boolean offer(E e) {
        if (e == null) throw new NullPointerException();
        final AtomicInteger count = this.count;
        if (count.get() == capacity)
            return false;
        int c = -1;
        Node<E> node = new Node<E>(e);
        final ReentrantLock putLock = this.putLock;
        putLock.lock();
        try {
            if (count.get() < capacity) {
                enqueue(node);
                c = count.getAndIncrement();
                if (c + 1 < capacity)
                    notFull.signal();
            }
        } finally {
            putLock.unlock();
        }
        if (c == 0)
            signalNotEmpty();
        return c >= 0;
    }

    private void enqueue(Node<E> node) {
        // assert putLock.isHeldByCurrentThread();
        // assert last.next == null;
        last = last.next = node;
    }

private void signalNotEmpty() {
        final ReentrantLock takeLock = this.takeLock;
        takeLock.lock();
        try {
            notEmpty.signal();
        } finally {
            takeLock.unlock();
        }
    }
迭代器
迭代器这边跟ArrayBlockingQueue差不多,就不多说了,估计看也看的懂,无非就是初始化、移动指针,返回当前元素的值。
public Iterator<E> iterator() {
        return new Itr();
    }

    private class Itr implements Iterator<E> {
        private Node<E> current;
        private Node<E> lastRet;
        private E currentElement;

        Itr() {
            fullyLock();
            try {
                current = head.next;
                if (current != null)
                    currentElement = current.item;
            } finally {
                fullyUnlock();
            }
        }

        public boolean hasNext() {
            return current != null;
        }

        private Node<E> nextNode(Node<E> p) {
            for (;;) {
                Node<E> s = p.next;
                if (s == p)
                    return head.next;
                if (s == null || s.item != null)
                    return s;
                p = s;
            }
        }

        public E next() {
            fullyLock();
            try {
                if (current == null)
                    throw new NoSuchElementException();
                E x = currentElement;
                lastRet = current;
                current = nextNode(current);
                currentElement = (current == null) ? null : current.item;
                return x;
            } finally {
                fullyUnlock();
            }
        }
    }