在这篇博客中,我们将展示如何在Spring Boot中实现文件的下载功能。
还是遵循笔者写博客的一贯风格,简单又不失详细,实用又能让你学会。
本次建立的Spring Boot项目的主要功能为文件下载,而且这也是唯一功能,当然,作为例子,要尽可能简单,所以,功能简化为只下载E盘music_eg目录下的某一个文件。
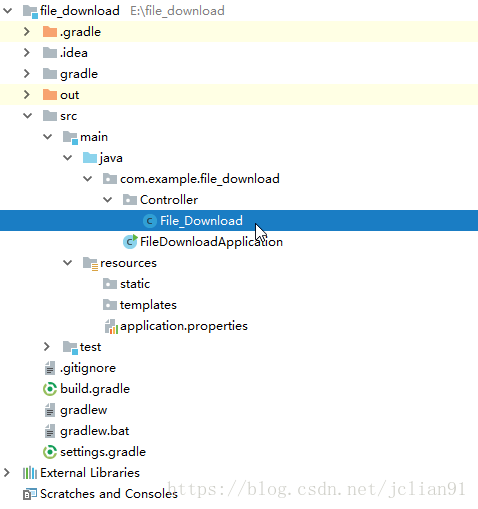
该Spring Boot项目的名称为file_download,其具体结构如下:
![项目结构]()
build.gradle文件的代码如下:
buildscript {
    ext {
        springBootVersion = '2.0.3.RELEASE'
    }
    repositories {
        mavenCentral()
    }
    dependencies {
        classpath("org.springframework.boot:spring-boot-gradle-plugin:${springBootVersion}")
    }
}

apply plugin: 'java'
apply plugin: 'eclipse'
apply plugin: 'org.springframework.boot'
apply plugin: 'io.spring.dependency-management'

group = 'com.example'
version = '0.0.1-SNAPSHOT'
sourceCompatibility = 1.8

repositories {
    mavenCentral()
}


dependencies {
    compile('org.springframework.boot:spring-boot-starter-web')
    testCompile('org.springframework.boot:spring-boot-starter-test')
}
我们只需要创建一个控制器(Controler)文件,即Controller目录下的File_Download.java,其完整目录如下:
package com.example.file_download.Controller;
import java.io.*;
import java.net.URLEncoder;
import javax.servlet.http.HttpServletRequest;
import javax.servlet.http.HttpServletResponse;
import org.springframework.stereotype.Controller;
import org.springframework.web.bind.annotation.RequestMapping;
@Controller
public class File_Download {
@RequestMapping("/download")
public String downloadFile(HttpServletRequest request,
HttpServletResponse response) throws UnsupportedEncodingException {
File scFileDir = new File("E://music_eg");
File TrxFiles[] = scFileDir.listFiles();
System.out.println(TrxFiles[0]);
String fileName = TrxFiles[0].getName();
if (fileName != null) {
String realPath = "E://music_eg/";
File file = new File(realPath, fileName);
if (file.exists()) {
response.setHeader("content-type", "application/octet-stream");
response.setContentType("application/octet-stream");
response.setHeader("Content-Disposition", "attachment;filename=" + URLEncoder.encode(fileName, "UTF-8"));
byte[] buffer = new byte[1024];
FileInputStream fis = null;
BufferedInputStream bis = null;
try {
fis = new FileInputStream(file);
bis = new BufferedInputStream(fis);
OutputStream os = response.getOutputStream();
int i = bis.read(buffer);
while (i != -1) {
os.write(buffer, 0, i);
i = bis.read(buffer);
}
System.out.println("Download the song successfully!");
}
catch (Exception e) {
System.out.println("Download the song failed!");
}
finally {
if (bis != null) {
try {
bis.close();
} catch (IOException e) {
e.printStackTrace();
}
}
if (fis != null) {
try {
fis.close();
} catch (IOException e) {
e.printStackTrace();
}
}
}
}
}
return null;
}
}
这样我们就完成了Spring Boot的文件下载功能。什么?这样就搞定了?是的,就是这么简单,因为只实现了文件下载功能。具体的代码留给读者好好分析哦~~
写完代码并不是我们的最终目的,我们还差最后一步,那就是测试!测试,真的相当重要啊~
运行Spring Boot项目后,在浏览器中输入:http://localhost:8080/download , 你会发现什么?那就是你的浏览器已经开始下载E盘music_eg目录下的某一个文件啦(前提是E盘中存在music_eg目录,当然里面还得有文件,本例仅作为测试),如下图所示:
![文件下载]()
我们再去查看E盘music_eg目录,如下:
![E盘music_eg目录]()
So, 用Spring Boot实现文件下载功能搞定!欢迎大家交流哦~
注意:本人现已开通两个微信公众号: 因为Python(微信号为:python_math)以及轻松学会Python爬虫(微信号为:easy_web_scrape), 欢迎大家关注哦~~