点对点聊天首先是基于多线程的网络编程,其次就是将每一个连接都保存为一个具有独一属性的对象并添加到连接列表中,对于每一个连接对象发送过来的信息必须要包含主要的三项内容(from,to,messages),这样当信息发送到服务器之后服务器根据to的连接对象遍历连接列表找到目标对象将信息发送给目标,目标拿到信息后就知道是谁发过来的,然后根据id号码进行回复。。此实现将会继续完善,后续新加功能将会在我个人github主页展现
服务器端实现:
'''
file:server.py
date:2017/9/10 12:43
author:lockey
email:lockey@123.com
platform:win7.x86_64 pycharm python3
desc:p2p communication serverside
'''
import socketserver,json
import subprocess
connLst = []
class Connector(object):
def __init__(self,account,password,addrPort,conObj):
self.account = account
self.password = password
self.addrPort = addrPort
self.conObj = conObj
class MyServer(socketserver.BaseRequestHandler):
def handle(self):
print("got connection from",self.client_address)
register = False
while True:
conn = self.request
data = conn.recv(1024)
if not data:
continue
dataobj = json.loads(data.decode('utf-8'))
if type(dataobj) == list and not register:
account = dataobj[0]
password = dataobj[1]
conObj = Connector(account,password,self.client_address,self.request)
connLst.append(conObj)
register = True
continue
print(connLst)
if len(connLst) > 1 and type(dataobj) == dict:
sendok = False
for obj in connLst:
if dataobj['to'] == obj.account:
obj.conObj.sendall(data)
sendok = True
if sendok == False:
print('no target valid!')
else:
conn.sendall('nobody recevied!'.encode('utf-8'))
continue
if __name__ == '__main__':
server = socketserver.ThreadingTCPServer(('192.168.1.4',8022),MyServer)
print('waiting for connection...')
server.serve_forever()
- 1
- 2
- 3
- 4
- 5
- 6
- 7
- 8
- 9
- 10
- 11
- 12
- 13
- 14
- 15
- 16
- 17
- 18
- 19
- 20
- 21
- 22
- 23
- 24
- 25
- 26
- 27
- 28
- 29
- 30
- 31
- 32
- 33
- 34
- 35
- 36
- 37
- 38
- 39
- 40
- 41
- 42
- 43
- 44
- 45
- 46
- 47
- 48
- 49
- 50
- 51
- 52
- 53
- 54
- 55
- 56
- 57
- 58
- 59
- 60
客户端实现:
'''
file:client.py.py
date:2017/9/10 11:01
author:lockey
email:lockey@123.com
platform:win7.x86_64 pycharm python3
desc:p2p communication clientside
'''
from socket import *
import threading,sys,json,re
HOST = '192.168.1.4'
PORT=8022
BUFSIZ = 1024
ADDR = (HOST,PORT)
tcpCliSock = socket(AF_INET,SOCK_STREAM)
tcpCliSock.connect(ADDR)
userAccount = None
def register():
myre = r"^[_a-zA-Z]\w{0,}"
accout = input('Please input your account: ')
if not re.findall(myre, accout):
print('Account illegal!')
return None
password1 = input('Please input your password: ')
password2 = input('Please confirm your password: ')
if not (password1 and password1 == password2):
print('Password not illegal!')
return None
global userAccount
userAccount = accout
return (accout,password1)
class inputdata(threading.Thread):
def run(self):
while True:
sendto = input('to>>:')
msg = input('msg>>:')
dataObj = {'to':sendto,'msg':msg,'froms':userAccount}
datastr = json.dumps(dataObj)
tcpCliSock.send(datastr.encode('utf-8'))
class getdata(threading.Thread):
def run(self):
while True:
data = tcpCliSock.recv(BUFSIZ)
dataObj = json.loads(data.decode('utf-8'))
print('{} -> {}'.format(dataObj['froms'],dataObj['msg']))
def main():
while True:
regInfo = register()
if regInfo:
datastr = json.dumps(regInfo)
tcpCliSock.send(datastr.encode('utf-8'))
break
myinputd = inputdata()
mygetdata = getdata()
myinputd.start()
mygetdata.start()
myinputd.join()
mygetdata.join()
if __name__ == '__main__':
main()
- 1
- 2
- 3
- 4
- 5
- 6
- 7
- 8
- 9
- 10
- 11
- 12
- 13
- 14
- 15
- 16
- 17
- 18
- 19
- 20
- 21
- 22
- 23
- 24
- 25
- 26
- 27
- 28
- 29
- 30
- 31
- 32
- 33
- 34
- 35
- 36
- 37
- 38
- 39
- 40
- 41
- 42
- 43
- 44
- 45
- 46
- 47
- 48
- 49
- 50
- 51
- 52
- 53
- 54
- 55
- 56
- 57
- 58
- 59
- 60
- 61
- 62
- 63
- 64
- 65
- 66
- 67
- 68
- 69
- 70
- 71
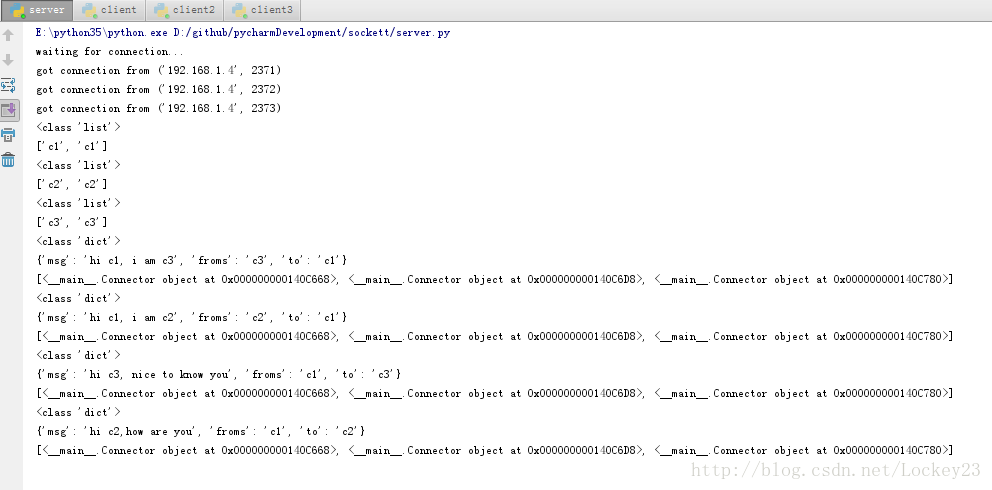
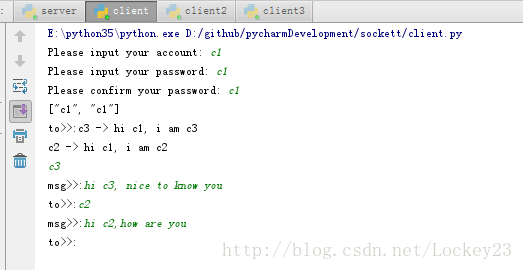
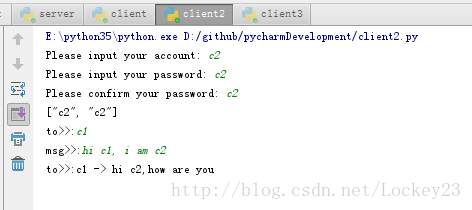
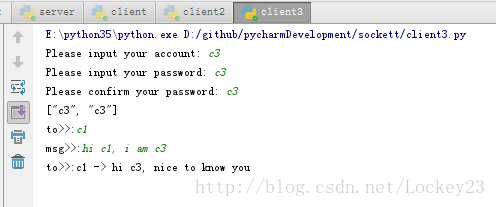
运行结果示例:
服务器端结果:
![这里写图片描述]()
客户端1:
![这里写图片描述]()
客户端2:
![这里写图片描述]()
客户端3:
![这里写图片描述]()
如果运行出错请检查平台以及python版本号