一、监听屏幕旋转方向
在处理iOS横竖屏时,经常会和UIDeviceOrientation、UIInterfaceOrientation和UIInterfaceOrientationMask这三个枚举类型打交道,它们从不同角度描述了屏幕旋转方向。
1、UIDeviceOrientation:设备方向
iOS的设备方向是通过iOS的加速计来获取的。
1)iOS定义了以下七种设备方向
- typedef NS_ENUM(NSInteger, UIDeviceOrientation) {
-
- UIDeviceOrientationUnknown, // 未知方向,可能是设备(屏幕)斜置
-
- UIDeviceOrientationPortrait, // 设备(屏幕)直立
-
- UIDeviceOrientationPortraitUpsideDown, // 设备(屏幕)直立,上下顛倒
-
- UIDeviceOrientationLandscapeLeft, // 设备(屏幕)向左横置
-
- UIDeviceOrientationLandscapeRight, // 设备(屏幕)向右橫置
-
- UIDeviceOrientationFaceUp, // 设备(屏幕)朝上平躺
-
- UIDeviceOrientationFaceDown // 设备(屏幕)朝下平躺
-
- };
说明:UIDeviceOrientation参考home键方向,如:home方向在右,设备(屏幕)方向向左(UIDeviceOrientationLandscapeLeft)
2)读取设备方向
UIDevice单例代表当前的设备。从这个单例中可以获得的信息设备,如设备方向orientation。
- UIDeviceOrientation deviceOrientation = [UIDevice currentDevice].orientation;
3)监听、处理和移除 设备方向改变的通知
当设备方向变化时候,发出UIDeviceOrientationDidChangeNotification通知;注册监听该通知,可以针对不同的设备方向处理视图展示。
- //开启和监听 设备旋转的通知(不开启的话,设备方向一直是UIInterfaceOrientationUnknown)
-
- if (![UIDevice currentDevice].generatesDeviceOrientationNotifications) {
-
- [[UIDevice currentDevice] beginGeneratingDeviceOrientationNotifications];
-
- }
-
- [[NSNotificationCenter defaultCenter]addObserver:self selector:@selector(handleDeviceOrientationChange:)
-
- name:UIDeviceOrientationDidChangeNotification object:nil];
-
-
-
-
-
- //设备方向改变的处理
-
- - (void)handleDeviceOrientationChange:(NSNotification *)notification{
-
-
-
- UIDeviceOrientation deviceOrientation = [UIDevice currentDevice].orientation;
-
- switch (ddeviceOrientation) {
-
- case UIDeviceOrientationFaceUp:
-
- NSLog(@"屏幕朝上平躺");
-
- break;
-
-
-
- case UIDeviceOrientationFaceDown:
-
- NSLog(@"屏幕朝下平躺");
-
- break;
-
-
-
- case UIDeviceOrientationUnknown:
-
- NSLog(@"未知方向");
-
- break;
-
-
-
- case UIDeviceOrientationLandscapeLeft:
-
- NSLog(@"屏幕向左横置");
-
- break;
-
-
-
- case UIDeviceOrientationLandscapeRight:
-
- NSLog(@"屏幕向右橫置");
-
- break;
-
-
-
- case UIDeviceOrientationPortrait:
-
- NSLog(@"屏幕直立");
-
- break;
-
-
-
- case UIDeviceOrientationPortraitUpsideDown:
-
- NSLog(@"屏幕直立,上下顛倒");
-
- break;
-
-
-
- default:
-
- NSLog(@"无法辨识");
-
- break;
-
- }
-
- }
-
-
-
- //最后在dealloc中移除通知 和结束设备旋转的通知
-
- - (void)dealloc{
-
- //...
-
- [[NSNotificationCenter defaultCenter]removeObserver:self];
-
- [[UIDevice currentDevice]endGeneratingDeviceOrientationNotifications];
说明:手机锁定竖屏后,UIDeviceOrientationDidChangeNotification通知就失效了。
2、UIInterfaceOrientation:界面方向
界面方向是反应iOS中界面的方向,它和Home按钮的方向是一致的。
1)iOS定义了以下五种界面方向
- typedef NS_ENUM(NSInteger, UIInterfaceOrientation) {
-
- UIInterfaceOrientationUnknown = UIDeviceOrientationUnknown, //未知方向
-
- UIInterfaceOrientationPortrait = UIDeviceOrientationPortrait, //界面直立
-
- UIInterfaceOrientationPortraitUpsideDown = UIDeviceOrientationPortraitUpsideDown, //界面直立,上下颠倒
-
- UIInterfaceOrientationLandscapeLeft = UIDeviceOrientationLandscapeRight, //界面朝左
-
- UIInterfaceOrientationLandscapeRight = UIDeviceOrientationLandscapeLeft //界面朝右
-
- } __TVOS_PROHIBITED;
说明:从定义可知,界面方向和设别方向有对应关系,如界面的竖直方向就是 设备的竖直方向:UIInterfaceOrientationUnknown = UIDeviceOrientationUnknown
2)读取界面方向
UIInterfaceOrientation和状态栏有关,通过UIApplication的单例调用statusBarOrientation来获取
- UIInterfaceOrientation interfaceOrientation = [[UIApplication sharedApplication] statusBarOrientation];
3)监听、处理和移除 界面方向改变的通知
当界面方向变化时候,先后发出UIApplicationWillChangeStatusBarOrientationNotification和UIApplicationDidChangeStatusBarOrientationNotification通知;注册监听这两个通知,可以针对不同的界面方向处理视图展示。
- //以监听UIApplicationDidChangeStatusBarOrientationNotification通知为例
-
- [[NSNotificationCenter defaultCenter]addObserver:self selector:@selector(handleStatusBarOrientationChange:)
-
- name:UIApplicationDidChangeStatusBarOrientationNotification object:nil];
-
-
-
-
-
- //界面方向改变的处理
-
- - (void)handleStatusBarOrientationChange: (NSNotification *)notification{
-
-
-
- UIInterfaceOrientation interfaceOrientation = [[UIApplication sharedApplication] statusBarOrientation];
-
- switch (interfaceOrientation) {
-
-
-
- case UIInterfaceOrientationUnknown:
-
- NSLog(@"未知方向");
-
- break;
-
-
-
- case UIInterfaceOrientationPortrait:
-
- NSLog(@"界面直立");
-
- break;
-
-
-
- case UIInterfaceOrientationPortraitUpsideDown:
-
- NSLog(@"界面直立,上下颠倒");
-
- break;
-
-
-
- case UIInterfaceOrientationLandscapeLeft:
-
- NSLog(@"界面朝左");
-
- break;
-
-
-
- case UIInterfaceOrientationLandscapeRight:
-
- NSLog(@"界面朝右");
-
- break;
-
-
-
- default:
-
- break;
-
- }
-
- }
-
-
-
- //最后在dealloc中移除通知
-
- - (void)dealloc{
-
- //...
-
- [[NSNotificationCenter defaultCenter]removeObserver:self];
-
- [[UIDevice currentDevice]endGeneratingDeviceOrientationNotifications];
-
- }
说明:手机锁定竖屏后,UIApplicationWillChangeStatusBarOrientationNotification和UIApplicationDidChangeStatusBarOrientationNotification通知也失效了。
3、UIInterfaceOrientationMask
UIInterfaceOrientationMask是为了集成多种UIInterfaceOrientation而定义的类型,和ViewController相关,一共有7种
1)iOS中的UIInterfaceOrientationMask定义
- typedef NS_OPTIONS(NSUInteger, UIInterfaceOrientationMask) {
-
- UIInterfaceOrientationMaskPortrait = (1 << UIInterfaceOrientationPortrait),
-
- UIInterfaceOrientationMaskLandscapeLeft = (1 << UIInterfaceOrientationLandscapeLeft),
-
- UIInterfaceOrientationMaskLandscapeRight = (1 << UIInterfaceOrientationLandscapeRight),
-
- UIInterfaceOrientationMaskPortraitUpsideDown = (1 << UIInterfaceOrientationPortraitUpsideDown),
-
- UIInterfaceOrientationMaskLandscape = (UIInterfaceOrientationMaskLandscapeLeft | UIInterfaceOrientationMaskLandscapeRight),
-
- UIInterfaceOrientationMaskAll = (UIInterfaceOrientationMaskPortrait | UIInterfaceOrientationMaskLandscapeLeft | UIInterfaceOrientationMaskLandscapeRight | UIInterfaceOrientationMaskPortraitUpsideDown),
-
- UIInterfaceOrientationMaskAllButUpsideDown = (UIInterfaceOrientationMaskPortrait | UIInterfaceOrientationMaskLandscapeLeft | UIInterfaceOrientationMaskLandscapeRight),
-
- } __TVOS_PROHIBITED;
2)UIInterfaceOrientationMask的使用
在ViewController可以重写- (UIInterfaceOrientationMask)supportedInterfaceOrientations方法返回类型,来决定UIViewController可以支持哪些界面方向。
- //支持界面直立
-
- - (UIInterfaceOrientationMask)supportedInterfaceOrientations{
-
- return UIInterfaceOrientationMaskPortrait;
-
- }
总结:UIDeviceOrientation(设备方向)和UIInterfaceOrientation(屏幕方向)是两个不同的概念。前者代表了设备的一种状态,而后者是屏幕为了应对不同的设备状态,做出的用户界面上的响应。在iOS设备旋转时,由UIKit接收到旋转事件,然后通过AppDelegate通知当前程序的UIWindow对象,UIWindow对象通知它的rootViewController,如果该rootViewController支持旋转后的屏幕方向,完成旋转,否则不旋转;弹出的ViewController也是如此处理。
二、视图控制器中旋转方向的设置
0、关于禁止横屏的操作(不建议)
比较常规的方法有两种。
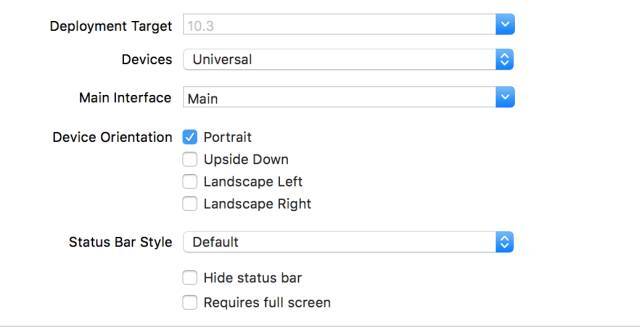
方法1:在项目的General–>Deployment Info–>Device Orientation中,只勾选Portrait(竖屏)
![]()
勾选Portrait.png
方法2:Device Orientation默认设置,在Appdelegate中实现supportedInterfaceOrientationsForWindow:只返回UIInterfaceOrientationMaskPortraitt(竖屏)
- - (NSUInteger)application:(UIApplication *)application supportedInterfaceOrientationsForWindow:(UIWindow *)window {
-
- return UIInterfaceOrientationMaskPortrait;
-
- }
说明:极少的APP中所有界面都是竖屏的,因为总会有界面需要支持横屏,如视频播放页。所以不建议设置禁止APP页面横屏。
下面介绍如何让项目中的 视图控制器中旋转方向的设置
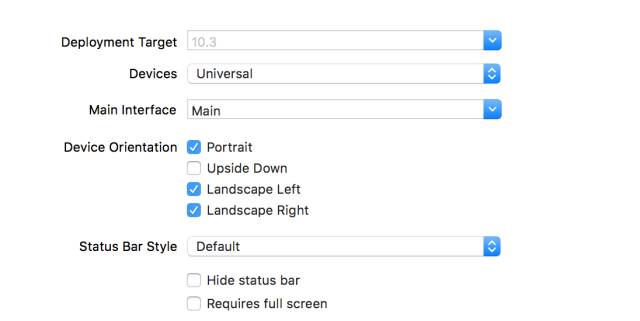
1、APP支持多个方向
![]()
APP支持多个方向.png
说明:如此,APP支持横屏和竖屏了,但是具体视图控制器支持的页面方向还需要进一步处理。由于不支持竖屏颠倒(Upside Down),即使设备上下颠倒,通过API也不会获得设备、屏幕上下颠倒方向的。
2、支持ViewController屏幕方向设置
1)关键函数
视图控制器支持的界面方向主要由以下三个函数控制
- //是否自动旋转,返回YES可以自动旋转,返回NO禁止旋转
-
- - (BOOL)shouldAutorotate NS_AVAILABLE_IOS(6_0) __TVOS_PROHIBITED;
-
-
-
- //返回支持的方向
-
- - (UIInterfaceOrientationMask)supportedInterfaceOrientations NS_AVAILABLE_IOS(6_0) __TVOS_PROHIBITED;
-
-
-
- //由模态推出的视图控制器 优先支持的屏幕方向
-
- - (UIInterfaceOrientation)preferredInterfaceOrientationForPresentation NS_AVAILABLE_IOS(6_0) __TVOS_PROHIBITED;
2) QSBaseViewController设置
- //QSBaseViewController.h
-
- @interface QSBaseController : UIViewController
-
-
-
- @end
-
-
-
- //QSBaseViewController.m
-
- @implementation QSBaseController
-
-
-
- //#pragma mark - 控制屏幕旋转方法
-
- //是否自动旋转,返回YES可以自动旋转,返回NO禁止旋转
-
- - (BOOL)shouldAutorotate{
-
- return NO;
-
- }
-
-
-
- //返回支持的方向
-
- - (UIInterfaceOrientationMask)supportedInterfaceOrientations{
-
- return UIInterfaceOrientationMaskPortrait;
-
- }
-
-
-
- //由模态推出的视图控制器 优先支持的屏幕方向
-
- - (UIInterfaceOrientation)preferredInterfaceOrientationForPresentation{
-
- return UIInterfaceOrientationPortrait;
-
- }
-
- @end
说明1:QSBaseViewController默认不支持旋转,只支持 界面竖直方向,项目中的Controller都继承自QSBaseViewController,可以通过重写这三个方法来让Controller支持除竖屏之外的方向或旋转。
3) 在QSNavigationController设置
目标:通过QSNavigationController来push视图控制器时,把支持屏幕旋转的设置交给最新push进来([self.viewControllers lastObject])的viewController来设置。
- //QSNavigationController.h
-
- @interface QSNavigationController : UINavigationController
-
-
-
- @end
-
-
-
- //QSNavigationController.m
-
- @implementation QSNavigationController
-
-
-
- #pragma mark - 控制屏幕旋转方法
-
- - (BOOL)shouldAutorotate{
-
- return [[self.viewControllers lastObject]shouldAutorotate];
-
- }
-
-
-
- - (UIInterfaceOrientationMask)supportedInterfaceOrientations{
-
- return [[self.viewControllers lastObject]supportedInterfaceOrientations];
-
- }
-
-
-
- - (UIInterfaceOrientation)preferredInterfaceOrientationForPresentation{
-
- return [[self.viewControllers lastObject] preferredInterfaceOrientationForPresentation];
-
- }
-
- @end
4) 在QSTabBarController设置
目标:TabBarController通常作为整个程序的rootViewController,UITabBar上面显示的每一个Tab都对应着一个ViewController;每点击一个Tab,出现的ViewController(self.selectedViewController)对屏幕旋转和支持方向的设置 交给其自身去控制。
- //QSTabBarController.h
-
- @interface QSTabBarController : UITabBarController
-
-
-
- @end
-
-
-
- //QSTabBarController.m
-
- @implementation QSTabBarController
-
-
-
- #pragma mark - 控制屏幕旋转方法
-
- - (BOOL)shouldAutorotate{
-
- return [self.selectedViewController shouldAutorotate];
-
- }
-
-
-
- - (UIInterfaceOrientationMask)supportedInterfaceOrientations{
-
- return [self.selectedViewController supportedInterfaceOrientations];
-
- }
-
-
-
- - (UIInterfaceOrientation)preferredInterfaceOrientationForPresentation{
-
- return [self.selectedViewController preferredInterfaceOrientationForPresentation];
-
- }
-
- @end
三、屏幕旋转方向下的视图处理
1、屏幕旋转时,建议监听UIApplicationDidChangeStatusBarOrientationNotification
原因1:supportedInterfaceOrientations方法中最终返回的是 多个界面方向。
原因2(最重要的原因):我们真正要处理的是页面方向发生旋转UI的变化。而在设备的物理方向发生旋转的时候,如果此时当前控制器的页面并没有旋转,我们这时改变UI布局,可能就发生问题了。
2、屏幕的宽高处理
1)在iOS 8之后,当屏幕旋转的时候,[[UIScreen mainScreen] bounds]也发生了改变。如横屏时候的屏幕宽度 其实是竖屏的时候屏幕的高度。
2)我们处理视图布局时候,如果使用到屏幕的宽高,不要直接使用SCREEN_HEIGHT和SCREEN_WIDTH,而使用SCREEN_MIN和SCREEN_MAX
- #define SCREEN_HEIGHT CGRectGetHeight([[UIScreen mainScreen] bounds])
-
- #define SCREEN_WIDTH CGRectGetWidth([[UIScreen mainScreen] bounds])
-
-
-
- #define SCREEN_MIN MIN(SCREEN_HEIGHT,SCREEN_WIDTH)
-
- #define SCREEN_MAX MAX(SCREEN_HEIGHT,SCREEN_WIDTH)
说明:竖屏时候,宽是SCREEN_MIN,高是SCREEN_MAX;横屏时候,宽是SCREEN_MAX,高是SCREEN_MIN。
3、屏幕旋转下处理Demo
- //监听UIApplicationDidChangeStatusBarOrientationNotification的处理
-
- - (void)handleStatusBarOrientationChange: (NSNotification *)notification{
-
-
-
- UIInterfaceOrientation interfaceOrientation = [[UIApplication sharedApplication] statusBarOrientation];
-
- BOOL isLandscape = NO;
-
- switch (interfaceOrientation) {
-
-
-
- case UIInterfaceOrientationUnknown:
-
- NSLog(@"未知方向");
-
- break;
-
-
-
- case UIInterfaceOrientationPortrait:
-
- case UIInterfaceOrientationPortraitUpsideDown:
-
- isLandscape = NO;
-
- break;
-
-
-
- case UIInterfaceOrientationLandscapeLeft:
-
- case UIInterfaceOrientationLandscapeRight:
-
- isLandscape = YES;
-
- break;
-
-
-
- default:
-
- break;
-
- }
-
- if (isLandscape) {
-
- self.tableView.frame = CGRectMake(0, 0, SCREEN_MAX, SCREEN_MIN - 44);
-
- }else{
-
- self.tableView.frame = CGRectMake(0, 0, SCREEN_MIN, SCREEN_MAX - 64);
-
- }
-
-
-
- [self.tableView reloadData];
-
- }
说明:当然也可以选择使用Masonry这样优秀的AutoLayout布局第三方库来处理,storyBoard来布局次之。
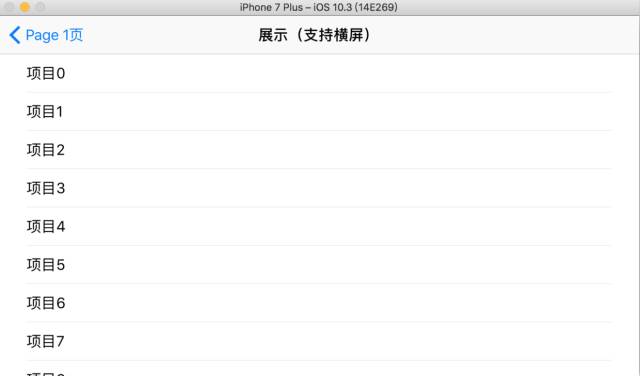
4、屏幕旋转下处理Demo效果图
![]()
竖屏下效果.png
![]()
横屏下效果.png
5、屏幕旋转处理的建议
1)旋转前后,view当前显示的位置尽量不变
2)旋转过程中,暂时界面操作的响应
3)视图中有tableview的话,旋转后,强制 [tableview reloadData],保证在方向变化以后,新的row能够充满全屏。
四、强制横屏
APP中某些页面,如视频播放页,一出现就要求横屏。这些横屏页面或模态弹出、或push进来。
1、模态弹出ViewController情况下 强制横屏的设置
- //QSShow3Controller.m
-
- - (BOOL)shouldAutorotate{
-
- return NO;
-
- }
-
-
-
- - (UIInterfaceOrientationMask)supportedInterfaceOrientations{
-
- return UIInterfaceOrientationMaskLandscapeRight;
-
- }
-
-
-
- - (UIInterfaceOrientation)preferredInterfaceOrientationForPresentation{
-
- return UIInterfaceOrientationLandscapeRight;
-
- }
-
-
-
- //模态弹出
-
- QSShow3Controller *vc = [[QSShow3Controller alloc]init];
-
- [self presentViewController:vc animated:YES completion:nil];
说明:这种情况比较简单处理。
2、push推入ViewController情况下 强制横屏的设置
- //QSShow4Controller.m
-
- -(void)viewWillAppear:(BOOL)animated{
-
-
-
- [super viewWillAppear:animated];
-
- [self setInterfaceOrientation:UIInterfaceOrientationLandscapeRight];
-
- }
-
-
-
- //强制转屏(这个方法最好放在BaseVController中)
-
- - (void)setInterfaceOrientation:(UIInterfaceOrientation)orientation{
-
-
-
- if ([[UIDevice currentDevice] respondsToSelector:@selector(setOrientation:)]) {
-
- SEL selector = NSSelectorFromString(@"setOrientation:");
-
- NSInvocation *invocation = [NSInvocation invocationWithMethodSignature:[UIDevice instanceMethodSignatureForSelector:selector]];
-
- [invocation setSelector:selector];
-
- [invocation setTarget:[UIDevice currentDevice]];
-
- // 从2开始是因为前两个参数已经被selector和target占用
-
- [invocation setArgument:&orientation atIndex:2];
-
- [invocation invoke];
-
- }
-
- }
-
-
-
- //必须返回YES
-
- - (BOOL)shouldAutorotate{
-
- return YES;
-
- }
-
-
-
- - (UIInterfaceOrientationMask)supportedInterfaceOrientations{
-
- return UIInterfaceOrientationMaskLandscapeRight;
-
- }
-
-
-
- //Push推入
-
- QSShow4Controller *vc = [[QSShow4Controller alloc]init];
-
- [self.navigationController pushViewController:vc animated:YES];
说明:苹果不允许直接调用setOrientation方法,否则有被拒的风险;使用NSInvocation对象给[UIDevice currentDevice]发消息,强制改变设备方向,使其页面方向对应改变,这是苹果允许的。
五、其他
1、 APP启动时,手机横屏下,首页UI(该页面只支持竖屏)出错(add by 2017/6/20)
- //设置设置状态栏竖屏
-
- [[UIApplication sharedApplication]setStatusBarOrientation:UIInterfaceOrientationPortrait];


