1: 什么是SpringBoot自动配置
首先介绍一下什么是SpringBoot,SpringBoost是基于Spring框架开发出来的功能更强大的Java程序开发框架,其最主要的特点是:能使程序开发者快速搭建一套开发环境。SpringBoot能将主流的开发框架(例如SpringMVC,Dubbo,Mybatis,Redis等),做到像Maven导入Jar包一样的简洁快速,做到开箱即用。其中最关键的技术就是SpringBoot定制的各种Starter,通Maven引入Starter就能快速搭建开发环境。
2: SpringBoot Starter自动装配案例
在以前单独使用SpringMVC Web编程框架时,我们需要单独配置DispatcherServlet和Tomcat,使用SpringBoot之后,我们只需要引入SpringBoot-Starter-Web就能直接开始编写Controller等Web相关的代码,这就是SpringBoot为们提供的开箱即用的便捷能力,下面就以SpringBoot-Starter-Web来说明SpringBoot自动配置的关键原理
3: SpringBoot自动装配案例源码解析
3.1 DispatcherServlet的自动配置原理
首先我们定位到SpringBoot自动配置的Maven依赖
     <dependency>
        <groupId>org.springframework.boot</groupId>
        <artifactId>spring-boot-autoconfigure</artifactId>
        <version>${spring-boot.version}</version>
      </dependency>
在依赖的Jar包中我们可以在META-INF/spring.factories中找到自动配置类:
org.springframework.boot.autoconfigure.web.servlet.DispatcherServletAutoConfiguration
在这个类中存在有一个静态内部类:
org.springframework.boot.autoconfigure.web.servlet.DispatcherServletAutoConfiguration.DispatcherServletConfiguration
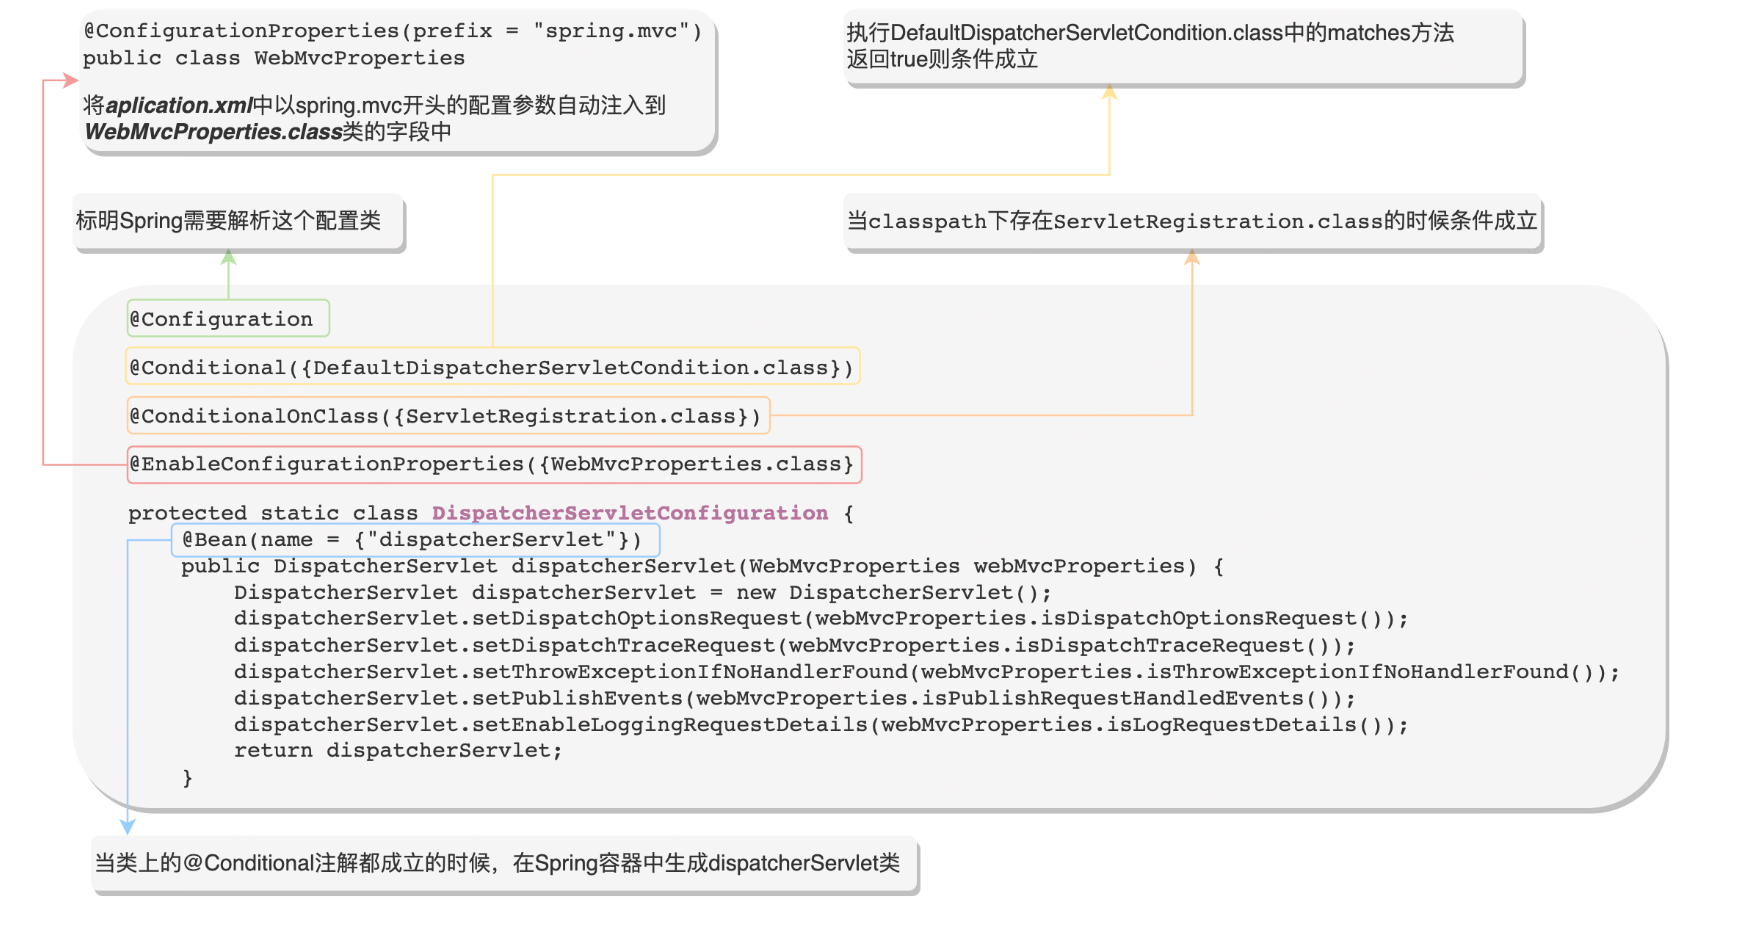
下图是这个配置类的主要源码和解析:
![]()
下面将上图中关键的注解功能,分别进行功能说明
3.1.1:@EnableConfigurationProperties({WebMvcProperties.class})注解解析
这个注解表示使WebMvcProperties.class类上的@ConfigurationProperties这个注解生效,同时@ConfigurationProperties这个注解是将application.xml中以spring.mvc开头的配置参数自动注入到WebMvcProperties.class类的字段中
3.1.2:@Conditional({DefaultDispatcherServletCondition.class}注解解析
该注解的原理就是将满足特定条件情况下的Bean自动加载到Spring容器中,该注解对应的Spring接口就是org.springframework.context.annotation.Condition这个接口
public interface Condition {
    boolean matches(ConditionContext var1, AnnotatedTypeMetadata var2);
}
3.1.3:@ConditionOnClass注解解析
@ConditionOnClass这个注解是在当程序代码环境classpath下存在xxx.class的情况下条件成立,同时最终也会调用到matches方法中,其中关键的源码如下:
protected static Class<?> resolve(String className, ClassLoader classLoader) throws ClassNotFoundException {
    return classLoader != null ? Class.forName(className, false, classLoader) : Class.forName(className);
}
从上面可以看到,代码利用Class.forName方法加载classpath下的xxx.class类,如果加载成功条件就会成立。最后,在满足了所有@ConditionOnal注解条件后,SpringBoot就会自动为我们在Spring容器中注入DispatcherServlet了,无需单独配置了,直接引入spring-boot-starter-webr即可开始使用web相关功能。
3.1.4:总结
我们以DispatcherServlet是如何自动配置到容器中为例,探究了SpringBoot Starter的自动配置原理,其中涉及了几个关键的注解和步骤:
第一步:涉及到了配置文件的读取和个性化配置,这里就涉及到了下面这两个注解
@ConfigurationProperties
@EnableConfigurationProperties
第二步:设计到了在什么条件下才自动配置的注解
@Conditional
@ConditionalOnClass
第三步:约定了自动配置类的加载路径
/META-INF/spring-factories
org.springframework.boot.autoconfigure.EnableAutoConfiguration=自动配置类全路径名称
在我们了解到了SpringBoot自动配置的原理之后,我们就可以自定义一个SpringBoot Starter来快速搭建我们的开发环境了
4:自定义一个打印输入输出日志的Starter
4.1 首先定义一个标记需要打印出入参日志的注解@PrintLog
@Target(ElementType.METHOD)
@Retention(RetentionPolicy.RUNTIME)
public @interface PrintLog {
}
4.2 定义一个存放打印日志配置的实体类
//自动注入application配置文件中已log.switch开头的配置参数
@ConfigurationProperties("log.switch")
public class LogProperties {
    //是否启用打印日志功能
    private Boolean enabled = false;
    //是否打印调用者ip
    private Boolean printIp = false;
    //是否打印调用者url
    private Boolean printUrl = false
}
4.3 定义一个@PrintLog注解的切面类
@Aspect
public class LogAspect {
    private static final Log LOGGER = LogFactory.getLog(LogAspect.class);
    private LogProperties logProperties;

    @Pointcut("@annotation(com.zl.annotation.PrintLog)")
    public void Log(){}

    @Around("Log()")
    public Object doAround(ProceedingJoinPoint joinPoint) throws Throwable {
        ServletRequestAttributes attributes = (ServletRequestAttributes) RequestContextHolder.getRequestAttributes();
        HttpServletRequest request = attributes.getRequest();
        MethodSignature signature = (MethodSignature) joinPoint.getSignature();
        Method method = signature.getMethod();
        String methodName = method.getName();
        //打印调用url
        if (Boolean.TRUE.equals(logProperties.getPrintUrl())){
            LOGGER.info("URL:" + request.getRequestURL().toString());
        }
        //打印ip
        if (Boolean.TRUE.equals(logProperties.getPrintIp())) {
            LOGGER.info("IP :" + request.getRemoteAddr());
        }
        //打印方法
        LOGGER.info("method :" + methodName);
        //打印参数
        LOGGER.info("parameter :" + Arrays.toString(joinPoint.getArgs()));
        Object result = joinPoint.proceed();
        //打印返回结果
        LOGGER.info("return :" + JSON.toJSONString(result));
        return result;
    }
}
4.4 定义一个打印日志的自动配置类
@Configuration
@EnableConfigurationProperties({LogProperties.class})
//表示在application配置文件中必须配置log.switch.enabled = true才启动自动配置
@ConditionalOnProperty(prefix = "log.switch", value = "enabled", havingValue = "true")
public class LogAutoConfigure {
    @Bean
    //Advice.class是aop切面中关键的切面方法类(@Before,@After等)
    //程序中有Advice.class类说明需要使用切面功能,这时才加载自定义的切面类
    @ConditionalOnClass(Advice.class)
    public LogAspect webLogAspect(LogProperties logProperties){
        return new LogAspect(logProperties);
    }
}
@ConditionalOnProperty表示在application配置文件中必须存在相应的配置才能使条件成立
4.5 配置自定义配置类的加载路径
META-INF/spring.factories
org.springframework.boot.autoconfigure.EnableAutoConfiguration=\
  com.zl.autoConfigure.LogAutoConfigure
4.6 Maven打包部署
maven install
5:开始使用自定义的Starter
5.1 在项目中引入Starter
<dependency>
   <groupId>com.zl.demo</groupId>
   <artifactId>LogStarter</artifactId>
   <version>1.0-SNAPSHOT</version>
</dependency>
5.2 在application.yml中配置参数
log:
  switch:
    enabled: true //启用打印日志功能
    printIp: true //打印请求ip
    printUrl: true //打印请求url
经过上面两个步骤就,打印日志的功能就已经开启了,接下来就可以进行编码测试了
5.3 定义一个Controller并标上打印日志的注解
@RestController
@RequestMapping("/test")
public class HelloWorldController {
    @PrintLog
    @RequestMapping("/hello")
    public String helleWorld(String test){
        return "hello world!";
    }
}
5.4 启动项目开始测试
com.zl.aspect.LogAspect   : URL:http://localhost:8080/test/hello
com.zl.aspect.LogAspect   : IP :0:0:0:0:0:0:0:1
com.zl.aspect.LogAspect   : method :helleWorld
com.zl.aspect.LogAspect   : parameter :[test]
com.zl.aspect.LogAspect   : return :"hello world!"
可以看到上面的入参和返回值都已经打印出来了,说明了自定义的starter已经生效了。
6:总结
SpringBoot自动配置功能带给我们的是开箱即用,快速便捷的功能,自动配置为我们研发人员带来的优点,我主要总结为以下两点:
1:提高研发效率。我们可以快速构建开发环境,对于开发中使用到的开源组件和中间件,我们直接引入对应的Starter就可以直接开发了,例如Redis和Mybatis等,可以直接引入对应的spring-boot-starter-data-redis就可以直接使用RedisTemplate来操作Redis了,这样可以极大的提高研发的效率,无需再进行复杂的起步配置了和各种版本依赖管理了。
2:标准模块复用。对于业务开发中的一些标准模块,例如常用的一些三方服务,我们可以利用Starter直接配置好,在需要使用的项目中直接引入这个starter就可以立即使用了,无需再去引入Jar包和编写配置文件等,同样的,对于一些标准非业务强耦合的功能,例如监控,鉴权等,也可以定义一个Starter,需要使用鉴权和监控功能的项目就可以直接复用了,无需再次开发。
作者:京东零售 钟磊
来源:京东云开发者社区 自猿其说Tech 转载请注明来源