1 Spring boot源码环境构建
推荐环境:
idea:2020.3
gradle:版本gradle-6.5.1
jdk:1.8
注意!idea和gradle的版本有兼容性问题,要注意搭配
1.1 Spring boot源码下载
1、从github获取源码,网址:
https://github.com/spring-projects/spring-boot
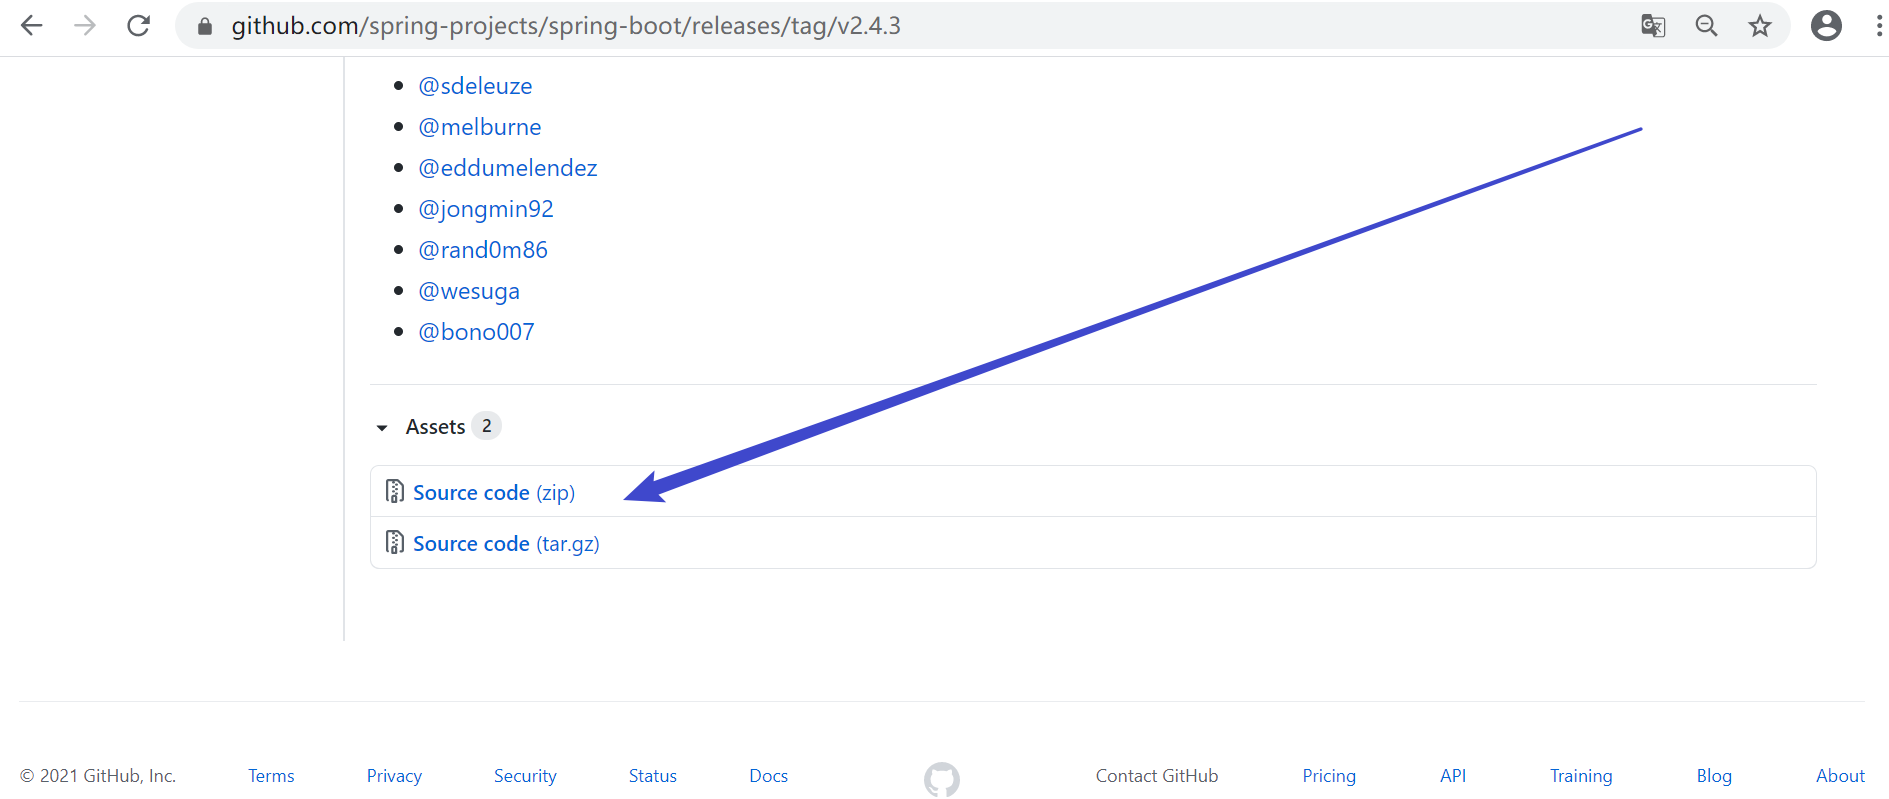
我们要搭建的是2.4.3.RELEASE版本,所以点击release 之后在tags查找相应版本或者访问
https://github.com/spring-projects/spring-boot/releases/tag/v2.4.3
找到 后点击sourcecode下载源码压缩包
![file]() 目录结构
目录结构
![file]() Spring-boot-project 核心代码,代码量很多(197508 行) Spring-boot-tests 测试代码
Spring-boot-project 核心代码,代码量很多(197508 行) Spring-boot-tests 测试代码
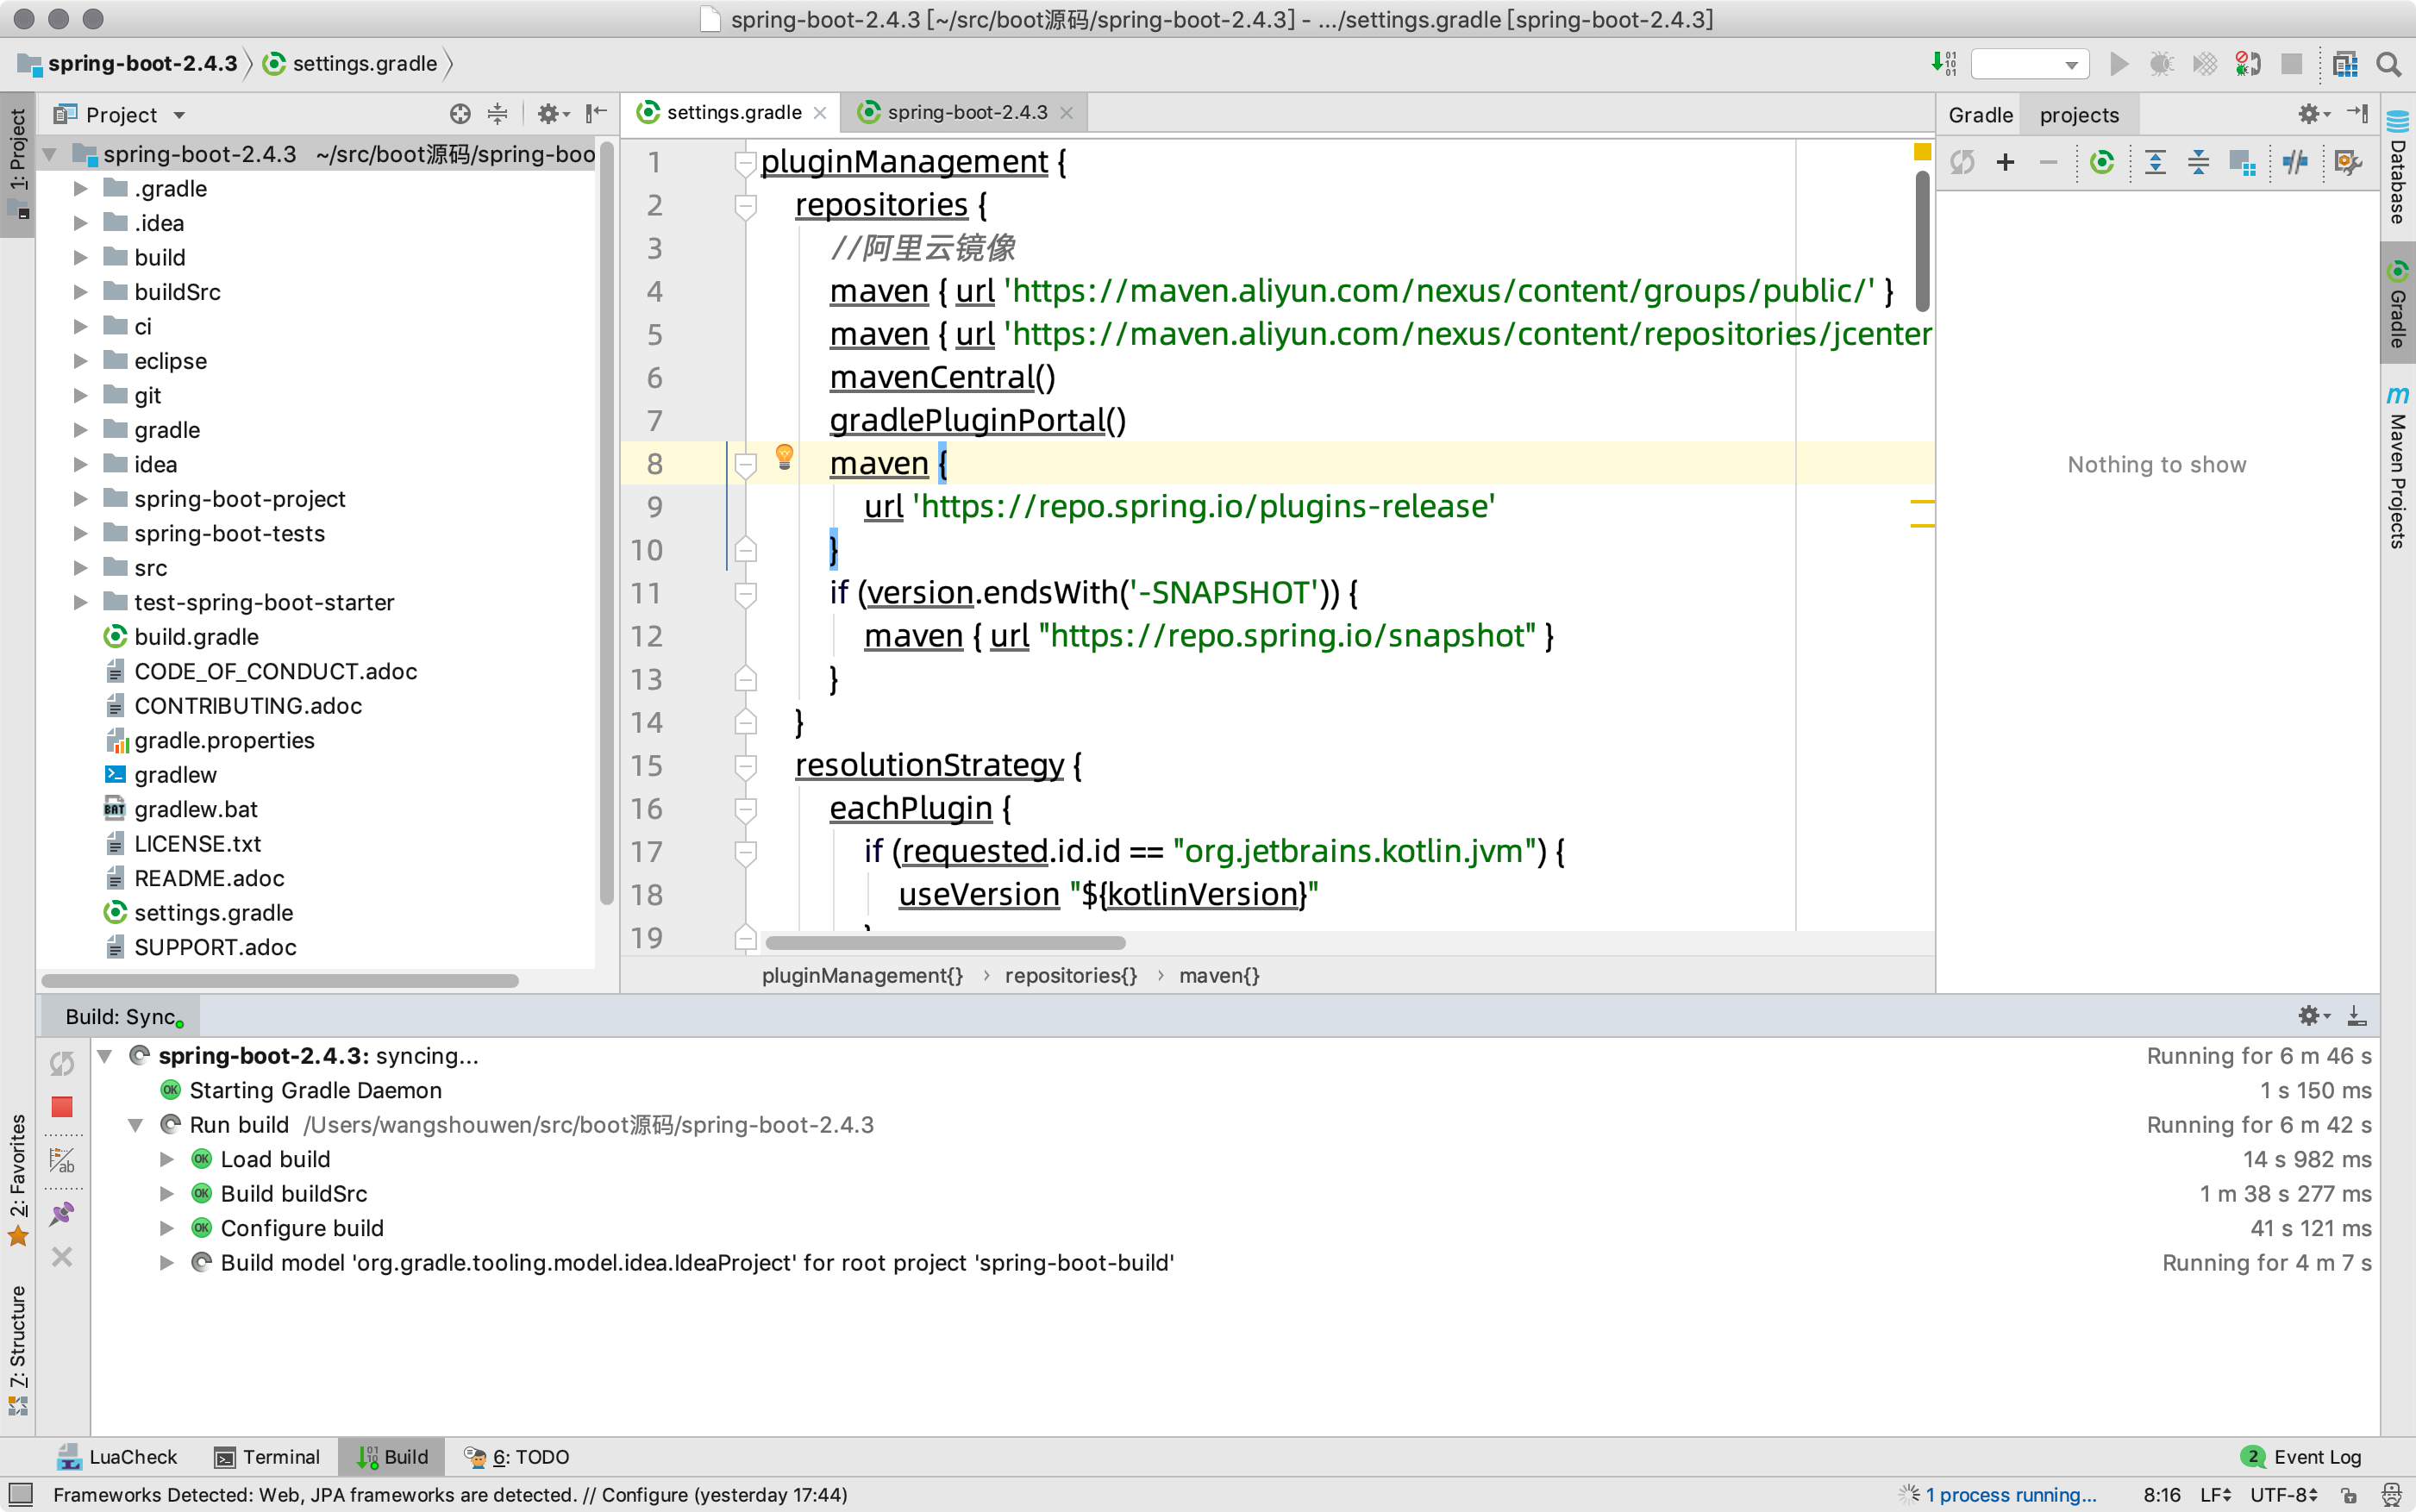
2、直接用提供的源码包(推荐)
将源码导入到idea。漫长的等待……
![file]()
1.2 Spring boot源码编译
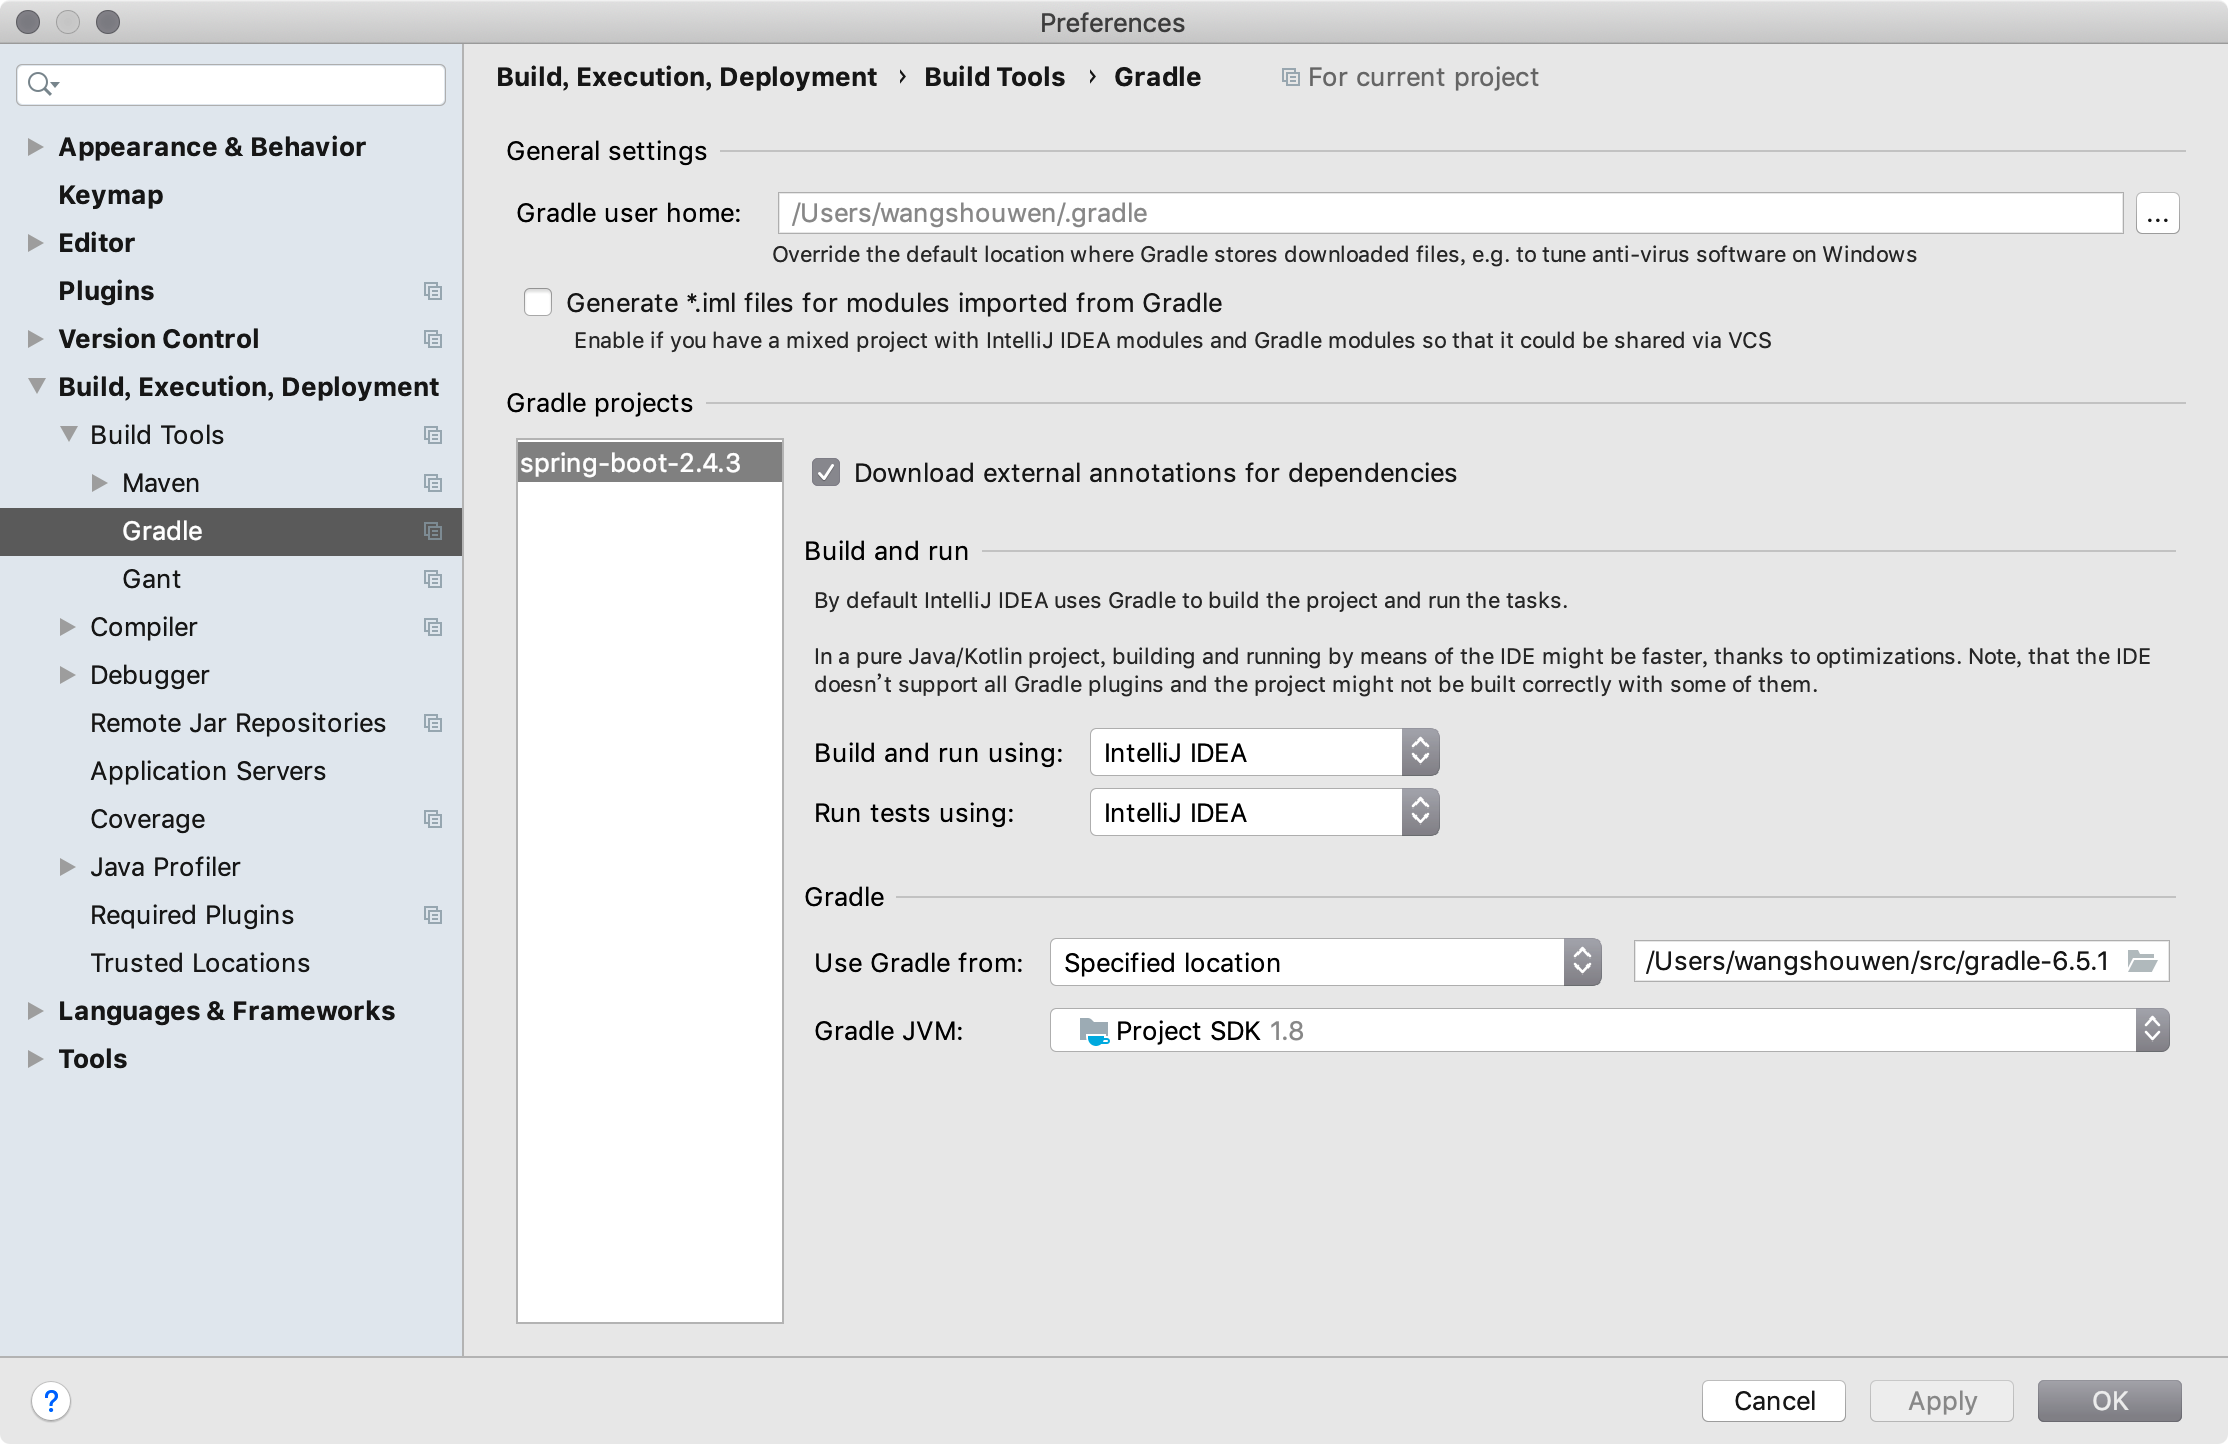
1、环境配置
推荐配置:
![file]() 2、开始gradle构建
2、开始gradle构建
使用idea的build,不要用gradle的任务
![file]()
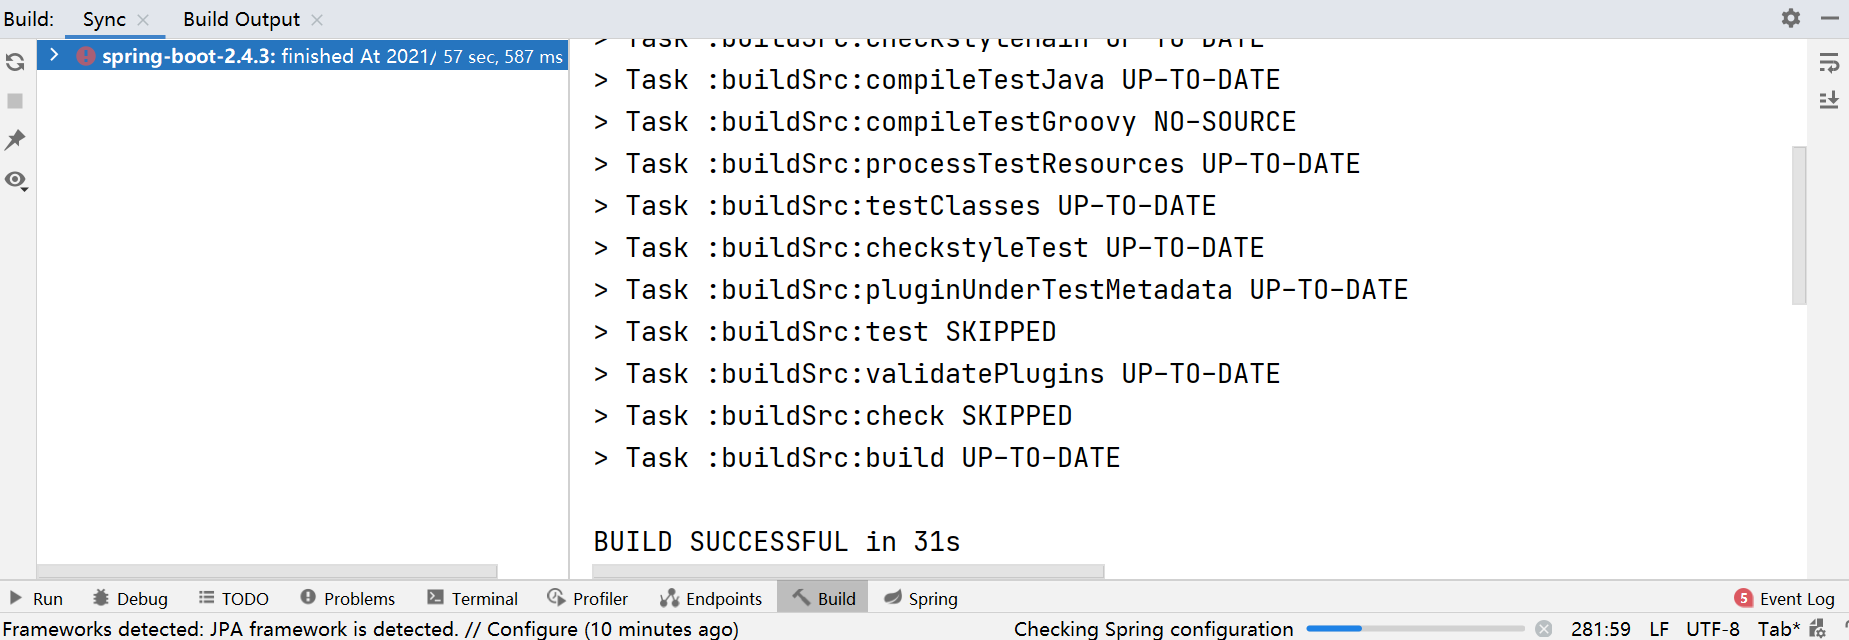
看到下面的BUILE SUCESSFUL表示成功
![file]()
1.3 Spring boot冒烟测试
在springboot-boot-tests模块下很多冒烟测试的,会拖慢上面的编译,只留下了一个:
spring-boot-smoke-test-hibernate52工程来进行冒烟测试,打开Hibernate52Application.java文件,直接执行main方法启动springboot,成功!
org.springframework.boot.tests.hibernate52.Hibernate52Application
package org.springframework.boot.tests.hibernate52;

import org.springframework.boot.SpringApplication;
import org.springframework.boot.autoconfigure.SpringBootApplication;

@SpringBootApplication
public class Hibernate52Application {

	public static void main(String[] args) {
		SpringApplication.run(Hibernate52Application.class, args);
	}

}
执行run
console中出现我们熟悉的图标。
![file]()
2 Spring boot源码深度剖析
引言
使用过SpringBoot开发项目的读者应该都能够感觉到
SpringBoot的开发完成后,只需要通过执行一个main方法就可以将整个web项目启动
无需将项目的jar文件放在tomcat下,然后启动tomcat,进而启动项目。
除此之外,好多依赖的jar包也无需我们再进行手动配置,减少了配置,
同时也减少了许多xml文件的配置,大大简化了我们的开发过程
那么
springboot在启动的时候到底做了哪些事情?
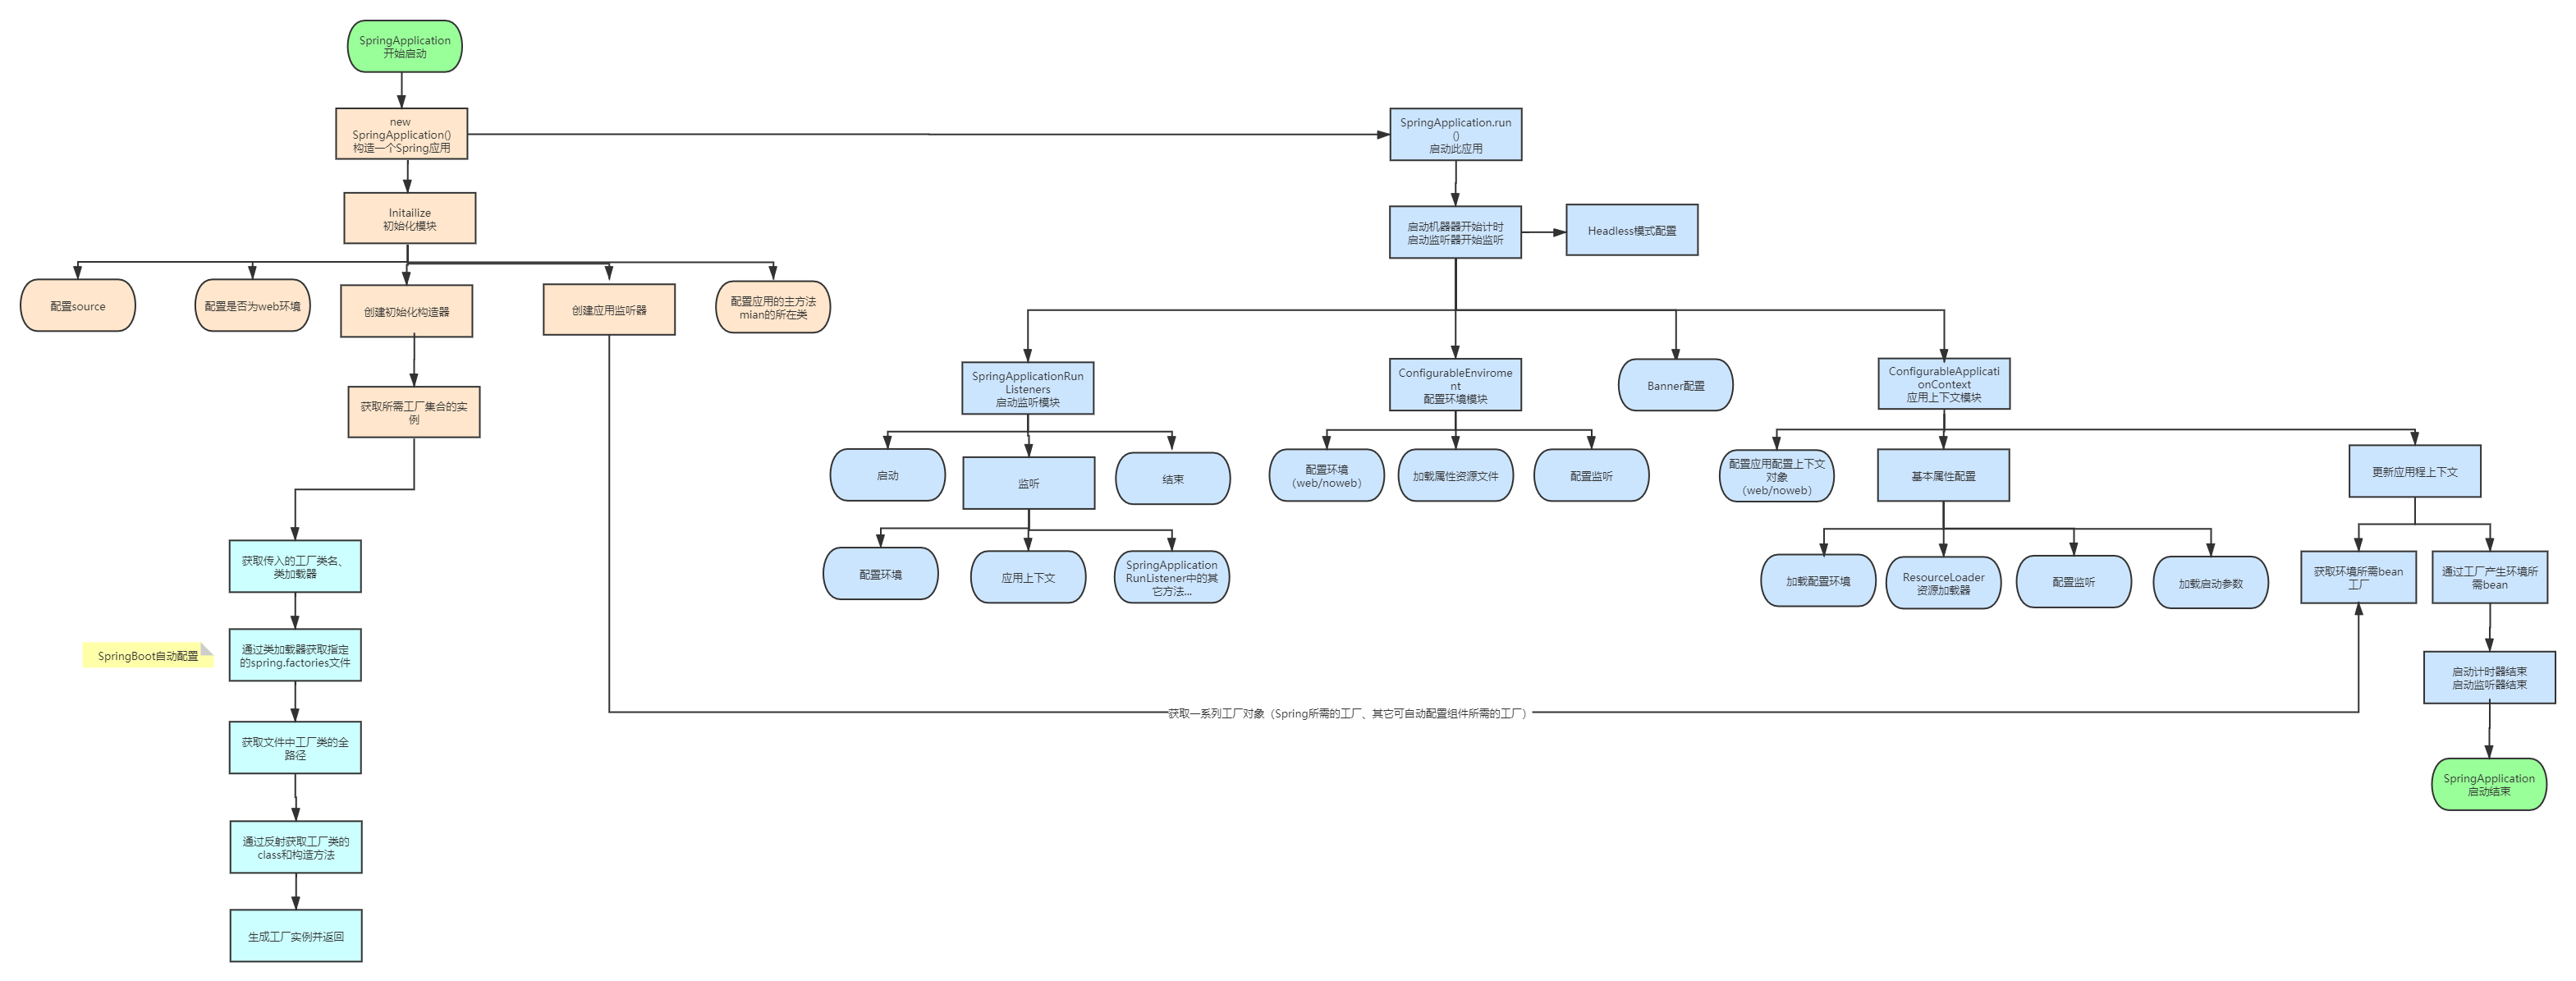
2.1 Spring boot启动流程剖析
第一步:new SpringApplication(primarySources)
第二步:run!
2.1.1 Spring boot启动流程剖析
Debug一下,追踪一下整个启动过程
main方法作为程序的入口,执行SpringApplication.run(),传入参数是启动类的class对象
![file]()
1)Spring boot源码入口
@SpringBootApplication
public class Hibernate52Application {

	public static void main(String[] args)  {
		SpringApplication.run(Hibernate52Application.class, args);
	}

}
跟踪run方法;进入到
参数一可支持多个主要资源。
	public static ConfigurableApplicationContext run(Class<?> primarySource, String... args) {
		return run(new Class<?>[] { primarySource }, args);
	}
继续进入到run方法
	public static ConfigurableApplicationContext run(Class<?>[] primarySources, String[] args) {
		return new SpringApplication(primarySources).run(args);
	}
2)构造器(new)
//方法目标
//1、初始化资源加载器(classloader)
//2、处理primarySources
//3、web应用类型推断 (web、reactive、servlet)
//4、通过spring.factories加载配置类并初始化监听器 (SPI) 【重点】
//5、提取主类
	public SpringApplication(ResourceLoader resourceLoader, Class<?>... primarySources) {
		//null;资源加载器,用来获取 Resource 和 classLoader 以及加载资源
		this.resourceLoader = resourceLoader;
		Assert.notNull(primarySources, "PrimarySources must not be null");
		//存放主加载类;set中可同时创建多个Application,最后要解析这个来源上的注解
		this.primarySources = new LinkedHashSet<>(Arrays.asList(primarySources));
		//推断 web 类型:servlet 或 reactive
		this.webApplicationType = WebApplicationType.deduceFromClasspath();
//		0个,从spring.factories中找出Bootstrapper对应的属性
		this.bootstrappers = new ArrayList<>(getSpringFactoriesInstances(Bootstrapper.class));
//		7个,设置初始化器,从spring.factories中找出ApplicationContextInitializer对应的属性
		setInitializers((Collection) getSpringFactoriesInstances(ApplicationContextInitializer.class));
//		9个,设置监听器 从spring.factories中找出ApplicationListener对应的属性
		setListeners((Collection) getSpringFactoriesInstances(ApplicationListener.class));
		//找出主函数main的类
		this.mainApplicationClass = deduceMainApplicationClass();
	}
上面 的代码最终会调用到getSpringFactoriesInstances,从spring.factories加载属性配置
加载核心源码如下
下面代码
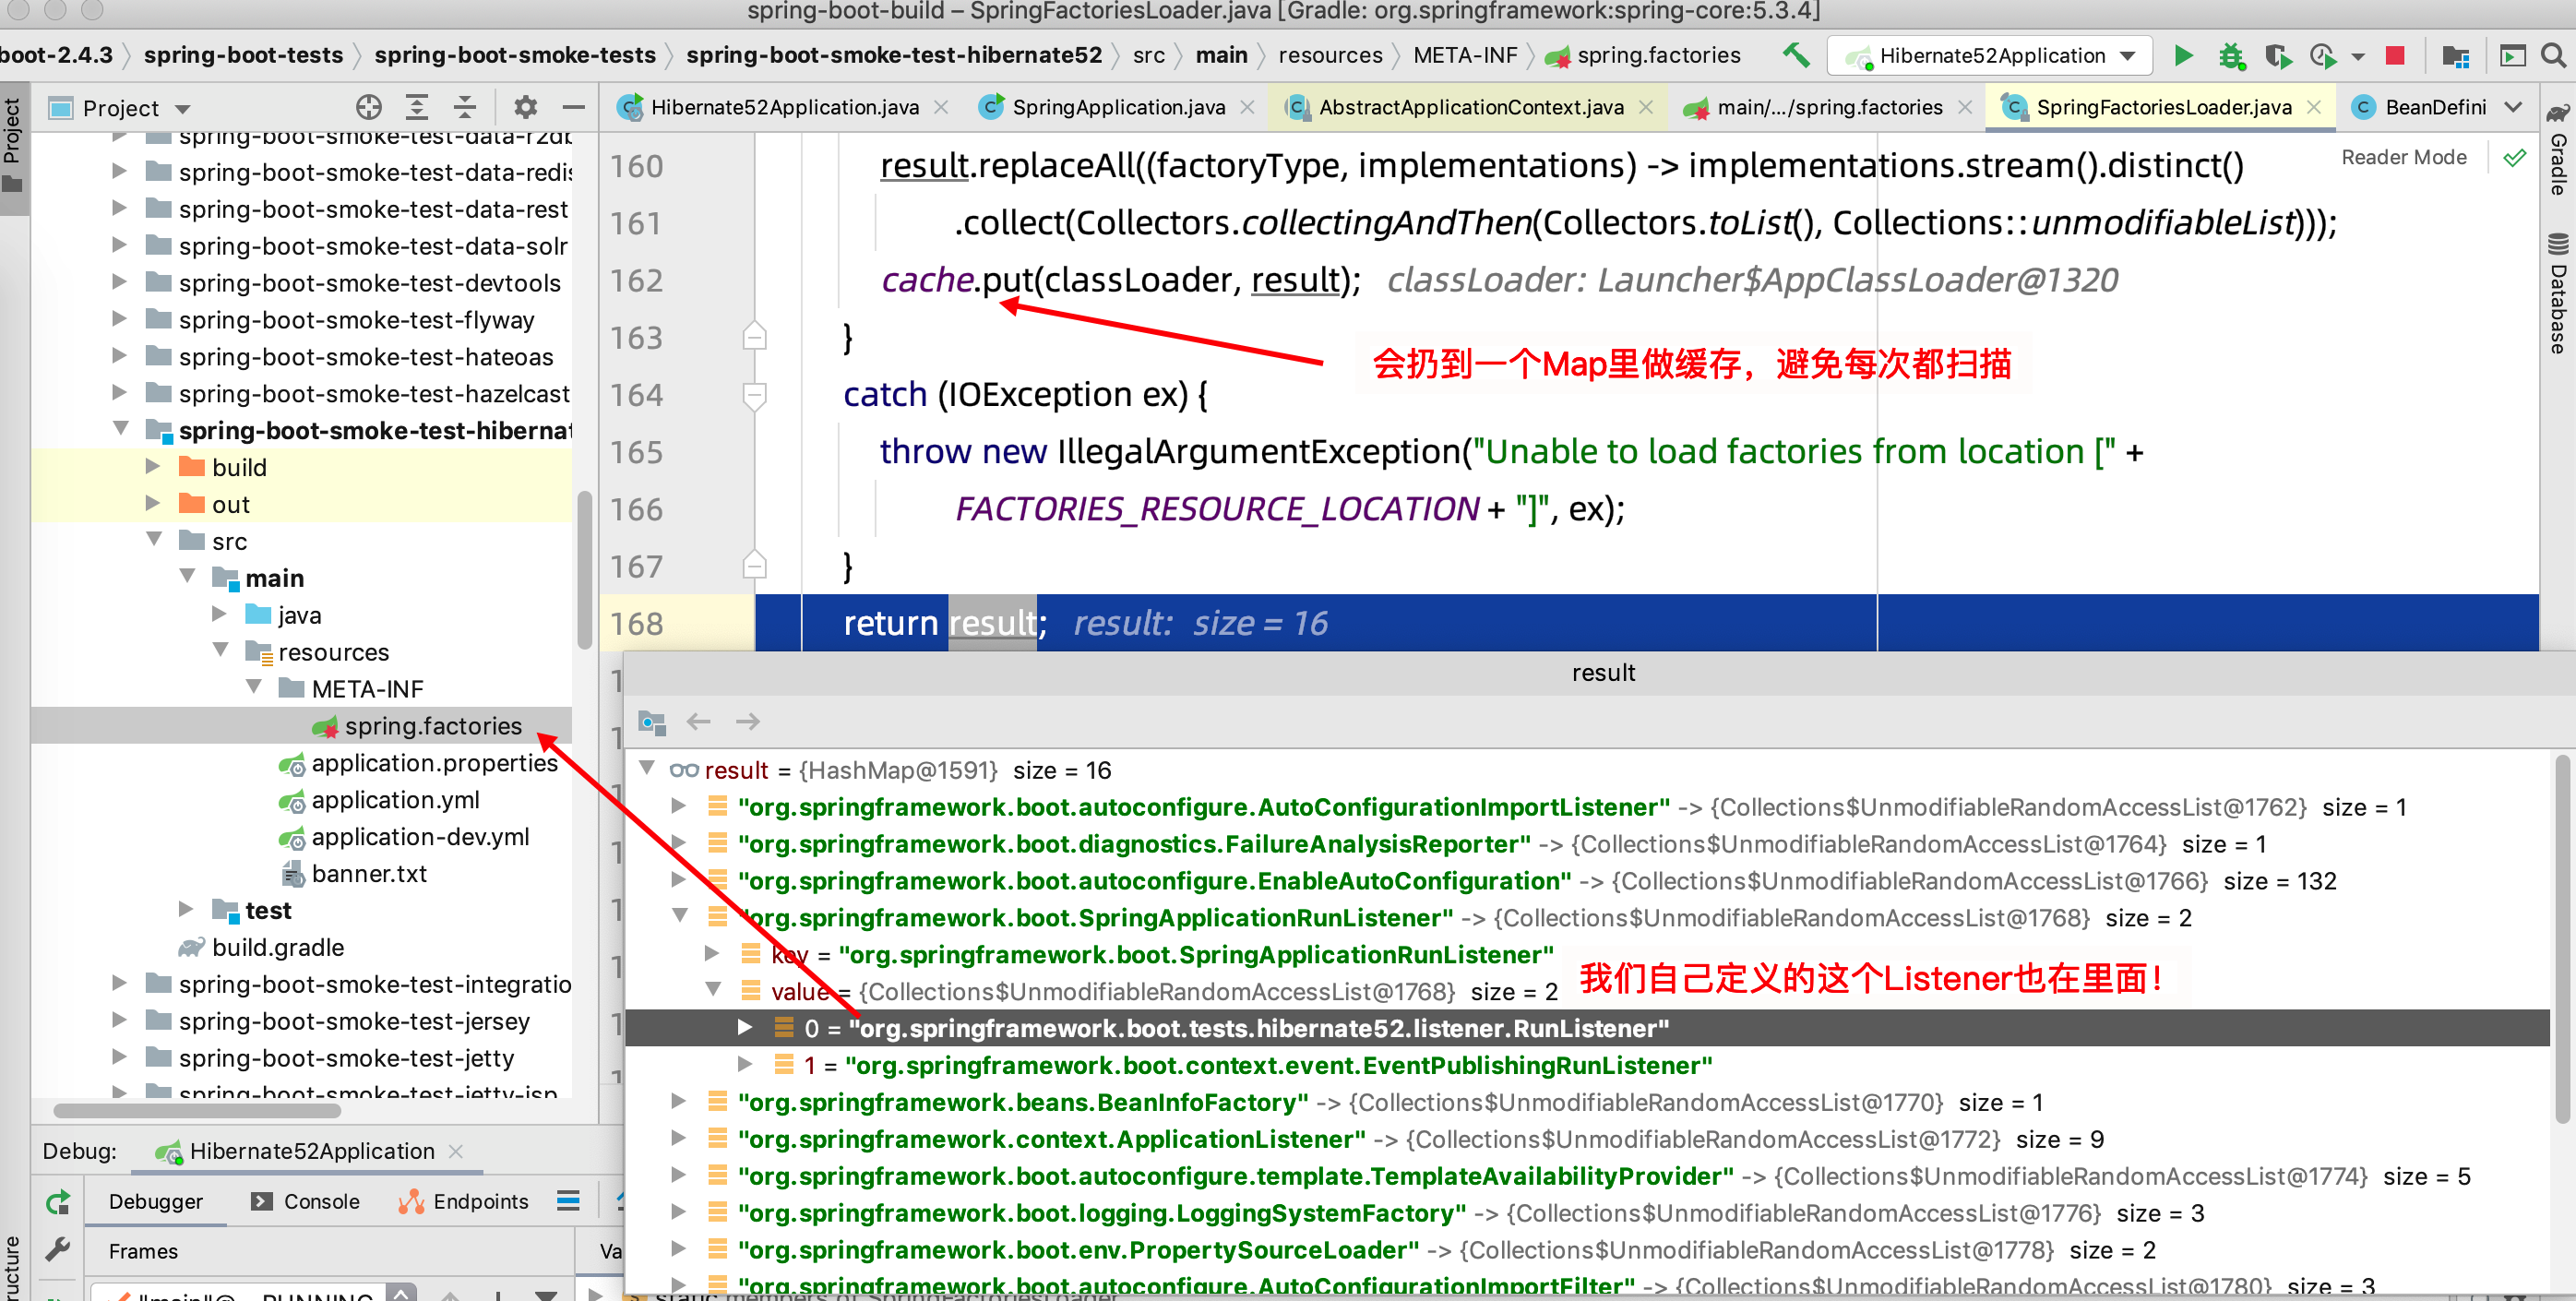
首先会用classLoader加载类路径下的所有spring.factories的配置内容,loadSpringFactories方法将返回一个key=接口名,value=实现类集合的Map结构
private static Map<String, List<String>> loadSpringFactories(ClassLoader classLoader) {
    // 先试着取缓存
		Map<String, List<String>> result = cache.get(classLoader);
		if (result != null) {
			return result;
		}

		result = new HashMap<>();
		try {
             // 获取所有spring.factories的URL(3个地方)
			Enumeration<URL> urls = classLoader.getResources(FACTORIES_RESOURCE_LOCATION);
            // 遍历URL
			while (urls.hasMoreElements()) {
				URL url = urls.nextElement();
				UrlResource resource = new UrlResource(url);
                 // 加载每个URL中的properties配置
				Properties properties = PropertiesLoaderUtils.loadProperties(resource);

				for (Map.Entry<?, ?> entry : properties.entrySet()) {

					String factoryTypeName = ((String) entry.getKey()).trim();
                          // 将实现类的配置按照","符号分割开
					String[] factoryImplementationNames =
							StringUtils.commaDelimitedListToStringArray((String) entry.getValue());
					for (String factoryImplementationName : factoryImplementationNames) {
                             // 逐个添加到接口对应的集合当中
						result.computeIfAbsent(factoryTypeName, key -> new ArrayList<>())
								.add(factoryImplementationName.trim());
					}
				}
			}

			// Replace all lists with unmodifiable lists containing unique elements
			result.replaceAll((factoryType, implementations) -> implementations.stream().distinct()
					.collect(Collectors.collectingAndThen(Collectors.toList(), Collections::unmodifiableList)));
            //加入缓存
			cache.put(classLoader, result);
		}
		catch (IOException ex) {
			throw new IllegalArgumentException("Unable to load factories from location [" +
					FACTORIES_RESOURCE_LOCATION + "]", ex);
		}
		return result;
	}
![file]()
主要的spring.factories
spring-boot-2.4.3/spring-boot-project/spring-boot-autoconfigure/build/resources/main/META-INF/spring.factories


spring-boot-2.4.3/spring-boot-project/spring-boot/build/resources/main/META-INF/spring.factories


spring-beans-5.3.4.jar!/META-INF/spring.factories
构造器流程总结
1、处理资源加载器、主要资源primarySources
2、web应用类型推断
3、从spring.factories中找出引导包装器、初始化器、监听器
4、设置应用程序主类
3)boot运行(run)
发布事件
打印banner
初始化ioc容器,启动tomcat
七大步骤
//七大步骤
	public ConfigurableApplicationContext run(String... args) {
		//计时器
		StopWatch stopWatch = new StopWatch();
		stopWatch.start(); //开始计时
		//  创建启动上下文对象
		DefaultBootstrapContext bootstrapContext = createBootstrapContext();
		// 可配置的程序容器
		ConfigurableApplicationContext context = null;
		// 设置属性 不重要
		configureHeadlessProperty();
			// 第一步:获取并启动监听器    从spring.factories文件中加载【测试点】
		SpringApplicationRunListeners listeners = getRunListeners(args);
			//监听器发布ApplicationStartingEvent 事件.
		listeners.starting(bootstrapContext, this.mainApplicationClass);
		try {
			// 对参数进行包装(ApplicationArguments)
			ApplicationArguments applicationArguments = new DefaultApplicationArguments(args);
			//第二步:准备应用程序环境【关键点】
			ConfigurableEnvironment environment = prepareEnvironment(listeners, bootstrapContext, applicationArguments);
			// 配置忽略bean的信息(不重要)
			configureIgnoreBeanInfo(environment);
			//第三步: 打印banner(可自定义,参考讲义)【关键点】
			Banner printedBanner = printBanner(environment);
            // 第四步:创建spring容器
			context = createApplicationContext();
			context.setApplicationStartup(this.applicationStartup);
			//第五步:准备 applicationContext
			prepareContext(bootstrapContext, context, environment, listeners, applicationArguments, printedBanner);
			//第六步:ioc的refresh创建容器,初始化bean,tomcat也在这里被启动起来 【关键点】
			refreshContext(context);
			//第七步:上下文刷新后触发(空方法)
			afterRefresh(context, applicationArguments);
			stopWatch.stop();//停止计时
			if (this.logStartupInfo) {
				new StartupInfoLogger(this.mainApplicationClass).logStarted(getApplicationLog(), stopWatch);
			}
			// 发布started事件
			listeners.started(context);
			//执行runner的run方法 【测试点】
			callRunners(context, applicationArguments);
		} catch (Throwable ex) {
			// 异常处理
			handleRunFailure(context, ex, listeners);
			throw new IllegalStateException(ex);
		}

		try {
			// 触发running事件
			listeners.running(context);
		} catch (Throwable ex) {
			handleRunFailure(context, ex, null);
			throw new IllegalStateException(ex);
		}
		// 返回最终构建的容器对象
		return context;
	}
2.1.2 Spring boot七大步骤详解
1)获取并启动监听器
这里的启动监听就是我们需要监听SpringBoot的启动流程监听,实现SpringApplicationRunListener类即可监听
	//获取spring.factories中 key为SpringApplicationRunListener的对象实例。
	private SpringApplicationRunListeners getRunListeners(String[] args) {
		Class<?>[] types = new Class<?>[]{SpringApplication.class, String[].class};
		// 通过从 spring.factories 中获取 SpringApplicationRunListener 类型的配置类
		return new SpringApplicationRunListeners(logger,
				getSpringFactoriesInstances(SpringApplicationRunListener.class, types, this, args),
				this.applicationStartup);
	}
查看具体SpringApplicationRunListener都有哪些方法
package org.springframework.boot;

import org.springframework.context.ApplicationContext;
import org.springframework.context.ConfigurableApplicationContext;
import org.springframework.core.env.ConfigurableEnvironment;
import org.springframework.core.io.support.SpringFactoriesLoader;


public interface SpringApplicationRunListener {

	/**
	 * Called immediately when the run method has first started. Can be used for very
	 * early initialization.
	 * @param bootstrapContext the bootstrap context
	 */
	//当调用run方法后会立即调用,可以用于非常早期的初始化
	default void starting(ConfigurableBootstrapContext bootstrapContext) {
		starting();
	}

	/**
	 * Called immediately when the run method has first started. Can be used for very
	 * early initialization.
	 * @deprecated since 2.4.0 in favor of {@link #starting(ConfigurableBootstrapContext)}
	 */
	@Deprecated
	default void starting() {
	}

	/**
	 * Called once the environment has been prepared, but before the
	 * {@link ApplicationContext} has been created.
	 * @param bootstrapContext the bootstrap context
	 * @param environment the environment
	 */
	//环境准备好之后调用
	default void environmentPrepared(ConfigurableBootstrapContext bootstrapContext,
			ConfigurableEnvironment environment) {
		environmentPrepared(environment);
	}

	/**
	 * Called once the environment has been prepared, but before the
	 * {@link ApplicationContext} has been created.
	 * @param environment the environment
	 * @deprecated since 2.4.0 in favor of
	 * {@link #environmentPrepared(ConfigurableBootstrapContext, ConfigurableEnvironment)}
	 */
	@Deprecated
	default void environmentPrepared(ConfigurableEnvironment environment) {
	}

	/**
	 * Called once the {@link ApplicationContext} has been created and prepared, but
	 * before sources have been loaded.
	 * @param context the application context
	 */
	//在加载资源之前,ApplicationContex准备好之后调用
	default void contextPrepared(ConfigurableApplicationContext context) {
	}

	/**
	 * Called once the application context has been loaded but before it has been
	 * refreshed.
	 * @param context the application context
	 */
	//在加载应用程序上下文但在其刷新之前调用
	default void contextLoaded(ConfigurableApplicationContext context) {
	}

	/**
	 * The context has been refreshed and the application has started but
	 * {@link CommandLineRunner CommandLineRunners} and {@link ApplicationRunner
	 * ApplicationRunners} have not been called.
	 * @param context the application context.
	 * @since 2.0.0
	 */
	/**
	 * 上下文已经刷新且应用程序已启动且所有{@link CommandLineRunner commandLineRunner}
	 * 和{@link ApplicationRunner ApplicationRunners}未调用之前调用
	 */
	default void started(ConfigurableApplicationContext context) {
	}

	/**
	 * Called immediately before the run method finishes, when the application context has
	 * been refreshed and all {@link CommandLineRunner CommandLineRunners} and
	 * {@link ApplicationRunner ApplicationRunners} have been called.
	 * @param context the application context.
	 * @since 2.0.0
	 */
	/**
	 * 当应用程序上下文被刷新并且所有{@link CommandLineRunner commandLineRunner}
	 * 和{@link ApplicationRunner ApplicationRunners}都已被调用时,在run方法结束之前立即调用。
	 */

	default void running(ConfigurableApplicationContext context) {
	}

	/**
	 * Called when a failure occurs when running the application.
	 * @param context the application context or {@code null} if a failure occurred before
	 * the context was created
	 * @param exception the failure
	 * @since 2.0.0
	 */
	//在启动过程发生失败时调用
	default void failed(ConfigurableApplicationContext context, Throwable exception) {
	}

}
2)准备应用程序环境
创建并配置SpringBooty应用将要使用的Environment
//不看细节,看返回的环境数据即可
	//创建并配置SpringBooty应用将要使用的Environment
	//过程如下:
	//	1、创建配置环境 ConfigurableEnvironment
	//	2、加载属性文件资源
	//	3、配置监听
	private ConfigurableEnvironment prepareEnvironment(SpringApplicationRunListeners listeners,
													   DefaultBootstrapContext bootstrapContext, ApplicationArguments applicationArguments) {
		// 根据不同的web类型创建不同实现的Environment对象
		ConfigurableEnvironment environment = getOrCreateEnvironment();
		// 配置环境
		configureEnvironment(environment, applicationArguments.getSourceArgs());
		ConfigurationPropertySources.attach(environment);
		// 发送环境已准备完成事件
		listeners.environmentPrepared(bootstrapContext, environment);
		DefaultPropertiesPropertySource.moveToEnd(environment);
		// 根据命令行参数中spring.profiles.active属性配置Environment对象中的activeProfile(比如dev、prod、test)
		configureAdditionalProfiles(environment);
		// 绑定环境中spring.main属性绑定到SpringApplication对象中
		bindToSpringApplication(environment);
		// 如果用户使用spring.main.web-application-type属性手动设置了webApplicationType
		if (!this.isCustomEnvironment) {
			// 将环境对象转换成用户设置的webApplicationType相关类型,他们是继承同一个父类,直接强转
			environment = new EnvironmentConverter(getClassLoader()).convertEnvironmentIfNecessary(environment,
					deduceEnvironmentClass());
		}
		ConfigurationPropertySources.attach(environment);
		return environment; //环境查看(控制台)
	}
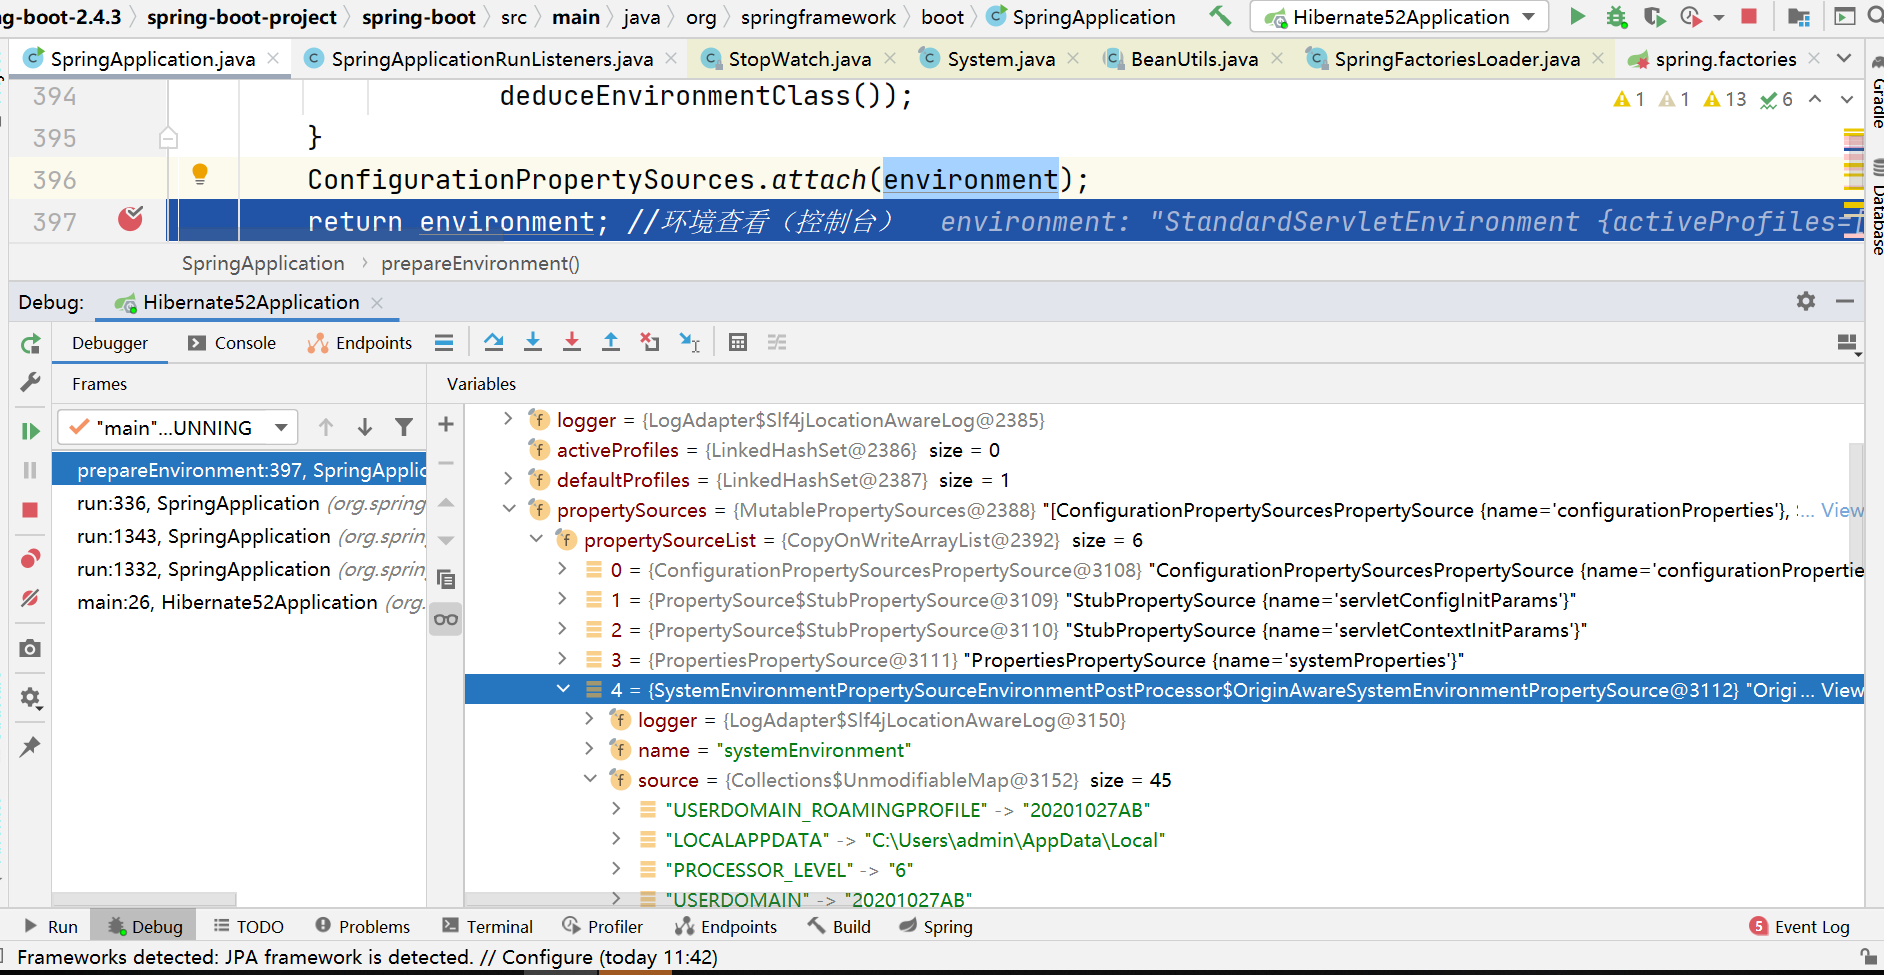
查看环境
![file]()
3)控制台打印Banner
	private Banner printBanner(ConfigurableEnvironment environment) {
		// banner模式,可以是console、log、off
		if (this.bannerMode == Banner.Mode.OFF) {
			return null;
		}
		ResourceLoader resourceLoader = (this.resourceLoader != null) ? this.resourceLoader
				: new DefaultResourceLoader(null);
		SpringApplicationBannerPrinter bannerPrinter = new SpringApplicationBannerPrinter(resourceLoader, this.banner);
		//日志打印banner
		if (this.bannerMode == Mode.LOG) {
			return bannerPrinter.print(environment, this.mainApplicationClass, logger);
		}
		//控制台打印banner
		return bannerPrinter.print(environment, this.mainApplicationClass, System.out);
	}
最终打印
通过org.springframework.boot.ResourceBanner#printBanner
	@Override
	public void printBanner(Environment environment, Class<?> sourceClass, PrintStream out) {
		try {
			String banner = StreamUtils.copyToString(this.resource.getInputStream(),
					environment.getProperty("spring.banner.charset", Charset.class, StandardCharsets.UTF_8));

			for (PropertyResolver resolver : getPropertyResolvers(environment, sourceClass)) {
				banner = resolver.resolvePlaceholders(banner);
			}
			out.println(banner);//此处打印
		}
		catch (Exception ex) {
			logger.warn(LogMessage.format("Banner not printable: %s (%s: '%s')", this.resource, ex.getClass(),
					ex.getMessage()), ex);
		}
	}
截图如下
![file]()
4)创建应用上下文对象
	protected ConfigurableApplicationContext createApplicationContext() {
		return this.applicationContextFactory.create(this.webApplicationType);
	}
调用到下面
public interface ApplicationContextFactory {

	/**
	 * A default {@link ApplicationContextFactory} implementation that will create an
	 * appropriate context for the {@link WebApplicationType}.
	 */
	//返回一个应用程序上下文
	ApplicationContextFactory DEFAULT = (webApplicationType) -> {
		try {
			switch (webApplicationType) {
			case SERVLET:
				return new AnnotationConfigServletWebServerApplicationContext();
			case REACTIVE:
				return new AnnotationConfigReactiveWebServerApplicationContext();
			default:
				return new AnnotationConfigApplicationContext();
			}
		}
		catch (Exception ex) {
			throw new IllegalStateException("Unable create a default ApplicationContext instance, "
					+ "you may need a custom ApplicationContextFactory", ex);
		}
	};
5)准备应用上下文
核心代码如下
	/**
	 * Spring容器准备
	 */
	private void prepareContext(DefaultBootstrapContext bootstrapContext, ConfigurableApplicationContext context,
								ConfigurableEnvironment environment, SpringApplicationRunListeners listeners,
								ApplicationArguments applicationArguments, Banner printedBanner) {
		context.setEnvironment(environment);//设置环境
		postProcessApplicationContext(context);//设置上下文
		// 执行所有ApplicationContextInitializer对象的initialize方法(这些对象是通过读取spring.factories加载)
		applyInitializers(context);//设置初始化工作(不用看)
		// 发布上下文准备完成事件到所有监听器
		listeners.contextPrepared(context);//触发监听器
		bootstrapContext.close(context);
		if (this.logStartupInfo) { //日志操作
			logStartupInfo(context.getParent() == null);
			logStartupProfileInfo(context);
		}
		// 获取工厂 DefaultListableBeanFactory
		ConfigurableListableBeanFactory beanFactory = context.getBeanFactory();
		//注册单例对象
		beanFactory.registerSingleton("springApplicationArguments", applicationArguments);
		if (printedBanner != null) {
			//注册banner单例对象
			beanFactory.registerSingleton("springBootBanner", printedBanner);
		}
		if (beanFactory instanceof DefaultListableBeanFactory) {
			//是否覆盖bean
			((DefaultListableBeanFactory) beanFactory)
					.setAllowBeanDefinitionOverriding(this.allowBeanDefinitionOverriding);
		}
		if (this.lazyInitialization) { //是否懒加载
			context.addBeanFactoryPostProcessor(new LazyInitializationBeanFactoryPostProcessor());
		}
		// Load the sources
		Set<Object> sources = getAllSources();
		Assert.notEmpty(sources, "Sources must not be empty");
		//加载(业务类的注解需要扫描)  bean到上下文
		load(context, sources.toArray(new Object[0]));
		// 发送上下文加载完成事件
		listeners.contextLoaded(context);
	}
6)刷新应用程序上下文
ioc容器初始化
重要!
tomcat的启动在这里!
  //核心方法
	private void refreshContext(ConfigurableApplicationContext context) {
		// ……
		// 开始执行启动容器(调用模板方法)
		refresh((ApplicationContext) context);
	}
扩展问题:
如果在springboot里使用了web容器,它是如何启动的?
refreshContext 里面,沿着 refresh - onRefresh,注意是 ServletWebServerApplicationContext的
我们说,在普通的spring里onRefresh是个空方法,留给子类去实现,那么,
看看这个 ServletWebServerApplicationContext 实现类它的 onRefresh偷偷干了些啥见不得人的事?……
7)容器回调方法
空方法
	protected void afterRefresh(ConfigurableApplicationContext context, ApplicationArguments args) {
	}
run方法启动后 主要做如下几件事情:
1、发出启动结束事件
2、执行实现ApplicationRunner、CommandLineRunner的run方法 3、发布应用程序已启动(ApplicationStartedEvent)事件
4、异常处理
小疑问:
boot启动了一个web,那么一定有一个DispacherServlet,它是啥时候被加载的呢???
提示:
@EnableAutoConfiguration 注解的spi,在spring-boot-autoconfigure的spring.factories里
EnableAutoConfiguration的加载类里有个:DispatcherServletAutoConfiguration 做了自动装配
秘密就藏在这货里
那自动装配又是什么鬼呢?除了DS,还有各种starter,怎么加载的呢?下节课继续……
2.2 boot自定义Banner
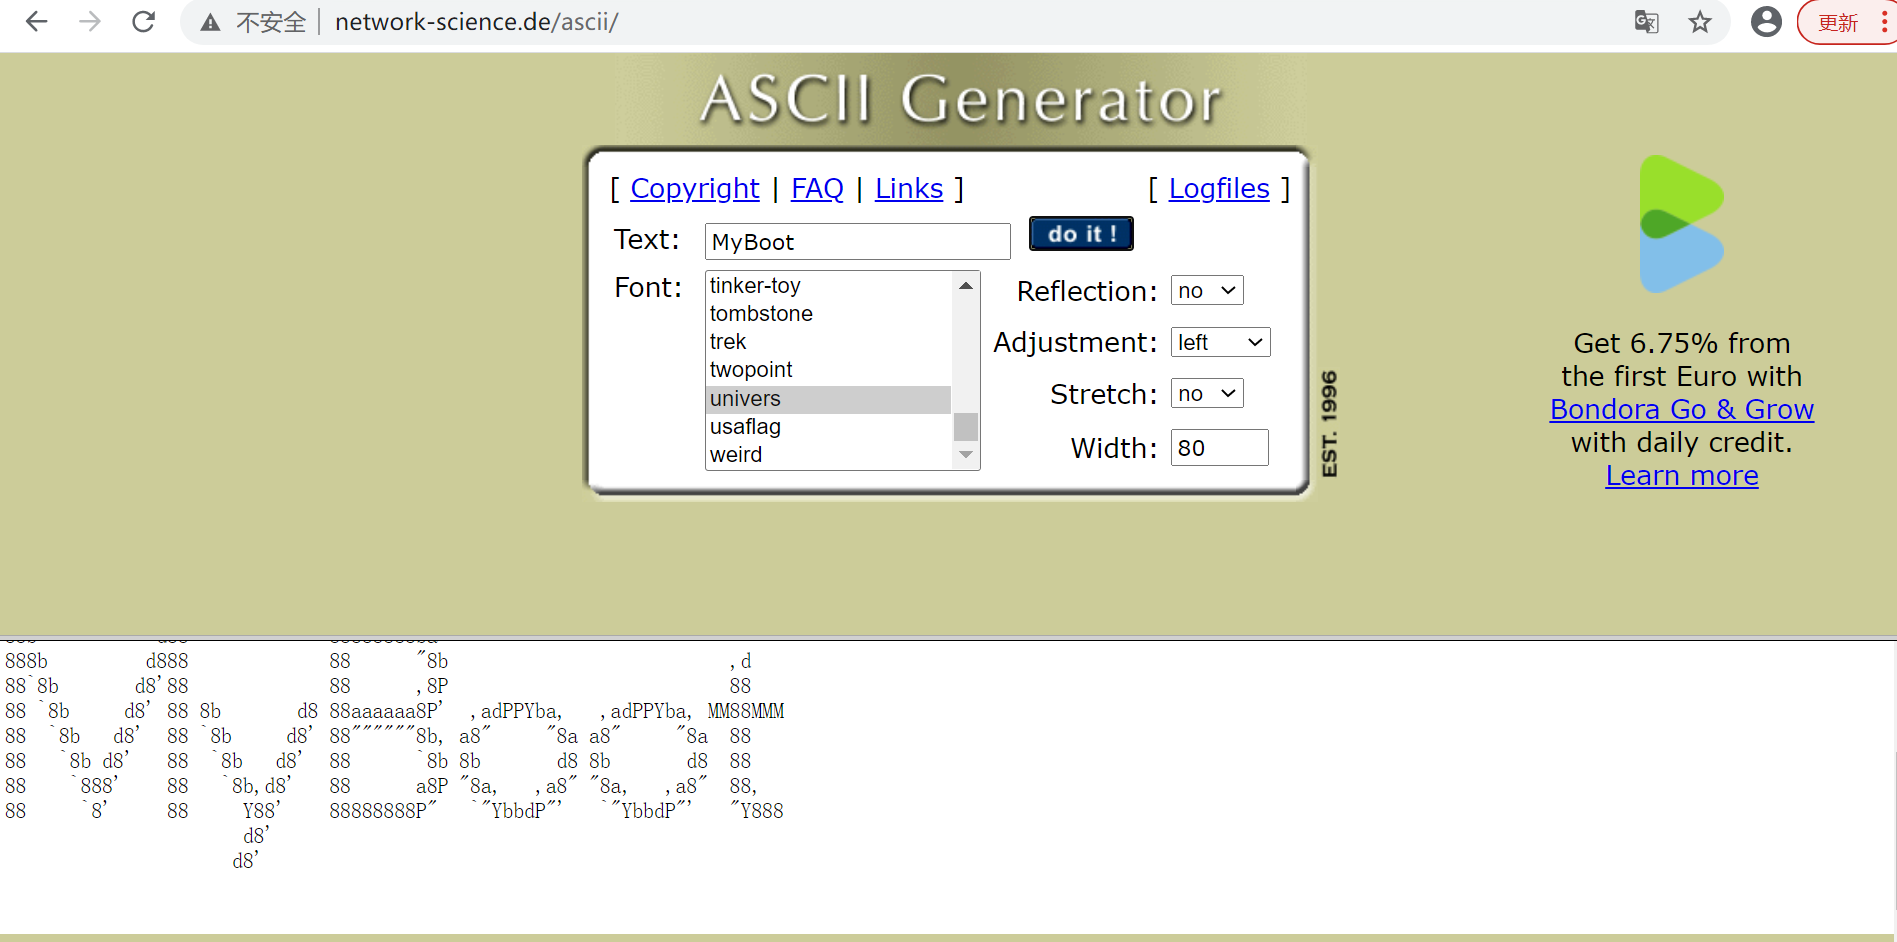
banner自动生成工具,ascii文字展示
http://www.network-science.de/ascii/
![file]() Spring boot启动如下
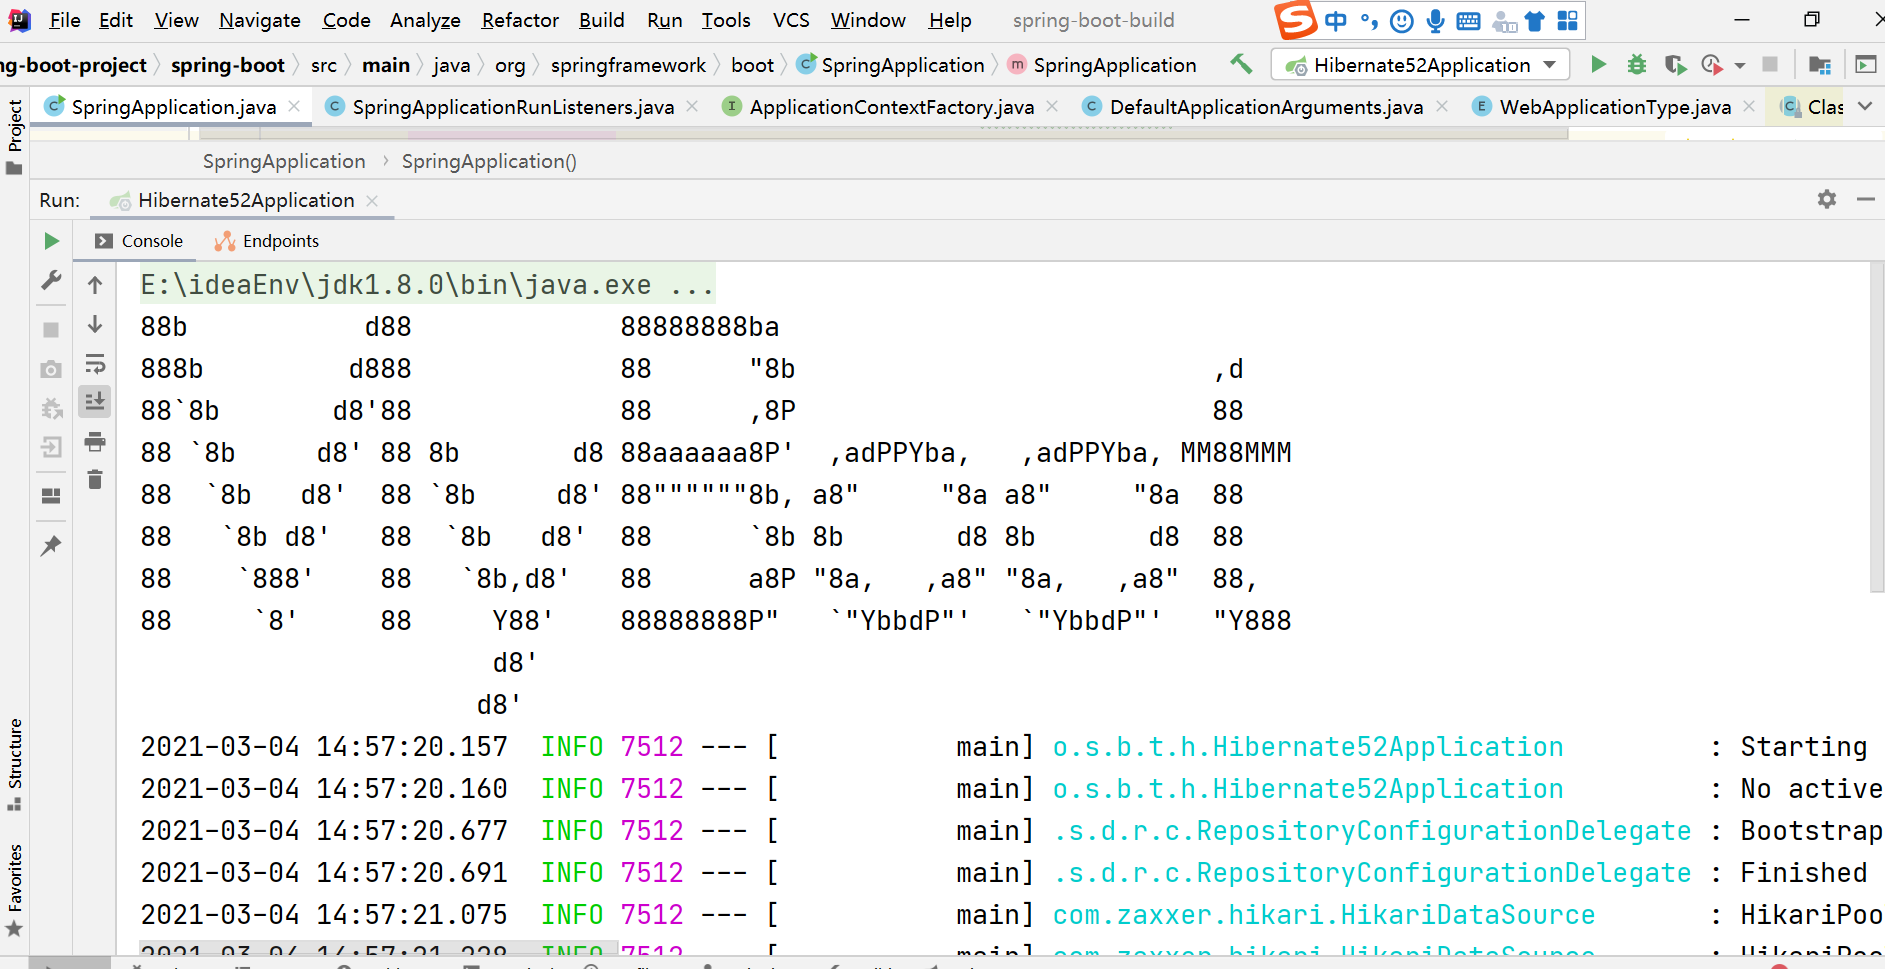
Spring boot启动如下
![file]() 在路径
在路径
\spring-boot-tests\spring-boot-smoke-tests\spring-boot-smoke-test-hibernate52\src\main\resources
下创建banner.txt(注意:文件名称不能变,否则无法加载)
banner.txt内容如下
88b           d88             88888888ba
888b         d888             88      "8b                          ,d
88`8b       d8'88             88      ,8P                          88
88 `8b     d8' 88 8b       d8 88aaaaaa8P'  ,adPPYba,   ,adPPYba, MM88MMM
88  `8b   d8'  88 `8b     d8' 88""""""8b, a8"     "8a a8"     "8a  88
88   `8b d8'   88  `8b   d8'  88      `8b 8b       d8 8b       d8  88
88    `888'    88   `8b,d8'   88      a8P "8a,   ,a8" "8a,   ,a8"  88,
88     `8'     88     Y88'    88888888P"   `"YbbdP"'   `"YbbdP"'   "Y888
                      d8'
                     d8'
2.3 面试题
1、Spring Boot 的核心注解是哪个?它主要由哪几个注解组成的
启动类上面的注解是@SpringBootApplication,它也是 Spring Boot 的核心注解,主要组合包含了以下 3 个注解:
- @SpringBootConfiguration:组合了 @Configuration 注解,实现配置文件的功能。
- @EnableAutoConfiguration:打开自动配置的功能,也可以关闭某个自动配置的选项,如关闭数据源自动配置功能: @SpringBootApplication(exclude = { DataSourceAutoConfiguration.class })。
组合了
@AutoConfigurationPackage
@Import(AutoConfigurationImportSelector.class)
- @ComponentScan:Spring组件扫描
2、Spring Boot 自动配置原理是什么?
注解 @EnableAutoConfiguration, @Configuration, @ConditionalOnClass 就是自动配置的核心,
@EnableAutoConfiguration 给容器导入META-INF/spring.factories 里定义的自动配置类。
筛选有效的自动配置类。
每一个自动配置类结合对应的 xxx.java 读取配置文件进行自动配置功能
3、Spring Boot 中的 starter 到底是什么 ?
首先,这个 Starter 并非什么新的技术点,基本上还是基于 Spring 已有功能来实现的。首先它提供了一个自动化配置类,一般命名为 XXXAutoConfiguration ,在这个配置类中通过条件注解来决定一个配置是否生效(条件注解就是 Spring 中原本就有的),然后它还会提供一系列的默认配置,也允许开发者根据实际情况自定义相关配置,然后通过类型安全的属性注入将这些配置属性注入进来,新注入的属性会代替掉默认属性。正因为如此,很多第三方框架,我们只需要引入依赖就可以直接使用了。当然,开发者也可以自定义 Starter
4、运行 Spring Boot 有哪几种方式?
1)打包用命令或者放到容器中运行
2)用 Maven/ Gradle 插件运行
3)直接执行 main 方法运行
本文由传智教育博学谷教研团队发布。
如果本文对您有帮助,欢迎关注和点赞;如果您有任何建议也可留言评论或私信,您的支持是我坚持创作的动力。
转载请注明出处!
 目录结构
目录结构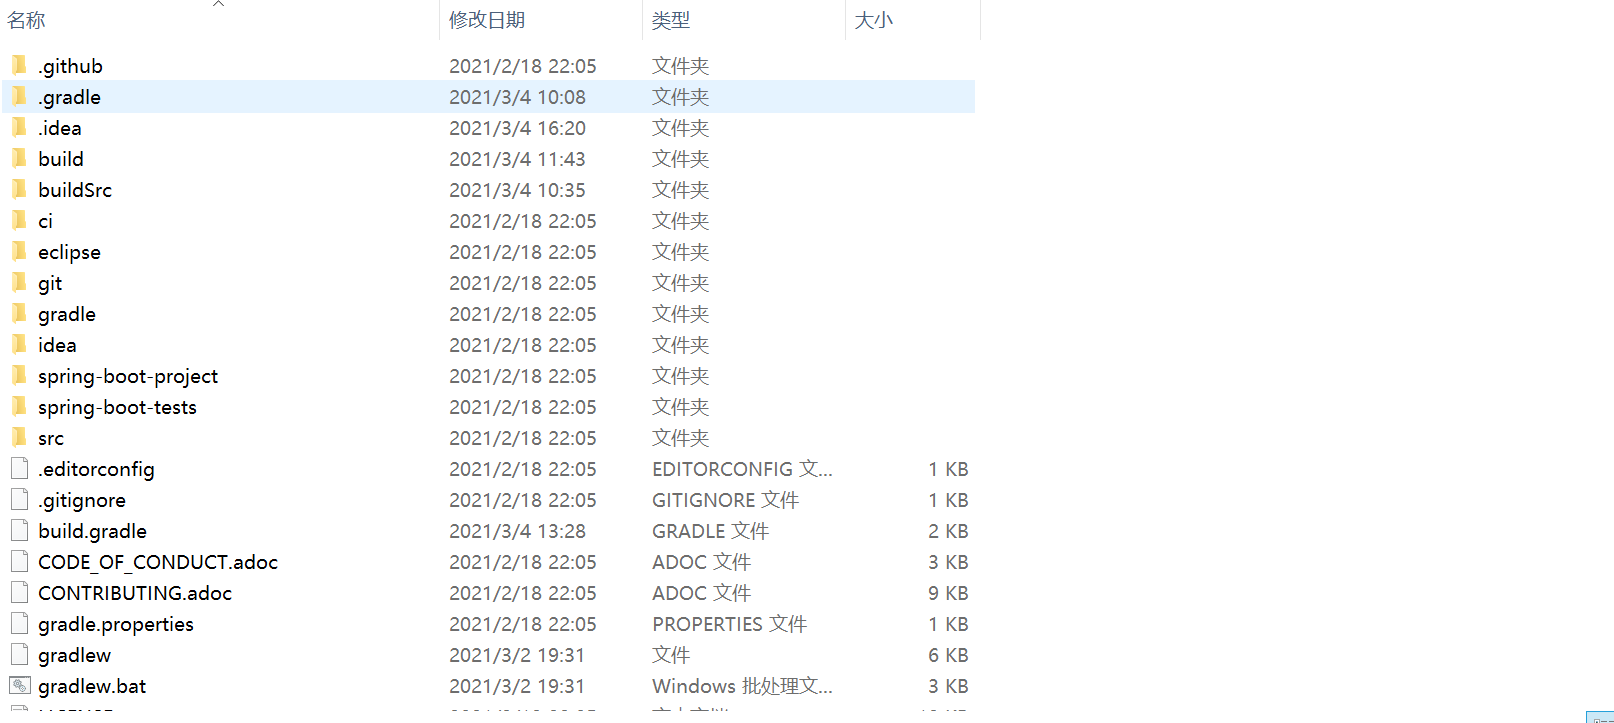 Spring-boot-project 核心代码,代码量很多(197508 行) Spring-boot-tests 测试代码
 2、开始gradle构建


 Spring boot启动如下
 在路径
在路径


