Ext1:本文源码解析基于 mybatis-spring-boot-starter 2.1.1,即 mybatis 3.5.3 版本。
Ext2:本文主要是对源码的讲解,着重点会是在源码上。
Ext3:阅读本文前,最好对 mapperProxy、 sqlSession 有一定的了解
一、 XMLMapperBuilder、mapperProxy 与 mapperMethod
上篇文章 讲了 mapper 文件是怎么解析的,在文章开头提到了 SqlSessionFactory 这个重要的对象,是的就是我们经常需要配置的:
  @Bean
  @ConditionalOnMissingBean
  public SqlSessionFactory sqlSessionFactory(DataSource dataSource) throws Exception {
          //  略
  }
这里面做了很多自动化的配置,当然我们可以通过重写它来自定义我们自己的 sqlSessionFactory,借用一下上篇文章的图片: ![]()
spring 借助 SqlSessionFactoryBean 来创建 sqlSessionFactory,这可以视作是一个典型的建造者模式,来创建 SqlSessionFactory。
上篇文章说到,spring 拿到我们配置的 mapper 路径去扫描我们 mapper.xml 然后进行一个循环进行解析(上篇文章第二章节:二、SqlSessionFactory 的初始化与 XMLMapperBuilder):
-- 代码位于 org.mybatis.spring.SqlSessionFactoryBean#buildSqlSessionFactory --

   if (this.mapperLocations != null) {
      if (this.mapperLocations.length == 0) {
        LOGGER.warn(() -> "Property 'mapperLocations' was specified but matching resources are not found.");
      } else {
        for (Resource mapperLocation : this.mapperLocations) {
          if (mapperLocation == null) {
            continue;
          }
          try {
            XMLMapperBuilder xmlMapperBuilder = new XMLMapperBuilder(mapperLocation.getInputStream(),
                targetConfiguration, mapperLocation.toString(), targetConfiguration.getSqlFragments());
            xmlMapperBuilder.parse();
          } catch (Exception e) {
            throw new NestedIOException("Failed to parse mapping resource: '" + mapperLocation + "'", e);
          } finally {
            ErrorContext.instance().reset();
          }
          LOGGER.debug(() -> "Parsed mapper file: '" + mapperLocation + "'");
        }
      }
    } else {
      LOGGER.debug(() -> "Property 'mapperLocations' was not specified.");
    }

-- 代码位于 org.apache.ibatis.builder.xml.XMLMapperBuilder#parse --

  public void parse() {
    if (!configuration.isResourceLoaded(resource)) {
      configurationElement(parser.evalNode("/mapper")); // 上篇文章主要说的
      configuration.addLoadedResource(resource);
      bindMapperForNamespace();// 创建mapperProxy的工厂对象
    }

    parsePendingResultMaps();
    parsePendingCacheRefs();
    parsePendingStatements();
  }
1.1 从 xml 到 mapperStatement
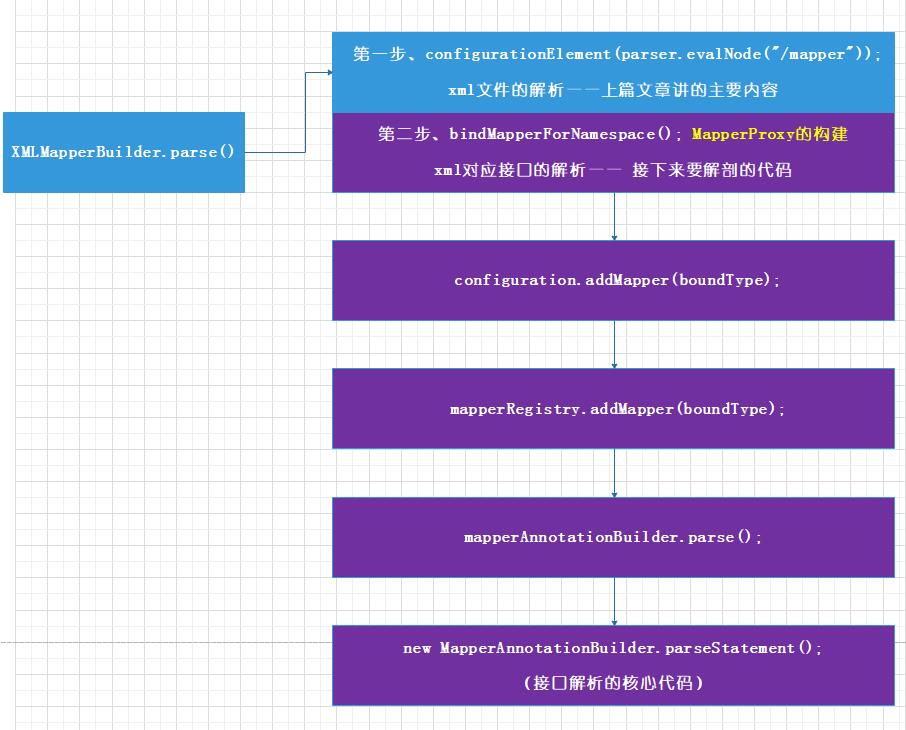
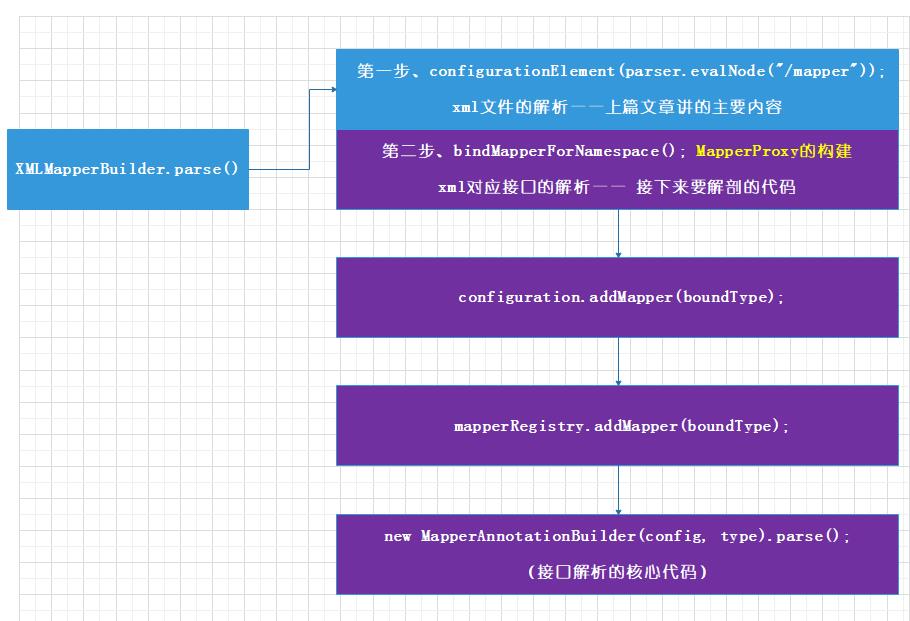
上篇文章实际上就是在讲解 configurationElement(parser.evalNode("/mapper")); 里面发生的故事,实际上还有后续的步骤,如果对 mybatis 有所了解的,应该知道,mybatis 会为我们的接口创建一个叫做 mapperProxy 的代理对象(划重点),其实就是在这后续的步骤 bindMapperForNamespace(); 做的(不尽然,实际上是创建并绑定了 mapperProxyFactory)。
![]()
不贴太多代码,bindMapperForNamespace() 方法里核心做的主要就是调用 configuration.addMapper() 方法
      if (boundType != null) {
        if (!configuration.hasMapper(boundType)) {
          // Spring may not know the real resource name so we set a flag
          // to prevent loading again this resource from the mapper interface
          // look at MapperAnnotationBuilder#loadXmlResource
          configuration.addLoadedResource("namespace:" + namespace);
          configuration.addMapper(boundType);
        }
      }
这个 boundType 就是我们在 mapper 文件里面指定的 namespace,比如:
<mapper namespace="com.anur.mybatisdemo.test.TrackerConfigMapper">
     XXXXXXXXXXXXXXXXXX 里面写的sql语句,resultMap 等等,略
</mapper>
在 configuration.addMapper() 中调用了 mapperRegistry.addMapper(),看到 knowMappers ,这个就是存储我们生产 MapperProxy 的工厂映射 map,我们稍微再讲,先继续往下看。
  public <T> void addMapper(Class<T> type) {
    if (type.isInterface()) {
      if (hasMapper(type)) {
        throw new BindingException("Type " + type + " is already known to the MapperRegistry.");
      }
      boolean loadCompleted = false;
      try {
        knownMappers.put(type, new MapperProxyFactory<>(type));
        // It's important that the type is added before the parser is run
        // otherwise the binding may automatically be attempted by the
        // mapper parser. If the type is already known, it won't try.
        MapperAnnotationBuilder parser = new MapperAnnotationBuilder(config, type);
        parser.parse();
        loadCompleted = true;
      } finally {
        if (!loadCompleted) {
          knownMappers.remove(type);
        }
      }
    }
  }
1.2 从注解到 mapperStatement
看到 MapperAnnotationBuilder#parse(),parse() 中主要是对这个接口里面定义的方法做了 parseStatement 这件事
      for (Method method : methods) {
        try {
          // issue #237
          if (!method.isBridge()) {
            parseStatement(method);
          }
        } catch (IncompleteElementException e) {
          configuration.addIncompleteMethod(new MethodResolver(this, method));
        }
      }
parseStatement() 就是解析注解语句的地方, 如果说我们没有写 xml,将语句以注解的形式写在方法上,则会在这里进行语句解析。它和我们上篇文章讲到的解析xml很像,就是拿到一大堆属性,比如 resultMap,keyGenerator 等等,生成一个 MappedStatement 对象,这里就不赘述了。
void parseStatement(Method method) {
   Class<?> parameterTypeClass = getParameterType(method);
   LanguageDriver languageDriver = getLanguageDriver(method);
   SqlSource sqlSource = getSqlSourceFromAnnotations(method, parameterTypeClass, languageDriver);
   if (sqlSource != null) {
		// 解析注解式的 sql 语句,略
   }
 }
1.3 如果写了 xml,也写了注解会怎么样(调皮)
我们知道承载 mapperStatement 的是一个 map 映射,通过我们在上篇文章中反复强调的 id 来作为 key,那么重复添加会出现什么呢?
答案在这里,mybatis 的这个 map 被重写了,同时写这两者的话,会抛出 ...already contains value for... 的异常
-- 代码位置 org.apache.ibatis.session.Configuration.StrictMap#put --
    @Override
    @SuppressWarnings("unchecked")
    public V put(String key, V value) {
      if (containsKey(key)) {
        throw new IllegalArgumentException(name + " already contains value for " + key
            + (conflictMessageProducer == null ? "" : conflictMessageProducer.apply(super.get(key), value)));
      }
      if (key.contains(".")) {
        final String shortKey = getShortName(key);
        if (super.get(shortKey) == null) {
          super.put(shortKey, value);
        } else {
          super.put(shortKey, (V) new Ambiguity(shortKey));
        }
      }
      return super.put(key, value);
    }
1.4 回到 MapperProxy
1.4.1 MapperProxy 的创建
刚才在1.1中我们提到了,mapperProxy,也就是刚才 org.apache.ibatis.binding.MapperRegistry#addMapper 的代码:knownMappers.put(type, new MapperProxyFactory<>(type));
看到 MapperProxyFactory 的内部:
-- 有删减 --
public class MapperProxyFactory<T> {

  private final Class<T> mapperInterface;
  private final Map<Method, MapperMethod> methodCache = new ConcurrentHashMap<>();

  public MapperProxyFactory(Class<T> mapperInterface) {
    this.mapperInterface = mapperInterface;
  }

  @SuppressWarnings("unchecked")
  protected T newInstance(MapperProxy<T> mapperProxy) {
    return (T) Proxy.newProxyInstance(mapperInterface.getClassLoader(), new Class[] { mapperInterface }, mapperProxy);
  }

  public T newInstance(SqlSession sqlSession) {
    final MapperProxy<T> mapperProxy = new MapperProxy<>(sqlSession, mapperInterface, methodCache);
    return newInstance(mapperProxy);
  }
}
了解JDK动态代理的小伙伴应该很清楚了, newProxyInstance(ClassLoader loader, Class<?>[] interfaces, InvocationHandler h) 意为,为接口创建一个实现了 InvocationHandler 的代理对象。我们在调用接口方法的时候,实际上要看代理类是如何实现的。
那么看看 mapperProxy 的内部的 invoke 是如何实现的,这里有三类方法,
- 一种是一些
Object 对象带来的方法,这里不进行代理,直接 invoke,
- 一种是default方法,一种比较蛋疼的写法,把接口当抽象类写,里面可以放一个default方法写实现,这种代理了也没太大意义
- 最后一种也就是我们准备代理的方法, 它会为每个非上面两者的方法,懒加载一个
MapperMethod 对象,并调用 MapperMethod#execute 来执行真正的 mybatis 逻辑。
1.4.2 MapperMethod 的创建
-- 有删减 --
public class MapperProxy<T> implements InvocationHandler, Serializable {

  public MapperProxy(SqlSession sqlSession, Class<T> mapperInterface, Map<Method, MapperMethod> methodCache) {
    this.sqlSession = sqlSession;
    this.mapperInterface = mapperInterface;
    this.methodCache = methodCache;
  }

  @Override
  public Object invoke(Object proxy, Method method, Object[] args) throws Throwable {
    try {
      if (Object.class.equals(method.getDeclaringClass())) {// 来自 Object 的方法,比如 toString()
        return method.invoke(this, args);
      } else if (method.isDefault()) {// 静态方法,我们可以直接忽略
        if (privateLookupInMethod == null) {
          return invokeDefaultMethodJava8(proxy, method, args);
        } else {
          return invokeDefaultMethodJava9(proxy, method, args);
        }
      }
    } catch (Throwable t) {
      throw ExceptionUtil.unwrapThrowable(t);
    }
    final MapperMethod mapperMethod = cachedMapperMethod(method);
    return mapperMethod.execute(sqlSession, args);
  }

  private MapperMethod cachedMapperMethod(Method method) {
    return methodCache.computeIfAbsent(method,
        k -> new MapperMethod(mapperInterface, method, sqlSession.getConfiguration()));
  }
}
MapperMethod 的逻辑是怎么样的,也很好猜到,它的构造函数中创建了两个对象,
public class MapperMethod {

  private final SqlCommand command;
  private final MethodSignature method;

  public MapperMethod(Class<?> mapperInterface, Method method, Configuration config) {
    this.command = new SqlCommand(config, mapperInterface, method);
    this.method = new MethodSignature(config, mapperInterface, method);
  }
sqlCommand 实际上就是从 configuration 里面把它对应的 MappedStatement 取出来,持有它的唯一 id 和执行类型。
  public static class SqlCommand {

    private final String name;
    private final SqlCommandType type;

    public SqlCommand(Configuration configuration, Class<?> mapperInterface, Method method) {
      final String methodName = method.getName();
      final Class<?> declaringClass = method.getDeclaringClass();
      MappedStatement ms = resolveMappedStatement(mapperInterface, methodName, declaringClass,
          configuration);
      if (ms == null) {
        if (method.getAnnotation(Flush.class) != null) {
          name = null;
          type = SqlCommandType.FLUSH;
        } else {
          throw new BindingException("Invalid bound statement (not found): "
              + mapperInterface.getName() + "." + methodName);
        }
      } else {
        name = ms.getId();
        type = ms.getSqlCommandType();
        if (type == SqlCommandType.UNKNOWN) {
          throw new BindingException("Unknown execution method for: " + name);
        }
      }
    }
- MethodSignature
MethodSignature 是针对接口返回值、参数等值的解析,比如我们的 @Param 注解,就是在 new ParamNameResolver(configuration, method); 里面解析的,比较简单,在之前的文章 简单概括的mybatis sqlSession 源码解析 里也提到过,这里就不多说了。
    public MethodSignature(Configuration configuration, Class<?> mapperInterface, Method method) {
      Type resolvedReturnType = TypeParameterResolver.resolveReturnType(method, mapperInterface);
      if (resolvedReturnType instanceof Class<?>) {
        this.returnType = (Class<?>) resolvedReturnType;
      } else if (resolvedReturnType instanceof ParameterizedType) {
        this.returnType = (Class<?>) ((ParameterizedType) resolvedReturnType).getRawType();
      } else {
        this.returnType = method.getReturnType();
      }
      this.returnsVoid = void.class.equals(this.returnType);
      this.returnsMany = configuration.getObjectFactory().isCollection(this.returnType) || this.returnType.isArray();
      this.returnsCursor = Cursor.class.equals(this.returnType);
      this.returnsOptional = Optional.class.equals(this.returnType);
      this.mapKey = getMapKey(method);
      this.returnsMap = this.mapKey != null;
      this.rowBoundsIndex = getUniqueParamIndex(method, RowBounds.class);
      this.resultHandlerIndex = getUniqueParamIndex(method, ResultHandler.class);
      this.paramNameResolver = new ParamNameResolver(configuration, method);
    }
1.4.3 MapperMethod 的执行
mapperMethod 就是 sqlSession 与 mappedStatement 的一个整合。它的执行是一个策略模式:
  public Object execute(SqlSession sqlSession, Object[] args) {
    Object result;
    switch (command.getType()) {
      case INSERT: {
        Object param = method.convertArgsToSqlCommandParam(args);
        result = rowCountResult(sqlSession.insert(command.getName(), param));
        break;
      }
      case UPDATE: {
        Object param = method.convertArgsToSqlCommandParam(args);
        result = rowCountResult(sqlSession.update(command.getName(), param));
        break;
      }
      case DELETE: {
        Object param = method.convertArgsToSqlCommandParam(args);
        result = rowCountResult(sqlSession.delete(command.getName(), param));
        break;
      }
      case SELECT:
		// 略..
  }
具体是怎么执行的在文章 简单概括的mybatis sqlSession 源码解析 提到过,这里也不过多赘述。
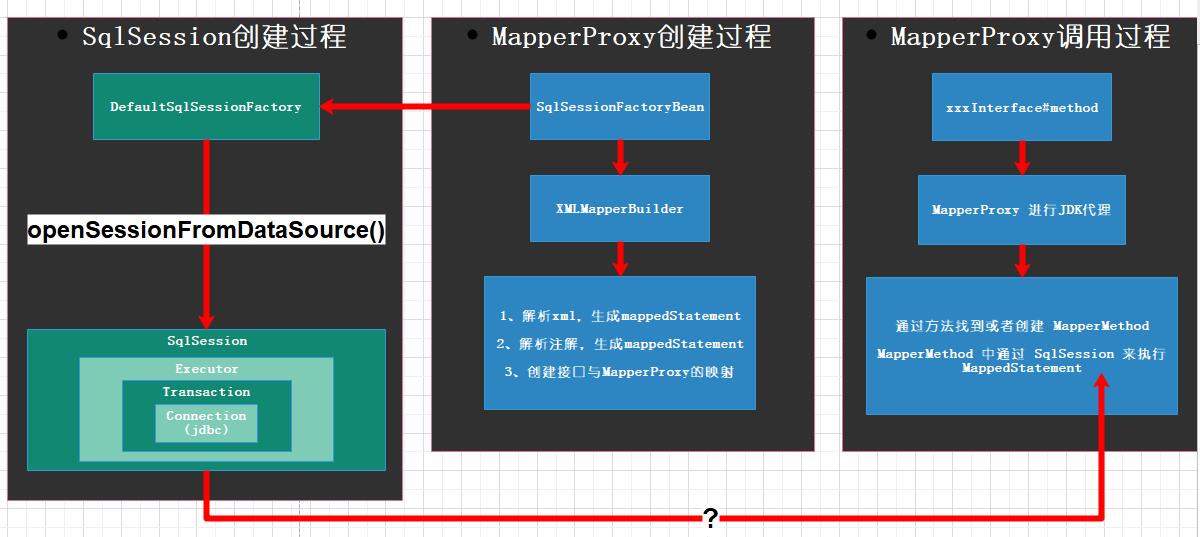
这里对 MapperProxy 在初始化与调用过程中的关系做一下罗列:
![]()
二、 下文序言
上面的 MapperProxy 讲解的比较粗略,因为真的很简单(复杂一点的在 MepperMethod 的策略模式,也就是调用 sqlSession 去执行语句的时候,但是那个本文不会详细说明,后续的文章会解析这部分代码)
本文要讲的是几个在很多文章或者书里都没有提到,或者只是简单提了一下的点:本文将会把 sqlSession、MapperProxy、Spring事务管理几个关联密切的功能点进行总结,比如如下这样的疑问:
- 1、我们知道一个 sqlSession 对应一个数据库连接,在创建 MapperProxy 的时候,又注入了 sqlSession ,难道我们用的一直是同一个 sqlSession?或者难道每次使用不同的数据库连接,会创建不同的 MapperProxy 代理?
- 2、事务传播等级是怎么实现的,和 sqlSession 有关系吗?
- 3、代理对象 MapperProxy 是如何和 spring 产生关联的?
三、 SqlSession 的初始化及其运作总览
为了避免有小伙伴对 sqlSession 完全没有概念,这里将接口代码贴出,可以看出 sqlSession 是执行语句的一个入口,同时也提供了事务的一些操作,实际上就是如此:
public interface SqlSession extends Closeable {
  <T> T selectOne(String statement);
  <T> T selectOne(String statement, Object parameter);
  <E> List<E> selectList(String statement);
  <E> List<E> selectList(String statement, Object parameter);
  <E> List<E> selectList(String statement, Object parameter, RowBounds rowBounds);
  <K, V> Map<K, V> selectMap(String statement, String mapKey);
  <K, V> Map<K, V> selectMap(String statement, Object parameter, String mapKey);
  <K, V> Map<K, V> selectMap(String statement, Object parameter, String mapKey, RowBounds rowBounds);
  <T> Cursor<T> selectCursor(String statement);
  <T> Cursor<T> selectCursor(String statement, Object parameter);
  <T> Cursor<T> selectCursor(String statement, Object parameter, RowBounds rowBounds);
  void select(String statement, Object parameter, ResultHandler handler);
  void select(String statement, ResultHandler handler);
  void select(String statement, Object parameter, RowBounds rowBounds, ResultHandler handler);
  int insert(String statement);
  int insert(String statement, Object parameter);
  int update(String statement);
  int update(String statement, Object parameter);
  int delete(String statement);
  int delete(String statement, Object parameter);
  void commit();
  void commit(boolean force);
  void rollback();
  void rollback(boolean force);
  List<BatchResult> flushStatements();
  void close();
  void clearCache();
  Configuration getConfiguration();
  <T> T getMapper(Class<T> type);
  Connection getConnection();
}
3.1 sqlSession 的创建
3.1.1 Environment 与 Transaction
首先忘掉 spring 为我们提供的便利,看一下基础的,脱离了 spring 托管的 mybatis 是怎么进行 sql 操作的:
        SqlSession sqlSession = sqlSessionFactory.openSession();
        TrackerConfigMapper mapper = sqlSession.getMapper(TrackerConfigMapper.class);
        TrackerConfigDO one = mapper.getOne(1);
SqlSessionFactory 有两个子类实现:DefaultSqlSessionFactory 和 SqlSessionManager,SqlSessionManager 使用动态代理 + 静态代理对 DefaultSqlSessionFactory 进行了代理,不过不用太在意这个 SqlSessionManager,后面会说明原因。
上面不管怎么代理,实际逻辑的执行者都是 DefaultSqlSessionFactory,我们看看它的创建方法,也就是 openSession() 实际执行的方法:
  private SqlSession openSessionFromDataSource(ExecutorType execType, TransactionIsolationLevel level, boolean autoCommit) {
    Transaction tx = null;
    try {
      final Environment environment = configuration.getEnvironment();
      final TransactionFactory transactionFactory = getTransactionFactoryFromEnvironment(environment);
      tx = transactionFactory.newTransaction(environment.getDataSource(), level, autoCommit);
      final Executor executor = configuration.newExecutor(tx, execType);
      return new DefaultSqlSession(configuration, executor, autoCommit);
    } catch (Exception e) {
      closeTransaction(tx); // may have fetched a connection so lets call close()
      throw ExceptionFactory.wrapException("Error opening session.  Cause: " + e, e);
    } finally {
      ErrorContext.instance().reset();
    }
  }
environment 可用于数据源切换,那么提到数据源切换,就很容易想到了,连接的相关信息是这货维持的。 所以看到我们的代码: tx = transactionFactory.newTransaction(environment.getDataSource(), level, autoCommit);, TransactionFactory 有三个实现,它们分别是 JdbcTransactionFactory、ManagedTransactionFactory 和 SpringManagedTransactionFactory。
JdbcTransactionFactory 和 ManagedTransactionFactory 最大的区别就在于 ManagedTransactionFactory 实现了空的 commit 与 rollback,源码中这样说道:付与容器来管理 transaction 的生命周期,这个博主不是特别熟悉,因为没这么用过,tomcat、jetty 等容器实现了对 jdbc 的代理。要注意,不管如何都是使用的 jdbc 这套接口规范进行数据库操作的。
/**
 * {@link Transaction} that lets the container manage the full lifecycle of the transaction.
 * Delays connection retrieval until getConnection() is called.
 * Ignores all commit or rollback requests.
 * By default, it closes the connection but can be configured not to do it.
 *
 * @author Clinton Begin
 *
 * @see ManagedTransactionFactory
 */
Transaction 是 mybatis 创建的一个对象,它实际上是对 jdbc connection 对象的一个封装:
-- 代码位于 org.apache.ibatis.transaction.jdbc.JdbcTransaction --

  @Override
  public Connection getConnection() throws SQLException {
    if (connection == null) {
      openConnection();
    }
    return connection;
  }

  @Override
  public void commit() throws SQLException {
    if (connection != null && !connection.getAutoCommit()) {
      if (log.isDebugEnabled()) {
        log.debug("Committing JDBC Connection [" + connection + "]");
      }
      connection.commit();
    }
  }

  @Override
  public void rollback() throws SQLException {
    if (connection != null && !connection.getAutoCommit()) {
      if (log.isDebugEnabled()) {
        log.debug("Rolling back JDBC Connection [" + connection + "]");
      }
      connection.rollback();
    }
  }
3.1.2 Executor 与 SqlSession
我们知道 sqlSession 的 四大对象之一,Executor,负责统领全局,从语句获取(从 mappedStatement),到参数拼装(parameterHandler),再到执行语句(statementHandler),最后结果集封装(resultHandler),都是它负责“指挥”的。
我们看到它使用 Transaction 进行初始化,另外的一个参数是它的类型,这里不多说,REUSE 是带语句缓存的,和普通的 SimpleExecutor 没有特别大的区别,BATCH 类型则是通过 jdbc 提供的批量提交来对网络请求进行优化。
public enum ExecutorType { SIMPLE, REUSE, BATCH}
最后将持有 Transaction 的 Executor 置入 SqlSession ,完成一个 SqlSession 对象的创建。
可以看到,我们的确是一个SqlSession 对应一个连接(Transaction),MapperProxy 这个业务接口的动态代理对象又持有一个 SqlSession 对象,那么总不可能一直用同一个连接吧?
当然有疑问是好的,而且通过对 SqlSession 初始化过程的剖析,我们已经完善了我们对 mybatis 的认知:
![]()
接下来就是来打消这个疑问,MapperProxy 持有的 sqlSession 和 SqlSessionFactory 创建的这个有什么关系?
3.2 SqlSessionTemplate 对 sqlSession 的代理
实际上答案就在 SqlSessionTemplate,SqlSessionTemplate 是 spring 对 mybatis SqlSessionFactory 的封装,同时,它还是 SqlSession 的代理。
SqlSessionTemplate 和 mybatis 提供的 SqlSessionManager( SqlSessionFactory 的另一个实现类,也是DefaultSqlSessionFactory 的代理类,可以细想一下,业务是否共用同一个 sqlSession 还要在业务里面去传递,去控制是不是很麻烦) 是一样的思路,不过 spring 直接代理了 sqlSession:
-- 代码位于 org.mybatis.spring.SqlSessionTemplate --

  private final SqlSessionFactory sqlSessionFactory;

  private final ExecutorType executorType;

  private final SqlSession sqlSessionProxy;

  private final PersistenceExceptionTranslator exceptionTranslator;

  /**
   * Constructs a Spring managed {@code SqlSession} with the given
   * {@code SqlSessionFactory} and {@code ExecutorType}.
   * A custom {@code SQLExceptionTranslator} can be provided as an
   * argument so any {@code PersistenceException} thrown by MyBatis
   * can be custom translated to a {@code RuntimeException}
   * The {@code SQLExceptionTranslator} can also be null and thus no
   * exception translation will be done and MyBatis exceptions will be
   * thrown
   *
   * @param sqlSessionFactory a factory of SqlSession
   * @param executorType an executor type on session
   * @param exceptionTranslator a translator of exception
   */
  public SqlSessionTemplate(SqlSessionFactory sqlSessionFactory, ExecutorType executorType,
      PersistenceExceptionTranslator exceptionTranslator) {

    notNull(sqlSessionFactory, "Property 'sqlSessionFactory' is required");
    notNull(executorType, "Property 'executorType' is required");

    this.sqlSessionFactory = sqlSessionFactory;
    this.executorType = executorType;
    this.exceptionTranslator = exceptionTranslator;
    this.sqlSessionProxy = (SqlSession) newProxyInstance(
        SqlSessionFactory.class.getClassLoader(),
        new Class[] { SqlSession.class },
        new SqlSessionInterceptor());
  }
还是熟悉的配方,就是 jdk 的动态代理,SqlSessionTemplate 在初始化时创建了一个 SqlSession 代理,也内置了 ExecutorType,SqlSessionFactory 等 defaultSqlSession 初始化的必要组件。
想必看到这里,已经有很多小伙伴知道这里是怎么回事了,是的,我们对 SqlSession 的操作都是经由这个代理来完成,代理的内部,实现了真正 SqlSession 的创建与销毁,回滚与提交等,我们先纵览以下它的代理实现。
3.2.1 sqlSession 常规代理流程赏析
对于这种jdk动态代理,我们看到 SqlSessionInterceptor#invoke 方法就明了了。我们先过一遍常规的流程,也就是没有使用 spring 事务功能支持,执行完 sql 就直接提交事务的常规操作:
- 1、
getSqlSession() 创建 sqlSession
- 2、执行
MapperProxy,也就是前面讲了一大堆的,MapperProxy 中,通过 MapperMethod 来调用 sqlSession 和我们生成好的 mappedStatement 操作 sql 语句。
- 3、提交事务
- 4、关闭事务
注:代码有很大删减
 private class SqlSessionInterceptor implements InvocationHandler {
   @Override
   public Object invoke(Object proxy, Method method, Object[] args) throws Throwable {
     SqlSession sqlSession = getSqlSession(
         SqlSessionTemplate.this.sqlSessionFactory,
         SqlSessionTemplate.this.executorType,
         SqlSessionTemplate.this.exceptionTranslator); // 创建或者获取真正需要的 SqlSession
     try {
       Object result = method.invoke(sqlSession, args); // 执行原本想对 SqlSession 做的事情
       if (!isSqlSessionTransactional(sqlSession, SqlSessionTemplate.this.sqlSessionFactory)) {
         // force commit even on non-dirty sessions because some databases require
         // a commit/rollback before calling close()
         sqlSession.commit(true);// 如非 spring 管理事务,则直接提交
     } finally {
       if (sqlSession != null) {
         closeSqlSession(sqlSession, SqlSessionTemplate.this.sqlSessionFactory);
       }
     }
  }
}
注意:注释掉的代码在此类型的操作中没有什么意义,getSqlSession() 在这里只是简单通过 sessionFactory 创建了一个 sqlSession:
  public static SqlSession getSqlSession(SqlSessionFactory sessionFactory, ExecutorType executorType, PersistenceExceptionTranslator exceptionTranslator) {
    // SqlSessionHolder holder = (SqlSessionHolder) TransactionSynchronizationManager.getResource(sessionFactory);

   // SqlSession session = sessionHolder(executorType, holder);
   //  if (session != null) {
   //    return session;
   // }

    LOGGER.debug(() -> "Creating a new SqlSession");
    session = sessionFactory.openSession(executorType);
   //  registerSessionHolder(sessionFactory, executorType, exceptionTranslator, session);
    return session;
  }
3.2.2 sqlSession 借助 TransactionSynchronizationManager 代理流程赏析
看完前面的实现,有小伙伴会好奇,我的 @Transactional 注解呢?我的事务传播等级呢?
实际上,除去上述常规流程,更多的是要借助 TransactionSynchronizationManager 这个对象来完成,比如刚才步骤一,getSqlSession() 我暂时注释掉的代码里面,有一个很重要的操作:
我们把刚才 getSqlSession() 中注释掉的代码再拿回来看看:
    SqlSessionHolder holder = (SqlSessionHolder) TransactionSynchronizationManager.getResource(sessionFactory);

    SqlSession session = sessionHolder(executorType, holder);
     if (session != null) {
       return session;
    }

    session = sessionFactory.openSession(executorType);
    registerSessionHolder(sessionFactory, executorType, exceptionTranslator, session);
    return session;
我们可以看到首先获取一个叫做 SqlSessionHolder 的东西,如果里面没有 sqlSession 则调用 sessionFactory.openSession(executorType); 创建一个,并把它注册到 TransactionSynchronizationManager。
sqlSessionHolder 没什么可说的,它就只是个纯粹的容器,里面主要就是装着一个 SqlSession :
  public SqlSessionHolder(SqlSession sqlSession,
      ExecutorType executorType,
      PersistenceExceptionTranslator exceptionTranslator) {

    notNull(sqlSession, "SqlSession must not be null");
    notNull(executorType, "ExecutorType must not be null");

    this.sqlSession = sqlSession;
    this.executorType = executorType;
    this.exceptionTranslator = exceptionTranslator;
  }
所以说我们只需要把目光焦距在 TransactionSynchronizationManager 就可以了,它的内部持有了很多个元素为 Map<Object, Object> 的 ThreadLocal(代码示例中只贴出了 resources 这一个 ThreadLocal ):
public abstract class TransactionSynchronizationManager {

	private static final Log logger = LogFactory.getLog(TransactionSynchronizationManager.class);

	private static final ThreadLocal<Map<Object, Object>> resources =
			new NamedThreadLocal<>("Transactional resources");

	@Nullable
	public static Object getResource(Object key) {
		Object actualKey = TransactionSynchronizationUtils.unwrapResourceIfNecessary(key);
		Object value = doGetResource(actualKey);
		if (value != null && logger.isTraceEnabled()) {
			logger.trace("Retrieved value [" + value + "] for key [" + actualKey + "] bound to thread [" +
					Thread.currentThread().getName() + "]");
		}
		return value;
	}

	@Nullable
	private static Object doGetResource(Object actualKey) {
		Map<Object, Object> map = resources.get();
		if (map == null) {
			return null;
		}
		Object value = map.get(actualKey);
		// Transparently remove ResourceHolder that was marked as void...
		if (value instanceof ResourceHolder && ((ResourceHolder) value).isVoid()) {
			map.remove(actualKey);
			// Remove entire ThreadLocal if empty...
			if (map.isEmpty()) {
				resources.remove();
			}
			value = null;
		}
		return value;
	}
也就是说,spring 的事务,是借助 TransactionSynchronizationManager + SqlSessionHolder 对 sqlSession 的控制来实现的。
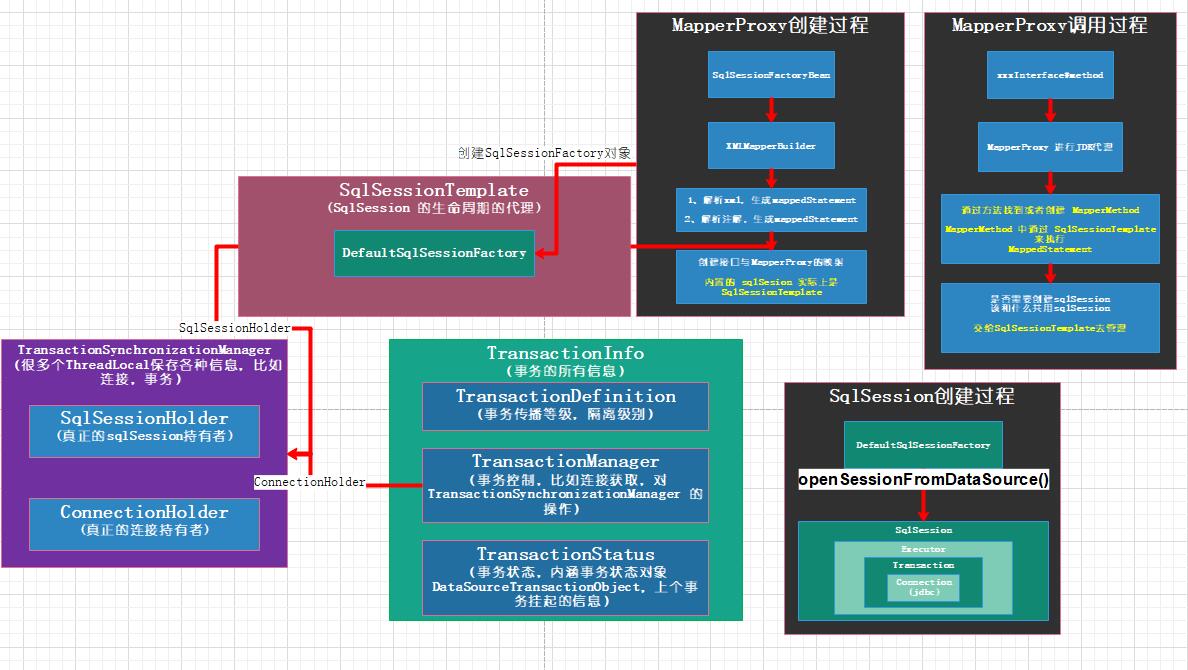
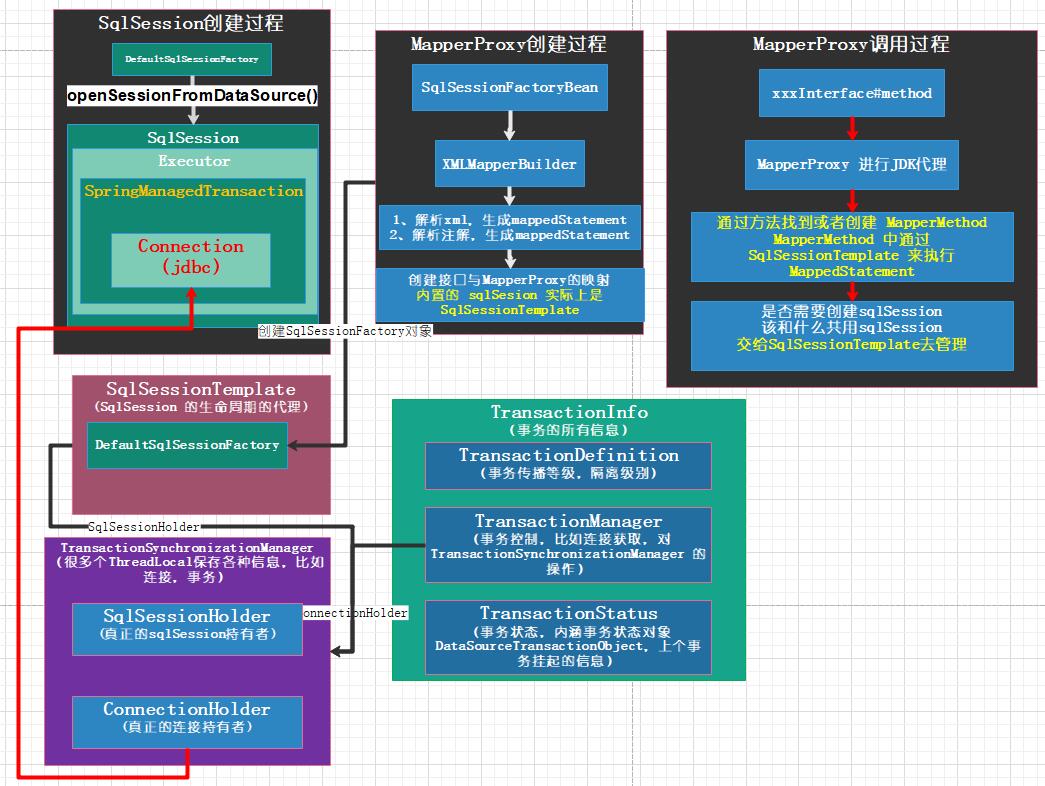
那么这样就很清晰了,如下总结,也如下图:
MapperProxy 内置的 sqlSession 是 sqlSessiontemplatesqlSessiontemplate 通过持有 SqlSessionFactory 来创建真正的 SqlSessionTransactionSynchronizationManager + SqlSessionHolder 则扮演着 SqlSession 管理的角色
![]()
四、spring 如何管理 sqlSession
上一个小节只是讲了是什么,没有讲为什么,到了这里如果有好奇宝宝一定会好奇诸如 spring 的一系列事务控制是怎么实现的,当然本文不会讲太多 spring 事务管理相关的太多东西,以后会有后续文章专门剖析事务管理。
我们可以简单看下 TransactionInterceptor ,这是 @Transactional 注解的代理类。
/**
 * AOP Alliance MethodInterceptor for declarative transaction
 * management using the common Spring transaction infrastructure
 * ({@link org.springframework.transaction.PlatformTransactionManager}/
 * {@link org.springframework.transaction.ReactiveTransactionManager}).
 *
 * <p>Derives from the {@link TransactionAspectSupport} class which
 * contains the integration with Spring's underlying transaction API.
 * TransactionInterceptor simply calls the relevant superclass methods
 * such as {@link #invokeWithinTransaction} in the correct order.
 *
 * <p>TransactionInterceptors are thread-safe.
 *
 * @author Rod Johnson
 * @author Juergen Hoeller
 * @see TransactionProxyFactoryBean
 * @see org.springframework.aop.framework.ProxyFactoryBean
 * @see org.springframework.aop.framework.ProxyFactory
 */
@SuppressWarnings("serial")
public class TransactionInterceptor extends TransactionAspectSupport implements MethodInterceptor, Serializable {

	/**
	 * Create a new TransactionInterceptor.
	 * <p>Transaction manager and transaction attributes still need to be set.
	 * @see #setTransactionManager
	 * @see #setTransactionAttributes(java.util.Properties)
	 * @see #setTransactionAttributeSource(TransactionAttributeSource)
	 */
	public TransactionInterceptor() {
	}

	@Override
	@Nullable
	public Object invoke(MethodInvocation invocation) throws Throwable {
		// Work out the target class: may be {@code null}.
		// The TransactionAttributeSource should be passed the target class
		// as well as the method, which may be from an interface.
		Class<?> targetClass = (invocation.getThis() != null ? AopUtils.getTargetClass(invocation.getThis()) : null);

		// Adapt to TransactionAspectSupport's invokeWithinTransaction...
		return invokeWithinTransaction(invocation.getMethod(), targetClass, invocation::proceed);
	}
可以看到它的代理方法 invoke() 的执行逻辑在 invokeWithinTransaction() 里:
--代码位于 org.springframework.transaction.interceptor.TransactionAspectSupport#invokeWithinTransaction --
	@Nullable
	protected Object invokeWithinTransaction(Method method, @Nullable Class<?> targetClass,
			final InvocationCallback invocation) throws Throwable {

		// If the transaction attribute is null, the method is non-transactional.
		TransactionAttributeSource tas = getTransactionAttributeSource();
		final TransactionAttribute txAttr = (tas != null ? tas.getTransactionAttribute(method, targetClass) : null);
		final TransactionManager tm = determineTransactionManager(txAttr);

		if (this.reactiveAdapterRegistry != null && tm instanceof ReactiveTransactionManager) {
			// 响应式事务相关
		}

		PlatformTransactionManager ptm = asPlatformTransactionManager(tm);
		final String joinpointIdentification = methodIdentification(method, targetClass, txAttr);

		if (txAttr == null || !(ptm instanceof CallbackPreferringPlatformTransactionManager)) {
			// Standard transaction demarcation with getTransaction and commit/rollback calls.
			TransactionInfo txInfo = createTransactionIfNecessary(ptm, txAttr, joinpointIdentification);

			Object retVal;
			try {
				// This is an around advice: Invoke the next interceptor in the chain.
				// This will normally result in a target object being invoked.
				retVal = invocation.proceedWithInvocation();
			}
			catch (Throwable ex) {
				// target invocation exception
				completeTransactionAfterThrowing(txInfo, ex);
				throw ex;
			}
			finally {
				cleanupTransactionInfo(txInfo);
			}

			if (vavrPresent && VavrDelegate.isVavrTry(retVal)) {
				// Set rollback-only in case of Vavr failure matching our rollback rules...
				TransactionStatus status = txInfo.getTransactionStatus();
				if (status != null && txAttr != null) {
					retVal = VavrDelegate.evaluateTryFailure(retVal, txAttr, status);
				}
			}

			commitTransactionAfterReturning(txInfo);
			return retVal;
		}

		else {
		// CallbackPreferringPlatformTransactionManager 的处理逻辑
		}
	}
invokeWithinTransaction() 的代码虽然长,我们还是把它分段来看:
4.1 TransactionDefinition 与 TransactionManager 的创建
也就是这部分代码:
		// If the transaction attribute is null, the method is non-transactional.
		TransactionAttributeSource tas = getTransactionAttributeSource();
		final TransactionAttribute txAttr = (tas != null ? tas.getTransactionAttribute(method, targetClass) : null);
		final TransactionManager tm = determineTransactionManager(txAttr);
		PlatformTransactionManager ptm = asPlatformTransactionManager(tm);
		final String joinpointIdentification = methodIdentification(method, targetClass, txAttr);
获取 TransactionAttribute(TransactionDefinition(底层接口),这里面装载了事务传播等级,隔离级别等属性。 TransactionAttribute 的创建依据配置,或者我们的事务传播等级注解,对什么异常进行回滚等,后续会继续对它的应用做说明, PlatformTransactionManager 则是进行事务管理的主要操作者。
4.2 获取 TransactionInfo
- 第二部分,事务开启或者获取与准备,也就是我们执行逻辑的第一行代码
createTransactionIfNecessary()(是不是和前面说到的 SqlSession的创建或者获取很像?)
我们可以看到 createTransactionIfNecessary() 的实现就做了两件事,其一是获取一个叫做 TransactionStatus 的东西,另外则是调用 prepareTransactionInfo(),获取一个 TransactionInfo:
	// Standard transaction demarcation with getTransaction and commit/rollback calls.
	TransactionInfo txInfo = createTransactionIfNecessary(ptm, txAttr, joinpointIdentification);

--代码位于 org.springframework.transaction.interceptor.TransactionAspectSupport#createTransactionIfNecessary --

	protected TransactionInfo createTransactionIfNecessary(@Nullable PlatformTransactionManager tm,
			@Nullable TransactionAttribute txAttr, final String joinpointIdentification) {

		TransactionStatus status = tm.getTransaction(txAttr);
		return prepareTransactionInfo(tm, txAttr, joinpointIdentification, status);
	}
先看看第一件事,也就是获取 TransactionStatus,它保存了事务的 savePoint ,是否新事物等。删减掉一些判断方法,代码如下:
	public final TransactionStatus getTransaction(@Nullable TransactionDefinition definition)
			throws TransactionException {

		// Use defaults if no transaction definition given.
		TransactionDefinition def = (definition != null ? definition : TransactionDefinition.withDefaults());

		Object transaction = doGetTransaction();
		boolean debugEnabled = logger.isDebugEnabled();

		if (isExistingTransaction(transaction)) {
			// Existing transaction found -> check propagation behavior to find out how to behave.
			return handleExistingTransaction(def, transaction, debugEnabled);
		}
                if (def.getPropagationBehavior() == TransactionDefinition.PROPAGATION_REQUIRED ||
				def.getPropagationBehavior() == TransactionDefinition.PROPAGATION_REQUIRES_NEW ||
				def.getPropagationBehavior() == TransactionDefinition.PROPAGATION_NESTED) {
			SuspendedResourcesHolder suspendedResources = suspend(null);
			try {
				boolean newSynchronization = (getTransactionSynchronization() != SYNCHRONIZATION_NEVER);
				DefaultTransactionStatus status = newTransactionStatus(
						def, transaction, true, newSynchronization, debugEnabled, suspendedResources);
				doBegin(transaction, def);
				prepareSynchronization(status, def);
				return status;
			}
			catch (RuntimeException | Error ex) {
				resume(null, suspendedResources);
				throw ex;
			}
		}
		else {
			// Create "empty" transaction: no actual transaction, but potentially synchronization.
			if (def.getIsolationLevel() != TransactionDefinition.ISOLATION_DEFAULT && logger.isWarnEnabled()) {
				logger.warn("Custom isolation level specified but no actual transaction initiated; " +
						"isolation level will effectively be ignored: " + def);
			}
			boolean newSynchronization = (getTransactionSynchronization() == SYNCHRONIZATION_ALWAYS);
			return prepareTransactionStatus(def, null, true, newSynchronization, debugEnabled, null);
		}
	}
代码很长,但是不急,我们可以简单看出它分为两个部分:
- 第一部分是获取事务
doGetTransaction()
- 第二部分则是判断是否新事物,
- 如果不是新事物,则执行
handleExistingTransaction,
- 如果是新事物
- 则
TransactionDefinition.PROPAGATION_REQUIRED、TransactionDefinition.PROPAGATION_REQUIRES_NEW、TransactionDefinition.PROPAGATION_NESTED 是一种逻辑
- 其余是另一种逻辑,信息量有点大,但是慢慢来:
4.2.1 doGetTransaction
	protected Object doGetTransaction() {
		DataSourceTransactionObject txObject = new DataSourceTransactionObject();
		txObject.setSavepointAllowed(isNestedTransactionAllowed());
		ConnectionHolder conHolder =
				(ConnectionHolder) TransactionSynchronizationManager.getResource(obtainDataSource());
		txObject.setConnectionHolder(conHolder, false);
		return txObject;
	}
doGetTransaction 获取我们的事务对象,这里也使用了 TransactionSynchronizationManager(前面说到的 SqlSession 的管理类),事务对象会尝试获取本事务所使用的连接对象,这个和事务传播等级有关,先立个 flag。
我们可以看到这里面主要逻辑就是去获取 ConnectionHolder,实际上很简单,只要能获取到,就是已经存在的事务,获取不到(或者事务已经关闭)就是新事物。
4.2.2 新事物的处理之创建一个真正的事务对象
如果说前面无法从 TransactionSynchronizationManager 获取到 conHolder,或者说,我们的线程中并没有 ConnectionHolder 那么将会进入此分支,此分支的支持的三个事务传播等级 TransactionDefinition.PROPAGATION_REQUIRED、TransactionDefinition.PROPAGATION_REQUIRES_NEW、TransactionDefinition.PROPAGATION_NESTED 都是需要创建新事务的,所以它们在同一个分支里面:
	SuspendedResourcesHolder suspendedResources = suspend(null);
	boolean newSynchronization = (getTransactionSynchronization() != SYNCHRONIZATION_NEVER);
	DefaultTransactionStatus status = newTransactionStatus(
			def, transaction, true, newSynchronization, debugEnabled, suspendedResources);
	doBegin(transaction, def);
	prepareSynchronization(status, def);
	return status;
SuspendedResourcesHolder 与事务的挂起相关,doBegin() 则是对连接对象 connection 的获取和配置,prepareSynchronization() 则是对新事物的一些初始化操作。我们一点点看:
	/**
	 * This implementation sets the isolation level but ignores the timeout.
	 */
	@Override
	protected void doBegin(Object transaction, TransactionDefinition definition) {
		DataSourceTransactionObject txObject = (DataSourceTransactionObject) transaction;
		Connection con = null;

			if (!txObject.hasConnectionHolder() ||
					txObject.getConnectionHolder().isSynchronizedWithTransaction()) {
				Connection newCon = obtainDataSource().getConnection();
				if (logger.isDebugEnabled()) {
					logger.debug("Acquired Connection [" + newCon + "] for JDBC transaction");
				}
				txObject.setConnectionHolder(new ConnectionHolder(newCon), true);
			}

			txObject.getConnectionHolder().setSynchronizedWithTransaction(true);
			con = txObject.getConnectionHolder().getConnection();

			Integer previousIsolationLevel = DataSourceUtils.prepareConnectionForTransaction(con, definition);
			txObject.setPreviousIsolationLevel(previousIsolationLevel);
			txObject.setReadOnly(definition.isReadOnly());

			// Switch to manual commit if necessary. This is very expensive in some JDBC drivers,
			// so we don't want to do it unnecessarily (for example if we've explicitly
			// configured the connection pool to set it already).
			if (con.getAutoCommit()) {
				txObject.setMustRestoreAutoCommit(true);
				if (logger.isDebugEnabled()) {
					logger.debug("Switching JDBC Connection [" + con + "] to manual commit");
				}
				con.setAutoCommit(false);
			}

			prepareTransactionalConnection(con, definition);
			txObject.getConnectionHolder().setTransactionActive(true);

			// Bind the connection holder to the thread.
			if (txObject.isNewConnectionHolder()) {
				TransactionSynchronizationManager.bindResource(obtainDataSource(), txObject.getConnectionHolder());
			}
		}
	}
可以看到,ConnectionHolder 的创建和连接的打开就是在这里进行的,创建后,设置其隔离级别,取消 connection 的自动提交,将提交操作纳入到 spring 管理,并且将其存到 TransactionSynchronizationManager 使得 4.2.1 提到的 doGetTransaction() 可以拿到此 ConnectionHolder。
做完连接的获取与配置后,下一步就是对事物的一些初始化:
	/**
	 * Initialize transaction synchronization as appropriate.
	 */
	protected void prepareSynchronization(DefaultTransactionStatus status, TransactionDefinition definition) {
		if (status.isNewSynchronization()) {
			TransactionSynchronizationManager.setActualTransactionActive(status.hasTransaction());
			TransactionSynchronizationManager.setCurrentTransactionIsolationLevel(
					definition.getIsolationLevel() != TransactionDefinition.ISOLATION_DEFAULT ?
							definition.getIsolationLevel() : null);
			TransactionSynchronizationManager.setCurrentTransactionReadOnly(definition.isReadOnly());
			TransactionSynchronizationManager.setCurrentTransactionName(definition.getName());
			TransactionSynchronizationManager.initSynchronization();
		}
	}
这个代码都是代码字面意义的简单设置,就不赘述了。
4.2.3 新事物的处理之创建一个虚假的事务对象
刚才讲的是 “无法从 TransactionSynchronizationManager 获取到 conHolder”,并且属于一些需要创建新事物的传播等级的情况。
如果说方才没有事务,也不需要创建新的事务,则会进入此分支,创建一个空的 TransactionStatus,内部的事务对象为空,代码很简单就不贴了,有兴趣可以去看看 org.springframework.transaction.support.AbstractPlatformTransactionManager#getTransaction 的最后一个分支。
4.2.4 事务嵌套
刚才说的都是无法获取到 conHolder 的情况,如果获取到了,则又是另一套代码了,handleExistingTransaction 很长,它的第一个部分是对传播等级的控制,有兴趣的小伙伴可以去看看源码,我这里只挑一个简单的传播等级 PROPAGATION_NESTED_NEW 做说明(其他的会在专门的事务一期做讲解):
-- 代码位于 org.springframework.transaction.support.AbstractPlatformTransactionManager#handleExistingTransaction --
private TransactionStatus handleExistingTransaction(
			TransactionDefinition definition, Object transaction, boolean debugEnabled)
			throws TransactionException {

		if (definition.getPropagationBehavior() == TransactionDefinition.PROPAGATION_REQUIRES_NEW) {
			if (debugEnabled) {
				logger.debug("Suspending current transaction, creating new transaction with name [" +
						definition.getName() + "]");
			}
			SuspendedResourcesHolder suspendedResources = suspend(transaction);
			try {
				boolean newSynchronization = (getTransactionSynchronization() != SYNCHRONIZATION_NEVER);
				DefaultTransactionStatus status = newTransactionStatus(
						definition, transaction, true, newSynchronization, debugEnabled, suspendedResources);
				doBegin(transaction, definition);
				prepareSynchronization(status, definition);
				return status;
			}
			catch (RuntimeException | Error beginEx) {
				resumeAfterBeginException(transaction, suspendedResources, beginEx);
				throw beginEx;
			}
		}

	... 略
	}
我们可以发现和 4.2.2 新事物的处理 代码是一样的,唯一的区别就是此 TransactionStatus 对象会真正内嵌一个事务挂起对象 SuspendedResourcesHolder 。
4.3 封装 TransactionInfo
拿到 TransactionStatus 之后, prepareTransactionInfo() 里简单的将刚才那些 PlatformTransactionManager 、TransactionAttribute、TransactionStatus 包装成一个 TransactionInfo 对象,并将其保存在 ThreadLocal 中,这个 bindToThread() 还会将当前已经持有的 TransactionInfo 对象暂存。
protected TransactionInfo prepareTransactionInfo(@Nullable PlatformTransactionManager tm,
			@Nullable TransactionAttribute txAttr, String joinpointIdentification,
			@Nullable TransactionStatus status) {

		TransactionInfo txInfo = new TransactionInfo(tm, txAttr, joinpointIdentification);
		if (txAttr != null) {
			// The transaction manager will flag an error if an incompatible tx already exists.
			txInfo.newTransactionStatus(status);
		}

		// We always bind the TransactionInfo to the thread, even if we didn't create
		// a new transaction here. This guarantees that the TransactionInfo stack
		// will be managed correctly even if no transaction was created by this aspect.
		txInfo.bindToThread();
		return txInfo;
	}
到这里思路就很清晰了,代理为我们做的事情就是生成了一个叫做 TransactionInfo 的东西,里面的 TransactionManager 可以使得 spring 去对最底层的 connection 对象做一些回滚,提交操作。TransactionStatus 则保存挂起的事务的信息,以及当前事务的一些状态,如下图:
![]()
4.4 纵览流程
让我们回到第四节开头的那段很长的代码,到这里是不是很明了了:
	protected Object invokeWithinTransaction(Method method, @Nullable Class<?> targetClass,
			final InvocationCallback invocation) throws Throwable {

		// If the transaction attribute is null, the method is non-transactional.
		TransactionAttributeSource tas = getTransactionAttributeSource();
		final TransactionAttribute txAttr = (tas != null ? tas.getTransactionAttribute(method, targetClass) : null);
		final TransactionManager tm = determineTransactionManager(txAttr);
		PlatformTransactionManager ptm = asPlatformTransactionManager(tm);
		final String joinpointIdentification = methodIdentification(method, targetClass, txAttr);

		if (txAttr == null || !(ptm instanceof CallbackPreferringPlatformTransactionManager)) {
			// Standard transaction demarcation with getTransaction and commit/rollback calls.
			TransactionInfo txInfo = createTransactionIfNecessary(ptm, txAttr, joinpointIdentification);

			Object retVal;
			try {
				// This is an around advice: Invoke the next interceptor in the chain.
				// This will normally result in a target object being invoked.
				retVal = invocation.proceedWithInvocation();
			}
			catch (Throwable ex) {
				// target invocation exception
				completeTransactionAfterThrowing(txInfo, ex);
				throw ex;
			}
			finally {
				cleanupTransactionInfo(txInfo);
			}

			if (vavrPresent && VavrDelegate.isVavrTry(retVal)) {
				// Set rollback-only in case of Vavr failure matching our rollback rules...
				TransactionStatus status = txInfo.getTransactionStatus();
				if (status != null && txAttr != null) {
					retVal = VavrDelegate.evaluateTryFailure(retVal, txAttr, status);
				}
			}

			commitTransactionAfterReturning(txInfo);
			return retVal;
		}
	}
- 1、获取 TransactionInfo
- 2、执行切面
- 3、将之前挂起的
TransactionInfo 找回:
		private void bindToThread() {
			// Expose current TransactionStatus, preserving any existing TransactionStatus
			// for restoration after this transaction is complete.
			this.oldTransactionInfo = transactionInfoHolder.get();
			transactionInfoHolder.set(this);
		}

		private void restoreThreadLocalStatus() {
			// Use stack to restore old transaction TransactionInfo.
			// Will be null if none was set.
			transactionInfoHolder.set(this.oldTransactionInfo);
		}
4.5 最后一块拼图,spring 如何与 sqlSession 产生关联:
我们在第三章讲到,mybatis有一个叫做 defualtSqlSessionFactory 的类,负责创建 sqlSession,但是它和 spring 又是怎么产生关联的呢?
答案就在于,spring 实现了自己的 TransactionFactory,以及自己的 Transaction 对象 SpringManagedTransaction 。回顾一下 SqlSession 的创建过程:
  private SqlSession openSessionFromDataSource(ExecutorType execType, TransactionIsolationLevel level, boolean autoCommit) {
    Transaction tx = null;
    try {
      final Environment environment = configuration.getEnvironment();
      final TransactionFactory transactionFactory = getTransactionFactoryFromEnvironment(environment);
      tx = transactionFactory.newTransaction(environment.getDataSource(), level, autoCommit);
      final Executor executor = configuration.newExecutor(tx, execType);
      return new DefaultSqlSession(configuration, executor, autoCommit);
    } catch (Exception e) {
      closeTransaction(tx); // may have fetched a connection so lets call close()
      throw ExceptionFactory.wrapException("Error opening session.  Cause: " + e, e);
    } finally {
      ErrorContext.instance().reset();
    }
  }
看一下 SpringManagedTransaction 是如何管理 connection的:
  private void openConnection() throws SQLException {
    this.connection = DataSourceUtils.getConnection(this.dataSource);
    this.autoCommit = this.connection.getAutoCommit();
    this.isConnectionTransactional = DataSourceUtils.isConnectionTransactional(this.connection, this.dataSource);

    LOGGER.debug(() -> "JDBC Connection [" + this.connection + "] will"
        + (this.isConnectionTransactional ? " " : " not ") + "be managed by Spring");
  }
DataSourceUtils.getConnection(this.dataSource); 划重点,里面的实现不用我多说了,我们可以看到熟悉的身影,也就是 ConnectionHolder,连接是从这里(优先)拿的:
		ConnectionHolder conHolder = (ConnectionHolder) TransactionSynchronizationManager.getResource(dataSource);
		if (conHolder != null && (conHolder.hasConnection() || conHolder.isSynchronizedWithTransaction())) {
			conHolder.requested();
			if (!conHolder.hasConnection()) {
				logger.debug("Fetching resumed JDBC Connection from DataSource");
				conHolder.setConnection(fetchConnection(dataSource));
			}
			return conHolder.getConnection();
		}
更新整套体系图:
![]()
我们整体简单过一次:
- mybatis 启动时根据xml、注解创建了
mapperedStatement,用于sql执行,创建了 SqlSessionFactory 用于创建 SqlSession 对象。
- mybatis 启动时创建了
MapperProxyFactory 用于创建接口的代理对象 MapperProxy
- 在创建
MapperProxy 时,spring 为其注入了一个 sqlSession 用于 sql执行,但是这个 sqlSession 是一个代理对象,叫做 sqlSessionTemplate,它会自动选择我们该使用哪个 sqlSession 去执行
- 在执行时,spring 切面在执行事务之前,会创建一个叫做
TransactionInfo 的对象,此对象会根据事务传播等级来控制是否创建新连接,是否挂起上一个连接,将信息保存在 TransactionSynchronizationManager
- 到了真正需要创建或者获取
sqlSession 时,spring 重写的 TransactionFactory 会优先去 TransactionSynchronizationManager 中拿连接对象。
参考资料:
mybatis-spring-boot-starter 2.1.1
mybatis 3.5.3