一.Description
CDF(Cloudera DataFlow)源自HDF(Hortonworks DataFlow),HDF是一个可缩放的实时流分析平台,它可以提取、组织和分析数据,以获得关键洞察和即时的可操作情报。
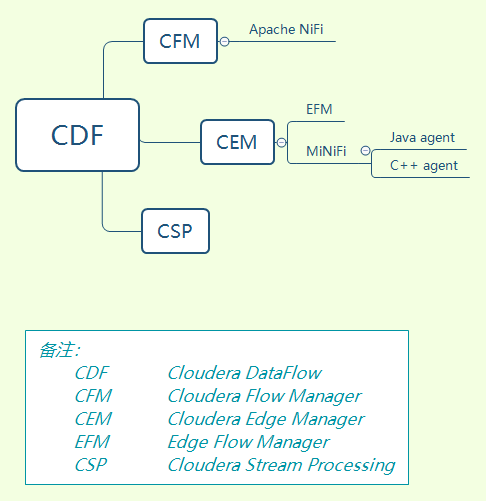
CDF是由CFM(Cloudera Flow Manager)、CEM(Cloudera Edge Manager)和CSP(Cloudera Stream Processing)3部分组成,其中,CEM包括EFM(Edge Flow Manager)和2类MiNiFi(Java Agent、C++ Agent)。
![]()
二.Install CFM
1.install nifi-registry
b).configration
vi nifi-registry-0.3.0.1.0.0.0-90/conf/nifi-registry.properties
# web properties #
nifi.registry.web.war.directory=./lib
nifi.registry.web.http.host=hostname
nifi.registry.web.http.port=18080
nifi.registry.web.https.host=
nifi.registry.web.https.port=
nifi.registry.web.jetty.working.directory=./work/jetty
nifi.registry.web.jetty.threads=200
c).start service
nifi-registry-0.3.0.1.0.0.0-90/bin/nifi-registry.sh start
d).view log
tail -400f logs/nifi-registry-app.log
e).access page
http://hostname:18080/nifi-registry
2.install EFM
a).download EFM
b).configration
efm-1.0.0.1.0.0.0-54/conf/efm.properties
# Web Server Properties
#  address: the hostname or ip address of the interface to bind to; to bind to all, use 0.0.0.0
efm.server.address=hostname
efm.server.port=10080
efm.server.servlet.contextPath=/efm

# NiFi Registry Properties
#  url: the base URL of a NiFi Registry instance
#  bucket: Only set one of bucketId OR bucketName
#  flowRefreshInterval: specify value and units (d=days, h=hours, m=minutes, s=seconds, ms=milliseconds)
efm.nifi.registry.enabled=true
efm.nifi.registry.url=http://hostname:18080
efm.nifi.registry.bucketId=
efm.nifi.registry.bucketName=minifi
efm.nifi.registry.flowRefreshInterval=60s
c).start service
efm-1.0.0.1.0.0.0-54/bin/efm.sh start
d).view log
tail -400f logs/efm-app.log
e).access page
http://localhost:10080/efm/ui
3.install java agent
a).download EFM
b).configration
vi minifi-0.6.0.1.0.0.0-54/conf/bootstrap.conf
# MiNiFi Command & Control Configuration
# C2 Properties
# Enabling C2 Uncomment each of the following options
# define those with missing options
nifi.c2.enable=true
## define protocol parameters
nifi.c2.rest.url=http://hostname:10080/efm/api/c2-protocol/heartbeat
nifi.c2.rest.url.ack=http://hostname:10080/efm/api/c2-protocol/acknowledge
## heartbeat in milliseconds.  defaults to once a second
nifi.c2.agent.heartbeat.period=10000
## define parameters about your agent
nifi.c2.agent.class=java-agent-100
# Optional.  Defaults to a hardware based unique identifier
nifi.c2.agent.identifier=100
c).start service
minifi-0.6.0.1.0.0.0-54/bin/minifi.sh start
d).view log
tail -400f logs/minifi-app.log
4.install C++ agent
a).download EFM
b).configration
nifi-minifi-cpp-0.6.0/conf/minifi.properties
## Enabling C2 Uncomment each of the following options
## define those with missing options
nifi.c2.enable=true
## define protocol parameters
## The default is CoAP, if that extension is built.
## Alternatively, you may use RESTSender if http-curl is built
#nifi.c2.agent.protocol.class=CoapProtocol
#nifi.c2.agent.coap.host=
#nifi.c2.agent.coap.port=
nifi.c2.rest.url=http://hostname:10080/efm/api/c2-protocol/heartbeat
nifi.c2.rest.url.ack=http://hostname:10080/efm/api/c2-protocol/acknowledge
#nifi.c2.root.classes=DeviceInfoNode,AgentInformation,FlowInformation
## heartbeat 4 times a second
nifi.c2.agent.heartbeat.period=5000
## define parameters about your agent
nifi.c2.agent.class=c_agent
nifi.c2.agent.identifier=6
c).start service
nifi-minifi-cpp-0.6.0/bin/minifi.sh start
d).view log
tail -400f logs/minifi-app.log
三.Mysql Data
When MySQL is used as a metadata base
1.create database and user
CREATE DATABASE EFM DEFAULT CHARACTER SET utf8;

CREATE USER 'efm'@'%' IDENTIFIED BY '2wsx@WSX';

GRANT ALL PRIVILEGES ON *.* TO 'efm'@'%' WITH GRANT OPTION;

commit;
2.change EFM config
vi efm-1.0.0.1.0.0.0-54/conf/efm.properties
# Database Properties
efm.db.url=jdbc:mysql://hostname:3306/EFM
efm.db.driverClass=com.mysql.jdbc.Driver
efm.db.username=efm
efm.db.password=
efm.db.maxConnections=5
efm.db.sqlDebug=false
3.restart EFM
efm-1.0.0.1.0.0.0-54/bin/efm.sh restart
四.Build C++ Agent
1.check environment
[root@localhost ~]# cmake --version
cmake version 3.12.0

[root@localhost ~]# gcc --version
gcc (GCC) 7.3.1 20180303 (Red Hat 7.3.1-5)

[root@localhost ~]# bison --version
bison (GNU Bison) 3.0.4

[root@localhost ~]# flex --version
flex 2.5.37

[root@localhost ~]# patch --version
GNU patch 2.7.1

[root@localhost ~]# autoconf --version
autoconf (GNU Autoconf) 2.69

[root@localhost ~]# automake --version
automake (GNU automake) 1.13.4

[root@localhost ~]# libtool --version
libtool (GNU libtool) 2.4.2