版权声明:本文为博主原创文章,转载请附上链接地址。 https://blog.csdn.net/ld15102891672/article/details/80275969
要实现C#代码画矢量图,其基本原理是先创建一个容器作为画板,然后创建Line(直线)、PolyLine(多段线)、Rectangle(矩形)或者Ellipse(椭圆)基本绘图对象生成各种矢量图形,最后把这些图形对象添加到画板中即可,一般用Canvas容器作为画板。下面以在Canvas容器控件中绘制Line(直线)、PolyLine(多段线)、Rectangle(矩形)或者Ellipse(椭圆)等基本图形对矢量绘图进行简单的介绍,希望对大家有所帮助。
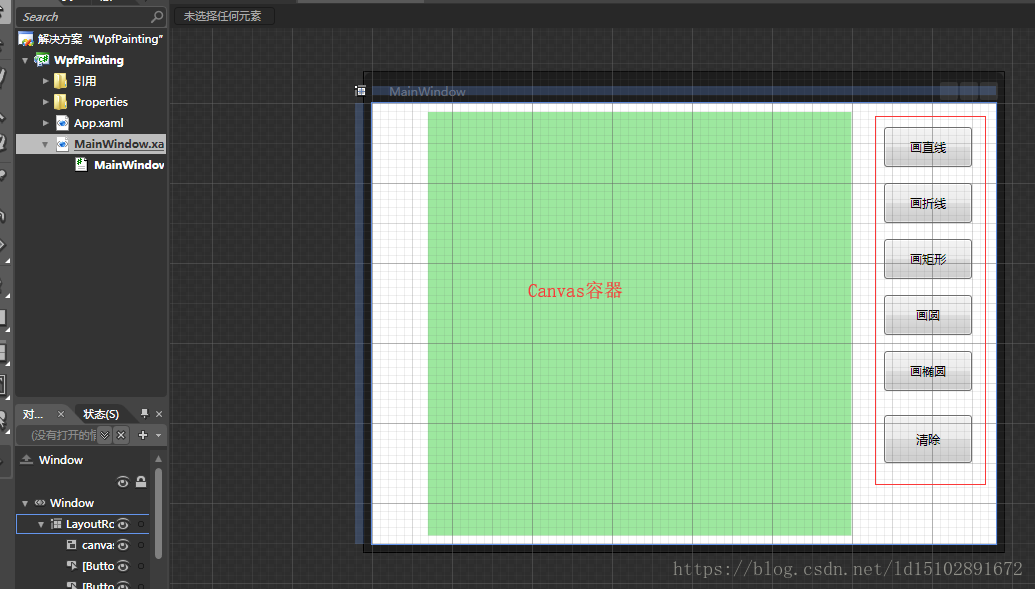
创建一个C#项目,在项目中添加Canvas并把Canvas属性的旋转角度设置为-90度,然后添加绘制各种基本图形的按钮
![]()
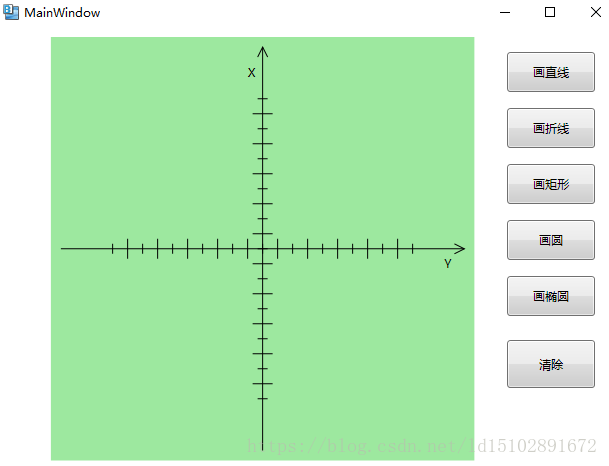
绘制坐标系效果图及代码
![]()
        private void PaintGrid()//画坐标系
		{
		    Line l=new Line();
			l.X1=0;
			l.Y1=10;
			l.X2=0;
			l.Y2=this.canvas.Height-10;
			l.StrokeThickness=1;
			l.Stroke=new SolidColorBrush(Color.FromRgb(0, 0, 0));
			Canvas.SetLeft(l,this.canvas.Width/2);
			this.canvas.Children.Add(l);
			l=new Line();
			l.X1=10;
			l.Y1=0;
			l.X2=this.canvas.Width-10;;
			l.Y2=0;
			l.StrokeThickness=1;
			l.Stroke=new SolidColorBrush(Color.FromRgb(0, 0, 0));
			Canvas.SetTop(l,this.canvas.Height/2);
			this.canvas.Children.Add(l);
			for(int i=-10;i<=10;i++)
			{
			  l=new Line();
			  Line ly=new Line();
			  l.X1=i*15;
			  l.X2=i*15;
			  ly.Y1=i*15;
			  ly.Y2=i*15;
			 if(i%2==0)
			  {
				l.Y1=-5;
				l.Y2=5;
				ly.X1=-5;
				ly.X2=5;
			   }
				else
			   {
			    l.Y1=-10;
				l.Y2=10;
				ly.X1=-10;
				ly.X2=10;
			    }
			  l.StrokeThickness=1;
			  l.Stroke=new SolidColorBrush(Color.FromRgb(0, 0, 0));
			  Canvas.SetLeft(l,this.canvas.Width/2);
			  Canvas.SetTop(l,this.canvas.Height/2);
			  ly.StrokeThickness=1;
			  ly.Stroke=new SolidColorBrush(Color.FromRgb(0, 0, 0));
			  Canvas.SetLeft(ly,this.canvas.Width/2);
			  Canvas.SetTop(ly,this.canvas.Height/2);
			  this.canvas.Children.Add(ly);
			  this.canvas.Children.Add(l);
			}
			 Label lb=new Label();
			  lb.Content="X";
			  RotateTransform rotateTransform = new RotateTransform(90);//90度
			  lb.RenderTransform=rotateTransform;
			  Canvas.SetRight(lb,5);
			  Canvas.SetTop(lb,canvas.Height/2-20);
			  this.canvas.Children.Add(lb);
			  lb=new Label();
			  lb.Content="Y";
			  lb.RenderTransform=rotateTransform;
			  Canvas.SetRight(lb,canvas.Width/2-15);
			  Canvas.SetBottom(lb,10);
			  this.canvas.Children.Add(lb);
			  Polyline pl=new Polyline();
			  pl.Points.Add(new Point(this.canvas.Width/2-20,-5));
			  pl.Points.Add(new Point(this.canvas.Width/2-10,0));
			  pl.Points.Add(new Point(this.canvas.Width/2-20,5));
			  pl.Stroke=new SolidColorBrush(Color.FromRgb(0,0,0));
			  pl.StrokeThickness=1;
			  Canvas.SetLeft(pl,this.canvas.Width/2);
			  Canvas.SetTop(pl,this.canvas.Height/2);
			   this.canvas.Children.Add(pl);
			  pl=new Polyline();
			  pl.Points.Add(new Point(-5,this.canvas.Height/2-20));
			  pl.Points.Add(new Point(0,this.canvas.Height/2-10));
			  pl.Points.Add(new Point(5,this.canvas.Height/2-20));
			  pl.Stroke=new SolidColorBrush(Color.FromRgb(0,0,0));
			  pl.StrokeThickness=1;
			  Canvas.SetLeft(pl,this.canvas.Width/2);
			  Canvas.SetTop(pl,this.canvas.Height/2);
			   this.canvas.Children.Add(pl);
		}
绘制直线代码
private void bth_paint_Line(object sender, System.Windows.RoutedEventArgs e)//画直线
		{
			this.canvas.Children.Clear();//清空画板
			this.PaintGrid();//画坐标系
			Line l=new Line();//直线
			l.X1=0;
			l.Y1=0;
			l.X2=200;
			l.Y2=200;
			l.StrokeThickness=1;//直线宽度
			l.Stroke=new SolidColorBrush(Color.FromRgb(0, 0, 255));//直线颜色(蓝色)
			Canvas.SetLeft(l,this.canvas.Width/2);//X的原点平移到canvas容器中间
			Canvas.SetTop(l,this.canvas.Height/2);//Y的原点平移到canvas容器中间
			this.canvas.Children.Add(l);//在容器中添加该直线
		}
效果图
![]()
画多段线代码
		private void bth_paint_Polyline(object sender, System.Windows.RoutedEventArgs e)//画多段线
		{
			this.canvas.Children.Clear();//清空画板
			this.PaintGrid();//画坐标系
			Polyline pl=new Polyline();
			pl.Points.Add(new Point(0,0));
			pl.Points.Add(new Point(50,50));
			pl.Points.Add(new Point(0,100));
			pl.Points.Add(new Point(50,150));
			pl.Stroke=new SolidColorBrush(Color.FromRgb(0,0,255));
			pl.StrokeThickness=1;
			Canvas.SetLeft(pl,this.canvas.Width/2);//X的原点平移到canvas容器中间
			Canvas.SetTop(pl,this.canvas.Height/2);//Y的原点平移到canvas容器中间
			this.canvas.Children.Add(pl);//在容器中添加该多段线
		}
效果图
![]()
画矩形代码
		private void bth_paint_Rectangle(object sender, System.Windows.RoutedEventArgs e)//画矩形
		{
			this.canvas.Children.Clear();//清空画板
			this.PaintGrid();//画坐标系
            Rectangle rect=new Rectangle();
			rect.Width=100;
			rect.Height=200;
			rect.Stroke=new SolidColorBrush(Color.FromRgb(0,0,255));
			rect.StrokeThickness=1;
			Canvas.SetLeft(rect,this.canvas.Width/2-rect.Width/2);
			Canvas.SetTop(rect,this.canvas.Height/2-rect.Height/2);
			this.canvas.Children.Add(rect);
		}
效果图
![]()
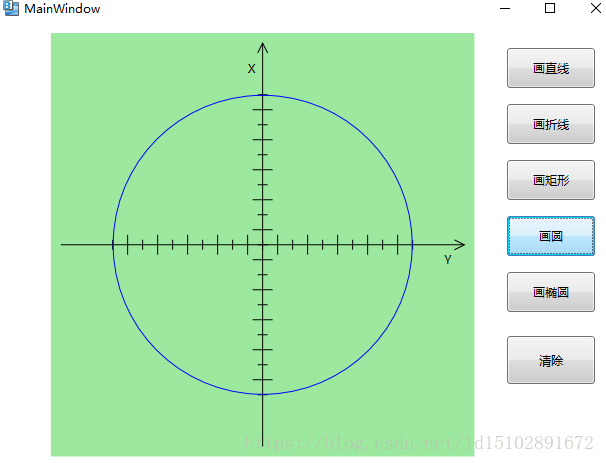
画圆代码
	private void bth_paint_Circle(object sender, System.Windows.RoutedEventArgs e)//画圆
		{
			this.canvas.Children.Clear();//清空画板
			this.PaintGrid();//画坐标系
			Ellipse ep=new Ellipse();
			ep.Height=300;
			ep.Width=300;
			ep.Stroke=new SolidColorBrush(Color.FromRgb(0, 0, 255));
			ep.StrokeThickness=1;
			Canvas.SetLeft(ep,this.canvas.Width/2-ep.Width/2);
			Canvas.SetTop(ep,this.canvas.Height/2-ep.Height/2);
			this.canvas.Children.Add(ep);
		}
效果图
![]()
画椭圆代码
private void bth_paint_Ellipse(object sender, System.Windows.RoutedEventArgs e)//画椭圆
		{
			this.canvas.Children.Clear();//清空画板
			this.PaintGrid();//画坐标系
            Ellipse ep=new Ellipse();
			ep.Height=300;
			ep.Width=50;
			ep.Stroke=new SolidColorBrush(Color.FromRgb(0, 0, 255));
			ep.StrokeThickness=1;
			Canvas.SetLeft(ep,this.canvas.Width/2-ep.Width/2);
			Canvas.SetTop(ep,this.canvas.Height/2-ep.Height/2);
			this.canvas.Children.Add(ep);
		}
效果图
![]()
清空画板代码
private void btn_Clear(object sender, System.Windows.RoutedEventArgs e)
		{
			this.canvas.Children.Clear();//清空画板
			this.PaintGrid();//画坐标系
		}
本次矢量画图编程就介绍到这里,如果还有不明白的地方,可以加入扣扣群234035436进行技术交流,希望大家多多支持!