

RN ImageBackground 问题
看下这个是什么问题呢? 不知道大家在用这个ImageBackground 的时候是不是也出现过同样的问题? image.png 排查了下样式 写的并没有什么问题,Android 模拟器也正常显示但是 iOS 却显示有问题 然后给父组件样式加了个透明背景色 backgroundColor:"rgba(254,200,46,0)" 问题解决了 记录下。 image.png
使用语言:kotlin,使用第三方:友盟
文中所用到的资源文件:https://pan.baidu.com/s/1eIS9JFd4JeYZUrFJYHrEyg。
如果仅仅想在Github上查看代码,可以到BlogDemo-QQShare进行查看
文章参考自友盟官方文档。QQ授权申请需要时间,建议收藏后慢慢观看。感谢友盟技术客户的耐心解释,文章不足之处,希望能得到您的指正
实现第三方登录我们有两个选择:
- 去各个平台上按照各个平台的文档进行集成
- 使用友盟这种第三方的方案
前者各个平台的文档使用方法不同,学习成本太高了。后者封装了统一的接口,降低了学习成本,所以我们使用它。
先来看一下效果的预览吧
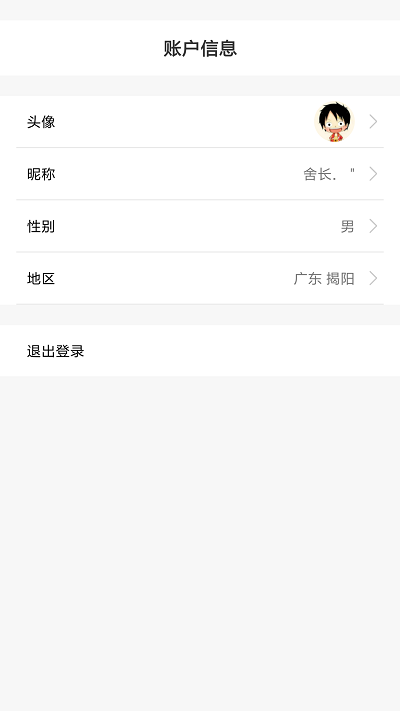
我们点击QQ图标,调起了QQ登录的页面,选择想要的账号登录。进入主页面,在主页面中显示获取到的QQ账号信息,头像,昵称,性别,地区。点击退出登录,回到登录页面。
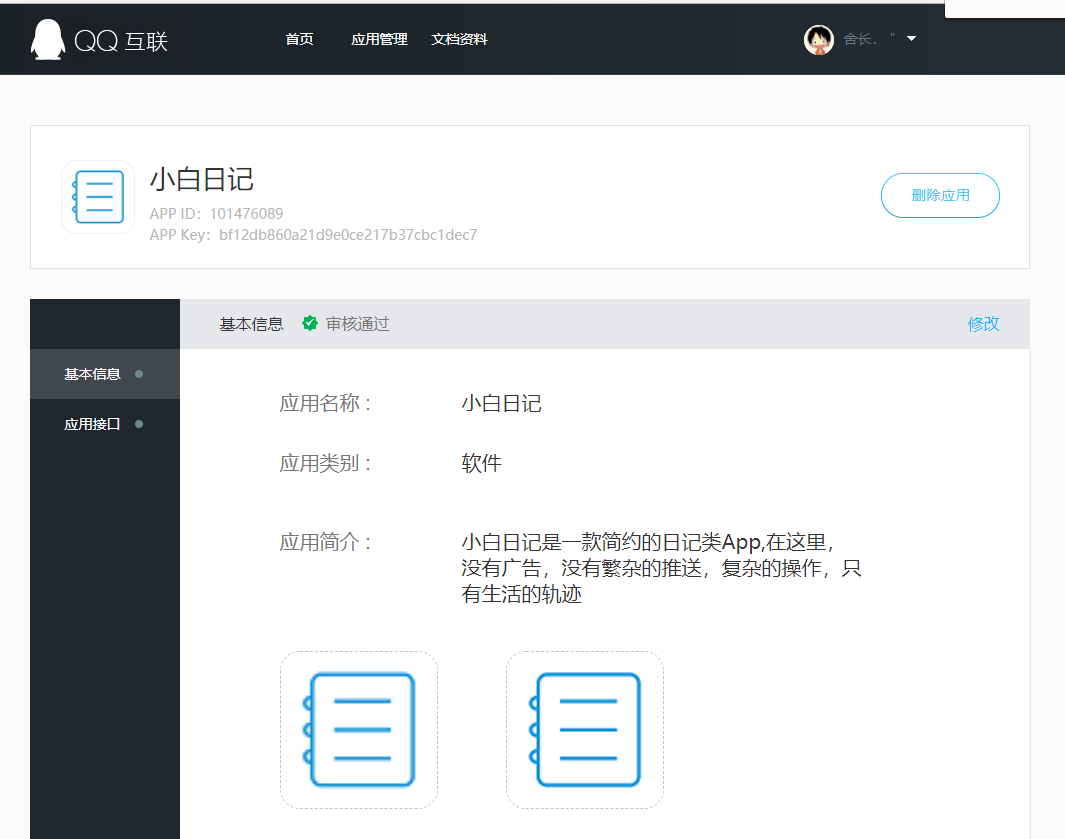
在开始之前我们需要到QQ互联平台注册好我们的应用,拿到应用的APP ID,App Key。
我们在首页选择移动应用接入。第一次创建应用比较麻烦,选择个人接入后需要上传身份证等信息,个人信息通过后就可以进行应用创建了。
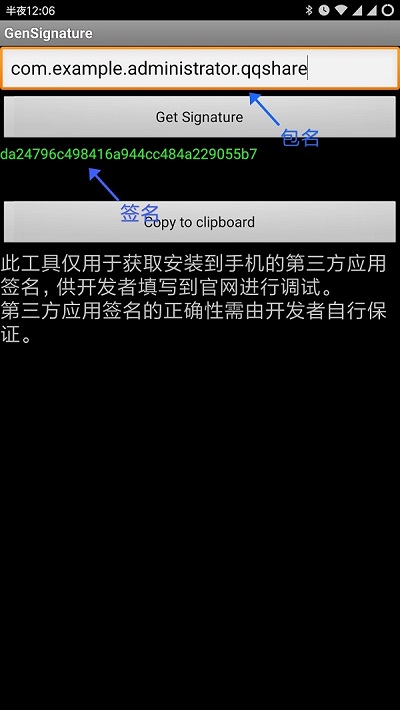
创建应用时需要填写你的应用包名和签名,包名就是我们对应module的build.gradle文件下的applicationId,我们还需要了解怎么给应用打包签名,然后我们使用签名获取工具(在资料文档里我已经为你们准备好了),输入我们的包名获得到我们的签名就可以了。
     defaultConfig {
//      就是这个了
        applicationId "com.example.administrator.qqshare"
        minSdkVersion 15
        targetSdkVersion 27
        versionCode 1
        versionName "1.0"
        testInstrumentationRunner "android.support.test.runner.AndroidJUnitRunner"
    }
本节只进行QQ登录的演示,之所以不演示微信登录,是因为微信登录申请通过后,你还需要交纳300元才能够使用他们的接口。
创建项目QQShare,勾选kotlin语言支持后在module创建以下4个包
- app 自定义Application
- base 基础类
- module 业务包
- util 工具包
然后我们进去res-values-styles下,把主题修改成没有标题的样式
<!-- Base application theme. -->
<style name="AppTheme" parent="Theme.AppCompat.Light.NoActionBar">
    <!-- Customize your theme here. -->
    <item name="colorPrimary">@color/colorPrimary</item>
    <item name="colorPrimaryDark">@color/colorPrimaryDark</item>
    <item name="colorAccent">@color/colorAccent</item>
</style>
然后我们在base包下创建WinActivity,作为等等全屏化Activity的基础类
import android.support.v7.app.AppCompatActivity
import android.os.Bundle
import android.view.WindowManager

/**
 * 全屏化基础Activity
 * 在kotlin中,一个类要能被子类继承,父类本身要加上open关键字
 */
open class WinActivity : AppCompatActivity() {

    override fun onCreate(savedInstanceState: Bundle?) {
        super.onCreate(savedInstanceState)
        //      设置全屏
        win()
    }

    private fun win() {
        window.setFlags(WindowManager.LayoutParams.FLAG_FULLSCREEN, WindowManager.LayoutParams.FLAG_FULLSCREEN)
    }
}
在module下创建login包,在login包下创建LoginActivity类。在LoginActivity类的导包中添加下面这一行,我们就不需要再为控件findViewByid了
//不需要再findID,activity_login当前Activity布局名字
import kotlinx.android.synthetic.main.activity_login.*
写登录布局文件activity_login(图片资源见博客资料drawable-hdpi)
布局代码
<?xml version="1.0" encoding="utf-8"?>
<RelativeLayout xmlns:android="http://schemas.android.com/apk/res/android"
    xmlns:app="http://schemas.android.com/apk/res-auto"
    xmlns:tools="http://schemas.android.com/tools"
    android:layout_width="match_parent"
    android:layout_height="match_parent"
    android:background="@android:color/black"
    tools:context="com.example.administrator.keep.module.SplashActivity">


    <ImageView
        android:id="@+id/img_close"
        android:layout_width="30dp"
        android:layout_height="30dp"
        android:layout_marginLeft="22dp"
        android:layout_marginTop="26dp"
        android:src="@drawable/ic_close_big" />

    <TextView
        android:id="@+id/txt_login"
        android:layout_width="wrap_content"
        android:layout_height="wrap_content"
        android:layout_centerHorizontal="true"
        android:layout_marginTop="122dp"
        android:text="登录"
        android:textColor="#FFFFFF"
        android:textSize="30dp" />

    <Button
        android:id="@+id/btn_login"
        android:layout_width="match_parent"
        android:layout_height="52dp"
        android:layout_below="@+id/txt_login"
        android:layout_marginLeft="40dp"
        android:layout_marginRight="40dp"
        android:layout_marginTop="46dp"
        android:background="#24C789"
        android:text="手机登陆"
        android:textColor="#FFFFFF" />

    <View
        android:layout_width="26dp"
        android:layout_height="0.6dp"
        android:layout_below="@+id/btn_login"
        android:layout_centerHorizontal="true"
        android:layout_marginTop="44dp"
        android:background="#66FFFFFF" />

    <TextView
        android:id="@+id/txt_01"
        android:layout_width="wrap_content"
        android:layout_height="wrap_content"
        android:layout_below="@+id/btn_login"
        android:layout_centerHorizontal="true"
        android:layout_marginTop="94dp"
        android:text="其他方式登录"
        android:textColor="#66FFFFFF"
        android:textSize="14sp" />

    <LinearLayout
        android:layout_width="320dp"
        android:layout_height="56dp"
        android:layout_below="@+id/txt_01"
        android:layout_centerHorizontal="true"
        android:layout_marginTop="30dp"
        android:orientation="horizontal">

        <RelativeLayout
            android:layout_width="0dp"
            android:layout_height="match_parent"
            android:layout_weight="1">

            <ImageView
                android:id="@+id/mWeiXin"
                android:layout_width="32dp"
                android:layout_height="32dp"
                android:layout_centerInParent="true"
                android:src="@drawable/ic_login_weixin_off" />
        </RelativeLayout>

        <RelativeLayout
            android:layout_width="0dp"
            android:layout_height="match_parent"
            android:layout_weight="1">

            <ImageView
                android:id="@+id/mQQ"
                android:layout_width="32dp"
                android:layout_height="32dp"
                android:layout_centerInParent="true"
                android:src="@drawable/ic_login_qq_off" />
        </RelativeLayout>

        <RelativeLayout
            android:layout_width="0dp"
            android:layout_height="match_parent"
            android:layout_weight="1">

            <ImageView
                android:layout_width="32dp"
                android:layout_height="32dp"
                android:layout_centerInParent="true"
                android:src="@drawable/ic_login_weibo_off" />
        </RelativeLayout>

        <RelativeLayout
            android:layout_width="0dp"
            android:layout_height="match_parent"
            android:layout_weight="1">

            <ImageView
                android:id="@+id/img_face"
                android:layout_width="32dp"
                android:layout_height="32dp"
                android:layout_centerInParent="true"
                android:src="@drawable/ic_login_facebook_off" />
        </RelativeLayout>
    </LinearLayout>

    <TextView
        android:id="@+id/txt_register"
        android:layout_width="wrap_content"
        android:layout_height="wrap_content"
        android:layout_alignParentBottom="true"
        android:layout_centerHorizontal="true"
        android:layout_marginBottom="24dp"
        android:text="还没有账号?注册极限运动账号"
        android:textColor="#FFFFFF" />
</RelativeLayout>
代码虽多,其实我们需要的,只是QQ那个小图标而已。其他的,只是我们模拟的页面。
我们回到LoginActivity,让LoginActivity继承于WinActivity。使用一个匿名内部类,实现QQ图标的点击事件。
import com.example.administrator.qqshare.base.WinActivity
//不需要在findID
import kotlinx.android.synthetic.main.activity_login.*

class LoginActivity : WinActivity() {

    override fun onCreate(savedInstanceState: Bundle?) {
        super.onCreate(savedInstanceState)
        setContentView(R.layout.activity_login)

        mQQ.setOnClickListener(View.OnClickListener {
            //QQ图标点击事件
            Log.d("tonjie","点击事件触发")
        })
    }
}
登录布局完成
MainActivity布局用来显示QQ回调给我们的用户信息,如QQ头像,昵称,所在地区,性别。
在build.gradle下添加图片处理框架
//圆形图片处理框架
compile 'de.hdodenhof:circleimageview:2.2.0'
同样在MainActivity类的导包中添加这一行,我们就不需要再为控件写findViewByid了
//不需要在findID,activity_main当前Activity布局名字
import kotlinx.android.synthetic.main.activity_main.*
xml文件activity_main
<?xml version="1.0" encoding="utf-8"?>
<LinearLayout xmlns:android="http://schemas.android.com/apk/res/android"
    xmlns:app="http://schemas.android.com/apk/res-auto"
    xmlns:tools="http://schemas.android.com/tools"
    android:layout_width="match_parent"
    android:layout_height="match_parent"
    android:background="#F7F7F7"
    android:orientation="vertical"
    tools:context="com.example.administrator.keep.module.my.UserInfoActivity">

    <RelativeLayout
        android:layout_width="match_parent"
        android:layout_height="20dp">

    </RelativeLayout>

    <RelativeLayout
        android:layout_width="match_parent"
        android:layout_height="54dp"
        android:background="#ffffff">


        <TextView
            android:layout_width="wrap_content"
            android:layout_height="wrap_content"
            android:layout_centerInParent="true"
            android:text="账户信息"
            android:textColor="#333333"
            android:textSize="18sp"
            android:textStyle="bold" />

    </RelativeLayout>


    <LinearLayout
        android:layout_width="match_parent"
        android:layout_height="wrap_content"
        android:layout_marginTop="20dp"
        android:background="#FFFFFF"
        android:orientation="vertical">


        <RelativeLayout
            android:id="@+id/mTelephone"
            android:layout_width="match_parent"
            android:layout_height="50dp"
            android:background="#ffffff">

            <TextView
                android:layout_width="wrap_content"
                android:layout_height="wrap_content"
                android:layout_centerVertical="true"
                android:layout_marginLeft="26dp"
                android:text="头像"
                android:textColor="@android:color/black"
                android:textSize="14sp" />

            <de.hdodenhof.circleimageview.CircleImageView
                android:id="@+id/mUserLogo"
                android:layout_width="40dp"
                android:layout_height="40dp"
                android:layout_centerVertical="true"
                android:layout_marginRight="10dp"
                android:layout_toLeftOf="@+id/mImage1"
                android:src="@drawable/test_user_logo" />

            <ImageView
                android:id="@+id/mImage1"
                android:layout_width="16dp"
                android:layout_height="16dp"
                android:layout_alignParentRight="true"
                android:layout_centerVertical="true"
                android:layout_marginRight="18dp"
                android:src="@drawable/my_right" />

        </RelativeLayout>

        <View
            android:layout_width="match_parent"
            android:layout_height="1dp"
            android:layout_marginLeft="16dp"
            android:layout_marginRight="16dp"
            android:background="#66CCCCCC" />

        <RelativeLayout
            android:layout_width="match_parent"
            android:layout_height="50dp">

            <TextView
                android:layout_width="wrap_content"
                android:layout_height="wrap_content"
                android:layout_centerVertical="true"
                android:layout_marginLeft="26dp"
                android:text="昵称"
                android:textColor="@android:color/black"
                android:textSize="14sp" />

            <TextView
                android:id="@+id/mUsername"
                android:layout_width="wrap_content"
                android:layout_height="wrap_content"
                android:layout_centerVertical="true"
                android:layout_marginRight="10dp"
                android:layout_toLeftOf="@+id/mUsernameDetail"
                android:text="小紫" />

            <ImageView
                android:id="@+id/mUsernameDetail"
                android:layout_width="16dp"
                android:layout_height="16dp"
                android:layout_alignParentRight="true"
                android:layout_centerVertical="true"
                android:layout_marginRight="18dp"
                android:src="@drawable/my_right" />

        </RelativeLayout>


        <View
            android:layout_width="match_parent"
            android:layout_height="1dp"
            android:layout_marginLeft="16dp"
            android:layout_marginRight="16dp"
            android:background="#66CCCCCC" />

        <RelativeLayout
            android:layout_width="match_parent"
            android:layout_height="50dp">

            <TextView
                android:layout_width="wrap_content"
                android:layout_height="wrap_content"
                android:layout_centerVertical="true"
                android:layout_marginLeft="26dp"
                android:text="性别"
                android:textColor="@android:color/black"
                android:textSize="14sp" />

            <TextView
                android:id="@+id/mUserSex"
                android:layout_width="wrap_content"
                android:layout_height="wrap_content"
                android:layout_centerVertical="true"
                android:layout_marginRight="10dp"
                android:layout_toLeftOf="@+id/mUserSexDetail"
                android:text="女" />

            <ImageView
                android:id="@+id/mUserSexDetail"
                android:layout_width="16dp"
                android:layout_height="16dp"
                android:layout_alignParentRight="true"
                android:layout_centerVertical="true"
                android:layout_marginRight="18dp"
                android:src="@drawable/my_right" />

        </RelativeLayout>


        <View
            android:layout_width="match_parent"
            android:layout_height="1dp"
            android:layout_marginLeft="16dp"
            android:layout_marginRight="16dp"
            android:background="#66CCCCCC" />


        <RelativeLayout
            android:layout_width="match_parent"
            android:layout_height="50dp">

            <TextView
                android:layout_width="wrap_content"
                android:layout_height="wrap_content"
                android:layout_centerVertical="true"
                android:layout_marginLeft="26dp"
                android:text="地区"
                android:textColor="@android:color/black"
                android:textSize="14sp" />

            <TextView
                android:id="@+id/mUserArea"
                android:layout_width="wrap_content"
                android:layout_height="wrap_content"
                android:layout_centerVertical="true"
                android:layout_marginRight="10dp"
                android:layout_toLeftOf="@+id/mUserAreaDetail"
                android:text="广东 揭阳" />

            <ImageView
                android:id="@+id/mUserAreaDetail"
                android:layout_width="16dp"
                android:layout_height="16dp"
                android:layout_alignParentRight="true"
                android:layout_centerVertical="true"
                android:layout_marginRight="18dp"
                android:src="@drawable/my_right" />

        </RelativeLayout>


        <View
            android:layout_width="match_parent"
            android:layout_height="1dp"
            android:layout_marginLeft="16dp"
            android:layout_marginRight="16dp"
            android:background="#66CCCCCC" />


    </LinearLayout>


    <RelativeLayout
        android:id="@+id/mLogOut"
        android:layout_width="match_parent"
        android:layout_height="50dp"
        android:layout_marginTop="20dp"
        android:background="#ffffff">

        <TextView
            android:layout_width="wrap_content"
            android:layout_height="wrap_content"
            android:layout_centerVertical="true"
            android:layout_marginLeft="26dp"
            android:text="退出登录"
            android:textColor="@android:color/black"
            android:textSize="14sp" />

        <TextView
            android:layout_width="wrap_content"
            android:layout_height="wrap_content"
            android:layout_centerVertical="true"
            android:layout_marginRight="10dp"
            android:text="" />


    </RelativeLayout>


</LinearLayout>
回到MainActivity,实现注销登录布局的点击事件
import android.support.v7.app.AppCompatActivity
import android.os.Bundle
import android.util.Log
import android.view.View
import kotlinx.android.synthetic.main.activity_main.*

class MainActivity : AppCompatActivity() {

    override fun onCreate(savedInstanceState: Bundle?) {
        super.onCreate(savedInstanceState)
        setContentView(R.layout.activity_main)

        mLogOut.setOnClickListener(View.OnClickListener {
            Log.d("tonjies","注销")
        })
    }
}
到这里,我们的布局文件就写好了
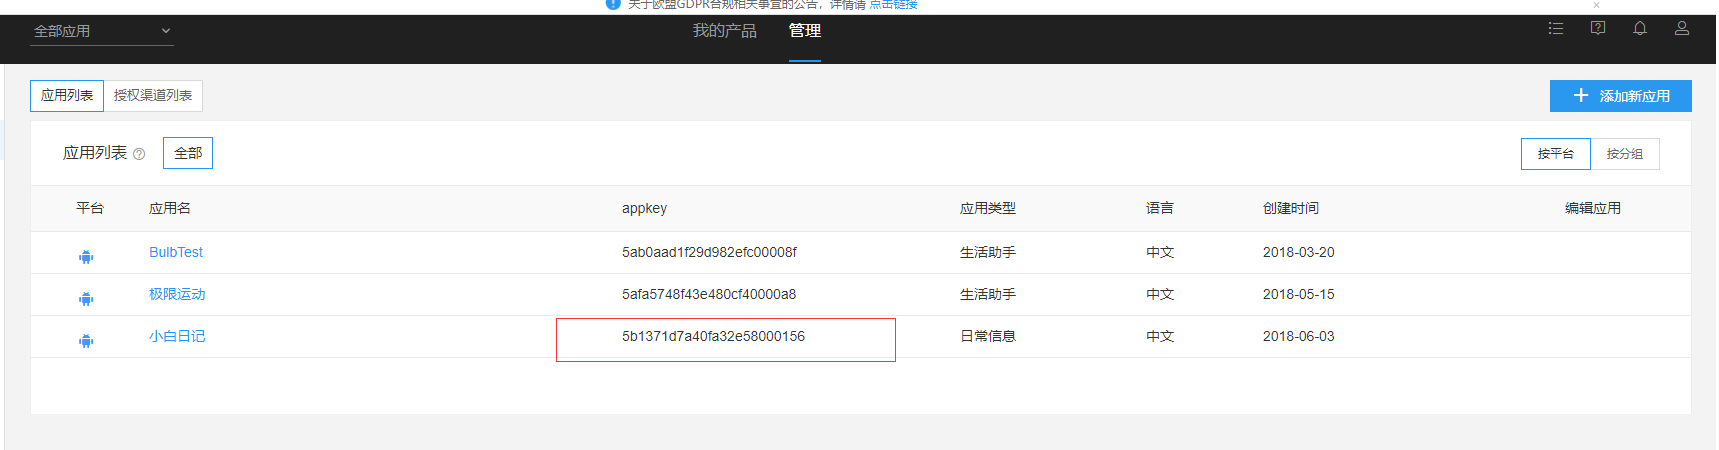
打开友盟网站:https://www.umeng.com/,注册账户后我们打开我的产品页面,https://mobile.umeng.com/apps。找到右边的管理页面,在页面下创建一个应用,拿到应用的appKey。
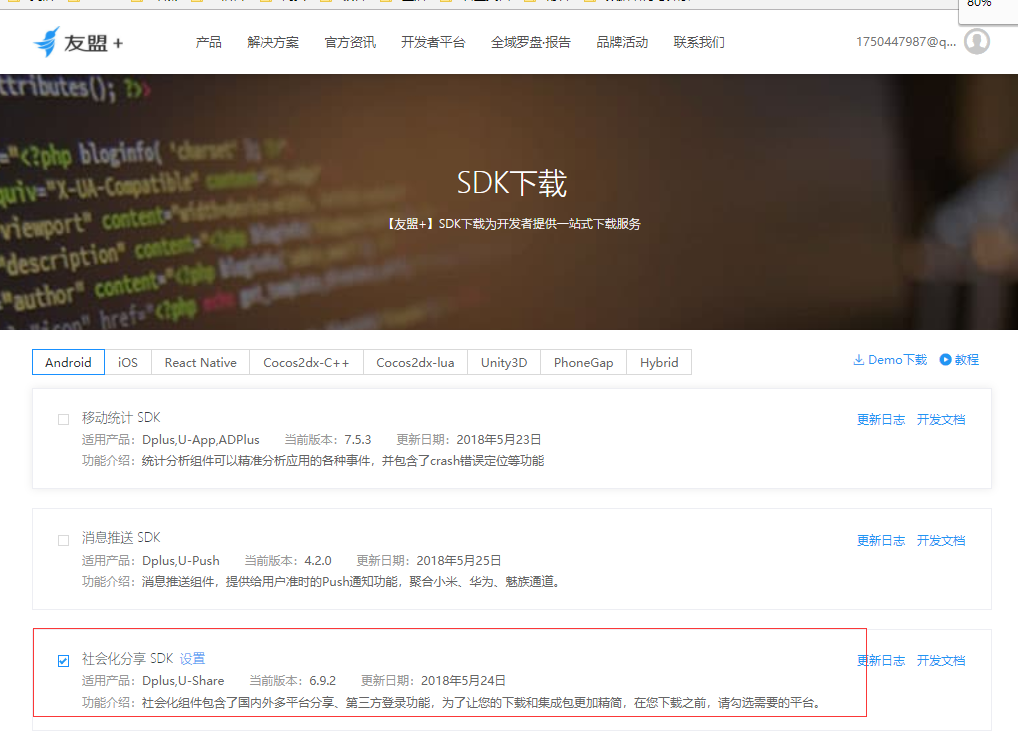
之后我们打开首页-产品-社会化分享(https://mobile.umeng.com/social),点击右边的SDK及文档,选择Androdi机器人图标进入SDK下载页面,勾选社会化分享,下载SDK。
到这里,我们可以使用SDK里面的jar包去一个一个复制到我们的app里面,然后进行集成。但是这样太麻烦了,而且这样你的module会显得凌乱,不好整理。
其实友盟提供了另外一种方案,就是通过官方的集成辅助工具把SDK里面的jar文件,都打包成一个库,然后我们只要把这个库依赖到我们想要使用登录功能的module就可以了。
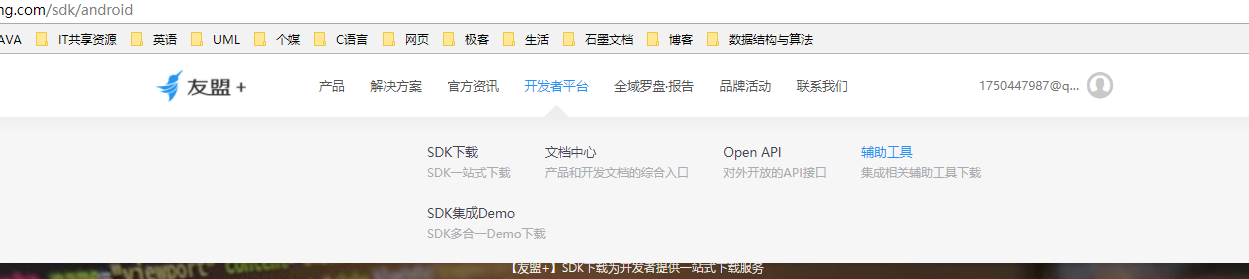
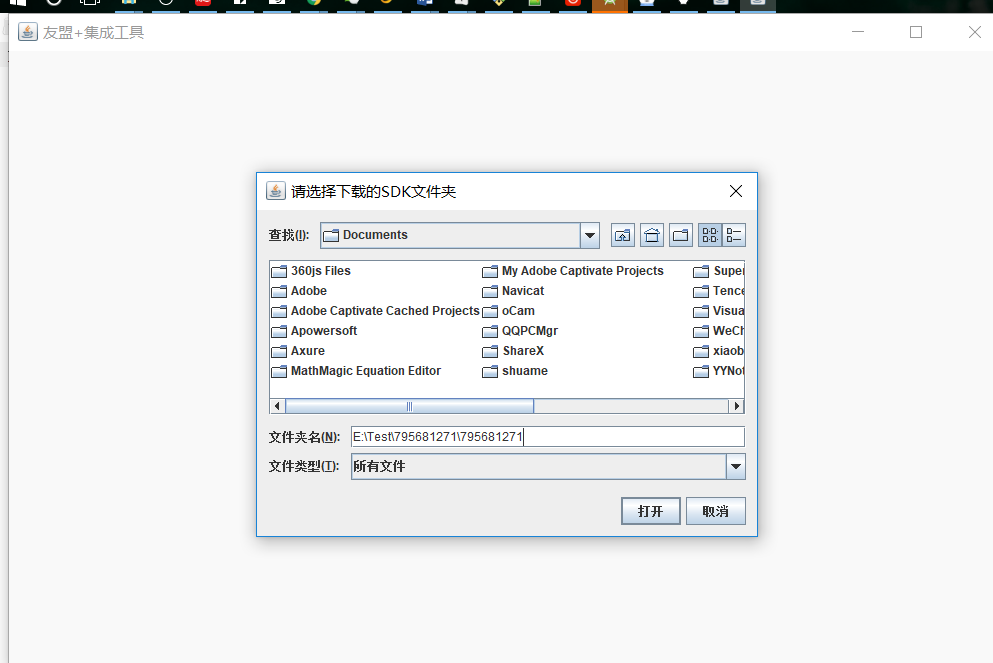
打开开发者平台,辅助工具,点击SDK集成辅助工具,下载(当然在博客资料里面也有)。
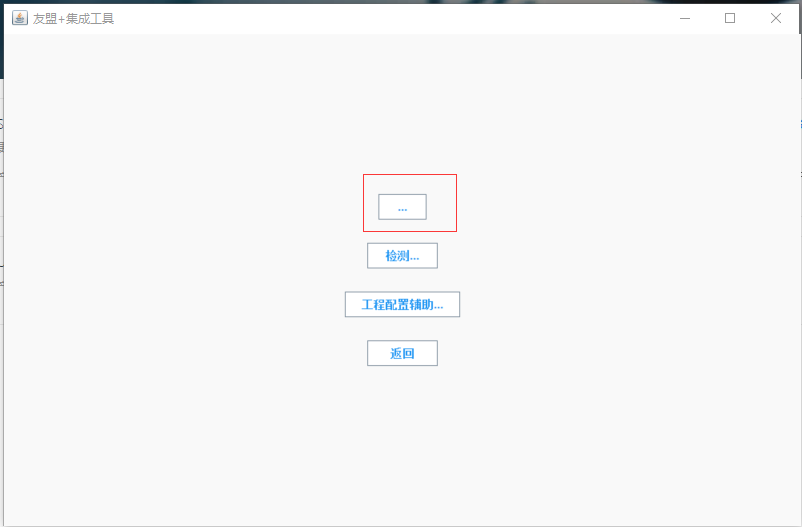
我们单独创建一个文件夹test,把集成工具和解压后的SDK文件都放到test文件夹里面。打开集成工具,点击最上边的...号,找到我们下载后解压的社会化分享SDK后,点击打开
我们点击打开后,可以看到test文件夹下多个个UMLibrary库文件,这个就是我们需要的库文件了,我们打开我们的项目,把该库导进我们的项目。命名为umeng。然后让我们的module依赖于该库
//app build.gradle
dependencies {
    implementation fileTree(include: ['*.jar'], dir: 'libs')
    implementation "org.jetbrains.kotlin:kotlin-stdlib-jre7:$kotlin_version"
    implementation 'com.android.support:appcompat-v7:27.1.1'
    implementation 'com.android.support.constraint:constraint-layout:1.1.0'
    testImplementation 'junit:junit:4.12'
    androidTestImplementation 'com.android.support.test:runner:1.0.2'
    androidTestImplementation 'com.android.support.test.espresso:espresso-core:3.0.2'
    //圆形图片处理框架
    compile 'de.hdodenhof:circleimageview:2.2.0'
    //友盟第三方分享库
    implementation project(':umeng')
}
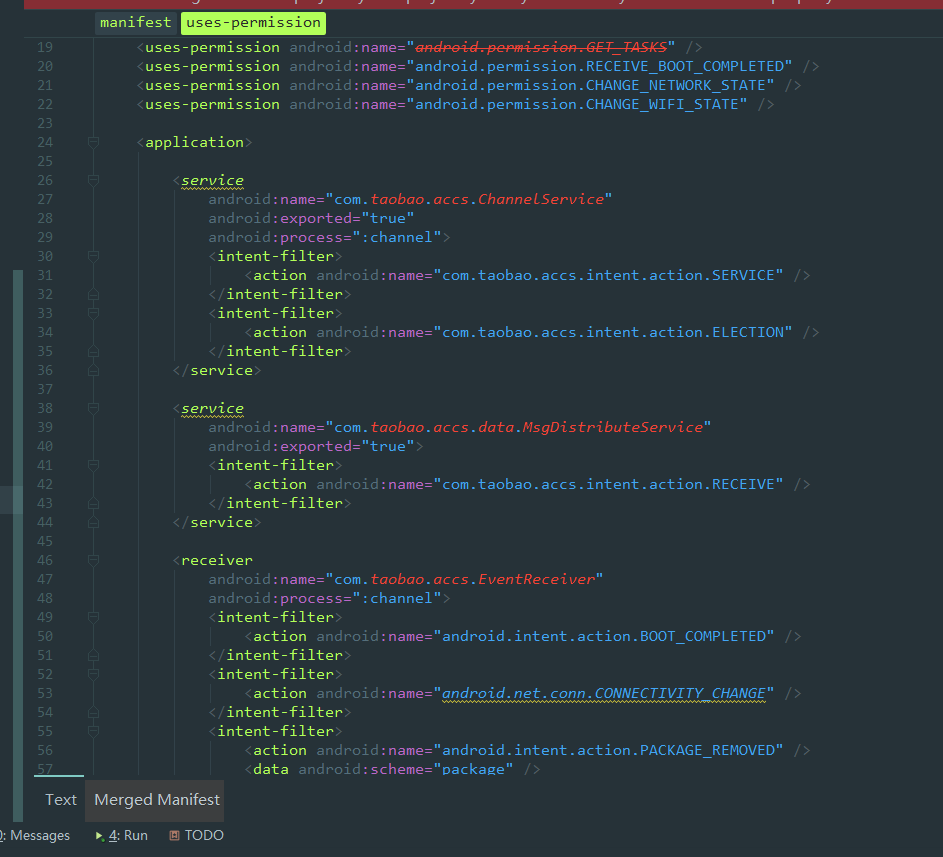
sync项目后我们运行程序,发现程序崩溃了!这是为什么呢,我们来到umeng库的AndroidManifest.xml文件一看,有好多的service服务爆红,显示找不到
其实如果我们当时下载SDK的时候,有勾选PushSDK,即友盟推送的SDK,那么就很容易看出,这些爆红的服务其实全都是PushSDK下的。
为什么我们只下载了Share分享SDK,它却给我们生成了PushSDK的东西这个问题我还不清楚。我的解决方案是大胆的把这些爆红的服务全都注释掉,再次运行程序,程序成功运行。
在app包下自定义Application类
/**
 * Created by 舍长 on 2018/5/28.
 * 舍长: 自定义Applciation
 */
class App : Application() {
    override fun onCreate() {
        super.onCreate()
        //        友盟统计
        /**
         * 初始化common库
         * 参数1:上下文,不能为空
         * 参数2:【友盟+】 AppKey
         * 参数3:【友盟+】 Channel
         * 参数4:设备类型,UMConfigure.DEVICE_TYPE_PHONE为手机、UMConfigure.DEVICE_TYPE_BOX为盒子,默认为手机
         * 参数5:Push推送业务的secret
         */
        UMConfigure.init(this,"5afa5748f43e480cf40000a8"
                ,"umeng",UMConfigure.DEVICE_TYPE_PHONE,"")
        /**
         * 设置组件化的Log开关
         * 参数: boolean 默认为false,如需查看LOG设置为true
         */
        UMConfigure.setLogEnabled(true)
    }

    /**
     * 代码块
     * 101476089 为AppId
     * bf12db860a21d9e0ce217b37cbc1dec7为AppKey
     */
    init {
        PlatformConfig.setQQZone("101476089", "bf12db860a21d9e0ce217b37cbc1dec7")
    }
}
我们把我们在QQ互联平台申请到的APP ID 和APP key填去初始化代码块,kotlin的初始代码块和Java不同,必须加上init关键字,最后别忘了在AndroidManifest.xml文件中去引用
android:name=".app.App"
我们需要在AndroidManifest.xml文件里加上我们要使用的权限吗?
不需要,因为在我们的umeng库里面,已经有了我们登录所需要的权限了。
我们继续在AndroidManifest.xml文件的Application标签内添加以下代码
<!-- 友盟Appkey-->
<meta-data
    android:name="UMENG_APPKEY"
    android:value="5afa5748f43e480cf40000a8" />

<!--渠道配置 -->
<meta-data
    android:name="UMENG_CHANNEL"
    android:value="umeng_test" />
       <!-- 友盟QQ配置文件-->
        <activity
            android:name="com.tencent.tauth.AuthActivity"
            android:launchMode="singleTask"
            android:noHistory="true">
            <intent-filter>
                <action android:name="android.intent.action.VIEW" />

                <category android:name="android.intent.category.DEFAULT" />
                <category android:name="android.intent.category.BROWSABLE" />

                <data android:scheme="tencent101473285" />
            </intent-filter>
        </activity>

        <!-- 友盟QQ配置文件 -->
        <activity
            android:name="com.tencent.connect.common.AssistActivity"
            android:configChanges="orientation|keyboardHidden|screenSize"
            android:theme="@android:style/Theme.Translucent.NoTitleBar" />
AndroidManifest.xml完整代码
<?xml version="1.0" encoding="utf-8"?>
<manifest xmlns:android="http://schemas.android.com/apk/res/android"
    package="com.example.administrator.qqshare">

    <application
        android:name=".app.App"
        android:allowBackup="true"
        android:icon="@mipmap/ic_launcher"
        android:label="@string/app_name"
        android:roundIcon="@mipmap/ic_launcher_round"
        android:supportsRtl="true"
        android:theme="@style/AppTheme">

        <!--主函数-->
        <activity android:name=".MainActivity">

        </activity>

        <!--登录Activity-->
        <activity android:name=".module.login.LoginActivity" >
            <intent-filter>
                <action android:name="android.intent.action.MAIN" />

                <category android:name="android.intent.category.LAUNCHER" />
            </intent-filter>
        </activity>

        <!--全屏化基础类-->
        <activity android:name=".base.WinActivity">

        </activity>


        <!-- 友盟Appkey-->
        <meta-data
            android:name="UMENG_APPKEY"
            android:value="5afa5748f43e480cf40000a8" />

        <!--渠道配置 -->
        <meta-data
            android:name="UMENG_CHANNEL"
            android:value="umeng_test" />


        <!-- 友盟QQ配置文件-->
        <activity
            android:name="com.tencent.tauth.AuthActivity"
            android:launchMode="singleTask"
            android:noHistory="true">
            <intent-filter>
                <action android:name="android.intent.action.VIEW" />

                <category android:name="android.intent.category.DEFAULT" />
                <category android:name="android.intent.category.BROWSABLE" />

                <data android:scheme="tencent101473285" />
            </intent-filter>
        </activity>

        <!-- 友盟QQ配置文件 -->
        <activity
            android:name="com.tencent.connect.common.AssistActivity"
            android:configChanges="orientation|keyboardHidden|screenSize"
            android:theme="@android:style/Theme.Translucent.NoTitleBar" />


    </application>

</manifest>
LoginActivity:
配置友盟的工作就结束了,就可以到LoginActivity里面写我们真正的第三方登录登录代码啦。
为了方便调试,我们在util包下创建一个简单的日志工具类
/**
 * Created by 舍长 on 2018/4/27.
 * 在kotlin中,加了object后,L类就成为了一个单例模式的类,相当于帮我们省略掉了以前Java实现单例的代码
 * 之后我们可以直接以L.d的形式调用类中的方法
 */
object L {

    //    TAG
    public var TAG: String = "tonJies"

    fun d(test: String) {
        Log.d(TAG, test)
    }
}
接着在util包下创建一个SharedPreferences封装类,这里就暂且使用Java代码,关于该封装类的详细介绍,可以查看我的另一篇文章,Android常用工具类
/**
 * Created by Tulin_TonJie on 2018/2/10.
 * SharedPreferences
 */

public class ShareUtils {

    public static final String NAME = "config";

    //存储
    public static void putString(Context mContext, String key, String value) {
        SharedPreferences sharedPreferences = mContext.getSharedPreferences(NAME, Context.MODE_PRIVATE);
        sharedPreferences.edit().putString(key, value).commit();
    }

    //获取
    public static String getString(Context mContext, String key, String defValue) {
        SharedPreferences sharedPreferences = mContext.getSharedPreferences(NAME, Context.MODE_PRIVATE);
        return sharedPreferences.getString(key, defValue);
    }


    //存储
    public static void putInt(Context mContext, String key, int value) {
        SharedPreferences sharedPreferences = mContext.getSharedPreferences(NAME, Context.MODE_PRIVATE);
        sharedPreferences.edit().putInt(key, value).commit();
    }

    //获取
    public static int getInt(Context mContext, String key, int defValue) {
        SharedPreferences sharedPreferences = mContext.getSharedPreferences(NAME, Context.MODE_PRIVATE);
        return sharedPreferences.getInt(key, defValue);
    }

    //存储
    public static void putBoolean(Context mContext, String key, boolean value) {
        SharedPreferences sharedPreferences = mContext.getSharedPreferences(NAME, Context.MODE_PRIVATE);
        sharedPreferences.edit().putBoolean(key, value).commit();
    }

    //获取
    public static boolean getBoolean(Context mContext, String key, Boolean defValue) {
        SharedPreferences sharedPreferences = mContext.getSharedPreferences(NAME, Context.MODE_PRIVATE);
        return sharedPreferences.getBoolean(key, defValue);
    }

    //删除 单个
    public static void deleShare(Context context, String key) {
        SharedPreferences sharedPreferences = context.getSharedPreferences(NAME, Context.MODE_PRIVATE);
        sharedPreferences.edit().remove(key).commit();
    }

    //删除全部
    public static void deleAll(Context context) {
        SharedPreferences sharedPreferences = context.getSharedPreferences(NAME, Context.MODE_PRIVATE);
        sharedPreferences.edit().clear().commit();
    }
}
LoginActivity完整的代码
//不需要在findID
import kotlinx.android.synthetic.main.activity_login.*
class LoginActivity : WinActivity() {
override fun onCreate(savedInstanceState: Bundle?) {
super.onCreate(savedInstanceState)
setContentView(R.layout.activity_login)
mQQ.setOnClickListener(View.OnClickListener {
L.d("登录")
//QQ图标点击事件
UMShareAPI.get(this@LoginActivity).getPlatformInfo(this@LoginActivity, SHARE_MEDIA.QQ, authListener)
})
}
/**
* 第三方登录回调
*/
internal var authListener: UMAuthListener = object : UMAuthListener {
/**
* 开始登录的回调
* @param platform 第三方登录的平台名称
*/
override fun onStart(platform: SHARE_MEDIA) {
L.d("登录的第三方平台是:" + platform)
}
/**
* 登录成功回调
* @param platform
* @param action
* @param map
*/
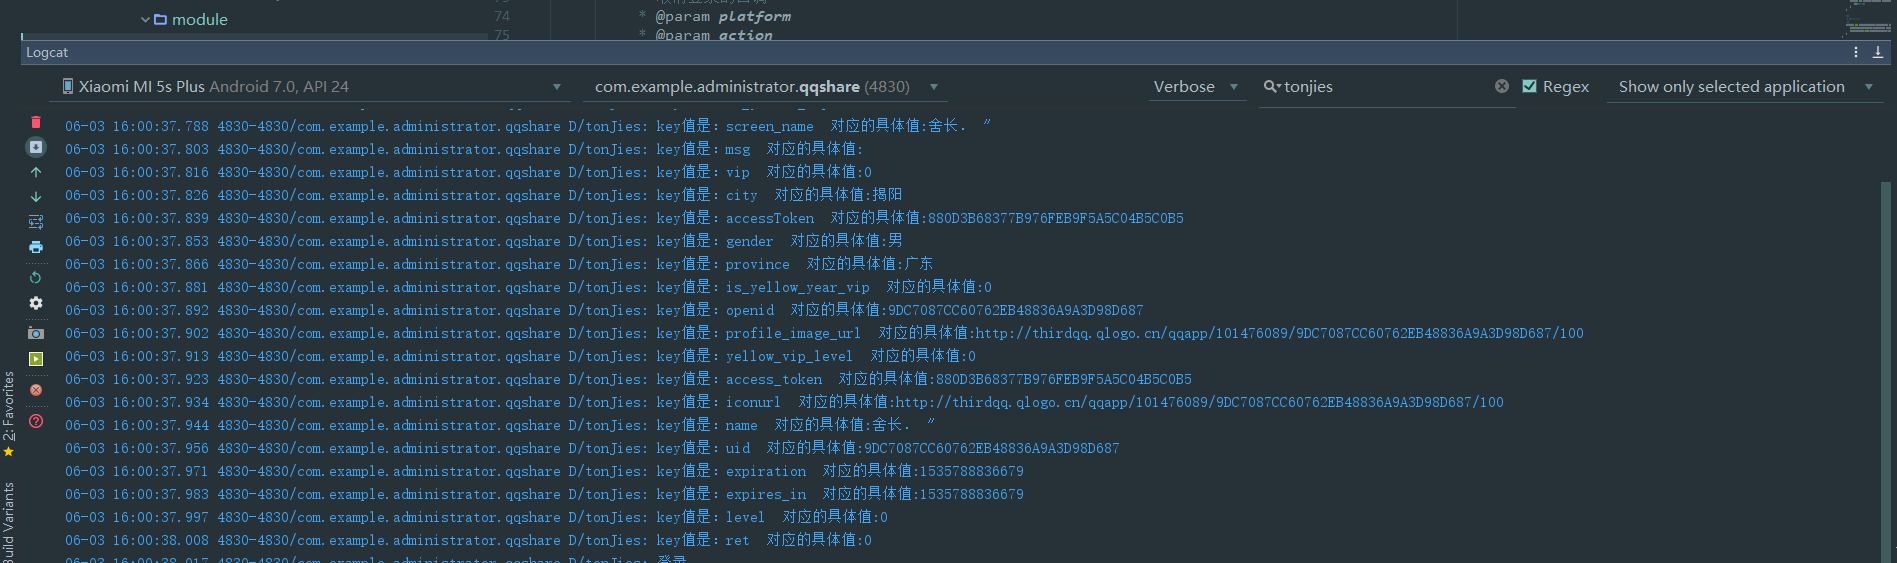
override fun onComplete(platform: SHARE_MEDIA, action: Int, map: Map<String, String>) {
// 遍历map集合,取出QQ登录后回调给我们的信息
for (key in map.keys) {
L.d("key值是:" + key + " 对应的具体值:" + map[key] + "\n")
// 将取出的QQ账户信息存储到SharedPreferences中
ShareUtils.putString(this@LoginActivity, key, map[key])
}
L.d("登录")
}
/**
* 失败
* @param platform
* @param action
* @param t
*/
override fun onError(platform: SHARE_MEDIA, action: Int, t: Throwable) {
L.d("登录失败" + t.message)
}
/**
* 取消登录的回调
* @param platform
* @param action
*/
override fun onCancel(platform: SHARE_MEDIA, action: Int) {
L.d("取消登录")
}
}
/**
* QQ登录必须加入此回调
*/
override fun onActivityResult(requestCode: Int, resultCode: Int, data: Intent) {
super.onActivityResult(requestCode, resultCode, data)
UMShareAPI.get(this).onActivityResult(requestCode, resultCode, data)
}
}
运行程序后点击QQ图标,我们调出了QQ授权登录的页面,输入账户的密码后,查看Log可以看到已经有了相应的回调信息
MainActivity:
在module的build.grale下添加图片加载框架Glide,用于对QQ头像的加载
//    图片加载框架
compile 'com.github.bumptech.glide:glide:4.5.0'
创建initData方法,使用ShareUtils封装类取出用户的信息,并展示到布局上
  /**
     * 加载用户信息
     */
    private fun initData() {
        //      QQ昵称
        val screen_name = ShareUtils.getString(this, "name", "")
        //      性别
        val gender = ShareUtils.getString(this, "gender", "")
        //      省份
        val province = ShareUtils.getString(this, "province", "")
        //      城市
        val city = ShareUtils.getString(this, "city", "")
        //      头像地址
        val iconurl = ShareUtils.getString(this, "iconurl", "http://p5olxq226.bkt.clouddn.com//test_user_logo.jpeg")

        //      用户昵称
        mUsername.setText(screen_name)

        //      用户性别
        mUserSex.setText(gender)

        //      用户地区
        mUserArea.setText(province + " " + city)

        //       用户头像
        Glide.with(this).load(iconurl).into(mUserLogo)
    }
创建LogOut方法,用来注销账户信息
    private fun LogOut() {
        mLogOut.setOnClickListener(View.OnClickListener {
            UMShareAPI.get(this).deleteOauth(this, SHARE_MEDIA.QQ, object : UMAuthListener {
                /**
                 * 成功
                 */
                override fun onComplete(p0: SHARE_MEDIA?, p1: Int, p2: MutableMap<String, String>?) {
                    L.d("注销回调:成功")
                }

                override fun onCancel(p0: SHARE_MEDIA?, p1: Int) {
                    L.d("注销回调:取消")
                }

                override fun onError(p0: SHARE_MEDIA?, p1: Int, p2: Throwable?) {
                    L.d("注销回调:取消")
                }

                override fun onStart(p0: SHARE_MEDIA?) {
                }

            })
            startActivity(Intent(this@MainActivity, LoginActivity::class.java))
        })
    }
MainActivity完整代码
//绑定控件
import kotlinx.android.synthetic.main.activity_main.*

class MainActivity : WinActivity() {

    override fun onCreate(savedInstanceState: Bundle?) {
        super.onCreate(savedInstanceState)
        setContentView(R.layout.activity_main)
//      加载用户信息
        initData()
//      注销账号
        LogOut()
    }

    private fun LogOut() {
        mLogOut.setOnClickListener(View.OnClickListener {
            UMShareAPI.get(this).deleteOauth(this, SHARE_MEDIA.QQ, object : UMAuthListener {
                /**
                 * 成功
                 */
                override fun onComplete(p0: SHARE_MEDIA?, p1: Int, p2: MutableMap<String, String>?) {
                    L.d("注销回调:成功")
                }

                override fun onCancel(p0: SHARE_MEDIA?, p1: Int) {
                    L.d("注销回调:取消")
                }

                override fun onError(p0: SHARE_MEDIA?, p1: Int, p2: Throwable?) {
                    L.d("注销回调:取消")
                }

                override fun onStart(p0: SHARE_MEDIA?) {
                }

            })
            startActivity(Intent(this@MainActivity, LoginActivity::class.java))
        })
    }

    /**
     * 加载用户信息
     */
    private fun initData() {
        //      QQ昵称
        val screen_name = ShareUtils.getString(this, "name", "")
        //      性别
        val gender = ShareUtils.getString(this, "gender", "")
        //      省份
        val province = ShareUtils.getString(this, "province", "")
        //      城市
        val city = ShareUtils.getString(this, "city", "")
        //      头像地址
        val iconurl = ShareUtils.getString(this, "iconurl", "http://p5olxq226.bkt.clouddn.com//test_user_logo.jpeg")

        val stringBuffer = StringBuffer()
        stringBuffer.append("姓名:  $screen_name\n性别:$gender  省份:$province  城市:$city  ")

        //      用户昵称
        mUsername.setText(screen_name)

        //      用户性别
        mUserSex.setText(gender)

        //      用户地区
        mUserArea.setText(province + " " + city)

        //       用户头像
        Glide.with(this).load(iconurl).into(mUserLogo)
    }
}
整个第三方登录的案例到这里就结束了

微信关注我们
转载内容版权归作者及来源网站所有!
低调大师中文资讯倾力打造互联网数据资讯、行业资源、电子商务、移动互联网、网络营销平台。持续更新报道IT业界、互联网、市场资讯、驱动更新,是最及时权威的产业资讯及硬件资讯报道平台。
为解决软件依赖安装时官方源访问速度慢的问题,腾讯云为一些软件搭建了缓存服务。您可以通过使用腾讯云软件源站来提升依赖包的安装速度。为了方便用户自由搭建服务架构,目前腾讯云软件源站支持公网访问和内网访问。
Rocky Linux(中文名:洛基)是由Gregory Kurtzer于2020年12月发起的企业级Linux发行版,作为CentOS稳定版停止维护后与RHEL(Red Hat Enterprise Linux)完全兼容的开源替代方案,由社区拥有并管理,支持x86_64、aarch64等架构。其通过重新编译RHEL源代码提供长期稳定性,采用模块化包装和SELinux安全架构,默认包含GNOME桌面环境及XFS文件系统,支持十年生命周期更新。
Sublime Text具有漂亮的用户界面和强大的功能,例如代码缩略图,Python的插件,代码段等。还可自定义键绑定,菜单和工具栏。Sublime Text 的主要功能包括:拼写检查,书签,完整的 Python API , Goto 功能,即时项目切换,多选择,多窗口等等。Sublime Text 是一个跨平台的编辑器,同时支持Windows、Linux、Mac OS X等操作系统。
WebStorm 是jetbrains公司旗下一款JavaScript 开发工具。目前已经被广大中国JS开发者誉为“Web前端开发神器”、“最强大的HTML5编辑器”、“最智能的JavaScript IDE”等。与IntelliJ IDEA同源,继承了IntelliJ IDEA强大的JS部分的功能。
扫码在手机上查看文章
扫描二维码,手机阅读更方便
有任何问题或合作意向欢迎联系我们
Email: 99873273@qq.com
QQ: 99873273