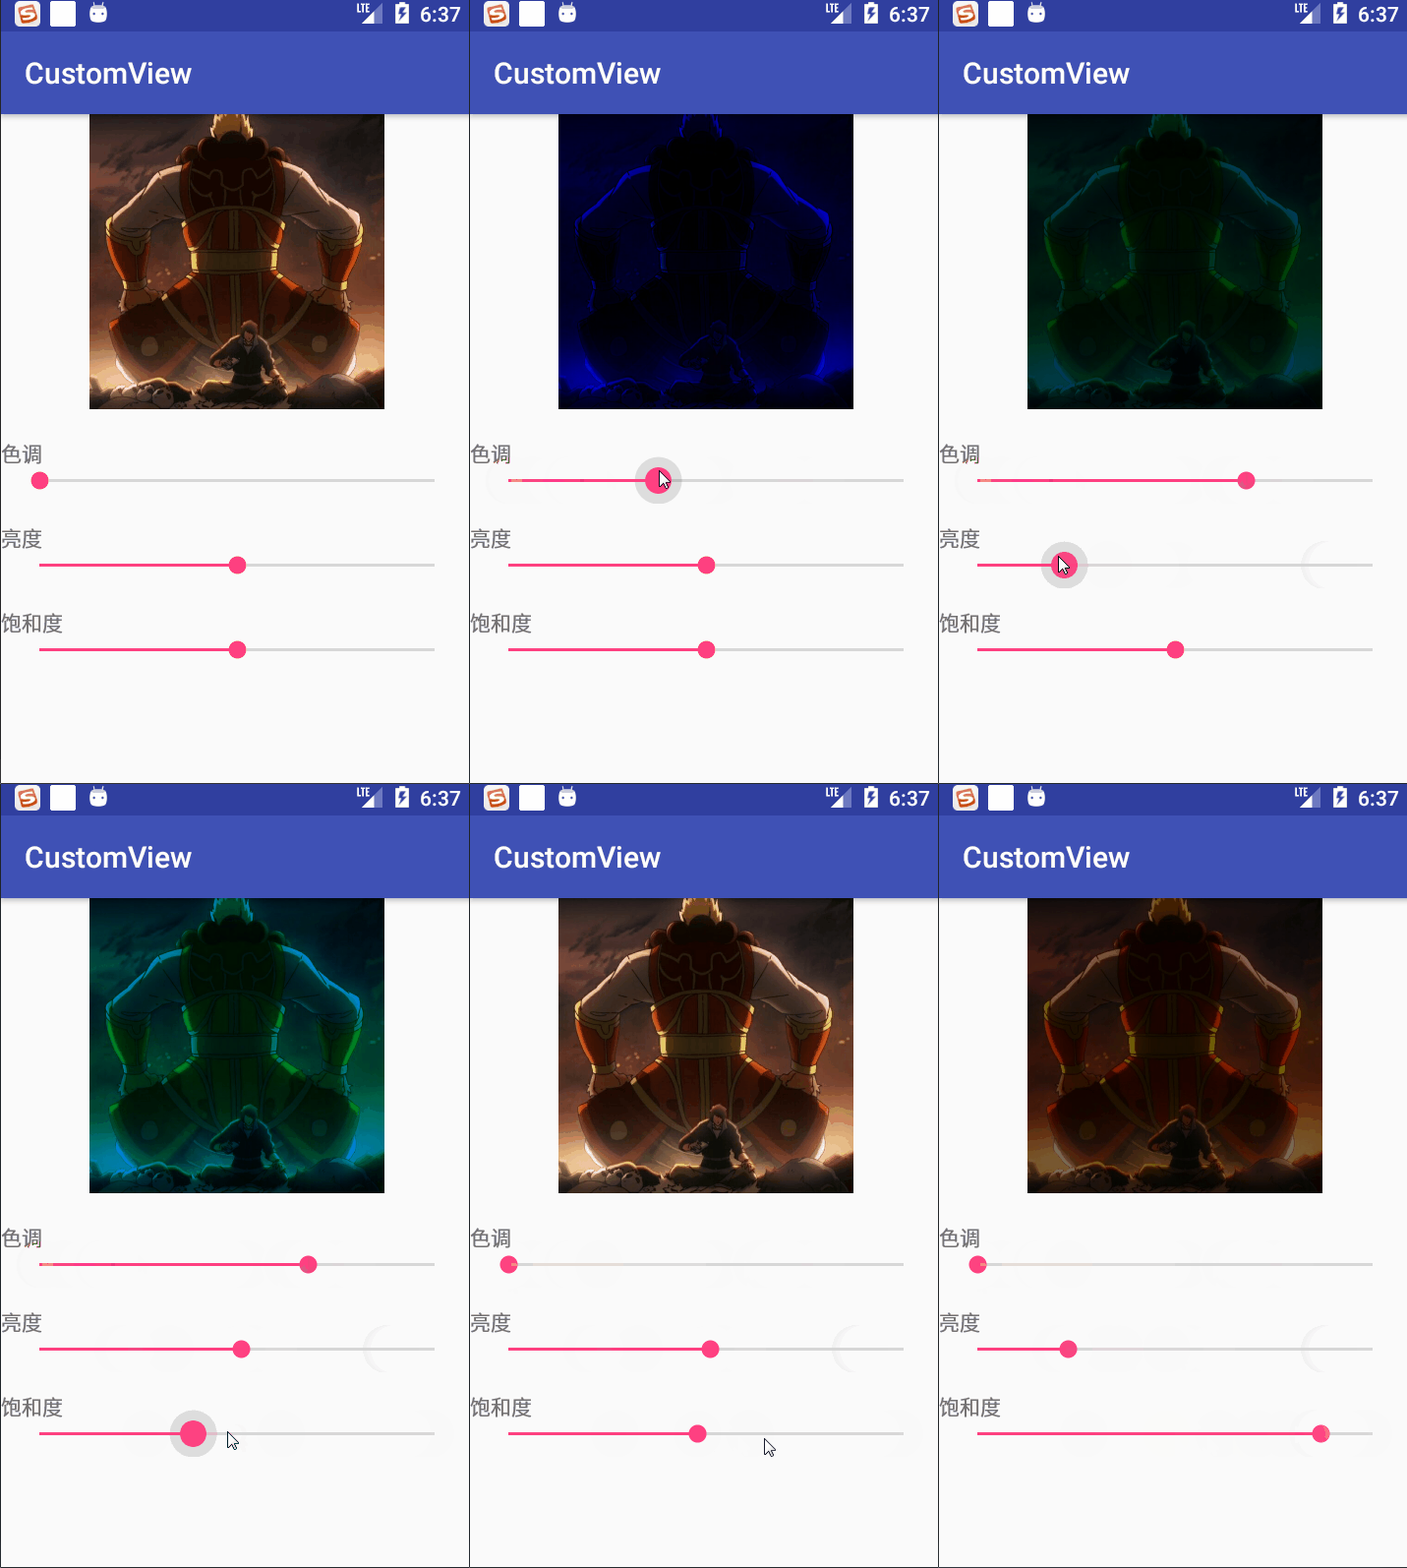
对于图像的色调、亮度、饱和度Android提供了ColorMatrix来供我们进行修改
●setRotate(int axis, float degrees) 设置色调
参数一(axis):颜色编号1(红),2(绿),3(蓝)
参数二(degrees):修改的值(这里为角度值0~360)
方法调用
ColorMatrix colorMatrixS=new ColorMatrix();
colorMatrixS.setRotate(0,one);//红
colorMatrixS.setRotate(1,one);//绿
colorMatrixS.setRotate(2,one);//蓝
●setSaturation(float sat) 设置饱和度
参数(sat):值为1时是原图,大于1饱和度增加,小于1时饱和度减少,值为0时图像为灰色
方法调用
colorMatrixB.setSaturation(three);
●setScale(float rScale, float gScale, float bScale, float aScale)设置亮度
参数一(rScale):红色
参数二(gScale):绿色
参数三(bScale):蓝色
参数四(aScale):透明度
各个参数的值对应调节各个颜色的亮度,0代表全黑1代表原图,一般将透明度的值固定设置为1(原图效果),通过调节三元色的值来调节亮度。
方法调用
colorMatrixL.setScale(two,two,two,1);
效果展示
完整代码
Activity
public class MainActivity extends AppCompatActivity     implements SeekBar.OnSeekBarChangeListener{
    SeekBar seekBarone,seekbartwo,seekbarthree;
    ImageView imageView;
    float one=1,two=1,three=1;
    private Bitmap baseBitmap,copyBitmap;
    @Override
    protected void onCreate(Bundle savedInstanceState) {
        super.onCreate(savedInstanceState);
        setContentView(R.layout.activity_main);
        imageView = findViewById(R.id.img);
        seekBarone=findViewById(R.id.one);
        seekbartwo=findViewById(R.id.two);
        seekbarthree=findViewById(R.id.three);
        seekBarone.setOnSeekBarChangeListener(this);
        seekbartwo.setOnSeekBarChangeListener(this);
        seekbarthree.setOnSeekBarChangeListener(this);
        baseBitmap = BitmapFactory.decodeResource(getResources(), R.mipmap.aaa);
        //既然是复制一张与原图一模一样的图片那么这张复制图片的画纸的宽度和高度以及分辨率都要与原图一样,copyBitmap就为一张与原图相同尺寸分辨率的空白画纸
        copyBitmap=Bitmap.createBitmap(baseBitmap.getWidth(), baseBitmap.getHeight(), baseBitmap.getConfig());
    }
    @Override
    public void onProgressChanged(SeekBar seekBar, int progress, boolean fromUser) {
        switch (seekBar.getId()){
            case R.id.one:
                one=progress*1.0f/seekBar.getMax()*360;
                break;
            case R.id.two:
                two=progress*1.0f/(seekBar.getMax()-50);
                break;
            case R.id.three:
                three=progress*1.0f/(seekBar.getMax()-50);
                break;
        }
        Paint paint=new Paint();
        Canvas canvas=new Canvas(copyBitmap);
        ColorMatrix colorMatrixS=new ColorMatrix();
        colorMatrixS.setRotate(0,one);
        colorMatrixS.setRotate(1,one);
        colorMatrixS.setRotate(2,one);
        ColorMatrix colorMatrixL=new ColorMatrix();
        colorMatrixL.setScale(two,two,two,1);
        ColorMatrix colorMatrixB=new ColorMatrix();
        colorMatrixB.setSaturation(three);
        ColorMatrix colorMatriximg=new ColorMatrix();
    //        通过postConcat()方法可以将以上效果叠加到一起
        colorMatriximg.postConcat(colorMatrixB);
        colorMatriximg.postConcat(colorMatrixL);
        colorMatriximg.postConcat(colorMatrixS);
        ColorMatrixColorFilter colorMatrixColorFilter=new ColorMatrixColorFilter(colorMatriximg);
        paint.setColorFilter(colorMatrixColorFilter);
        canvas.drawBitmap(baseBitmap,new Matrix(),paint);
        imageView.setImageBitmap(copyBitmap);
    }

    @Override
    public void onStartTrackingTouch(SeekBar seekBar) {

    }

    @Override
    public void onStopTrackingTouch(SeekBar seekBar) {

    }
}
布局代码
<?xml version="1.0" encoding="utf-8"?>
    <LinearLayout xmlns:android="http://schemas.android.com/apk/res/android"
        xmlns:app="http://schemas.android.com/apk/res-auto"
        xmlns:tools="http://schemas.android.com/tools"
        android:layout_width="match_parent"
        android:layout_height="match_parent"
        android:orientation="vertical"
        tools:context="com.yuyigufen.customview.MainActivity">

        <ImageView
            android:layout_width="match_parent"
            android:src="@mipmap/aaa"
            android:id="@+id/img"
            android:layout_height="200dp" />
        <TextView
            android:layout_width="wrap_content"
            android:text="色调"
            android:layout_marginTop="20dp"
            android:layout_height="wrap_content" />
        <android.support.v7.widget.AppCompatSeekBar
            android:layout_width="match_parent"
            android:layout_marginLeft="10dp"
            android:id="@+id/one"
            android:layout_marginRight="10dp"
            android:layout_height="wrap_content" />
        <TextView
            android:layout_width="wrap_content"
            android:text="亮度"
            android:layout_marginTop="20dp"
            android:layout_height="wrap_content" />
        <android.support.v7.widget.AppCompatSeekBar
            android:layout_width="match_parent"
            android:layout_marginLeft="10dp"
            android:id="@+id/two"
            android:progress="50"
            android:layout_marginRight="10dp"
            android:layout_height="wrap_content" />
        <TextView
            android:layout_width="wrap_content"
            android:text="饱和度"
            android:layout_marginTop="20dp"
            android:layout_height="wrap_content" />
        <android.support.v7.widget.AppCompatSeekBar
            android:layout_width="match_parent"
            android:layout_marginLeft="10dp"
            android:id="@+id/three"
            android:progress="50"
            android:layout_marginRight="10dp"
            android:layout_height="wrap_content" />

</LinearLayout>


