导读
这里我们将要了解什么是多层感知机神经网络,为什么它这么强大以及我们如何实现它。
我们将要介绍多层感知机神经网络以及反向传播算法,这是现今最流行的神经网络结构。
教学前提知识
读者要熟悉感知机神经网络(单个的)
读者有c/c++的基础知识
读者知道如何编译和运行程序
教学目标
读者将会了解到多层感知器神经网络
读者将会了解到反向传播算法
读者将会知道这个神经网络广泛应用在哪里
读者将通过一个数字识别的例子学习到以上的知识
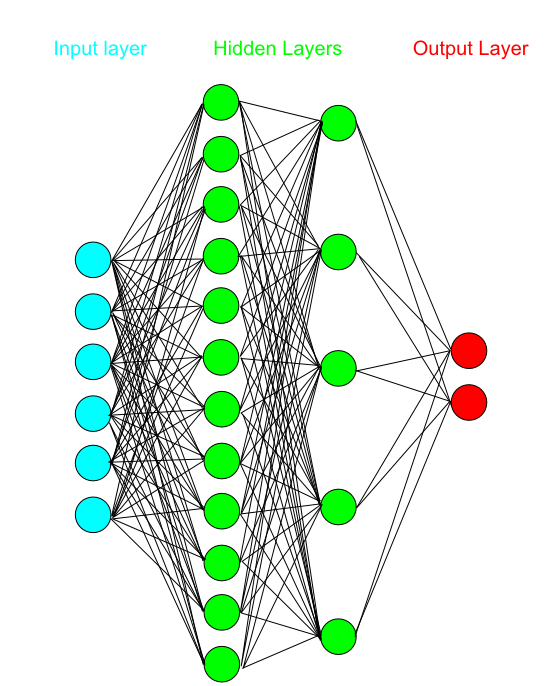
这个神经网络在1986年与反向传播算法一起提出。直到那个时候,没有任何规则去训练多层的神经网络。多层感知机就如它的名字一样,很多个神经元,分成很多层。如图所示:
![images/S276tY6saxGjXWDpkQSaX63HKZWDFczd.png images/S276tY6saxGjXWDpkQSaX63HKZWDFczd.png]()
多层感知机
1,输入层(input layer),这一层是神经网络的输入。在这一层,有多少个输入就有多少个神经元。
2,一层或者多层隐藏层(hidden layers)。隐藏层在输入层和输出层之间,层数是可变的。隐藏层的功能就是把输入映射到输出。已经得到证明的是,一个只有一个隐藏层的多层感知器可以估算任何连接输入和输出的函数,如果这个函数存在的话。
3,输出层,这层的神经元的多少取决于我们要解决的问题。
多层感知器与简单的感知器有很多的不同。相同的是它们的权重都是随机的,所有的权重通常都是[-0.5,0.5]之间的随机数。除此之外,每个模式(pattern)输入到神经网络时,都会经过三个阶段。接下来让我们一个个详细地介绍。
阶段一:输出的计算
在这个阶段,我们计算神经网络的输出。在每一层,我们计算这一层每个神经元的触发值(firing value)(不同地方不同叫法,意思一样)。触发值通过计算连接这个神经元的前一层的所有神经元的值与相应的权重的乘积之和得到。有点拗口,看看代码吧
    for(int i = 0; i < previousLayerNeurons; i ++)
    value[neuron,layer] += weight(i,neuron) * value[i,layer-1];

    value[neuron,layer] = activationFunction(value[neuron,layer]);
从上面的伪代码我们可以看到激励函数(activation function)。激励函数是用来归一化每个神经元的输出的。这个函数在感知机的分析中经常出现。这个输出的计算在神经网络中一层层往前直到输出层得到一些输出值。这些输出值一开始的时候都是随机的,跟我们的目标值没有什么关系。但这里是反向传递算法的开始之处。
阶段二:反向传递
反向传递算法使用了delta规则。这个算法就是在算delta,这是从输出神经元开始往回直到输入层的每个神经元的局部梯度下降。要计算输出神经元的delta,我们首先要得到每个输出神经元的误差。这是很简单的,因为多层感知器是有监督的训练网络,所以误差就是神经网络的输出与实际输出的差别。
ej(n) = dj(n) – oj(n)
e(n)是误差向量,d(n)是实际输出(期望输出),o(n)是神经网络的输出。现在可以计算delta了,
deltaj(L)(n) = ej(L)(n) * f'(uj(L)(n)) ,这个式子是对于在输出层L的第j个神经元
f'(uj(L)(n))是输出层L的第j个神经元的值的求导所得的值。
deltaj(l)(n) = f'(uj(l)(n)) Σk(deltak(l+1)(n)*wkj(l+1)(n)) , 这个式子是对于隐藏层l的第j个神经元。
在求和符号里面的是下一层所有神经元的delta值以及相应的权重的乘积。
这一部分在delta规则中是很重要的,是反向传递算法的精髓。你可能会问为什么?因为中学数学老师教过我们,求导能得到一个函数随着它的输入的变化,这个函数变化了多少。通过反向传递求导的值,前面的神经元就会知道权重要变化多少以更好地让神经网络的输出符合实际的输出。这一切都要从神经网络的输出与实际输出的差别开始算起。是不是很神奇呢?
阶段三:权重的调整
在计算了所有神经元的delta之后,我们开始最后一个阶段的计算。这次,我们要根据以下式子调整权重:
wji(l)(n+1) = wji(l)(n) + α * [wji(l)(n) – wji(l)(n-1)] + η * deltaj(l)(n)yi(l-1)(n)
不要被这么多数学符号吓到,其实这很简单,这个式子说的是:
对于层l来说,新的权重是在现在的权重上加上两样东西。第一个是现在权重与之前的权重的差别乘以一个系数α。这个系数叫做势系数(momentum coefficient)。势系数通过往多层神经网络里面加入已经发生的权重变化起到加速训练的作用。这是把双刃剑,因为如果势系数设得太大,神经网络不会收敛,很有可能陷入局部最小值。
另一个加入的东西是层 l 的delta值乘以前一层 l-1 的神经元的输出,这个乘积还要乘以一个系数η,在前一个教学中我们已经学过这个系数叫学习步长。基本就是这样了!这就是多层感知器了。在统计分析中,神经网络是一个毋庸置疑的强有力的工具!
实例+代码
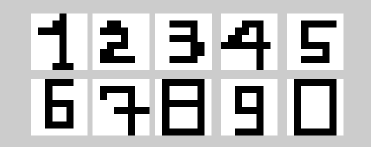
多层感知机有很多应用。统计分析学,模式识别,光学符号识别只是其中的一些应用。我们将给出一个很简单的例子。最后,MLP(多层感知机)能够分辨出一些单色位图并且告诉我们每幅图对应哪个数字,这些图片是一些8×8 像素的图片。当然图片的像素可以由用户自己定义,因为程序会自动读取位图的大小。下图是一个例子:
![images/FF2mj75wmktjdNQYcQ3yKBJZfkYrk2wm.png images/FF2mj75wmktjdNQYcQ3yKBJZfkYrk2wm.png]()
这些数字很丑,是不是?对于计算机来说分辨它们会很难吗?这些丑的地方可以视作噪声。MLP(多层感知器)真的很擅长分辨噪声和实际的数据。让我们看看代码吧:
    class MLP
    {
    private:
    std::vector inputNeurons;
    std::vector> hiddenNeurons;
    std::vector outputNeurons;
    std::vector weights;

    FileReader* reader;
    int inputN,outputN,hiddenN,hiddenL;
    public:
    MLP(int hiddenL,int hiddenN);
    ~MLP();

    //assigns values to the input neurons
    bool populateInput(int fileNum);
    //calculates the whole network, from input to output
    void calculateNetwork();
    //trains the network according to our parameters
    bool trainNetwork(float teachingStep,float lmse,float momentum,int trainingFiles);
    //recalls the network for a given bitmap file
    void recallNetwork(int fileNum);
    };
以上就是多层感知器的类。我们可以看到有神经元向量,权重向量。还有个FileReader的对象。这个FileReader是一个读取位图文件的类。MLP读取位图文件,计算神经网络的输出然后训练神将网络。此外,你还可以输入一个‘fileNum'来调用这个神经网络,看下神经网络对你给的图片上的数字的判断是什么。
    //Multi-layer perceptron constructor
    MLP::MLP(int hL,int hN)
    {
    //initialize the filereader
    reader = new FileReader();
    outputN = 10; //the 9 possible numbers and zero
    hiddenL = hL;
    hiddenN = hN;

    //initialize the filereader
    reader = new FileReader();

    //read the first image to see what kind of input will our net have
    inputN = reader->getBitmapDimensions();
    if(inputN == -1)
    {
    printf("There was an error detecting img0.bmp\n\r");
    return ;
    }

    //let's allocate the memory for the weights
    weights.reserve(inputN*hiddenN+(hiddenN*hiddenN*(hiddenL-1))+hiddenN*outputN);

    //also let's set the size for the neurons vector
    inputNeurons.resize(inputN);
    hiddenNeurons.resize(hiddenN*hiddenL);
    outputNeurons.resize(outputN);

    //randomize weights for inputs to 1st hidden layer
    for(int i = 0; i < inputN*hiddenN; i++)
    {
    weights.push_back( (( (float)rand() / ((float)(RAND_MAX)+(float)(1)) )) - 0.5 );//[-0.5,0.5]
    }

    //if there are more than 1 hidden layers, randomize their weights
    for(int i=1; i < hiddenL; i++)
    {
    for(int j = 0; j < hiddenN*hiddenN; j++)
    {
    weights.push_back( (( (float)rand() / ((float)(RAND_MAX)+(float)(1)) )) - 0.5 );//[-0.5,0.5]
    }
    }
    //and finally randomize the weights for the output layer
    for(int i = 0; i < hiddenN*outputN; i ++)
    {
    weights.push_back( (( (float)rand() / ((float)(RAND_MAX)+(float)(1)) )) - 0.5 );//[-0.5,0.5]
    }
    }
神经网络把隐藏层的层数和隐藏层的神经元数作为参数来初始化神经元和权重向量。此外,通过一下这个语句,神经网络读取第一幅位图'imag0.bmp'以获取输入的维数(即输入层的神经元个数):
inputN = reader->getBitmapDimensions();
这个输入是这个教程的程序需要的。你可以随意输入任何大小的位图,但是之后输入的位图必须与第一输入的位图大小一致。大部分的神经网络的权重初始化范围是[-0.5,0.5]。
    void MLP::calculateNetwork()
    {
    //let's propagate towards the hidden layer
    for(int hidden = 0; hidden < hiddenN; hidden++)
    {
    hiddenAt(1,hidden) = 0;
    for(int input = 0 ; input < inputN; input ++)
    {
    hiddenAt(1,hidden) += inputNeurons.at(input)*inputToHidden(input,hidden);
    }
    //and finally pass it through the activation function
    hiddenAt(1,hidden) = sigmoid(hiddenAt(1,hidden));
    }

    //now if we got more than one hidden layers
    for(int i = 2; i <= hiddenL; i ++)
    {
    //for each one of these extra layers calculate their values
    for(int j = 0; j < hiddenN; j++)//to
    {
    hiddenAt(i,j) = 0;
    for(int k = 0; k < hiddenN; k++)//from
    {
    hiddenAt(i,j) += hiddenAt(i-1,k)*hiddenToHidden(i,k,j);
    }
    //and finally pass it through the activation function
    hiddenAt(i,j) = sigmoid(hiddenAt(i,j));
    }
    }

    int i;
    //and now hidden to output
    for(i =0; i < outputN; i ++)
    {
    outputNeurons.at(i) = 0;
    for(int j = 0; j < hiddenN; j++)
    {
    outputNeurons.at(i) += hiddenAt(hiddenL,j) * hiddenToOutput(j,i);
    }
    //and finally pass it through the activation function
    outputNeurons.at(i) = sigmoid( outputNeurons.at(i) );
    }
    }
上面这个calculateNetwrok()计算当前输入的输出。它把输入的信号传递到输出层。上面的代码并没有什么特别,就是之前讲到的一些式子的实现。这个例子有10个不同的输出。每个输出表示的是 输入的模式是一个特定的数字的可能性。所以,输出1(接近1.0)表示输入的模式最有可能是1,以此类推。
训练函数太大不能摆在这里,但是推荐你看.zip文件里面的源代码(原文中有源代码下载)。我们就集中看反向传递算法的实现。
    for(int i = 0; i < outputN; i ++)
    {
    //let's get the delta of the output layer
    //and the accumulated error
    if(i != target)
    {
    outputDeltaAt(i) = (0.0 - outputNeurons[i])*dersigmoid(outputNeurons[i]);
    error += (0.0 - outputNeurons[i])*(0.0-outputNeurons[i]);
    }
    else
    {
    outputDeltaAt(i) = (1.0 - outputNeurons[i])*dersigmoid(outputNeurons[i]);
    error += (1.0 - outputNeurons[i])*(1.0-outputNeurons[i]);
    }
    }
    //we start propagating backwards now, to get the error of each neuron
    //in every layer
    //let's get the delta of the last hidden layer first
    for(int i = 0; i < hiddenN; i++)
    {
    hiddenDeltaAt(hiddenL,i) = 0;//zero the values from the previous iteration
    //add to the delta for each connection with an output neuron
    for(int j = 0; j < outputN; j ++)
    {
    hiddenDeltaAt(hiddenL,i) += outputDeltaAt(j) * hiddenToOutput(i,j) ;
    }
    //The derivative here is only because of the
    //delta rule weight adjustment about to follow
    hiddenDeltaAt(hiddenL,i) *= dersigmoid(hiddenAt(hiddenL,i));
    }

    //now for each additional hidden layer, provided they exist
    for(int i = hiddenL-1; i >0; i--)
    {
    //add to each neuron's hidden delta
    for(int j = 0; j < hiddenN; j ++)//from
    {
    hiddenDeltaAt(i,j) = 0;//zero the values from the previous iteration
    for(int k = 0; k < hiddenN; k++)//to
    {
    //the previous hidden layers delta multiplied by the weights
    //for each neuron
    hiddenDeltaAt(i,j) += hiddenDeltaAt(i+1,k) * hiddenToHidden(i+1,j,k);
    }
    //The derivative here is only because of the
    //delta rule weight adjustment about to follow
    hiddenDeltaAt(i,j) *= dersigmoid(hiddenAt(i,j));
    }
    }
我们看到上面的代码是第二阶段反向传播算法。计算了输出并且知道期望输出(或者在上面的代码中叫做target),我们可以根据之前的等式计算delta。如果你不喜欢数学,我们给你有一些代码。你可以看到有很多宏(macros)去分辨不同层的权重以及delta。
    //Weights modification
    tempWeights = weights;//keep the previous weights somewhere, we will need them

    //hidden to Input weights
    for(int i = 0; i < inputN; i ++)
    {
    for(int j = 0; j < hiddenN; j ++)
    {
    inputToHidden(i,j) += momentum*(inputToHidden(i,j) - _prev_inputToHidden(i,j)) +
    teachingStep* hiddenDeltaAt(1,j) * inputNeurons[i];
    }
    }

    //hidden to hidden weights, provided more than 1 layer exists
    for(int i = 2; i <=hiddenL; i++)
    {
    for(int j = 0; j < hiddenN; j ++)//from
    {
    for(int k =0; k < hiddenN; k ++)//to
    {
    hiddenToHidden(i,j,k) += momentum*(hiddenToHidden(i,j,k) - _prev_hiddenToHidden(i,j,k)) +
    teachingStep * hiddenDeltaAt(i,k) * hiddenAt(i-1,j);
    }
    }
    }

    //last hidden layer to output weights
    for(int i = 0; i < outputN; i++)
    {
    for(int j = 0; j < hiddenN; j ++)
    {
    hiddenToOutput(j,i) += momentum*(hiddenToOutput(j,i) - _prev_hiddenToOutput(j,i)) +
    teachingStep * outputDeltaAt(i) * hiddenAt(hiddenL,j);
    }
    }

    prWeights = tempWeights;
以上代码是我们最后的阶段,是一个从前向后由输入层到输出层的算法。我们用之前计算的delta来调整神经网络的权重。这个只是我们之前看到的权重调整的式子的代码实现。
我们可以看到学习步长如何起作用。此外,细心的读者会发现我们把前一次的权重向量暂时地保存起来。这是因为势(momentum,向前冲之力)。之前那个权重调整的式子里面,势加快了训练速度,因为添加了权重的变化部分。
这就是关于反向传播训练算法以及多层感知机的所有了。让我们看看那fileReader类吧。
    class FileReader
    {
    private:
    char* imgBuffer;
    //a DWORD
    char* check;
    bool firstImageRead;
    //the input filestream used to read
    ifstream fs;

    //image stuff
    int width;
    int height;
    public:
    FileReader();
    ~FileReader();

    bool readBitmap(int fileNum);

    //reads the first bitmap file, the one designated with a '0'
    //and gets the dimensions. All other .bmp are assumed with
    //equal and identical dimensions
    int getBitmapDimensions();

    //returns a pointer to integers with all the goals
    //that each bitmap should have. Reads it from a file
    int* getImgGoals();

    //returns a pointer to the currently read data
    char* getImgData();

    //helper function convering bytes to an int
    int bytesToInt(char* bytes,int number);
    };
这个是fileReader类。这个类包含imgBuffer用来存储现在读取的位图数据,这个类用输入文件流来读取位图文件,这个类还会保存初始图片的宽和高。需要知道更多如何实现这些函数的可以看.zip文件。你需要知道的是这个类是用来读取指定的位图’img0.bmp',并且假定其它所有位图的大小是一样的,而且所有图片保存在相同的路径下。
你可以用任何图片编辑程序去得到单色位图。你可以建立自己的位图,但要用升序的数字去保存他们,并且相应地更新golas.txt。此外,所有的图片要大小一致。
如图运行代码:
![images/nb6nkAtDsEAnDWk4HCjJiCWQd8d7tHeA.png images/nb6nkAtDsEAnDWk4HCjJiCWQd8d7tHeA.png]()
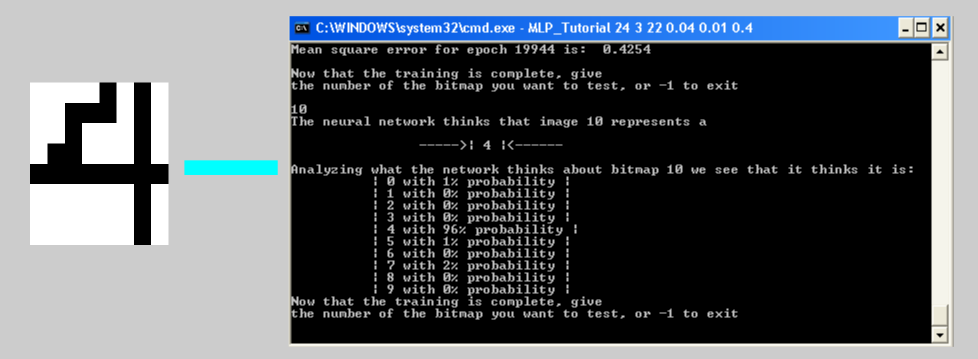
假设你在相同的路径下有一些位图以及goals.txt文件,你可以如上图那样运行这个教程的例子。这就像在windows中使用cmd命令行一样,当然在Linux下也是可以运行的。你可以在上图看到如何调用。如果错误地调用了,你会马上看到一个改正的要求。
![images/sM7zZ3mnEMDMfxNx3xrQHccShpd74MC7.png images/sM7zZ3mnEMDMfxNx3xrQHccShpd74MC7.png]()
在windows的训练期间和在Linux每1000代(epochs),你可以停止或者开始调用图片。你要输入图片的号码,就是图片文件名跟在‘img'后面那个数字。神经网络调用这个图片,然后它会告诉你它认为这个图片是什么数字。最后,你可以在上面这幅图看到,神经网络认为这个图片是0到9这些数字的概率。
相关推荐:http://www.roncoo.com/course/view/5a057438cc2a4231a8c245695faea238


