本文从以下几个方面介绍:
相关文章
前言
缓存的相关接口
一级缓存的实现过程
二级缓存的实现过程
如何保证缓存的线程安全
缓存的装饰器
相关文章
Mybatis 解析 SQL 源码分析二
Mybatis Mapper.xml 配置文件中 resultMap 节点的源码解析
Mybatis 解析 SQL 源码分析一
Mybatis Mapper 接口源码解析(binding包)
Mybatis 数据源和数据库连接池源码解析(DataSource)
Mybatis 类型转换源码分析
Mybatis 解析配置文件的源码解析
前言
在使用诸如 Mybatis 这种 ORM 框架的时候,一般都会提供缓存功能,用来缓存从数据库查询到的结果,当下一次查询条件相同的时候,只需从缓存中进行查找返回即可,如果缓存中没有,再去查库;一方面是提高查询速度,另一方面是减少数据库压力;Mybatis 也提供了缓存,它分为一级缓存和二级缓存,接下来就来看看它的缓存系统是如何实现的。
缓存系统的实现使用了 模板方法模式 和 装饰器模式
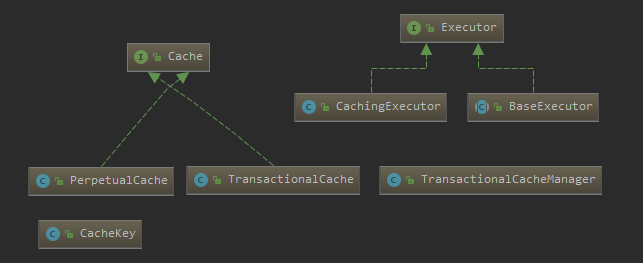
接下来先来看下和缓存相关的接口
![]()
Cache
Mybatis 使用 Cache 来表示缓存,它是一个接口,定义了缓存需要的一些方法,如下所示:
public interface Cache {
  //获取缓存的id,即 namespace
  String getId();
  // 添加缓存
  void putObject(Object key, Object value);
  //根据key来获取缓存对应的值
  Object getObject(Object key);
  // 删除key对应的缓存
  Object removeObject(Object key);
  // 清空缓存
  void clear();
  // 获取缓存中数据的大小
  int getSize();
  //取得读写锁, 从3.2.6开始没用了
  ReadWriteLock getReadWriteLock();
}
对于每一个 namespace 都会创建一个缓存的实例,Cache 实现类的构造方法都必须传入一个 String 类型的ID,Mybatis自身的实现类都使用 namespace 作为 ID
PerpetualCache
Mybatis 为 Cache 接口提供的唯一一个实现类就是 PerpetualCache,这个唯一并不是说 Cache 只有一个实现类,只是缓存的处理逻辑,Cache 还有其他的实现类,但是只是作为装饰器存在,只是对 Cache 进行包装而已。
PerpetualCache 的实现比较简单,就是把对应的 key-value 缓存数据存入到 map 中,如下所示:
public class PerpetualCache implements Cache {
  // id,一般对应mapper.xml 的namespace 的值
  private String id;

  // 用来存放数据,即缓存底层就是使用 map 来实现的
  private Map<Object, Object> cache = new HashMap<Object, Object>();

  public PerpetualCache(String id) {
    this.id = id;
  }
  //......其他的getter方法.....
  // 添加缓存
  @Override
  public void putObject(Object key, Object value) {
    cache.put(key, value);
  }
  // 获取缓存
  @Override
  public Object getObject(Object key) {
    return cache.get(key);
  }
  // 删除缓存
  @Override
  public Object removeObject(Object key) {
    return cache.remove(key);
  }
  // 清空缓存
  @Override
  public void clear() {
    cache.clear();
  }
}
从上面的代码逻辑可以看到,mybatis 提供的缓存底层就是使用一个 HashMap 来实现的,但是我们知道,HashMap 不是线程安全的,它是如何来保证缓存中的线程安全问题呢?在后面讲到 Cache 的包装类就知道,它提供了一个 SynchronizedCache 的装饰器类,就是用来包装线程安全的,在该类中所有方法都加上了 synchronized 关键字。
CacheKey
Mybatis 的缓存使用了 key-value 的形式存入到 HashMap 中,而 key 的话,Mybatis 使用了 CacheKey 来表示 key,它的生成规则为:mappedStementId + offset + limit + SQL + queryParams + environment生成一个哈希码.
public class CacheKey implements Cloneable, Serializable {

  private static final int DEFAULT_MULTIPLYER = 37;
  private static final int DEFAULT_HASHCODE = 17;

  // 参与计算hashcode,默认值为37
  private int multiplier;
  // CacheKey 对象的 hashcode ,默认值 17
  private int hashcode;
  // 检验和
  private long checksum;
  // updateList 集合的个数
  private int count;
  // 由该集合中的所有对象来共同决定两个 CacheKey 是否相等
  private List<Object> updateList;

  public int getUpdateCount() {
    return updateList.size();
  }
  // 调用该方法,向 updateList 集合添加对应的对象
  public void update(Object object) {
    if (object != null && object.getClass().isArray()) {
      // 如果是数组,则循环处理每一项
      int length = Array.getLength(object);
      for (int i = 0; i < length; i++) {
        Object element = Array.get(object, i);
        doUpdate(element);
      }
    } else {
      doUpdate(object);
    }
  }
  // 计算 count checksum hashcode 和把对象添加到 updateList 集合中
  private void doUpdate(Object object) {
    int baseHashCode = object == null ? 1 : object.hashCode();
    count++;
    checksum += baseHashCode;
    baseHashCode *= count;
    hashcode = multiplier * hashcode + baseHashCode;

    updateList.add(object);
  }

  // 判断两个 CacheKey 是否相等
  @Override
  public boolean equals(Object object) {
    if (this == object) {
      return true;
    }
    if (!(object instanceof CacheKey)) {
      return false;
    }

    final CacheKey cacheKey = (CacheKey) object;

    if (hashcode != cacheKey.hashcode) {
      return false;
    }
    if (checksum != cacheKey.checksum) {
      return false;
    }
    if (count != cacheKey.count) {
      return false;
    }
    // 如果前几项都不满足,则循环遍历 updateList 集合,判断每一项是否相等,如果有一项不相等则这两个CacheKey不相等
    for (int i = 0; i < updateList.size(); i++) {
      Object thisObject = updateList.get(i);
      Object thatObject = cacheKey.updateList.get(i);
      if (thisObject == null) {
        if (thatObject != null) {
          return false;
        }
      } else {
        if (!thisObject.equals(thatObject)) {
          return false;
        }
      }
    }
    return true;
  }

  @Override
  public int hashCode() {
    return hashcode;
  }
}
如果需要进行缓存,则如何创建 CacheKey 呢?下面这个就是创建 一个 CacheKey 的方法:
  public CacheKey createCacheKey(MappedStatement ms, Object parameterObject, RowBounds rowBounds, BoundSql boundSql) {
    //cacheKey 对象
    CacheKey cacheKey = new CacheKey();
    // 向 updateList 存入id
    cacheKey.update(ms.getId());
    // 存入offset
    cacheKey.update(rowBounds.getOffset());
    // 存入limit
    cacheKey.update(rowBounds.getLimit());
    // 存入sql
    cacheKey.update(boundSql.getSql());
    List<ParameterMapping> parameterMappings = boundSql.getParameterMappings();
    TypeHandlerRegistry typeHandlerRegistry = ms.getConfiguration().getTypeHandlerRegistry();
    for (ParameterMapping parameterMapping : parameterMappings) {
      if (parameterMapping.getMode() != ParameterMode.OUT) {
          String propertyName = parameterMapping.getProperty();
          MetaObject metaObject = configuration.newMetaObject(parameterObject);
          Object  value = metaObject.getValue(propertyName);
          // 存入每一个参数
          cacheKey.update(value);
      }
    }
    if (configuration.getEnvironment() != null) {
      // 存入 environmentId
      cacheKey.update(configuration.getEnvironment().getId());
    }
    return cacheKey;
  }
从上面 CacheKey 和创建 CacheKey 的代码逻辑可以看出,Mybatis 的缓存使用了 mappedStementId + offset + limit + SQL + queryParams + environment 生成的hashcode作为 key。
了解了上述和缓存相关的接口后,接下来就来看看 Mybatis 的缓存系统是如何实现的,Mybatis 的缓存分为一级缓存和二级缓存,一级缓存是在 BaseExecutor 中实现的,二级缓存是在 CachingExecutor 中实现的。
Executor
Executor 接口定义了操作数据库的基本方法,SqlSession 的相关方法就是基于 Executor 接口实现的,它定义了操作数据库的方法如下:
public interface Executor {

  ResultHandler NO_RESULT_HANDLER = null;

  // insert | update | delete 的操作方法
  int update(MappedStatement ms, Object parameter) throws SQLException;

  // 查询,带分页,带缓存
  <E> List<E> query(MappedStatement ms, Object parameter, RowBounds rowBounds, ResultHandler resultHandler, CacheKey cacheKey, BoundSql boundSql) throws SQLException;

  // 查询,带分页
  <E> List<E> query(MappedStatement ms, Object parameter, RowBounds rowBounds, ResultHandler resultHandler) throws SQLException;

  // 查询存储过程
  <E> Cursor<E> queryCursor(MappedStatement ms, Object parameter, RowBounds rowBounds) throws SQLException;

  //刷新批处理语句
  List<BatchResult> flushStatements() throws SQLException;

  // 事务提交
  void commit(boolean required) throws SQLException;
  // 事务回滚
  void rollback(boolean required) throws SQLException;

  // 创建缓存的key
  CacheKey createCacheKey(MappedStatement ms, Object parameterObject, RowBounds rowBounds, BoundSql boundSql);
  // 是否缓存
  boolean isCached(MappedStatement ms, CacheKey key);
  // 清空缓存
  void clearLocalCache();
  // 延迟加载
  void deferLoad(MappedStatement ms, MetaObject resultObject, String property, CacheKey key, Class<?> targetType);
  // 获取事务
  Transaction getTransaction();
}
一级缓存
BaseExecutor
BaseExecutor 是一个抽象类,实现了 Executor 接口,并提供了大部分方法的实现,只有 4 个基本方法:doUpdate, doQuery, doQueryCursor, doFlushStatement 没有实现,还是一个抽象方法,由子类实现,这 4 个方法相当于模板方法中变化的那部分。
Mybatis 的一级缓存就是在该类中实现的。
Mybatis 的一级缓存是会话级别的缓存,Mybatis 每创建一个 SqlSession 对象,就表示打开一次数据库会话,在一次会话中,应用程序很可能在短时间内反复执行相同的查询语句,如果不对数据进行缓存,则每查询一次就要执行一次数据库查询,这就造成数据库资源的浪费。又因为通过 SqlSession 执行的操作,实际上由 Executor 来完成数据库操作的,所以在 Executor 中会建立一个简单的缓存,即一级缓存;将每次的查询结果缓存起来,再次执行查询的时候,会先查询一级缓存,如果命中,则直接返回,否则再去查询数据库并放入缓存中。
一级缓存的生命周期与 SqlSession 的生命周期相同,当调用 Executor.close 方法的时候,缓存变得不可用。一级缓存是默认开启的,一般情况下不需要特殊的配置,如果需要特殊配置,则可以通过插件的形式来实现
public abstract class BaseExecutor implements Executor {
  // 事务,提交,回滚,关闭事务
  protected Transaction transaction;
  // 底层的 Executor 对象
  protected Executor wrapper;
  // 延迟加载队列
  protected ConcurrentLinkedQueue<DeferredLoad> deferredLoads;
  // 一级缓存,用于缓存查询结果
  protected PerpetualCache localCache;
  // 一级缓存,用于缓存输出类型参数(存储过程)
  protected PerpetualCache localOutputParameterCache;
  protected Configuration configuration;
  // 用来记录嵌套查询的层数
  protected int queryStack;
  private boolean closed;

  protected BaseExecutor(Configuration configuration, Transaction transaction) {
    this.transaction = transaction;
    this.deferredLoads = new ConcurrentLinkedQueue<DeferredLoad>();
    this.localCache = new PerpetualCache("LocalCache");
    this.localOutputParameterCache = new PerpetualCache("LocalOutputParameterCache");
    this.closed = false;
    this.configuration = configuration;
    this.wrapper = this;
  }

// 4 个抽象方法,由子类实现,模板方法中可变部分
  protected abstract int doUpdate(MappedStatement ms, Object parameter)throws SQLException;
  protected abstract List<BatchResult> doFlushStatements(boolean isRollback) throws SQLException;
  protected abstract <E> List<E> doQuery(MappedStatement ms, Object parameter, RowBounds rowBounds, ResultHandler resultHandler, BoundSql boundSql)throws SQLException;
  protected abstract <E> Cursor<E> doQueryCursor(MappedStatement ms, Object parameter, RowBounds rowBounds, BoundSql boundSql)throws SQLException;

  // 执行 insert | update | delete 语句,调用 doUpdate 方法实现,在执行这些语句的时候,会清空缓存
  public int update(MappedStatement ms, Object parameter) throws SQLException {
    // ....
    // 清空缓存
    clearLocalCache();
    // 执行SQL语句
    return doUpdate(ms, parameter);
  }

  // 刷新批处理语句,且执行缓存中还没执行的SQL语句
  @Override
  public List<BatchResult> flushStatements() throws SQLException {
    return flushStatements(false);
  }
  public List<BatchResult> flushStatements(boolean isRollBack) throws SQLException {
    // ...
    // doFlushStatements 的 isRollBack 参数表示是否执行缓存中的SQL语句,false表示执行,true表示不执行
    return doFlushStatements(isRollBack);
  }

  // 查询存储过程
  @Override
  public <E> Cursor<E> queryCursor(MappedStatement ms, Object parameter, RowBounds rowBounds) throws SQLException {
    BoundSql boundSql = ms.getBoundSql(parameter);
    return doQueryCursor(ms, parameter, rowBounds, boundSql);
  }

  // 事务的提交和回滚
  @Override
  public void commit(boolean required) throws SQLException {
    // 清空缓存
    clearLocalCache();
    // 刷新批处理语句,且执行缓存中的QL语句
    flushStatements();
    if (required) {
      transaction.commit();
    }
  }
  @Override
  public void rollback(boolean required) throws SQLException {
    if (!closed) {
      try {
        // 清空缓存
        clearLocalCache();
        // 刷新批处理语句,且不执行缓存中的SQL
        flushStatements(true);
      } finally {
        if (required) {
          transaction.rollback();
        }
      }
    }
  }
在上面的代码逻辑中,执行update类型的语句会清空缓存,且执行结果不需要进行缓存,而在执行查询语句的时候,需要对数据进行缓存,如下所示:
  @Override
  public <E> List<E> query(MappedStatement ms, Object parameter, RowBounds rowBounds, ResultHandler resultHandler) throws SQLException {
    // 获取查询SQL
    BoundSql boundSql = ms.getBoundSql(parameter);
    // 创建缓存的key,创建逻辑在 CacheKey中已经分析过了
    CacheKey key = createCacheKey(ms, parameter, rowBounds, boundSql);
    // 执行查询
    return query(ms, parameter, rowBounds, resultHandler, key, boundSql);
 }

  // 执行查询逻辑
  public <E> List<E> query(MappedStatement ms, Object parameter, RowBounds rowBounds, ResultHandler resultHandler, CacheKey key, BoundSql boundSql) throws SQLException {
    // ....
    if (queryStack == 0 && ms.isFlushCacheRequired()) {
      // 如果不是嵌套查询,且 <select> 的 flushCache=true 时才会清空缓存
      clearLocalCache();
    }
    List<E> list;
    try {
      // 嵌套查询层数加1
      queryStack++;
      // 首先从一级缓存中进行查询
      list = resultHandler == null ? (List<E>) localCache.getObject(key) : null;
      if (list != null) {
        // 如果命中缓存,则处理存储过程
        handleLocallyCachedOutputParameters(ms, key, parameter, boundSql);
      } else {
        // 如果缓存中没有对应的数据,则查数据库中查询数据
        list = queryFromDatabase(ms, parameter, rowBounds, resultHandler, key, boundSql);
      }
    } finally {
      queryStack--;
    }
    // ... 处理延迟加载的相关逻辑
    return list;
  }

  // 从数据库查询数据
  private <E> List<E> queryFromDatabase(MappedStatement ms, Object parameter, RowBounds rowBounds, ResultHandler resultHandler, CacheKey key, BoundSql boundSql) throws SQLException {
    List<E> list;
    // 在缓存中添加占位符
    localCache.putObject(key, EXECUTION_PLACEHOLDER);
    try {
      // 查库操作,由子类实现
      list = doQuery(ms, parameter, rowBounds, resultHandler, boundSql);
    } finally {
      // 删除占位符
      localCache.removeObject(key);
    }
    // 将从数据库查询的结果添加到一级缓存中
    localCache.putObject(key, list);
    // 处理存储过程
    if (ms.getStatementType() == StatementType.CALLABLE) {
      localOutputParameterCache.putObject(key, parameter);
    }
    return list;
  }
二级缓存
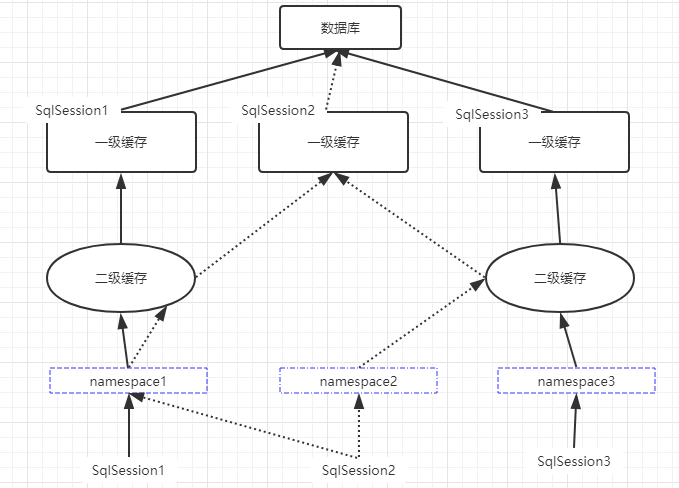
Mybatis 提供的二级缓存是应用级别的缓存,它的生命周期和应用程序的生命周期相同,且与二级缓存相关的配置有以下 3 个:
1. mybatis-config.xml 配置文件中的 cacheEnabled 配置,它是二级缓存的总开关,只有该配置为 true ,后面的缓存配置才会生效。默认为 true,即二级缓存默认是开启的。
2. Mapper.xml 配置文件中配置的 <cache> 和 <cache-ref>标签,如果 Mapper.xml 配置文件中配置了这两个标签中的任何一个,则表示开启了二级缓存的功能,在 Mybatis 解析 SQL 源码分析一 文章中已经分析过,如果配置了 <cache> 标签,则在解析配置文件的时候,会为该配置文件指定的 namespace 创建相应的 Cache 对象作为其二级缓存(默认为 PerpetualCache 对象),如果配置了 <cache-ref> 节点,则通过 ref 属性的namespace值引用别的Cache对象作为其二级缓存。通过 <cache> 和 <cache-ref> 标签来管理其在namespace中二级缓存功能的开启和关闭
3. <select> 节点中的 useCache 属性也可以开启二级缓存,该属性表示查询的结果是否要存入到二级缓存中,该属性默认为 true,也就是说 <select> 标签默认会把查询结果放入到二级缓存中。
![]()
Mybatis 的二级缓存是用 CachingExecutor 来实现的,它是 Executor 的一个装饰器类。为 Executor 对象添加了缓存的功能。
在介绍 CachingExecutor 之前,先来看看 CachingExecutor 依赖的两个类,TransactionalCacheManager 和 TransactionalCache。
TransactionalCache
TransactionalCache 实现了 Cache 接口,主要用于保存在某个 SqlSession 的某个事务中需要向某个二级缓存中添加的数据,代码如下:
public class TransactionalCache implements Cache {
  // 底层封装的二级缓存对应的Cache对象
  private Cache delegate;
  // 为true时,表示当前的 TransactionalCache 不可查询,且提交事务时会清空缓存
  private boolean clearOnCommit;
  // 存放需要添加到二级缓存中的数据
  private Map<Object, Object> entriesToAddOnCommit;
  // 存放为命中缓存的 CacheKey 对象
  private Set<Object> entriesMissedInCache;

  public TransactionalCache(Cache delegate) {
    this.delegate = delegate;
    this.clearOnCommit = false;
    this.entriesToAddOnCommit = new HashMap<Object, Object>();
    this.entriesMissedInCache = new HashSet<Object>();
  }

  // 添加缓存数据的时候,先暂时放到 entriesToAddOnCommit 集合中,在事务提交的时候,再把数据放入到二级缓存中,避免脏数据
  @Override
  public void putObject(Object key, Object object) {
    entriesToAddOnCommit.put(key, object);
  }
  // 提交事务,
  public void commit() {
    if (clearOnCommit) {
      delegate.clear();
    }
    // 把 entriesToAddOnCommit  集合中的数据放入到二级缓存中
    flushPendingEntries();
    reset();
  }
 // 把 entriesToAddOnCommit  集合中的数据放入到二级缓存中
  private void flushPendingEntries() {
    for (Map.Entry<Object, Object> entry : entriesToAddOnCommit.entrySet()) {
      // 放入到二级缓存中
      delegate.putObject(entry.getKey(), entry.getValue());
    }
    for (Object entry : entriesMissedInCache) {
      if (!entriesToAddOnCommit.containsKey(entry)) {
        delegate.putObject(entry, null);
      }
    }
  }
 // 事务回滚
 public void rollback() {
    // 把未命中缓存的数据清除掉
    unlockMissedEntries();
    reset();
  }
  private void unlockMissedEntries() {
    for (Object entry : entriesMissedInCache) {
        delegate.removeObject(entry);
    }
  }
TransactionalCacheManager
TransactionalCacheManager 用于管理 CachingExecutor 使用的二级缓存:
public class TransactionalCacheManager {

  //用来管理 CachingExecutor 使用的二级缓存
  // key 为对应的CachingExecutor 使用的二级缓存
  // value 为对应的 TransactionalCache 对象
  private Map<Cache, TransactionalCache> transactionalCaches = new HashMap<Cache, TransactionalCache>();

  public void clear(Cache cache) {
    getTransactionalCache(cache).clear();
  }
  public Object getObject(Cache cache, CacheKey key) {
    return getTransactionalCache(cache).getObject(key);
  }
  public void putObject(Cache cache, CacheKey key, Object value) {
    getTransactionalCache(cache).putObject(key, value);
  }
  public void commit() {
    for (TransactionalCache txCache : transactionalCaches.values()) {
      txCache.commit();
    }
  }
  public void rollback() {
    for (TransactionalCache txCache : transactionalCaches.values()) {
      txCache.rollback();
    }
  }
  // 所有的调用都会调用 TransactionalCache 的方法来实现
  private TransactionalCache getTransactionalCache(Cache cache) {
    TransactionalCache txCache = transactionalCaches.get(cache);
    if (txCache == null) {
      txCache = new TransactionalCache(cache);
      transactionalCaches.put(cache, txCache);
    }
    return txCache;
  }

}
CachingExecutor
接下来看下 二级缓存的实现 CachingExecutor :
public class CachingExecutor implements Executor {
  // 底层的 Executor
  private Executor delegate;
  private TransactionalCacheManager tcm = new TransactionalCacheManager();

  // 查询方法
  @Override
  public <E> List<E> query(MappedStatement ms, Object parameterObject, RowBounds rowBounds, ResultHandler resultHandler) throws SQLException {
    // 获取 SQL
    BoundSql boundSql = ms.getBoundSql(parameterObject);
    // 创建缓存key,在CacheKey中已经分析过创建过程
    CacheKey key = createCacheKey(ms, parameterObject, rowBounds, boundSql);
    return query(ms, parameterObject, rowBounds, resultHandler, key, boundSql);
  }

  // 查询
  public <E> List<E> query(MappedStatement ms, Object parameterObject, RowBounds rowBounds, ResultHandler resultHandler, CacheKey key, BoundSql boundSql)
      throws SQLException {
    // 获取查询语句所在namespace对应的二级缓存
    Cache cache = ms.getCache();
    // 是否开启了二级缓存
    if (cache != null) {
      // 根据 <select> 的属性 useCache 的配置,决定是否需要清空二级缓存
      flushCacheIfRequired(ms);
      if (ms.isUseCache() && resultHandler == null) {
        // 二级缓存不能保存输出参数,否则抛异常
        ensureNoOutParams(ms, parameterObject, boundSql);
        // 从二级缓存中查询对应的值
        List<E> list = (List<E>) tcm.getObject(cache, key);
        if (list == null) {
          // 如果二级缓存没有命中,则调用底层的 Executor 查询,其中会先查询一级缓存,一级缓存也未命中,才会去查询数据库
          list = delegate.<E> query(ms, parameterObject, rowBounds, resultHandler, key, boundSql);
          // 查询到的数据放入到二级缓存中去
          tcm.putObject(cache, key, list); // issue #578 and #116
        }
        return list;
      }
    }
    // 如果没有开启二级缓存,则直接调用底层的 Executor 查询,还是会先查一级缓存
    return delegate.<E> query(ms, parameterObject, rowBounds, resultHandler, key, boundSql);
  }
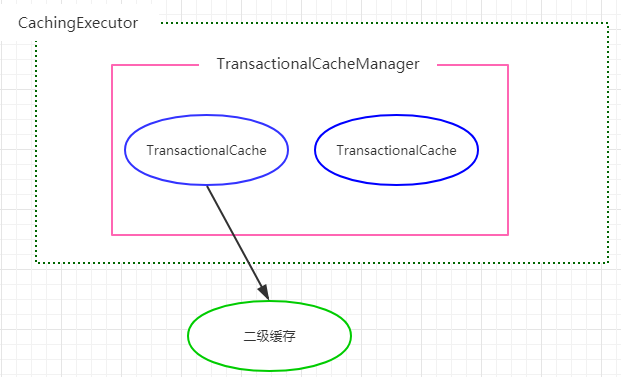
以上就是 Mybatis 的二级缓存的主要实现过程,CachingExecutor , TransactionalCacheManager 和 TransactionalCache 的关系如下所示,主要是通过 TransactionalCache 来操作二级缓存的。
![]()
此外,CachingExecutor 还有其他的一些方法,主要是调用底层封装的 Executor 来实现的。
以上就是 Mybatis 的一级缓存和二级缓存的实现过程。
Cache 装饰器
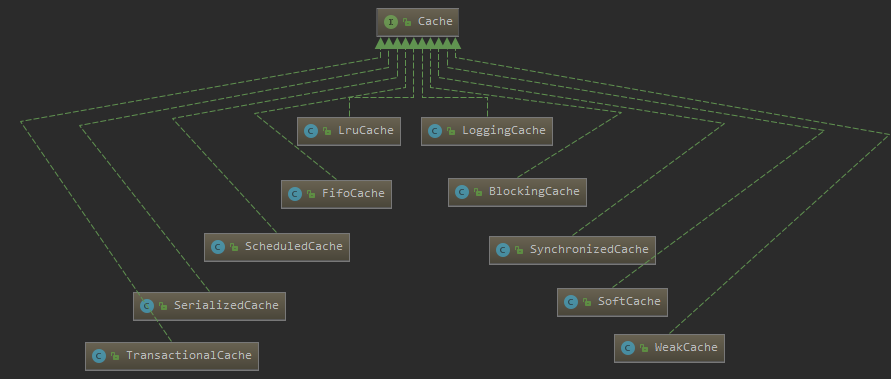
在介绍 Cache 接口的时候,说到,Cache 接口由很多的装饰器类,共 10 个,添加了不同的功能,如下所示:
![]()
来看看 SynchronizedCache 装饰器类吧,在上面的缓存实现中介绍到了 Mybatis 其实就是使用 HashMap 来实现缓存的,即把数据放入到 HashMap中,但是 HashMap 不是线安全的,Mybatis 是如何来保证缓存中的线程安全问题呢?就是使用了 SynchronizedCache 来保证的,它是一个装饰器类,其中的方法都加上了 synchronized 关键字:
public class SynchronizedCache implements Cache {

  private Cache delegate;

  public SynchronizedCache(Cache delegate) {
    this.delegate = delegate;
  }
  @Override
  public synchronized int getSize() {
    return delegate.getSize();
  }
  @Override
  public synchronized void putObject(Object key, Object object) {
    delegate.putObject(key, object);
  }
  @Override
  public synchronized Object getObject(Object key) {
    return delegate.getObject(key);
  }

  @Override
  public synchronized Object removeObject(Object key) {
    return delegate.removeObject(key);
  }
  // ............
}
接下来看下添加 Cache 装饰器的方法,在 CacheBuilder.build() 方法中进行添加:
public class CacheBuilder {
  //...........
  // 创建缓存
  public Cache build() {
    // 设置缓存的实现类
    setDefaultImplementations();
    Cache cache = newBaseCacheInstance(implementation, id);
    setCacheProperties(cache);
    // 添加装饰器类
    if (PerpetualCache.class.equals(cache.getClass())) {
      for (Class<? extends Cache> decorator : decorators) {
        cache = newCacheDecoratorInstance(decorator, cache);
        setCacheProperties(cache);
      }
      // 为 Cache 添加装饰器
      cache = setStandardDecorators(cache);
    } else if (!LoggingCache.class.isAssignableFrom(cache.getClass())) {
      cache = new LoggingCache(cache);
    }
    return cache;
  }
  // 设置 Cache 的默认实现类为 PerpetualCache
  private void setDefaultImplementations() {
    if (implementation == null) {
      implementation = PerpetualCache.class;
      if (decorators.isEmpty()) {
        decorators.add(LruCache.class);
      }
    }
  }
  // 添加装饰器
  private Cache setStandardDecorators(Cache cache) {
    try {
      // 添加 ScheduledCache 装饰器
      if (clearInterval != null) {
        cache = new ScheduledCache(cache);
        ((ScheduledCache) cache).setClearInterval(clearInterval);
      }
      // 添加SerializedCache装饰器
      if (readWrite) {
        cache = new SerializedCache(cache);
      }
      // 添加 LoggingCache 装饰器
      cache = new LoggingCache(cache);
      // 添加  SynchronizedCache 装饰器,保证线程安全
      cache = new SynchronizedCache(cache);
      if (blocking) {
        // 添加 BlockingCache 装饰器
        cache = new BlockingCache(cache);
      }
      return cache;
  }
}
还有其他的装饰器,这里就不一一列出来了。
到这里 Mybatis 的缓存系统模块就分析完毕了。


