原文:
WPF 4 开发Windows 7 跳转列表(JumpList)
在之前写过的《Windows 7 任务栏开发系列》中我们通过Visual Studio 2008 借助微软提供的Windows API Code Pack 对应用程序的任务栏进行开发,即将到来的Visual Studio 2010 为我们提供了更方便的开发方式,新版本的WPF 4 只需要通过XAML 代码即可实现Windows 7 任务栏的特性。本篇将针对JumpList(跳转列表)进行介绍,同时体验下.NET Framework 4.0 的新功能。
用XAML 编写JumpList
在WPF 4 中开发任务栏的方便之处就在于可以使用XAML 直接编写相应的功能代码,无须再使用API 编写繁琐的C# 程序。首先打开App.xaml 文件加入我们想要的JumpList 程序,其中JumpList 类为创建跳转列表提供了方法,JumpTask 类可以创建列表中的链接。可以对比一下通过API 编写的JumpList,很明显XAML 的方式更为简单清晰。
<Application x:Class="Win7TaskbarDemo.App"
             xmlns="http://schemas.microsoft.com/winfx/2006/xaml/presentation"
             xmlns:x="http://schemas.microsoft.com/winfx/2006/xaml"
             StartupUri="MainWindow.xaml">
    <Application.Resources>

    </Application.Resources>
    <JumpList.JumpList>
        <JumpList ShowFrequentCategory="True"
                  ShowRecentCategory="True">
            <JumpTask ApplicationPath="notepad.exe"
                      CustomCategory="Microsoft Tools"
                      Description="Start Notepad"
                      Title="Notepad"
                      IconResourcePath="notepad.exe"
                      IconResourceIndex="0" />

            <JumpTask ApplicationPath="mspaint.exe"
                      CustomCategory="Microsoft Tools"
                      Description="Start Paint"
                      Title="Paint"
                      IconResourcePath="mspaint.exe"
                      IconResourceIndex="0" />

            <JumpTask ApplicationPath="http://gnielee.cnblogs.com/"
                      CustomCategory="Blog Link"
                      Description="Go to {GnieTech}"
                      Title="Gnie's Blog"
                      IconResourcePath="C:\\Program Files\\Internet Explorer\\iexplore.exe" />
        </JumpList>
    </JumpList.JumpList>
</Application>
通过阅读上面的程序,很容易看出我们加入了两个应用程序(“记事本”、“画版”)和一个“网站链接”,其中的属性参数使用起来也十分方便。
![img_9a04de7a236b167af8759aba523b9b90.png]()
用C# 编写JumpList
上面使用XAML 方式编写了一个简单的JumpList,当然C# 同样也能实现相同的效果。首先在MainWindow 中拖入两个Button:
<Window x:Class="Win7TaskbarDemo.MainWindow"
        xmlns="http://schemas.microsoft.com/winfx/2006/xaml/presentation"
        xmlns:x="http://schemas.microsoft.com/winfx/2006/xaml"
        Title="MainWindow" Height="211" Width="363" Icon="/Win7TaskbarDemo;component/Resources/App.ico">

    <Grid>
        <Button Content="Clear All Tasks" Height="23" HorizontalAlignment="Right" Margin="0,29,59,0"
                Name="ClearBtn" VerticalAlignment="Top" Width="89" Click="ClearBtn_Click" />
        <Button Content="Add New Task" Height="23" HorizontalAlignment="Left" Margin="60,29,0,0"
                Name="AddBtn" VerticalAlignment="Top" Width="93" Click="AddBtn_Click" />
    </Grid>
</Window>
为它们分别添加点击事件,其中一个是为JumpList 增加“计算器”链接,另一个是将所有链接清空。创建JumpList 时需要使用System.Windows.Shell 命名空间,是不是有点像API 中的Microsoft.WindowsAPICodePack.Shell。
private void AddBtn_Click(object sender, RoutedEventArgs e)
{
   JumpTask jumpTask = new JumpTask();
   //Create a new Calculator JumpTask
   jumpTask.ApplicationPath = Path.Combine(Environment.GetFolderPath(Environment.SpecialFolder.System), "calc.exe");
   jumpTask.IconResourcePath = Path.Combine(Environment.GetFolderPath(Environment.SpecialFolder.System), "calc.exe");
   jumpTask.Title = "Calculator";
   jumpTask.Description = "Start Calculator";
   jumpTask.CustomCategory = "New Microsoft Tools";

   //Add Calculator to JumpList
   JumpList jumpList = JumpList.GetJumpList(App.Current);
   jumpList.JumpItems.Add(jumpTask);
   jumpList.Apply();
}

private void ClearBtn_Click(object sender, RoutedEventArgs e)
{
   JumpList jumpList1 = JumpList.GetJumpList(App.Current);
   jumpList1.JumpItems.Clear();
   jumpList1.Apply();
}
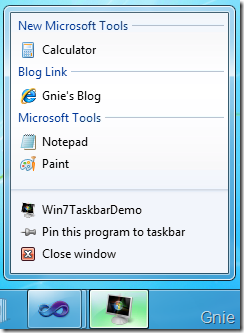
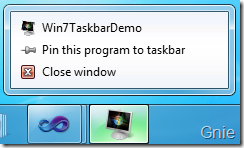
分别点击两个按键后的效果:
![img_29d90bddd40733374bc8e034b77762eb.png]()
![img_c4af002534b6a0833a41d517be147d50.png]()
相关参考资料
1.Windows 7 任务栏开发 之 跳转列表(Jump Lists)
http://www.cnblogs.com/gnielee/archive/2010/03/16/windows7-taskbar-jumplists.html
2.What's New in WPF Version 4
http://msdn.microsoft.com/en-us/library/bb613588(VS.100).aspx
3.JumpList Class
http://msdn.microsoft.com/en-us/library/system.windows.shell.jumplist(v=VS.100).aspx
源代码下载