开篇
Deque 接口继承自 Queue接口,但 Deque 支持同时从两端添加或移除元素,因此又被成为双端队列。鉴于此,Deque 接口的实现可以被当作 FIFO队列使用,也可以当作LIFO队列(栈)来使用。官方也是推荐使用 Deque 的实现来替代 Stack。
ArrayDeque 是 Deque 接口的一种具体实现,是依赖于可变数组来实现的。ArrayDeque 没有容量限制,可根据需求自动进行扩容。ArrayDeque不支持值为 null 的元素。
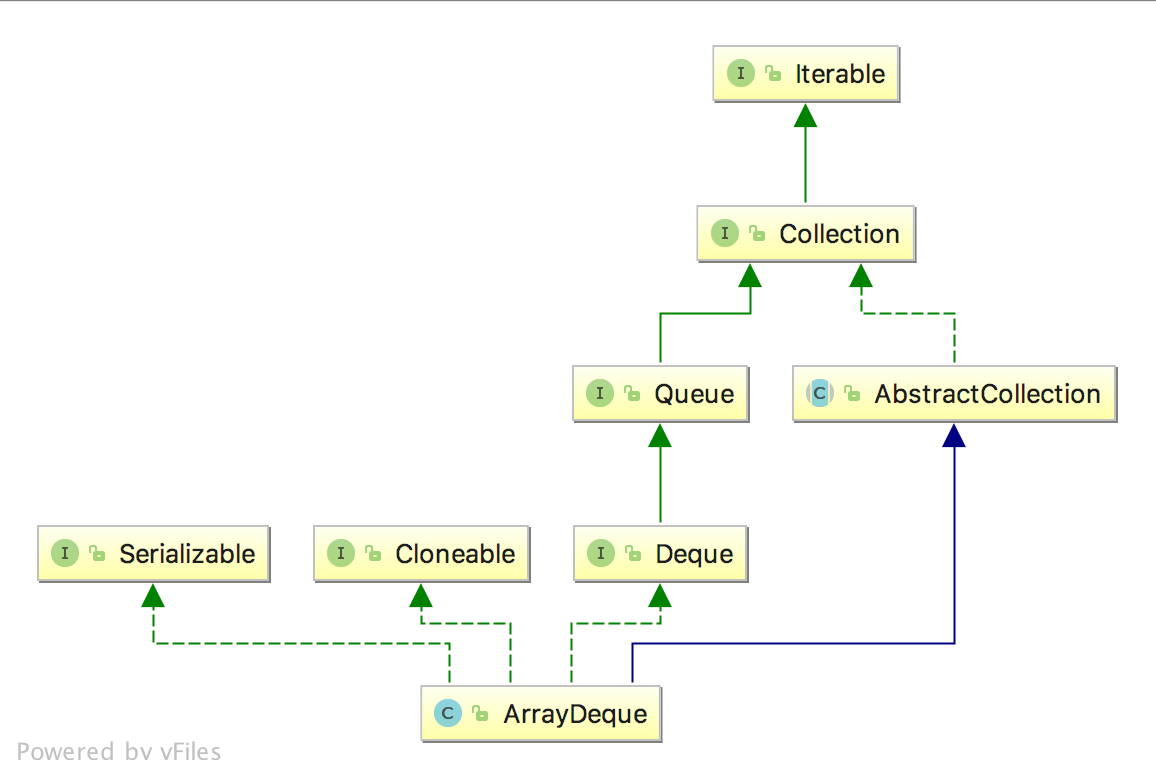
ArrayDeque类图
ArrayDeque的类变量和构造函数
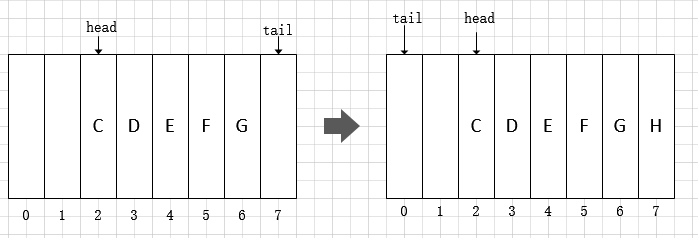
ArrayDeque的类变量当中数组elements用来保存队列元素,head指针指向第一个存储元素,tail指向最后一个元素的下一个位置。
ArrayDeque的calculateSize的逻辑非常巧妙,用于计算大于numElements的最小的2*n次方的值。
public class ArrayDeque<E> extends AbstractCollection<E>
                           implements Deque<E>, Cloneable, Serializable
{

    // ArrayDeque采用数组来保存元素,通过头尾指针实现循环数组
    transient Object[] elements; // non-private to simplify nested class access

    // 第一个元素和最后一个元素的位置
    transient int head;
    transient int tail;

    private static final int MIN_INITIAL_CAPACITY = 8;

    // 计算数组大小的方式,实现大于numElements的最小的2*n次方的数字
    private static int calculateSize(int numElements) {
        int initialCapacity = MIN_INITIAL_CAPACITY;

        if (numElements >= initialCapacity) {
            initialCapacity = numElements;
            initialCapacity |= (initialCapacity >>>  1);
            initialCapacity |= (initialCapacity >>>  2);
            initialCapacity |= (initialCapacity >>>  4);
            initialCapacity |= (initialCapacity >>>  8);
            initialCapacity |= (initialCapacity >>> 16);
            initialCapacity++;

            if (initialCapacity < 0)   // Too many elements, must back off
                initialCapacity >>>= 1;// Good luck allocating 2 ^ 30 elements
        }
        return initialCapacity;
    }

    // 分配数组的大小,calculateSize计算大小
    private void allocateElements(int numElements) {
        elements = new Object[calculateSize(numElements)];
    }
ArrayDeque的add相关操作
ArrayDeque的add操作支持head端插入和tail端插入,head端插入是先计算位置后插入元素,tail端的插入是先保存元素后计算位置,所以会造成head的指针指向第一个元素的位置,tail指向最后一个元素的下一个位置。
ArrayDeque的扩容时机是在head和tail相等的时候,根据上面分析我们可以得出ArrayDeque的容量达到(旧容量-1)的时候进行扩容。
ArrayDeque的头部插入过程是回退head指针后添加元素。
ArrayDeque的尾部插入过程是添加元素后前进tail指针。
    public boolean offerFirst(E e) {
        addFirst(e);
        return true;
    }

    public void addFirst(E e) {
        if (e == null)
            throw new NullPointerException();
        //head往后移动一个位置放置新插入的元素
        //head指向第一个元素的下标
        elements[head = (head - 1) & (elements.length - 1)] = e;
        if (head == tail)
            doubleCapacity();
    }


    public boolean offerLast(E e) {
        addLast(e);
        return true;
    }

    //tail往前移动一个位置放置新插入的元素
    //tail指向末尾元素的下一个位置,注意是末尾元素的下一个位置
    public void addLast(E e) {
        if (e == null)
            throw new NullPointerException();
        elements[tail] = e;
        //tail循环以后和head保持一个空余位置,也就是说head=tail+1的时候进行扩容
        if ( (tail = (tail + 1) & (elements.length - 1)) == head)
            doubleCapacity();
    }
ArrayDeque的remove相关操作
ArrayDeque的remove操作包括从head开始删除和从tail开始删除。
- 头部删除pollFirst()方法返回head指针指向的元素同时向后移动一个位置
- 尾部删除pollLast()方法返回tail指针指向位置的前一个位置的元素后tail指针往前移动一个位置
    public E removeFirst() {
        E x = pollFirst();
        if (x == null)
            throw new NoSuchElementException();
        return x;
    }

    public E removeLast() {
        E x = pollLast();
        if (x == null)
            throw new NoSuchElementException();
        return x;
    }

    public E pollFirst() {
        int h = head;
        @SuppressWarnings("unchecked")
        E result = (E) elements[h];
        // Element is null if deque empty
        if (result == null)
            return null;
        elements[h] = null;     // Must null out slot
        head = (h + 1) & (elements.length - 1);
        return result;
    }

    public E pollLast() {
        int t = (tail - 1) & (elements.length - 1);
        @SuppressWarnings("unchecked")
        E result = (E) elements[t];
        if (result == null)
            return null;
        elements[t] = null;
        tail = t;
        return result;
    }

    public E getFirst() {
        @SuppressWarnings("unchecked")
        E result = (E) elements[head];
        if (result == null)
            throw new NoSuchElementException();
        return result;
    }

    public E getLast() {
        @SuppressWarnings("unchecked")
        E result = (E) elements[(tail - 1) & (elements.length - 1)];
        if (result == null)
            throw new NoSuchElementException();
        return result;
    }

    @SuppressWarnings("unchecked")
    public E peekFirst() {
        // elements[head] is null if deque empty
        return (E) elements[head];
    }

    @SuppressWarnings("unchecked")
    public E peekLast() {
        return (E) elements[(tail - 1) & (elements.length - 1)];
    }
ArrayDeque的扩容过程
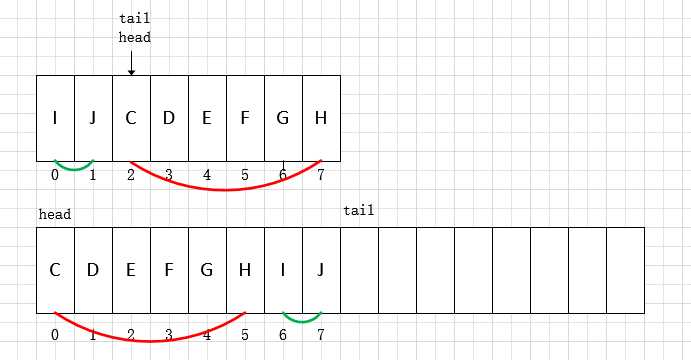
ArrayDeque的扩容过程如下:
- 以2倍速率进行扩容(int newCapacity = n << 1)
- 拷贝下标head到数组末尾的元素到新数组
- 拷贝下标0到tail指针的元素到新数组
    private void doubleCapacity() {
        assert head == tail;
        int p = head;
        int n = elements.length;
        int r = n - p; // number of elements to the right of p
        int newCapacity = n << 1;
        if (newCapacity < 0)
            throw new IllegalStateException("Sorry, deque too big");
        Object[] a = new Object[newCapacity];
        System.arraycopy(elements, p, a, 0, r);
        System.arraycopy(elements, 0, a, r, p);
        elements = a;
        head = 0;
        tail = n;
    }
ArrayDeque的操作图解过程
参考文章
Java 容器源码分析之 Deque 与 ArrayDeque