myeclipse 2017 CI 中如何修改Servlet模板
在实际开发中,这些生成的代码和注释一般我们都用不到的,每次都要手工删除这些注释和代码,很麻烦,因此可以根据开发的实际情况修改Servlet的模板代码,改成符合实际开发需求的模板代码。
下面以MyEclipse 2017为例进行说明如何修改Servlet的模板代码,具体步骤如下:
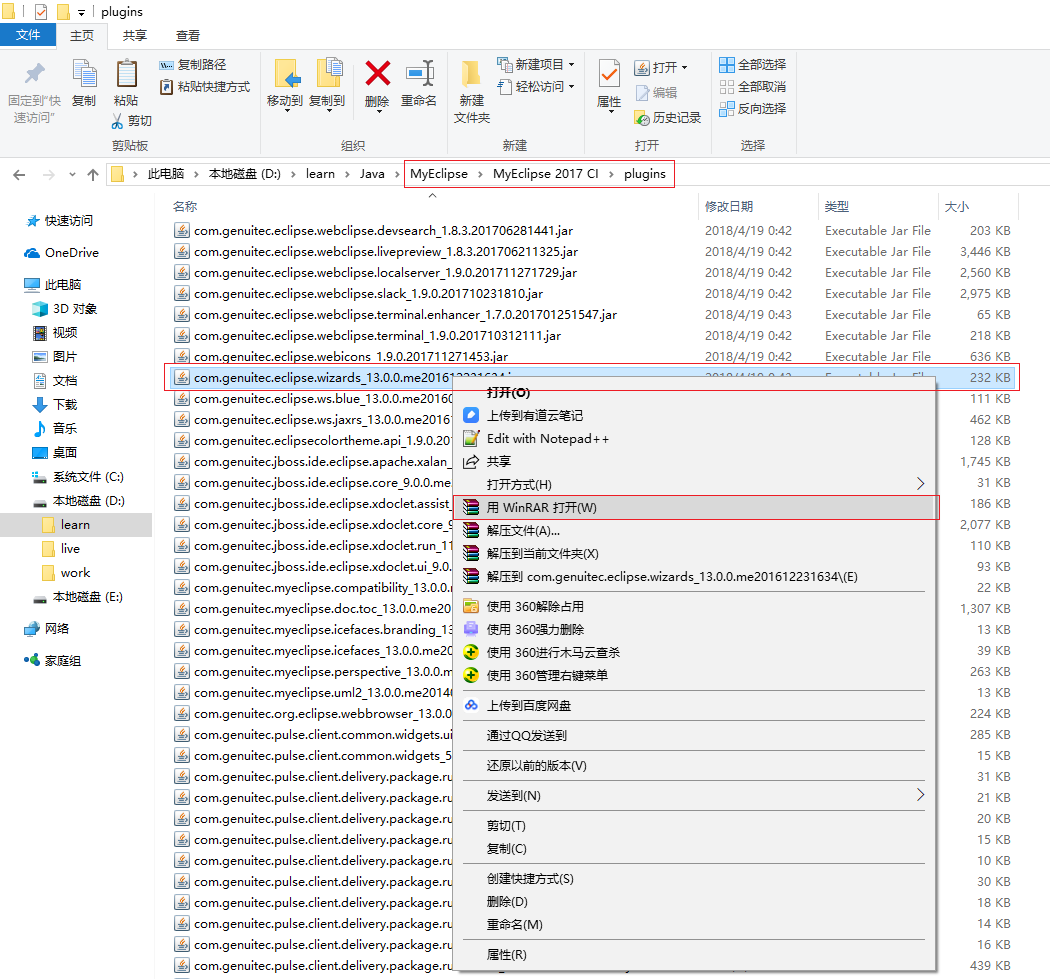
找到 MyEclipse 2017 CI 安装目录下的 plugins 文件夹,比如我的:D:\learn\Java\MyEclipse\MyEclipse 2017 CI\plugins,然后找到 com.genuitec.eclipse.wizards_13.0.0.me201612231634.jar 这个jar文件,
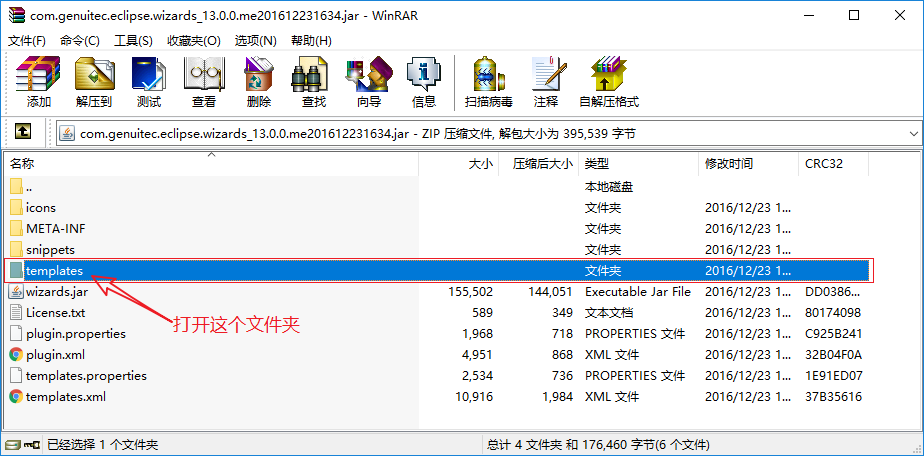
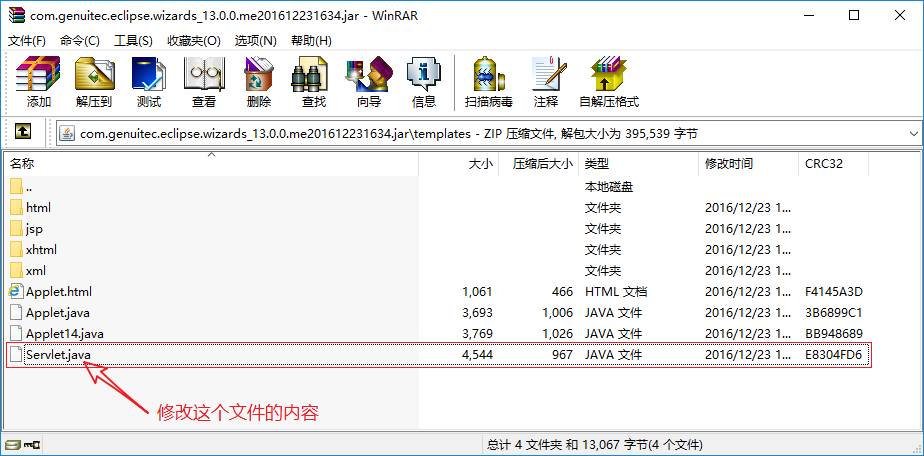
打开 com.genuitec.eclipse.wizards_13.0.0.me201612231634.jar 这个jar文件后,可以看到里面有一个 templates 文件夹,进入 templates 文件夹,可以看到里面有一个 Servlet.java 文件。
修改里面的代码:删除 doGet 和 doPost 里面的代码和方法注释,在 doPost 方法里面调用 doGet ,这是根据实际情况修改成的模板代码,修改好之后,保存,重启 MyEclipse 2017 CI,使用MyEclipse创建Servlet,此时就是用刚才修改过的模板进行生成了。
(注意:在 MyEclipse 10 安装目录下的 \Common\plugins文件夹 ,注意文件夹的不同哦!)
<aw:import> 表示的是要导入的包,
<aw:parentClass> 表示该servlet继承的父类,
<aw:constructor 表示的是构造器,
<aw:method 表示的是方法的声明,
新的 Servlet.java 文件中的内容如下:
#---------------------------------------------#
# <aw:description>Template for Servlet</aw:description>
# <aw:version>1.1</aw:version>
# <aw:date>04/05/2003</aw:date>
# <aw:author>Ferret Renaud</aw:author>
#---------------------------------------------#

<aw:import>java.io.IOException</aw:import>
<aw:import>java.io.PrintWriter</aw:import>

<aw:import>javax.servlet.ServletException</aw:import>
<aw:import>javax.servlet.http.HttpServlet</aw:import>
<aw:import>javax.servlet.http.HttpServletRequest</aw:import>
<aw:import>javax.servlet.http.HttpServletResponse</aw:import>

<aw:parentClass>javax.servlet.http.HttpServlet</aw:parentClass>

<aw:constructor name="c1">

    public <aw:className/>() {
        super();
    }

</aw:constructor>

<aw:method name="doGet">

    public void doGet(HttpServletRequest request, HttpServletResponse response)
        throws ServletException, IOException {

    }

</aw:method>

<aw:method name="doPost">

    public void doPost(HttpServletRequest request, HttpServletResponse response)
        throws ServletException, IOException {
        doGet(request,response);
    }

</aw:method>
示例 XxxServlet.java 文件
![]()
![]()
 1 package com.itheima.product.web.servlet;
 2
 3 import java.io.IOException;
 4
 5 import javax.servlet.ServletException;
 6 import javax.servlet.http.HttpServlet;
 7 import javax.servlet.http.HttpServletRequest;
 8 import javax.servlet.http.HttpServletResponse;
 9
10 public class PayOnlineServlet extends HttpServlet {
11
12     @Override
13     public void doGet(HttpServletRequest request, HttpServletResponse response) throws ServletException, IOException {
14
15     }
16
17     @Override
18     public void doPost(HttpServletRequest request, HttpServletResponse response) throws ServletException, IOException {
19         doGet(request, response);
20     }
21
22 }
XxxServlet.java
附上:旧的 Servlet.java 文件中的内容如下:
#---------------------------------------------#
# <aw:description>Template for Servlet</aw:description>
# <aw:version>1.1</aw:version>
# <aw:date>04/05/2003</aw:date>
# <aw:author>Ferret Renaud</aw:author>
#---------------------------------------------#

<aw:import>java.io.IOException</aw:import>
<aw:import>java.io.PrintWriter</aw:import>

<aw:import>javax.servlet.ServletException</aw:import>
<aw:import>javax.servlet.http.HttpServlet</aw:import>
<aw:import>javax.servlet.http.HttpServletRequest</aw:import>
<aw:import>javax.servlet.http.HttpServletResponse</aw:import>

<aw:parentClass>javax.servlet.http.HttpServlet</aw:parentClass>

<aw:constructor name="c1">
    /**
     * Constructor of the object.
     */
    public <aw:className/>() {
        super();
    }

</aw:constructor>

<aw:method name="doGet">
    /**
     * The doGet method of the servlet. <br>
     *
     * This method is called when a form has its tag value method equals to get.
     *
     * @param request the request send by the client to the server
     * @param response the response send by the server to the client
     * @throws ServletException if an error occurred
     * @throws IOException if an error occurred
     */
    public void doGet(HttpServletRequest request, HttpServletResponse response)
        throws ServletException, IOException {

        response.setContentType("text/html");
        PrintWriter out = response.getWriter();
        out.println(
            "<!DOCTYPE HTML PUBLIC \"-//W3C//DTD HTML 4.01 Transitional//EN\">");
        out.println("<HTML>");
        out.println("  <HEAD><TITLE>A Servlet</TITLE></HEAD>");
        out.println("  <BODY>");
        out.print("    This is ");
        out.print(this.getClass());
        out.println(", using the GET method");
        out.println("  </BODY>");
        out.println("</HTML>");
        out.flush();
        out.close();
    }

</aw:method>

<aw:method name="doPost">
    /**
     * The doPost method of the servlet. <br>
     *
     * This method is called when a form has its tag value method equals to post.
     *
     * @param request the request send by the client to the server
     * @param response the response send by the server to the client
     * @throws ServletException if an error occurred
     * @throws IOException if an error occurred
     */
    public void doPost(HttpServletRequest request, HttpServletResponse response)
        throws ServletException, IOException {

        response.setContentType("text/html");
        PrintWriter out = response.getWriter();
        out.println(
            "<!DOCTYPE HTML PUBLIC \"-//W3C//DTD HTML 4.01 Transitional//EN\">");
        out.println("<HTML>");
        out.println("  <HEAD><TITLE>A Servlet</TITLE></HEAD>");
        out.println("  <BODY>");
        out.print("    This is ");
        out.print(this.getClass());
        out.println(", using the POST method");
        out.println("  </BODY>");
        out.println("</HTML>");
        out.flush();
        out.close();
    }

</aw:method>

<aw:method name="doPut">
    /**
     * The doPut method of the servlet. <br>
     *
     * This method is called when a HTTP put request is received.
     *
     * @param request the request send by the client to the server
     * @param response the response send by the server to the client
     * @throws ServletException if an error occurred
     * @throws IOException if an error occurred
     */
    public void doPut(HttpServletRequest request, HttpServletResponse response)
        throws ServletException, IOException {

        // Put your code here
    }

</aw:method>

<aw:method name="doDelete">
    /**
     * The doDelete method of the servlet. <br>
     *
     * This method is called when a HTTP delete request is received.
     *
     * @param request the request send by the client to the server
     * @param response the response send by the server to the client
     * @throws ServletException if an error occurred
     * @throws IOException if an error occurred
     */
    public void doDelete(HttpServletRequest request, HttpServletResponse response)
        throws ServletException, IOException {

        // Put your code here
    }

</aw:method>

<aw:method name="init">
    /**
     * Initialization of the servlet. <br>
     *
     * @throws ServletException if an error occurs
     */
    public void init() throws ServletException {
        // Put your code here
    }

</aw:method>

<aw:method name="destroy">
    /**
     * Destruction of the servlet. <br>
     */
    public void destroy() {
        super.destroy(); // Just puts "destroy" string in log
        // Put your code here
    }

</aw:method>

<aw:method name="getServletInfo">
    /**
     * Returns information about the servlet, such as
     * author, version, and copyright.
     *
     * @return String information about this servlet
     */
    public String getServletInfo() {
        return "This is my default servlet created by Eclipse";
    }

</aw:method>
具体操作如下图所示:
![]()
![]()
![]()
我的GitHub地址:
https://github.com/heizemingjun
我的博客园地址:
http://www.cnblogs.com/chenmingjun
我的蚂蚁笔记博客地址:
http://blog.leanote.com/chenmingjun
Copyright ©2018 黑泽明军
【转载文章务必保留出处和署名,谢谢!】