-
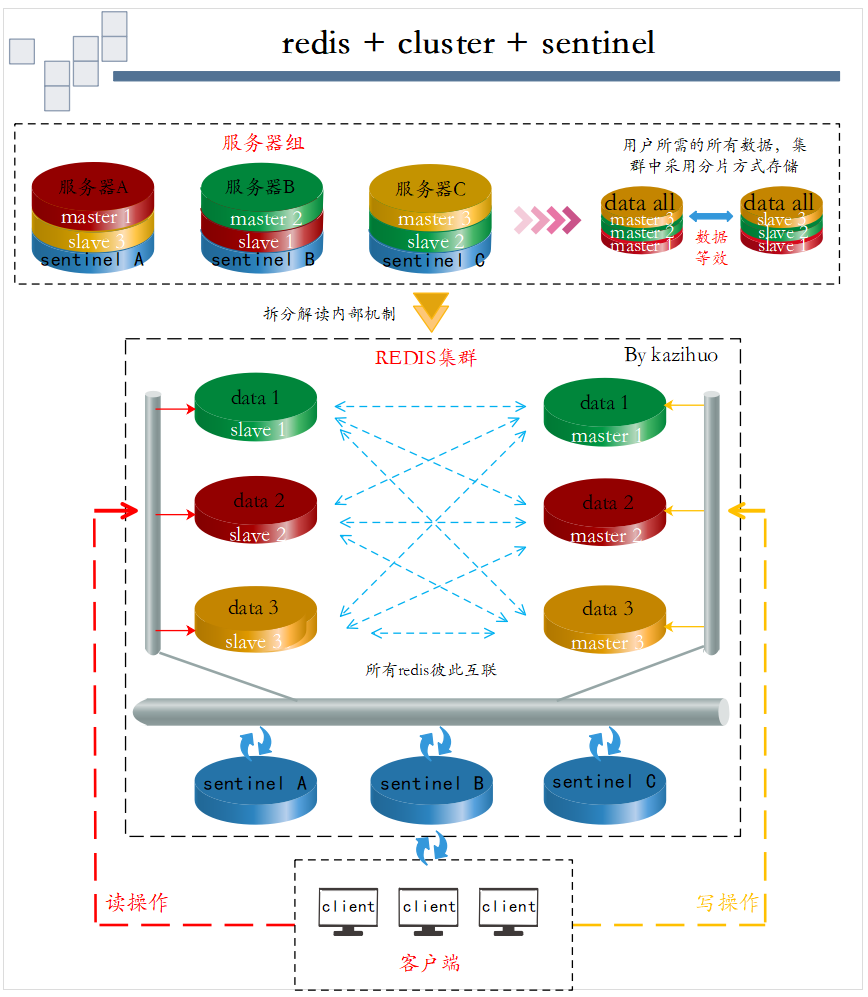
概述说明
![]()
说明:本次实验采用c1、c2、c3三台虚拟机完成,每台服务器上都部署一个master、一个slave和一个sentinel。当某主节点的挂了,相应的从节点替位;当某主节点及主节点对应的从节点同时挂了,将造成数据的丢失!故生产环境都采用一主多从的集群模式!
-
搭建环境
服务器信息如下:
c1 192.168.10.11
c2 192.168.10.12
c3 192.168.10.13
每台需要部署redis的服务器上配置系统参数,执行以下脚本
# cat xitongcanshu.sh
#!/bin/bash
echo 'net.core.somaxconn=512' >> /etc/sysctl.conf
echo 'vm.overcommit_memory=1' >> /etc/sysctl.conf
echo never > /sys/kernel/mm/transparent_hugepage/enabled
echo 'echo never > /sys/kernel/mm/transparent_hugepage/enabled' >> /etc/rc.local
chmod +x /etc/rc.d/rc.local
sysctl -p
cat >> /etc/security/limits.conf << EOF
* soft nofile 65535
* hard nofile 65535
* soft nproc 65535
* hard nproc 65535
EOF
ulimit -SHn 65535
ulimit -n
-
redis
说明:本次实验在c1、c2、c3三台服务器上分别部署一个master和一个slave!
[root@c1 ~]# wget http://download.redis.io/releases/redis-4.0.9.tar.gz
[root@c1 ~]# tar xf redis-4.0.9.tar.gz -C /usr/local/
[root@c1 ~]# ln -sv /usr/local/redis-4.0.9 /usr/local/redis
[root@c1 ~]# yum -y install tcl openssl-devel zlib-devel
[root@c1 /usr/local/redis]# make && make PREFIX=/usr/local/redis-4.0.9/ install
[root@c1 /usr/local/redis]# make test
[root@c1 ~]# mkdir -pv /etc/redis-cluster/{7001,7002} /var/log/redis
# 拷贝默认配置文件并根据需求修改,因实验环境,故采用简洁配置,如下:
[root@c1 ~]# cat /etc/redis-cluster/7001/redis.conf
port 7001
bind 192.168.10.11
cluster-enabled yes
cluster-config-file /etc/redis-cluster/7001/nodes.conf
logfile /var/log/redis/redis_7001.log
cluster-node-timeout 5000
appendonly yes
daemonize yes
[root@c1 ~]# cat /etc/redis-cluster/7002/redis.conf
port 7002
bind 192.168.10.12
cluster-enabled yes
cluster-config-file /etc/redis-cluster/7002/nodes.conf
logfile /var/log/redis/redis_7002.log
cluster-node-timeout 5000
appendonly yes
daemonize yes
# 启动
[root@c1 ~]# /usr/local/redis/bin/redis-server /etc/redis-cluster/7001/redis.conf
[root@c1 ~]# /usr/local/redis/bin/redis-server /etc/redis-cluster/7002/redis.conf
# c2、c3服务器也进行以上操作,配置只需修改对应的ip即可!
-
cluster
说明:本次实验主从关系如下:
c1 master --- c2 slave M/S 1
c2 master --- c3 slave M/S 2
c3 master --- c1 slave M/S 3
# 说明:框内内容是编译安装ruby工具,以便能成功执行redis-trib.rb创建集群,;yum方式安装ruby可能版本较低!
[root@c1 ~]# wget https://cache.ruby-lang.org/pub/ruby/2.5/ruby-2.5.1.tar.gz
[root@c1 ~]# wget https://rubygems.org/downloads/redis-4.0.0.gem
[root@c1 ~]# tar -xf ruby-2.5.1.tar.gz -C /usr/local/
[root@c1 /usr/local/ruby-2.5.1]# ./configure -prefix=/usr/local/ruby-2.5.1
[root@c1 /usr/local/ruby-2.5.1]# make && make install
[root@c1 ~]# ln -sv /usr/local/ruby-2.5.1/bin/gem /usr/bin/gem
[root@c1 ~]# ln -sv /usr/local/ruby-2.5.1/bin/ruby /usr/bin/ruby
# 在配置文件/usr/local/ruby-2.5.1/ext/openssl/Makefile和/usr/local/ruby-2.5.1/ext/zlib/Makefile中的定义变量处加上如下红色行,若存在相应变量的定义请注释;
srcdir = .
top_srcdir = ../..
topdir = /usr/local/ruby-2.5.1/include/ruby-2.5.0
[root@c1 /usr/local/ruby-2.5.1/ext/zlib]# ruby extconf.rb
[root@c1 /usr/local/ruby-2.5.1/ext/zlib]# make && make install
[root@c1 /usr/local/ruby-2.5.1/ext/openssl]# ruby extconf.rb
[root@c1 /usr/local/ruby-2.5.1/ext/openssl]# make && make install
[root@c1 ~]# gem install -l redis-4.0.0.gem
# 创建集群,格式:主 主 主 从 从 从
[root@c1 ~]# /usr/local/redis/src/redis-trib.rb create --replicas 1 192.168.10.11:7001 192.168.10.12:7001 192.168.10.13:7001 192.168.10.12:7002 192.168.10.13:7002 192.168.10.11:7002
>>> Creating cluster
>>> Performing hash slots allocation on 6 nodes...
Using 3 masters:
192.168.10.11:7001
192.168.10.12:7001
192.168.10.13:7001
Adding replica 192.168.10.12:7002 to 192.168.10.11:7001
Adding replica 192.168.10.13:7002 to 192.168.10.12:7001
Adding replica 192.168.10.11:7002 to 192.168.10.13:7001
M: 440541e2a3235205bf190336a1f37f127d18bf60 192.168.10.11:7001
slots:0-5460 (5461 slots) master
M: c588a93825de6e0e6730a8bbb072684619201803 192.168.10.12:7001
slots:5461-10922 (5462 slots) master
M: 9ba21cfda0fed2d9013103e934f199a247c378ef 192.168.10.13:7001
slots:10923-16383 (5461 slots) master
S: f07abd56170635aaad5166bd38af9f7267834ca7 192.168.10.12:7002
replicates 440541e2a3235205bf190336a1f37f127d18bf60
S: 1aa03c91fc62ac72aeccf349d040f32ae190120b 192.168.10.13:7002
replicates c588a93825de6e0e6730a8bbb072684619201803
S: ff7e453f9ad5d2db2c7867893700fec033767bd9 192.168.10.11:7002
replicates 9ba21cfda0fed2d9013103e934f199a247c378ef
Can I set the above configuration? (type 'yes' to accept): yes
>>> Nodes configuration updated
>>> Assign a different config epoch to each node
>>> Sending CLUSTER MEET messages to join the cluster
Waiting for the cluster to join..
>>> Performing Cluster Check (using node 192.168.10.11:7001)
M: 440541e2a3235205bf190336a1f37f127d18bf60 192.168.10.11:7001
slots:0-5460 (5461 slots) master
1 additional replica(s)
S: 1aa03c91fc62ac72aeccf349d040f32ae190120b 192.168.10.13:7002
slots: (0 slots) slave
replicates c588a93825de6e0e6730a8bbb072684619201803
S: ff7e453f9ad5d2db2c7867893700fec033767bd9 192.168.10.11:7002
slots: (0 slots) slave
replicates 9ba21cfda0fed2d9013103e934f199a247c378ef
M: 9ba21cfda0fed2d9013103e934f199a247c378ef 192.168.10.13:7001
slots:10923-16383 (5461 slots) master
1 additional replica(s)
M: c588a93825de6e0e6730a8bbb072684619201803 192.168.10.12:7001
slots:5461-10922 (5462 slots) master
1 additional replica(s)
S: f07abd56170635aaad5166bd38af9f7267834ca7 192.168.10.12:7002
slots: (0 slots) slave
replicates 440541e2a3235205bf190336a1f37f127d18bf60
[OK] All nodes agree about slots configuration.
>>> Check for open slots...
>>> Check slots coverage...
[OK] All 16384 slots covered.
# 查看节点信息
[root@c1 ~]# /usr/local/redis/bin/redis-cli -h 192.168.10.13 -p 7001
192.168.10.13:7001> cluster nodes
ff7e453f9ad5d2db2c7867893700fec033767bd9 192.168.10.11:7002@17002 slave 9ba21cfda0fed2d9013103e934f199a247c378ef 0 1527578162996 6 connected
1aa03c91fc62ac72aeccf349d040f32ae190120b 192.168.10.13:7002@17002 slave c588a93825de6e0e6730a8bbb072684619201803 0 1527578161483 5 connected
440541e2a3235205bf190336a1f37f127d18bf60 192.168.10.11:7001@17001 master - 0 1527578162000 1 connected 0-5460
f07abd56170635aaad5166bd38af9f7267834ca7 192.168.10.12:7002@17002 slave 440541e2a3235205bf190336a1f37f127d18bf60 0 1527578161000 4 connected
c588a93825de6e0e6730a8bbb072684619201803 192.168.10.12:7001@17001 master - 0 1527578162491 2 connected 5461-10922
9ba21cfda0fed2d9013103e934f199a247c378ef 192.168.10.13:7001@17001 myself,master - 0 1527578162000 3 connected 10923-16383
-
sentinel
前言
Redis-Sentinel是官方推荐的高可用(HA)解决方案,本身也是一个独立运行的进程,它能监控多个master-slave集群。为防止单点故障,可对sentinel进行集群化。其主要功能如下:
-
监控:sentinel不断的检查master和slave的活性;
-
通知:当发现redis节点故障,可通过API发出通知;
-
自动故障转移:当一个master节点故障时,能够从众多slave中选举一个作为新的master,同时其它slave节点也将自动将所追随的master的地址改为新master的地址;
-
配置提供者:哨兵作为redis客户端发现的权威来源:客户端连接到哨兵请求当前可靠的master地址,若发生故障,哨兵将报告新地址。
配置
说明:本次实验将三个哨兵分别部署在c1、c2、c3三台服务器上!
[root@c1 ~]# cp /usr/local/redis/sentinel.conf /etc/redis-cluster/
[root@c1 ~]# cat /etc/redis-cluster/sentinel.conf
protected-mode no
port 27001
daemonize yes
logfile "/var/log/sentinel.log"
sentinel monitor mymaster1 192.168.10.11 7001 2
sentinel monitor mymaster2 192.168.10.12 7001 2
sentinel monitor mymaster3 192.168.10.13 7001 2
sentinel down-after-milliseconds mymaster1 10000
sentinel down-after-milliseconds mymaster2 10000
sentinel down-after-milliseconds mymaster3 10000
sentinel parallel-syncs mymaster1 1
sentinel parallel-syncs mymaster2 1
sentinel parallel-syncs mymaster3 1
sentinel failover-timeout mymaster1 15000
sentinel failover-timeout mymaster2 15000
sentinel failover-timeout mymaster3 15000
# 启动哨兵
[root@c1 ~]# /usr/local/redis/bin/redis-sentinel /etc/redis-cluster/sentinel.conf
# c2、c3服务器也进行以上操作,配置只需修改对应的端口即可!
说明:启动哨兵后,配置文件会根据监控信息自动发生相应的变化,如下:
[root@c1 ~]# cat /etc/redis-cluster/sentinel.conf
protected-mode no
port 27001
daemonize yes
logfile "/var/log/sentinel.log"
sentinel myid e3733670b609b65e520b293789e4fbf10236089c
sentinel monitor mymaster3 192.168.10.13 7001 2
sentinel down-after-milliseconds mymaster3 10000
sentinel failover-timeout mymaster3 15000
sentinel config-epoch mymaster3 0
sentinel leader-epoch mymaster3 0
sentinel known-slave mymaster3 192.168.10.11 7002
sentinel monitor mymaster1 192.168.10.11 7001 2
sentinel down-after-milliseconds mymaster1 10000
sentinel failover-timeout mymaster1 15000
sentinel config-epoch mymaster1 0
sentinel leader-epoch mymaster1 0
# Generated by CONFIG REWRITE
dir "/etc/redis-cluster"
sentinel known-slave mymaster1 192.168.10.12 7002
sentinel monitor mymaster2 192.168.10.12 7001 2
sentinel down-after-milliseconds mymaster2 10000
sentinel failover-timeout mymaster2 15000
sentinel config-epoch mymaster2 0
sentinel leader-epoch mymaster2 0
sentinel known-slave mymaster2 192.168.10.13 7002
sentinel current-epoch 0
-
故障模拟
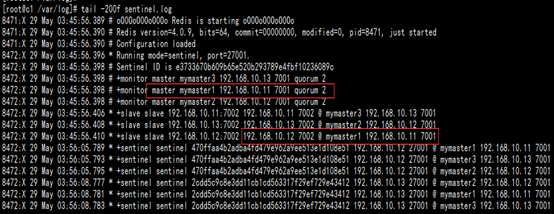
# 通过sentinel日志查看信息,图中可看出192.168.10.11 7001为 master,其相应的从为192.168.10.12 7002;
![]()
# 手动停止master 192.168.10.11 7001,slave 192.168.10.12 7002升为主
[root@c1 ~]# ps -ef |grep redis
root 4243 1 0 03:05 ? 00:00:23 /usr/local/redis/bin/redis-server 192.168.10.11:7001 [cluster]
root 4245 1 0 03:05 ? 00:00:23 /usr/local/redis/bin/redis-server 192.168.10.11:7002 [cluster]
root 8472 1 1 03:45 ? 00:00:07 /usr/local/redis/bin/redis-sentinel *:27001 [sentinel]
[root@c1 ~]# kill 4243
# 日志输出如下:
![]()
# 登陆查看nodes信息
# /usr/local/redis/bin/redis-cli -h 192.168.10.13 -p 7001
![]()
# 将192.168.10.11 7001的redis启动
[root@c1 ~]# /usr/local/redis/bin/redis-server /etc/redis-cluster/7001/redis.conf
# sentinel刷新日志
![]()
# 再次查看nodes信息,192.168.10.11 7001 已经变为192.168.10.12 7002的slave
![]()
-
报错说明
问题描述
在执行命令# /usr/local/redis/src/redis-trib.rb create --replicas 1 *** 创建集群时报错如下:
>>> Creating cluster
[ERR] Node 192.168.10.11:7001 is not empty. Either the node already knows other nodes (check with CLUSTER NODES) or contains some key in database 0.
问题解决
-
将节点下aof、rdb等本地备份删除;
-
删除node集群配置文件,即redis.conf中cluster-config-file对应的文件;