简介
Jenkins 解决Git插件不兼容问题的方案,很多时候由于项目打包需求的插件版本不同,导致jenkins加载插件失败或者配置经常丢失。今天我们主要解决Git插件不兼容或者版本问题。当然方案很多种,这里我们使用的是不依赖Git插件的方式。
服务器环境
主机系统:CentOS 7 i5 4核心 4GB内存
服务器:Tomcat + Jenkins
项目:Android打包
解决原理
jenkins参数化构建过程是有顺序的,我们在build的项目之前选择Execute Shell来git clone 或者更新代码。以下整个配置都是关于【构建选项】模块的配置。
步骤1:验证用户名和密码
在linux bash中通过git clone 项目输入自己的用户名和密码,这一步可以让linux系统将用户名和密码保存在本地。
步骤2:使用脚本下载或者更新代码
![]()
更新代码的脚本如下:
#!/bin/bash

echo 'Start GitClient  for using git to update the project to '`pwd`

declare  GITURL='http://[你的项目地址]' #如https://gitee.com/cn_lyjuan/BaseUtil-Android.git
declare git_cmd='/usr/local/git/bin/git'

echo 'GitServer Address : ' ${GITURL}

echo 'git rev-parse --is-inside-work-tree'

declare needUpdate=false

$git_cmd  rev-parse --is-inside-work-tree >/dev/null 2>&1
if [ $? -eq 0 ]
then
     needUpdate=true
else
     needUpdate=false
fi

echo 'needUpdate is ' ${needUpdate}

if [ $needUpdate != true ]
then

	echo 'git clone the remote project from '${GITURL}
	rm -rf .git
	echo 'git init '`pwd`
	$git_cmd init `pwd`
	echo '------------start fetching--------------------'
	echo 'git --version'
	$git_cmd --version
	echo 'git -c core.askpass=true fetch --tags --progress' ${GITURL} '+refs/heads/*:refs/remotes/origin/*'
	$git_cmd -c core.askpass=true fetch --tags --progress ${GITURL} +refs/heads/*:refs/remotes/origin/*
	echo 'git config remote.origin.url' ${GITURL}
    $git_cmd config remote.origin.url $GITUR
	echo 'git config --add remote.origin.fetch +refs/heads/*:refs/remotes/origin/*'
	$git_cmd config --add remote.origin.fetch +refs/heads/*:refs/remotes/origin/*
	echo 'git config remote.origin.url' ${GITURL}
	$git_cmd config remote.origin.url ${GITURL}

	echo '--------fetching upstream changes from '${GITURL} '----------'
	echo 'git -c core.askpass=true fetch --tags --progress' ${GITURL} '+refs/heads/*:refs/remotes/origin/*'
	$git_cmd -c core.askpass=true fetch --tags --progress ${GITURL} +refs/heads/*:refs/remotes/origin/*

	echo 'git rev-parse refs/remotes/origin/master^{commit}'

	declare commitId=$( $git_cmd rev-parse refs/remotes/origin/master^{commit}  )
	echo $commitId

	$git_cmd rev-parse refs/remotes/origin/origin/master^{commit} >/dev/null 2>&1
	if [ $? -eq 0 ]
	then
	    commitId=$( $git_cmd rev-parse refs/remotes/origin/origin/master^{commit} )
	fi
	echo '---------Checkout out Revision ' ${commitId}'--------'

	echo 'git config core.sparsecheckout'
	$git_cmd config core.sparsecheckout
	echo 'git checkout -f ' ${commitId}
	$git_cmd checkout -f ${commitId}

	echo 'unset varibiant'

	unset commitId

else


	echo 'git config remote.origin.url' ${GITURL}
	$git_cmd config remote.origin.url $GITURL

	echo 'git --version'
	$git_cmd --version

	echo 'git fetch --tags --progress' ${GITURL} '+refs/heads/*:refs/remotes/origin/*'
	$git_cmd  fetch --tags --progress ${GITURL} +refs/heads/*:refs/remotes/origin/*

	echo 'git rev-parse origin/master^{commit}'
	declare commitId=$( $git_cmd rev-parse origin/master^{commit} )

	echo '-------fetching upstream of Revision is ' ${commitId} '-----'

	echo 'git config core.sparsecheckout'
	$git_cmd config core.sparsecheckout

	echo 'git checkout -f' ${commitId}
	$git_cmd checkout -f $commitId

	echo 'git rev-list '${commitId}
	$git_cmd rev-list $commitId -1

	unset commitId

fi

$git_cmd log -1

unset GITURL
unset git_cmd


echo 'finishly execute this script'
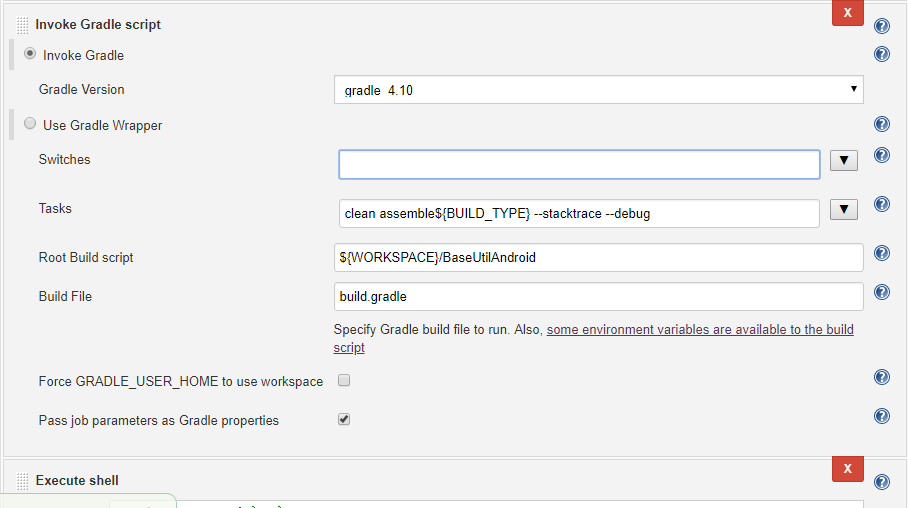
步骤3:配置打包参数
![]()
综上:我们可以解决Git插件不兼容的问题。本人对shell语法掌握不够熟练,以上脚本还有改造的潜能,如果有需要您可以自行改造。