介绍
本文将介绍如何在Spring项目中连接、处理MySQL数据库。
该项目使用Spring Data JPA和Hibernate来连接、处理MySQL数据库,当然,这仅仅是其中一种方式,你也可以使用Spring JDBC或者MyBatis.
Spring Data JPA是Spring Data的一个子项目,主要用于简化数据访问层的实现,使用Spring Data JPA可以轻松实现增删改查、分页、排序等。Spring Data拥有很多子项目,除了Spring Data Jpa外,还有如下子项目。
- Spring Data Commons
- Spring Data MongoDB
- Spring Data Redis
- Spring Data Solr
- Spring Data Gemfire
- Spring Data REST
- Spring Data Neo4j
Hibernate是一个开放源代码的对象关系映射框架,它对JDBC进行了非常轻量级的对象封装,它将POJO与数据库表建立映射关系,是一个全自动的ORM框架,Hibernate可以自动生成SQL语句,自动执行,使得Java程序员可以随心所欲的使用对象编程思维来操纵数据库。 Hibernate可以应用在任何使用JDBC的场合,既可以在Java的客户端程序使用,也可以在Servlet/JSP的Web应用中使用,最具革命意义的是,Hibernate可以在应用EJB的J2EE架构中取代CMP,完成数据持久化的重任。
本文将介绍如何使用Spring Data JPA和Hibernate来连接、处理MySQL数据库。
准备
首先我们需要对MySQL做一些准备处理。我们将要在MySQL中创建db_example数据库,并创建springuser用户,拥有对db_example数据库的所有操作权限。打开MySQL , 输入以下命令:
mysql> create database db_example;
mysql> create user 'springuser'@'localhost' identified by 'pwd123';
mysql> grant all on db_example.* to 'springuser'@'localhost'; -- 给予springuser用户对db_example数据库的所有操作权限
Spring Boot程序
Step1. 创建项目spring_mysql, 以及项目布局:
mkdir spring_mysql
cd ./spring_mysql
touch build.gradle
mkdir -p src/main/java
mkdir -p src/main/resources
mkdir -p src/test/java
mkdir -p src/test/resources
Step2 编写build.gradle
build.gradle代码如下:
buildscript {
repositories {
mavenCentral()
}
dependencies {
classpath("org.springframework.boot:spring-boot-gradle-plugin:2.0.0.RELEASE")
}
}
apply plugin: 'java'
apply plugin: 'eclipse'
apply plugin: 'idea'
apply plugin: 'org.springframework.boot'
apply plugin: 'io.spring.dependency-management'
bootJar {
baseName = 'gs-accessing-data-mysql'
version = '0.1.0'
}
repositories {
mavenCentral()
}
sourceCompatibility = 1.8
targetCompatibility = 1.8
dependencies {
compile("org.springframework.boot:spring-boot-starter-web")
compile 'org.springframework.boot:spring-boot-starter-data-jpa'
compile 'mysql:mysql-connector-java'
testCompile('org.springframework.boot:spring-boot-starter-test')
}
在上述Spring Boot项目中,主要使用spring-boot-starter-web ,spring-boot-starter-data-jpa和mysql:mysql-connector-java来实现在Web端操作MySQL .
Step3 配置属性文件
新建src/main/resources/application.properties文件,配置相关属性,代码如下:
spring.jpa.hibernate.ddl-auto=create
spring.datasource.url=jdbc:mysql://localhost:3306/db_example
spring.datasource.username=springuser
spring.datasource.password=pwd123
在上述代码中,主要的数据库操作为新建(create),因为数据库中实现不存在相应的表格。使用MySQL的localhost服务器的3306端口的db_example数据库,并设置用户名和密码。
Step4 编写Java文件
创建src/main/java/hello文件夹(package),在该文件夹下新建User.java,Hibernate会将该entity类自动转化成数据库中的表格。User.java的完整代码如下:
package hello;
import javax.persistence.Entity;
import javax.persistence.GeneratedValue;
import javax.persistence.GenerationType;
import javax.persistence.Id;
@Entity
public class User {
@Id
@GeneratedValue(strategy=GenerationType.AUTO)
private Integer id;
private String name;
private String email;
public Integer getId() {
return id;
}
public void setId(Integer id) {
this.id = id;
}
public String getName() {
return name;
}
public void setName(String name) {
this.name = name;
}
public String getEmail() {
return email;
}
public void setEmail(String email) {
this.email = email;
}
}
在上述文件夹中新建UserRepository.java,其代码如下:
package hello;
import org.springframework.data.repository.CrudRepository;
import hello.User;
public interface UserRepository extends CrudRepository<User, Long> {
}
这是repository接口, 它将会被Spring中的bean中自动执行。
在上述文件夹中新建MainController.java,代码如下:
package hello;
import org.springframework.beans.factory.annotation.Autowired;
import org.springframework.stereotype.Controller;
import org.springframework.web.bind.annotation.RequestMapping;
import org.springframework.web.bind.annotation.GetMapping;
import org.springframework.web.bind.annotation.RequestParam;
import org.springframework.web.bind.annotation.ResponseBody;
import hello.User;
import hello.UserRepository;
@Controller
@RequestMapping(path="/demo")
public class MainController {
@Autowired
private UserRepository userRepository;
@GetMapping(path="/add")
public @ResponseBody String addNewUser (@RequestParam String name
, @RequestParam String email) {
User n = new User();
n.setName(name);
n.setEmail(email);
userRepository.save(n);
return "Saved";
}
@GetMapping(path="/all")
public @ResponseBody Iterable<User> getAllUsers() {
return userRepository.findAll();
}
}
这是Spring应用的新控制器(Controller)。
在上述文件夹中新建Application.java,代码如下:
package hello;

import org.springframework.boot.SpringApplication;
import org.springframework.boot.autoconfigure.SpringBootApplication;

@SpringBootApplication
public class Application {

    public static void main(String[] args) {
        SpringApplication.run(Application.class, args);
    }
}
这是该Spring Boot项目的主要程序入口。
Step5 创建可执行jar包
cd spring_mysql
gradle build
执行完毕后,会在build/libs文件夹下生成gs-accessing-data-mysql-0.1.0.jar .
运行及测试
使用以下命令启动该Spring Boot项目
java -jar build/libs/gs-accessing-data-mysql-0.1.0.jar
在浏览器端测试,输入以下网址:
localhost:8080/demo/add?name=Alex&email=alex@baidu.com
localhost:8080/demo/add?name=Jclian&email=github@sina.com
localhost:8080/demo/add?name=Bob&email=bob@google.com
localhost:8080/demo/add?name=Cook&email=cook@apple.com
localhost:8080/demo/add?name=Mark&email=mark@west.com
上述程序将会name和email参数的值解析成数据库中user表中的记录并储存,浏览器界面如下图:
![储存数据]()
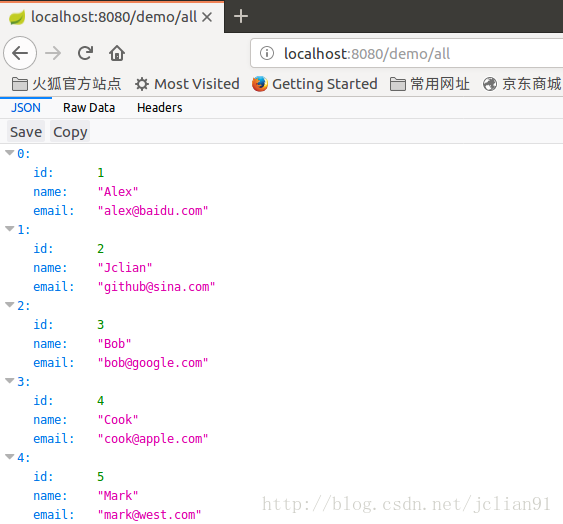
在浏览器中输入网址localhost:8080/demo/all,即可刚看我们我们插入到MySQL中的记录(JSON格式):
![网页中查看数据]()
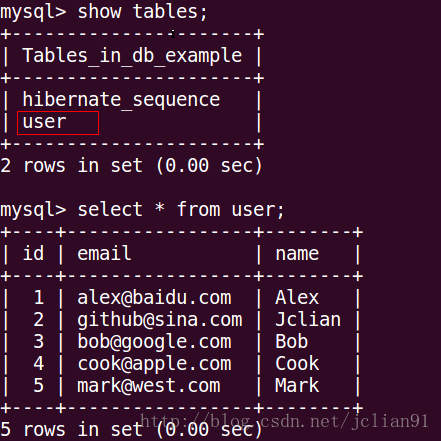
最后我们去MySQL中查看数据是否插入成功,结果如下图所示:
![MySQL中查看数据]()
结束语
本文将介绍如何使用Spring Data JPA和Hibernate来连接、处理MySQL数据库。
本次分享到此结束,接下来还会继续更新Spring Boot方面的内容,欢迎大家交流~~