基于EntityManager实现JPA分表的数据库操作
本文采用 EclipseLink的JPA实现,相关JPA接入使用请移步我的另外几篇博文。
首先还是讨论一下,实现JPA分表的增删改查操作,我们需要做什么:
- 分表规则定义(即从主表到分表的转换实现)
- 分表操作实现(即EntityManager根据分表规则操作具体分表)
1. EntityManager持久化操作
常用接口方法如下:
    // 新增
    void persist(Object var1);
    // 更新
    <T> T merge(T var1);
    // 删除
    void remove(Object var1);
    // 查找
    <T> T find(Class<T> var1, Object var2);
下面来分析一下上述增删改查的接口方法实现:
org.eclipse.persistence.internal.jpa.EntityManagerImpl
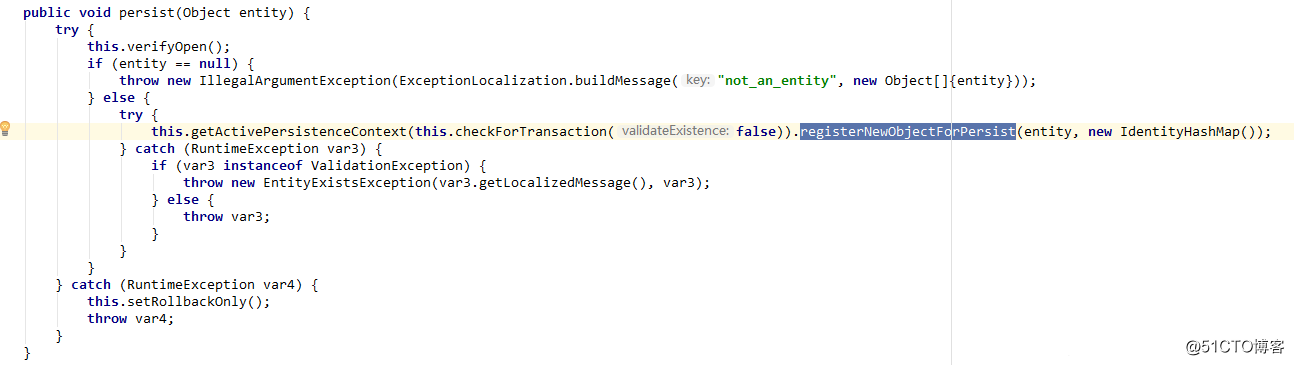
- persist
入参 : 实体对象实例
出参 : 无
![flea-frame-db使用之基于EntityManager实现JPA分表的数据库操作]()
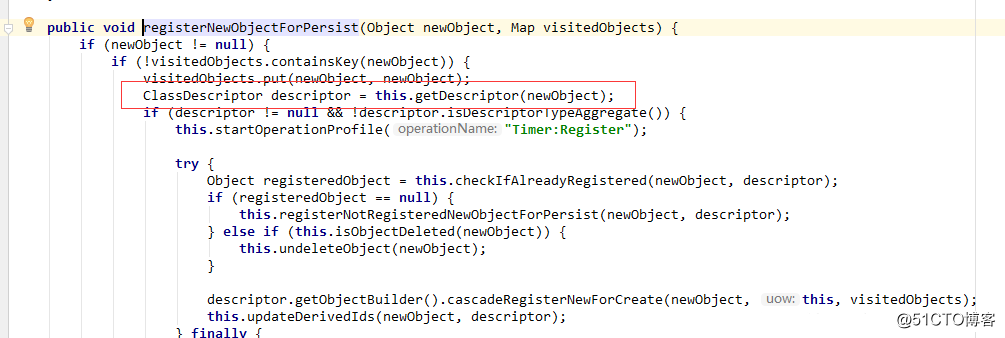
org.eclipse.persistence.internal.sessions.UnitOfWorkImpl
![flea-frame-db使用之基于EntityManager实现JPA分表的数据库操作]()
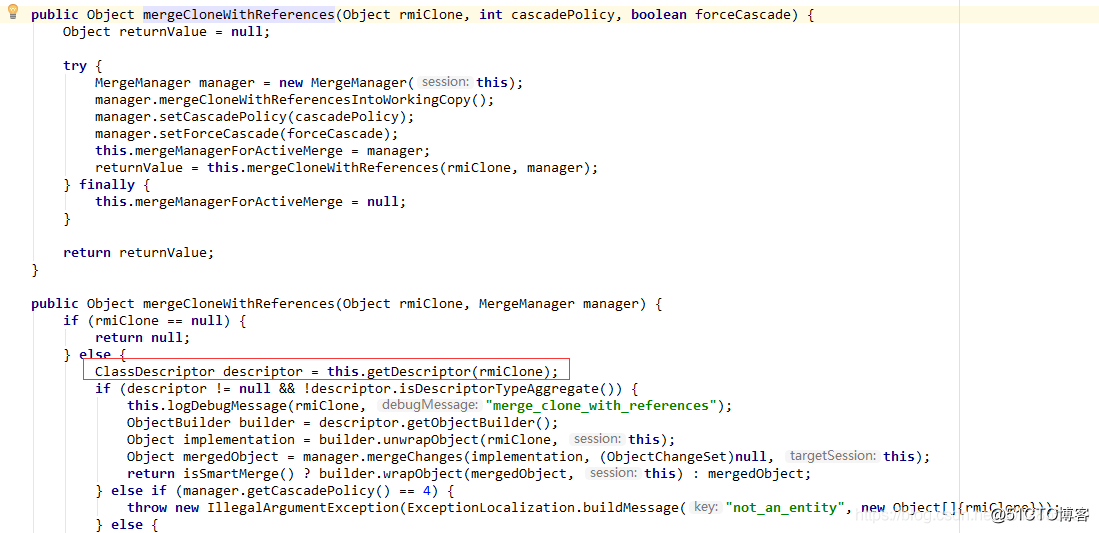
- merge
入参 : 实体对象实例
出参 : 实体对象实例
![flea-frame-db使用之基于EntityManager实现JPA分表的数据库操作]()
![flea-frame-db使用之基于EntityManager实现JPA分表的数据库操作]()
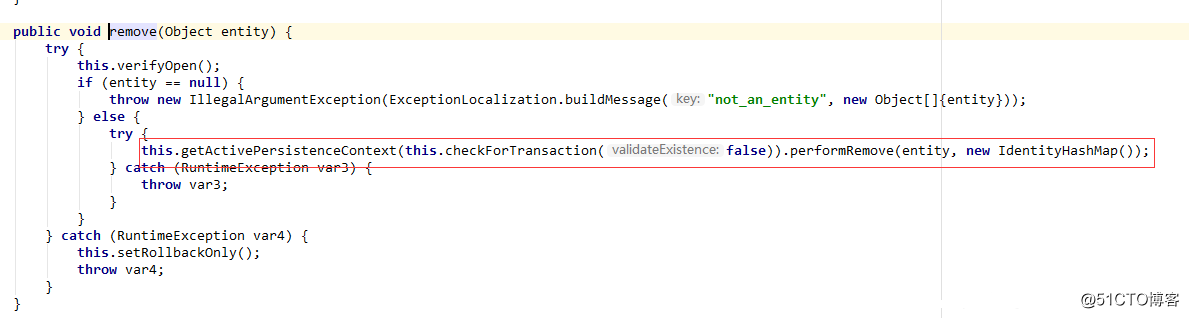
- remove
入参 : 实体对象实例
出参 : 无
![flea-frame-db使用之基于EntityManager实现JPA分表的数据库操作]()
![flea-frame-db使用之基于EntityManager实现JPA分表的数据库操作]()
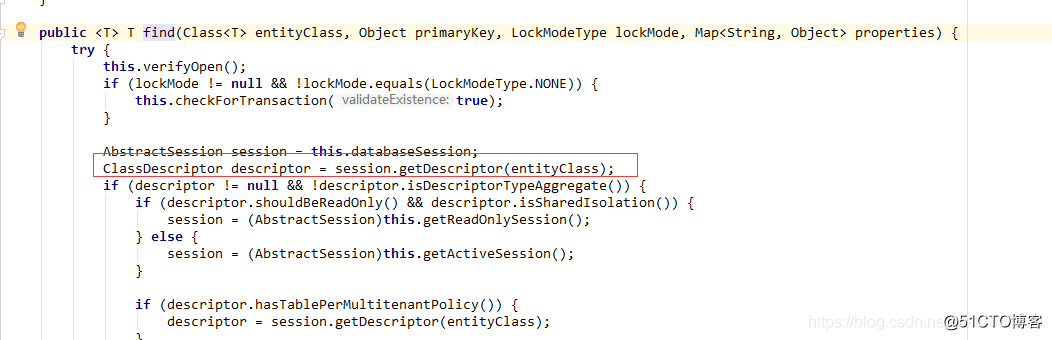
- find
入参 : 实体类Class, 实体类主键
出参 : 实体对象实例
![flea-frame-db使用之基于EntityManager实现JPA分表的数据库操作]()
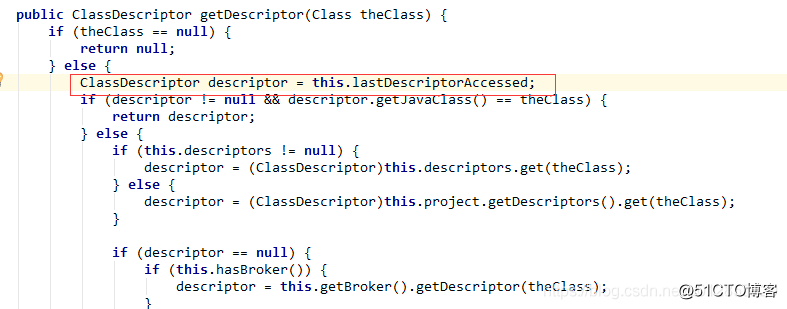
然后我们需要了解下getDescriptor方法的具体实现 :
org.eclipse.persistence.internal.sessions.AbstractSession
![flea-frame-db使用之基于EntityManager实现JPA分表的数据库操作]()
![flea-frame-db使用之基于EntityManager实现JPA分表的数据库操作]()
ClassDescriptor 最后都会被缓存到 lastDescriptorAccessed 变量。
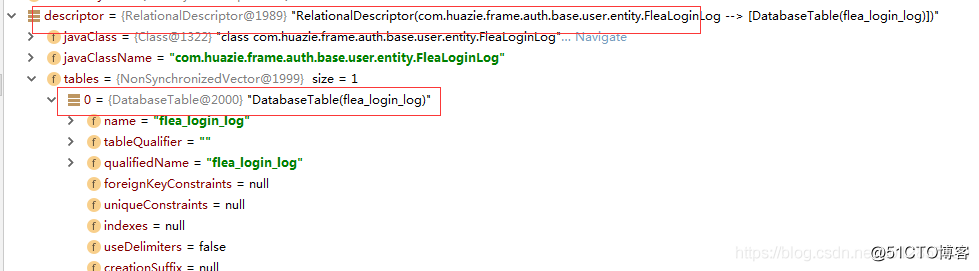
最后切到debug视图,查看一下 ClassDescriptor,从中可以看到 与实际表名相关的 DatabaseTable。
![flea-frame-db使用之基于EntityManager实现JPA分表的数据库操作]()
到了这一步,我们已经知道了表名存储在DatabaseTable中,要想实现分表操作,势必需要动态改变这里的值。
下面给出上述我们需要做的事情的解决方案:
2. 分表规则定义
实体类中定义的表名,我们可以理解为主表名;分表名的命名规则首先需要确定一下,定义如下配置:
<?xml version="1.0" encoding="UTF-8"?>
<tables>

    <!-- 定义分表配置
        name : 分表对应的主表名
        exp  : 分表名表达式 (FLEA_TABLE_NAME)_(列名大写)_(列名大写)
    -->
    <table name="flea_login_log" exp="(FLEA_TABLE_NAME)_(CREATE_DATE)" desc="Flea登录日志表分表规则">
        <splits>
            <!-- 定义分表后缀
                key : 分表类型关键字 (可查看 com.huazie.frame.db.common.table.split.TableSplitEnum )
                column : 分表属性列字段名
                implClass : 分表后缀转换实现类
            -->
            <split key="yyyymm" column="create_date" implClass="com.huazie.frame.db.common.table.split.impl.YYYYMMTableSplitImpl"/>
        </splits>
    </table>

</tables>
分表规则相关实现代码,可以移步 GitHub 查看 TableSplitHelper
3. 分表操作实现
在上述分表规则定义中, 我们可以看到分表名表达式exp是由 主表名 和 分表字段 组成,分表字段的转换实现规则由split定义。
分表处理者实现 EclipseLinkTableSplitHandler
    @Override
    public void handle(EntityManager entityManager, Object entity, boolean isRead) throws Exception {

        if (ObjectUtils.isEmpty(entityManager) || ObjectUtils.isEmpty(entity)) {
            return;
        }

        // 获取分表信息(包括主表名 和 分表名 【如果存在分表返回】)
        SplitTable splitTable = EntityUtils.getSplitTable(entity);

        // 存在分表,则需要操作具体分表
        if (StringUtils.isNotBlank(splitTable.getSplitTableName())) {
            // 获取可用的数据库会话对象
            AbstractSession session;
            if (isRead) {
                session = entityManager.unwrap(AbstractSession.class);
            } else {
                session = entityManager.unwrap(RepeatableWriteUnitOfWork.class);
            }
            // 重新设置 查询的分表表名
            session.getDescriptor(entity.getClass()).setTableName(splitTable.getSplitTableName());
        }
    }
JPA分表的增删改查操作相关代码可以 移步 GitHub 查看 AbstractFleaJPADAOImpl 和 EclipseLinkTableSplitHandler;
4. 自测
自测类可以查看 LoginLogAuthTest。
4.1 新增数据
    @Test
    public void testFleaLoginLogInsert() {
        try {
            IFleaLoginLogSV fleaLoginLogSV = (IFleaLoginLogSV) applicationContext.getBean("fleaLoginLogSV");
            FleaLoginLog fleaLoginLog = new FleaLoginLog();
            fleaLoginLog.setAccountId(1000000L);
            fleaLoginLog.setSystemAccountId(2000L);
            fleaLoginLog.setLoginIp4("127.0.0.1");
            fleaLoginLog.setLoginState(1);
            fleaLoginLog.setLoginTime(DateUtils.getCurrentTime());
            fleaLoginLog.setCreateDate(DateUtils.getCurrentTime());
            Long fleaLoginId = fleaLoginLogSV.getFleaNextValue(fleaLoginLog);
            fleaLoginLog.setLoginLogId(fleaLoginId);
            // 保存至分表
            fleaLoginLogSV.save(fleaLoginLog);
        } catch (Exception e) {
            LOGGER.error("Exception:", e);
        }
    }
4.2 查询数据
    @Test
    public void testFleaLoginLogQuery() {
        try {
            IFleaLoginLogSV fleaLoginLogSV = (IFleaLoginLogSV) applicationContext.getBean("fleaLoginLogSV");
            FleaLoginLog fleaLoginLog = new FleaLoginLog();
            fleaLoginLog.setCreateDate(DateUtils.getCurrentTime());
            fleaLoginLog = fleaLoginLogSV.queryNew(1L, fleaLoginLog);
            LOGGER.debug("FleaLoginLog = {}", fleaLoginLog);
        } catch (Exception e) {
            LOGGER.error("Exception:", e);
        }
    }
4.3 更新数据
    @Test
    public void testFleaLoginLogUpdate() {
        try {
            IFleaLoginLogSV fleaLoginLogSV = (IFleaLoginLogSV) applicationContext.getBean("fleaLoginLogSV");
            FleaLoginLog fleaLoginLog = new FleaLoginLog();
            fleaLoginLog.setCreateDate(DateUtils.getCurrentTime());
            fleaLoginLog = fleaLoginLogSV.queryNew(1L, fleaLoginLog);
            LOGGER.debug("FleaLoginLog = {}", fleaLoginLog);
            // 更新记录(分表)
            fleaLoginLog.setLogoutTime(DateUtils.getCurrentTime());
            fleaLoginLog.setDoneDate(DateUtils.getCurrentTime());
            fleaLoginLog.setLoginState(2);
            fleaLoginLog.setRemarks("用户退出登陆");
            fleaLoginLogSV.update(fleaLoginLog);
        } catch (Exception e) {
            LOGGER.error("Exception:", e);
        }
    }
4.4 删除数据
    @Test
    public void testFleaLoginLogDelete() {
        try {
            IFleaLoginLogSV fleaLoginLogSV = (IFleaLoginLogSV) applicationContext.getBean("fleaLoginLogSV");
            FleaLoginLog fleaLoginLog = new FleaLoginLog();
            fleaLoginLog.setCreateDate(DateUtils.getCurrentTime());
            fleaLoginLogSV.removeNew(1L, fleaLoginLog);
        } catch (Exception e) {
            LOGGER.error("Exception:", e);
        }
    }