管道(执行流)模型由 Pipeline(管道)/ Valve(阀门)/ Context(上下文) 组成
概念
我们把特定的业务,比如订单业务中的临时订单、订单提交以及订单支付等,抽象成一组Pipeline(管道);
拿生成临时订单业务来说,执行流程包括:1参数校验->2业务数据校验->3业务处理,这里的三段子流程是严格按照顺序执行的,我们用Valve(阀门)定义它们,每一个子流程即一个Valve;
在管道模式中,我们要处理的对象是一组业务数据,即概念中的Context(上下文),Context贯穿于整个执行流程。
意义
管道模式是多步流程业务很好的抽象,内部基于单链表实现顺序执行,具有强顺序性;
管道模式对于整体流程的拆分,使得业务的扩展性大大增强,当业务需求发生变化,只需要确定需要加入/删除的子流程位置即可,就像从单链表中增加/删除一个节点。
实现
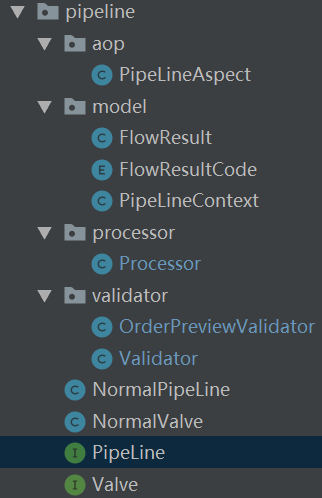
模块结构
![]()
PipeLineContext 实现管道上下文的概念,内部记录一个所处阀门在管道中的索引;使用HashMap存储业务数据,用户流程进行时的数据传递。
public class PipeLineContext {

    private PipeLineContext() {
    }

    @Getter
    private int index;

    @Getter
    private Map<String, Object> context;

    public PipeLineContext(int size) {
        this.index = 0;
        this.context = new HashMap<>(size);
    }

    public void put(String key, Object value) {
        context.put(key, value);
    }

    public void get(String key) {
        context.get(key);
    }

    @JSONField(serialize = false)
    public int getAndIncrement() {
        this.index++;
        return index;
    }

    @Override
    public String toString() {
        return "{\"index\":\"" + index + "\", \"context\":\"" + JSON.toJSONString(context) + "\"}";
    }

}
PipeLine 管道接口,包括添加阀门方法以及开启管道方法
public interface PipeLine {
    /**
     * 添加阀门
     * @param valve 阀门
     */
    void addValve(Valve valve);

    /**
     * 开启管道
     * @param pipeLineContext 管道上下文
     * @return FlowResult
     */
    FlowResult start(PipeLineContext pipeLineContext);
}
Valve 阀门接口,阀门都需实现该接口或者该接口的扩展接口
public interface Valve {
    /**
     * 获取下一个阀门
     * @return Valve 阀门
     */
    Valve getNext();

    /**
     * 设置下一个阀门
     * @param valve 阀门
     */
    void setNext(Valve valve);

    /**
     * 执行管道
     * @param pipeLineContext 管道上下文
     * @return FlowResult
     */
    FlowResult invoke(PipeLineContext pipeLineContext);
}
NormalPipeLine PipeLine接口通用实现
@Component
public class NormalPipeLine implements PipeLine {
    private Valve head = null;
    private Valve next = null;

    @Override
    public void addValve(Valve valve) {
        if (head == null) {
            head = valve;
            valve.setNext(next);
        } else {
            Valve current = head;
            while (current != null) {
                if (current.getNext() == next) {
                    current.setNext(valve);
                    valve.setNext(next);
                    break;
                }
                current = current.getNext();
            }
        }
    }

    @Override
    public FlowResult start(PipeLineContext pipeLineContext) {
        if (pipeLineContext == null) {
            return FlowResult.fail("pipeLineContext should be not null!");
        }
        if (head == null) {
            return FlowResult.fail("there's no valve in current pipeLine!");
        }
        return head.invoke(pipeLineContext);
    }
}
NormalValve Valve接口通用实现
public class NormalValve implements Valve {
    protected Valve next = null;

    @Override
    public Valve getNext() {
        return next;
    }

    @Override
    public void setNext(Valve valve) {
        this.next = valve;
    }

    @Override
    public FlowResult invoke(PipeLineContext pipeLineContext) {
        return processContinue(pipeLineContext);
    }

    protected FlowResult processContinue(PipeLineContext pipeLineContext) {
        return next == null ? FlowResult.ok() : getNext().invoke(pipeLineContext);
    }
}
Validator 订单-临时订单前置参数校验
@Slf4j
@Component
public class Validator extends NormalValve {
    @Override
    public FlowResult invoke(PipeLineContext pipeLineContext) {
        pipeLineContext.put("param", "1");
        return processContinue(pipeLineContext);
    }
}
使用AOP织入阀门,跟踪执行流
@Slf4j
@Aspect
@Component
public class PipeLineAspect {
    /**
     * 定义阀门invoke切点
     */
    @Pointcut(value = "this(com.nooice.order.common.pipeline.Valve) " +
            "&& execution(* invoke(com.nooice.order.common.pipeline.model.PipeLineContext)) && args((pipeLineContext))",
            argNames = "pipeLineContext")
    public void valveInvokeCutOffPoint(PipeLineContext pipeLineContext) {
    }

    @Before(value = "valveInvokeCutOffPoint(pipeLineContext)", argNames = "point,pipeLineContext")
    public void doBefore(JoinPoint point, PipeLineContext pipeLineContext) {
        int currentIndex = pipeLineContext.getAndIncrement();
        String className = point.getTarget().getClass().getName();
        log.info("管道前置通知-{}号阀门({})进入执行, pipeLineContext={}", currentIndex, className, pipeLineContext.toString());
    }
}
测试
@Slf4j
@RunWith(SpringJUnit4ClassRunner.class)
@SpringBootTest(classes = Application.class)
public class PipelineTest {

	@Autowired
	private NormalPipeLine normalPipeLine;
	@Autowired
	private Validator validator;
	@Autowired
	private OrderPreviewValidator orderPreviewValidator;
	@Autowired
	private Processor processor;

	@Test
	public void testUserController() {
		// 定义上下文
		PipeLineContext pipeLineContext = new PipeLineContext(0);
		pipeLineContext.put("index", "0");
		// 增加阀门
		normalPipeLine.addValve(validator); // 参数校验阀门
		normalPipeLine.addValve(orderPreviewValidator); // 业务校验阀门
		normalPipeLine.addValve(processor); // 业务处理阀门
		// 管道执行
		FlowResult flowResult = normalPipeLine.start(pipeLineContext);
		log.info(JSON.toJSONString(flowResult));
	}

}
管道前置通知-1号阀门(com.nooice.order.common.pipeline.validator.Validator)进入执行, pipeLineContext=管道前置通知-2号阀门(com.nooice.order.common.pipeline.validator.OrderPreviewValidator)进入执行, pipeLineContext={"index":"2", "context":"{"index":"0","param":"1"}"}
管道前置通知-3号阀门(com.nooice.order.common.pipeline.processor.Processor)进入执行, pipeLineContext={"index":"3", "context":"{"index":"0","param":"2"}"}
PipelineTest: {"code":1,"message":"成功"}