react-native-select-group-buttons-modal 纯RN实现一个多按钮选择Modal
转载请注明出处:王亟亟的大牛之路
开篇之前日常安利
https://github.com/ddwhan0123/Useful-Open-Source-Android (各种库的收纳,长期维护)
做这个东西的理由
最近公司的项目做了个通用组建,是RN提供给Native和Naive提供给RN多模块,多语言共用2个组件多东西,然后里面牵涉太多老代码和老业务的东西使得代码比较臃肿(还很LOW),然后又因为很多地方正在用又不能彻底干掉调整。
所以自己重写了下然后实现部分功能就有了这么个东西。
安装本库
$ npm install react-native-select-group-buttons-modal --save
使用本库
import RNSelectGroupButtonsModal from 'react-native-select-group-buttons-modal'; <RNSelectGroupButtonsModal settingBuild={this._settingBuild} onPaymentModeChanged={(item, index) => { this.setState({ selectText: JSON.stringify(item) }) }} data={this.initData()} closeButtonPress={(flag) => { this.setState({ selectorVisible: flag }) }} selectorVisible={this.state.selectorVisible}/>
运行示例
npm install expo-cli --global //If you haven't installed it before git clone git@github.com:ddwhan0123/react-native-select-group-buttons-modal.git //clone git cd sample npm install expo start -c --localhost --ios
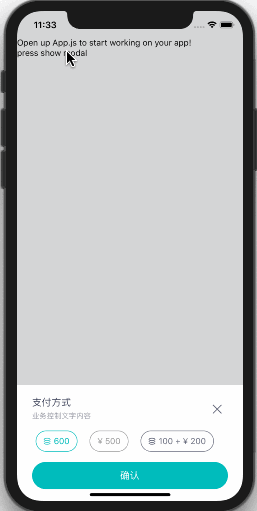
Android运行效果
iOS运行效果
属性
settingBuild?:object
构造基本业务属性的对象,如果不传将有默认值如下
_settingBuild = { backdropColor: '#303437', backdropOpacity: 0.2, animationIn: 'slideInUp', animationTime: 400,//Default animation duration hideOnBack: true, modalTitle: '支付方式',//Main title modalTips: '业务控制文字内容',Subheading closeWithOutSideClick: true,//Click on the grey area to close the bullet window submitText: '确定'//Bottom Button submit text };
onPaymentModeChanged?:(item, index) => void
按钮被选择后的数据回调,返回data数组的某个元素
data?:object[]
弹窗内部可选按钮的数据源,必须传
closeButtonPress?:(flag) => void
关闭按钮的回调
selectorVisible?:boolean
控制是否显示弹窗的flag
defaultMode?:object
默认被选中对象的
style
设置样式属性
SubmitButtonStyle
设置底部按钮属性
tipsColor
设置次标题字体颜色
hideCloseButton?:boolean
设置是否显示关闭按钮
defaultCloseIcon?:object
设置关闭按钮的Icon
closeWithOutSideClick?:boolean
设置是否点击外部关闭Modal
Licenses
- MIT
关于对React-Native的理解
首先我觉得这个项目做到现在仍然有很多问题,使用起来还是有很多坑,但是社区的大兄弟们也一直有努力。
至于为啥还在这部分做没有去用Flutter去实现有2个原因
- 业务需要
- 老项目迁移成本过高
有问题欢迎沟通,必须注明来意
低调大师中文资讯倾力打造互联网数据资讯、行业资源、电子商务、移动互联网、网络营销平台。
持续更新报道IT业界、互联网、市场资讯、驱动更新,是最及时权威的产业资讯及硬件资讯报道平台。
转载内容版权归作者及来源网站所有,本站原创内容转载请注明来源。
- 上一篇
LNMP安装与配置之Python3
环境 我们是在CentOS7下安装python3,但CentOS已经默认安装了Python2,而 Yum 等工具依赖原来的Python2。所以我们需要稍作配置让Python2与Python3可以共存。当然我们也可以使用Python虚拟环境,在这里我们就不做过多介绍了。下面进入主题。 安装 安装更新依赖包,依赖包很重要的,可以为你提供一些便利的操作以及避免一些不必要的错误,当然这不是所有的依赖包,还有些依赖还需要大家自己去发现。 # yum install -y wget git zlib-devel bzip2-devel openssl-devel ncurses-devel sqlite-devel readline-devel tk-devel gcc make 使用Yum安装 # yum install -y python36 python36-devel 查找安装位置 # whereis python3 结果如图,我们可以看到安装在了 /usr/bin/该目录下。这个时候我们通过命令 python3.6,就可进到python3的交互模式了,如图。 建立软连接进入/usr/bi...
- 下一篇
如何使用python分析CPU使用情况? 大概是这样吧
前言现在小编给大家分享一个可以分析CPU使用情况的代码,CPU分析是通过分享CPU执行代码的方式来测量代码的性能,以此来找到代码的不妥之处,然后处理它们, 接下来我们将看看如何跟踪python脚本使用时CPU使用情况,重点关注几个方面 : 1、cProfile 2、line_profiler 3、pprofile 4、vprof 测量CPU使用率,主要使用与内存分析中使用脚本相同的脚本,具体如下: import time def primes(n): if n == 2 : return [2] elif n < 2: return [] s = [] for i in range(3,n+1) : if i % 2 !=0 : s.append(i) mroot = n ** 0.5 half = (n+1) / 2 - 1 i = 0 m = 3 while m <= mroot : if s[i]: j = (m * m - 3) / 2 s[j] = 0 while j < half : s[j] = 0 j += m i = i + 1 m = 2 * i ...
相关文章
文章评论
共有0条评论来说两句吧...
文章二维码
点击排行
-
Docker使用Oracle官方镜像安装(12C,18C,19C)
- Springboot2将连接池hikari替换为druid,体验最强大的数据库连接池
- CentOS8编译安装MySQL8.0.19
- Docker快速安装Oracle11G,搭建oracle11g学习环境
- SpringBoot2配置默认Tomcat设置,开启更多高级功能
- MySQL8.0.19开启GTID主从同步CentOS8
- CentOS7,8上快速安装Gitea,搭建Git服务器
- Jdk安装(Linux,MacOS,Windows),包含三大操作系统的最全安装
- SpringBoot2编写第一个Controller,响应你的http请求并返回结果
推荐阅读
最新文章
- CentOS6,CentOS7官方镜像安装Oracle11G
- Windows10,CentOS7,CentOS8安装Nodejs环境
- CentOS8编译安装MySQL8.0.19
- SpringBoot2整合Thymeleaf,官方推荐html解决方案
- 设置Eclipse缩进为4个空格,增强代码规范
- CentOS7,8上快速安装Gitea,搭建Git服务器
- Windows10,CentOS7,CentOS8安装MongoDB4.0.16
- CentOS7安装Docker,走上虚拟化容器引擎之路
- CentOS6,7,8上安装Nginx,支持https2.0的开启
- CentOS7编译安装Cmake3.16.3,解决mysql等软件编译问题