原文:
【c#】队列(Queue)和MSMQ(消息队列)的基础使用
首先我们知道队列是先进先出的机制,所以在处理并发是个不错的选择。然后就写两个队列的简单应用。
Queue
命名空间
命名空间:System.Collections,不在这里做过多的理论解释,这个东西非常的好理解。
可以看下官方文档:https://docs.microsoft.com/zh-cn/dotnet/api/system.collections.queue?view=netframework-4.7.2
示例代码
我这里就是为了方便记忆做了一个基本的例子,首先创建了QueueTest类:
包含了获取队列的数量,入队和出队的实现
 1  public class QueueTest
 2     {
 3         public static Queue<string> q = new Queue<string>();
 4
 5         #region 获取队列数量
 6         public int GetCount()
 7         {
 8
 9             return q.Count;
10         }
11         #endregion
12
13         #region 队列添加数据
14         public void IntoData(string qStr)
15         {
16             string threadId = System.Threading.Thread.CurrentThread.ManagedThreadId.ToString();
17             q.Enqueue(qStr);
18             Console.WriteLine($"队列添加数据: {qStr};当前线程id:{threadId}");
19         }
20         #endregion
21
22         #region 队列输出数据
23
24         public string OutData()
25         {
26             string threadId = System.Threading.Thread.CurrentThread.ManagedThreadId.ToString();
27             string str = q.Dequeue();
28             Console.WriteLine($"队列输出数据: {str};当前线程id:{threadId}");
29             return str;
30         }
31         #endregion
32
33     }
为了模拟并发情况下也不会出现重复读取和插入混乱的问题所以写了TaskTest类里面开辟了两个异步线程进行插入和读取:
 1     class TaskTest
 2     {
 3
 4         #region 队列的操作模拟
 5         public static void QueueMian()
 6         {
 7             QueueA();
 8             QueueB();
 9         }
10         private static async void QueueA()
11         {
12             QueueTest queue = new QueueTest();
13             var task = Task.Run(() =>
14             {
15                 for (int i = 0; i < 20; i++)
16                 {
17                     queue.IntoData("QueueA" + i);
18                 }
19             });
20             await task;
21             Console.WriteLine("QueueAA插入完成,进行输出:");
22
23             while (queue.GetCount() > 0)
24             {
25                 queue.OutData();
26             }
27         }
28
29         private static async void QueueB()
30         {
31             QueueTest queue = new QueueTest();
32             var task = Task.Run(() =>
33             {
34                 for (int i = 0; i < 20; i++)
35                 {
36                     queue.IntoData("QueueB" + i);
37                 }
38             });
39             await task;
40             Console.WriteLine("QueueB插入完成,进行输出:");
41
42             while (queue.GetCount() > 0)
43             {
44                 queue.OutData();
45             }
46         }
47         #endregion
48
49     }
效果展示
然后在main函数直接调用即可:
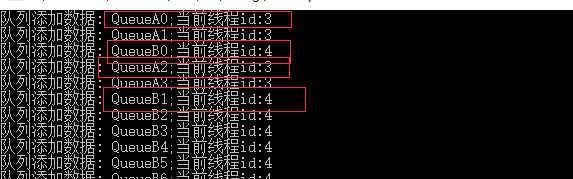
![]()
通过上面的截图可以看出插入线程是无先后的。
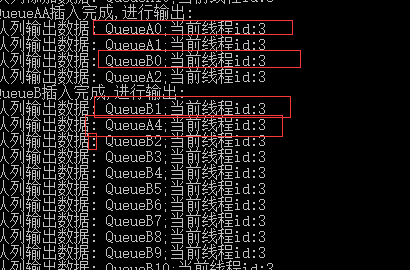
![]()
这张去除也是线程无先后,但是数据是根据插入的数据顺序取的,也就是说多线程取随便取,但是取的数据是根据插入的顺序取值。
MSMQ
msmq是微软提供的消息队列,本来在windows系统中就存在,但是默认没有开启。需要开启。
开启安装
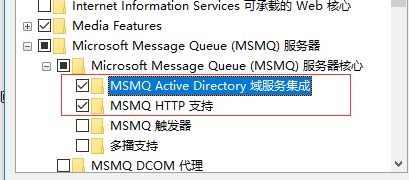
打开控制面板=>程序和功能=> 启动或关闭windows功能 => Microsoft Message Queue(MSMQ)服务器=>Microsoft Message Queue(MSMQ)服务器核心
一般选择:MSMQ Active Directory域服务继承和MSMQ HTTP支持即可。
![]()
点击确定等待安装成功。
命名空间
需要引用System.Messaging.DLL
命名空间:System.Messaging
官方资料文档:https://docs.microsoft.com/zh-cn/dotnet/api/system.messaging.messagequeue?view=netframework-4.7.2
示例代码
与上面queue同样的示例方式,创建一个MSMQ类,实现创建消息队列,查询数据,入列,出列功能:
  1  /// <summary>
  2     /// MSMQ消息队列
  3     /// </summary>
  4     class MSMQ
  5     {
  6         static string path = ".\\Private$\\myQueue";
  7         static MessageQueue queue;
  8         public static void Createqueue(string queuePath)
  9         {
 10             try
 11             {
 12                 if (MessageQueue.Exists(queuePath))
 13                 {
 14                     Console.WriteLine("消息队列已经存在");
 15                     //获取这个消息队列
 16                     queue = new MessageQueue(queuePath);
 17                 }
 18                 else
 19                 {
 20                     //不存在,就创建一个新的,并获取这个消息队列对象
 21                     queue = MessageQueue.Create(queuePath);
 22                     path = queuePath;
 23                 }
 24             }
 25             catch (Exception e)
 26             {
 27                 Console.WriteLine(e.Message);
 28             }
 29
 30         }
 31
 32
 33         #region 获取消息队列的数量
 34         public static int GetMessageCount()
 35         {
 36             try
 37             {
 38                 if (queue != null)
 39                 {
 40                     int count = queue.GetAllMessages().Length;
 41                     Console.WriteLine($"消息队列数量:{count}");
 42                     return count;
 43                 }
 44                 else
 45                 {
 46                     return 0;
 47                 }
 48             }
 49             catch (MessageQueueException e)
 50             {
 51
 52                 Console.WriteLine(e.Message);
 53                 return 0;
 54             }
 55
 56
 57         }
 58         #endregion
 59
 60         #region 发送消息到队列
 61         public static void SendMessage(string qStr)
 62         {
 63             try
 64             {
 65                 //连接到本地队列
 66
 67                 MessageQueue myQueue = new MessageQueue(path);
 68
 69                 //MessageQueue myQueue = new MessageQueue("FormatName:Direct=TCP:192.168.12.79//Private$//myQueue1");
 70
 71                 //MessageQueue rmQ = new MessageQueue("FormatName:Direct=TCP:121.0.0.1//private$//queue");--远程格式
 72
 73                 Message myMessage = new Message();
 74
 75                 myMessage.Body = qStr;
 76
 77                 myMessage.Formatter = new XmlMessageFormatter(new Type[] { typeof(string) });
 78
 79                 //发生消息到队列中
 80
 81                 myQueue.Send(myMessage);
 82
 83                 string threadId = System.Threading.Thread.CurrentThread.ManagedThreadId.ToString();
 84                 Console.WriteLine($"消息发送成功: {qStr};当前线程id:{threadId}");
 85             }
 86             catch (MessageQueueException e)
 87             {
 88                 Console.WriteLine(e.Message);
 89             }
 90         }
 91         #endregion
 92
 93         #region 连接消息队列读取消息
 94         public static void ReceiveMessage()
 95         {
 96             MessageQueue myQueue = new MessageQueue(path);
 97
 98
 99             myQueue.Formatter = new XmlMessageFormatter(new Type[] { typeof(string) });
100
101             try
102
103             {
104
105                 //从队列中接收消息
106
107                 Message myMessage = myQueue.Receive(new TimeSpan(10));// myQueue.Peek();--接收后不消息从队列中移除
108                 myQueue.Close();
109
110                 string context = myMessage.Body.ToString();
111                 string threadId = System.Threading.Thread.CurrentThread.ManagedThreadId.ToString();
112                 Console.WriteLine($"--------------------------消息内容: {context};当前线程id:{threadId}");
113
114             }
115
116             catch (System.Messaging.MessageQueueException e)
117
118             {
119
120                 Console.WriteLine(e.Message);
121
122             }
123
124             catch (InvalidCastException e)
125
126             {
127
128                 Console.WriteLine(e.Message);
129
130             }
131
132         }
133         #endregion
134     }
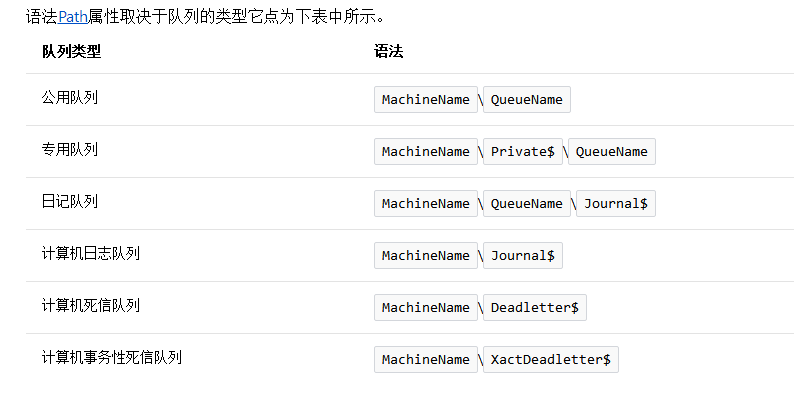
这里说明一下path这个字段,这是消息队列的文件位置和队列名称,我这里写的“.”(点)就是代表的位置MachineName字段,,代表本机的意思
![]()
然后TaskTest类修改成这个样子:
 1 class TaskTest
 2     {
 3
 4         #region 消息队列的操作模拟
 5         public static void MSMQMian()
 6         {
 7             MSMQ.Createqueue(".\\Private$\\myQueue");
 8             MSMQA();
 9             MSMQB();
10             Console.WriteLine("MSMQ结束");
11         }
12         private static async void MSMQA()
13         {
14             var task = Task.Run(() =>
15             {
16                 for (int i = 0; i < 20; i++)
17                 {
18                     MSMQ.SendMessage("MSMQA" + i);
19                 }
20             });
21             await task;
22             Console.WriteLine("MSMQA发送完成,进行读取:");
23
24             while (MSMQ.GetMessageCount() > 0)
25             {
26                 MSMQ.ReceiveMessage();
27             }
28         }
29
30         private static async void MSMQB()
31         {
32             var task = Task.Run(() =>
33             {
34                 for (int i = 0; i < 20; i++)
35                 {
36                     MSMQ.SendMessage("MSMQB" + i);
37                 }
38             });
39             await task;
40             Console.WriteLine("MSMQB发送完成,进行读取:");
41
42             while (MSMQ.GetMessageCount() > 0)
43             {
44                 MSMQ.ReceiveMessage();
45             }
46         }
47         #endregion
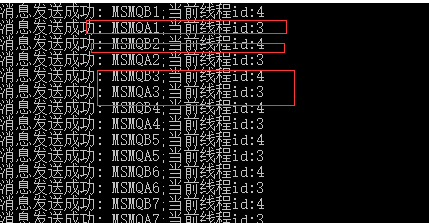
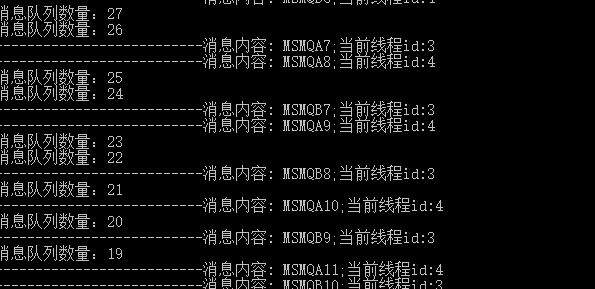
效果展示
![]()
![]()
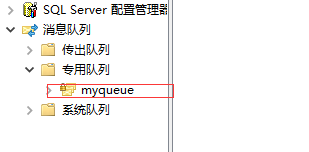
本机查看消息队列
创建成功的消息队列我们可以在电脑上查看:我的电脑=>管理 =>计算机管理 =>服务与应用程序 =>消息队列 =>专用队列就看到我刚才创建的消息队列
![]()