得益于最近有点时间和精力,我想起来了一件事。那就是在上家公司,公司要求做一个APP进程间的通信的功能,并不是APP对APP的直接跨进程通信,而是通过一个服务中心,做接收,然后,再转发,避免应用之间耦合性高,不然的话,新增一个APP,其他APP也要进行升级更新(类似于有服务中心的聊天室)。
我就花几个小时写点东西吧,顺便记录一下
大家都知道在Android设备上,有很多方式,比如,广播,socket,共享内存,aidl等,其中广播和aidl都是基于android中iBinder机制
广播:
广播有缺陷,就是效率不高,有时候会遇到广播丢失,或者说广播的队列过长,导致消息发送慢;
共享内存:
共享内存没有安全性可言,而且多线程读写数据的话,会无法控制
socket:
socket耦合度较高,内存需要拷贝两次,适用于跨网络
AIDL:
基于binder,效率高;基于C/S架构,分层清晰,功能明确;有Linux的进程ID概念,更加安全等优点
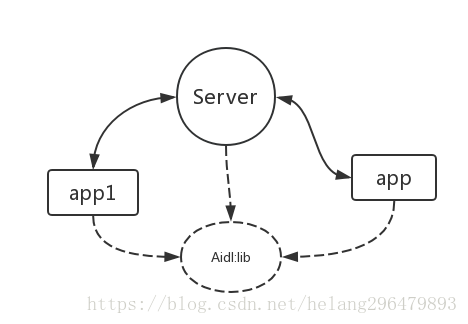
流程图
![]()
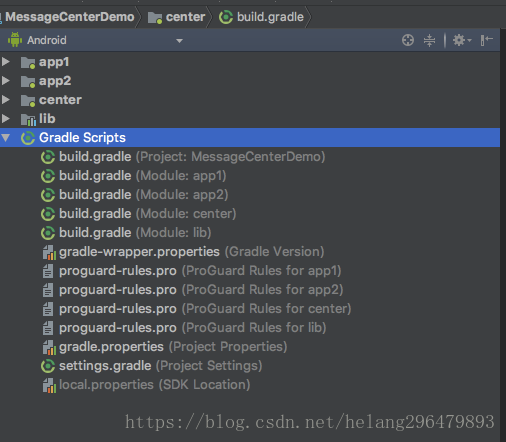
很简单的架构,所有的APP消息传递都通过Server来做,工程结构如下,center(消息中心),app1,app2都依赖于lib(aidl接口库)
![]()
利用aidl中的RemoteCallbackList类(原理和源码我就不多说了,其实Client调用Server是大同小异的,只不过是反者来了一次),来实现client中的接口回调,这样才能从server主动给client发消息,一般我们都是client主动调用Server,现在轮到Server主动调用client
服务端的代码如下,你可以按照你项目的要求来做
package com.helang.messagecenterdemo;

import android.app.Service;
import android.content.Intent;
import android.os.IBinder;
import android.os.RemoteCallbackList;
import android.os.RemoteException;
import android.support.annotation.Nullable;
import android.util.Log;

import com.helang.lib.IMyAidlCallBackInterface;
import com.helang.lib.IMyAidlInterface;

/**
 * 消息服务中心(记得在 manifest.xml 加上 android:exported="true")
 */
public class MyService extends Service {
    private final static String TAG = MyService.class.getSimpleName();
    private RemoteCallbackList<IMyAidlCallBackInterface> callbackList = new RemoteCallbackList<>();//回调的关键(API>=17,才能使用)

    @Override
    public void onCreate() {
        super.onCreate();
    }

    @Nullable
    @Override
    public IBinder onBind(Intent intent) {
        return iBinder;
    }

    /**
     * 实现iBinder
     */
    private IMyAidlInterface.Stub iBinder = new IMyAidlInterface.Stub() {
        @Override
        public void sendMessage(String tag, String message) throws RemoteException {
            callbackList.beginBroadcast();
            sendMessageToAllClient(tag,message);
            Log.d(TAG,"tag="+tag+"  message="+message);
            callbackList.finishBroadcast();
        }

        @Override
        public void registerListener(IMyAidlCallBackInterface listener) throws RemoteException {
            callbackList.register(listener);//注册回调listener
            Log.d(TAG,"registerListener");
        }

        @Override
        public void unregisterListener(IMyAidlCallBackInterface listener) throws RemoteException {
            callbackList.unregister(listener);//取消回调listener
            Log.d(TAG,"unregisterListener");
        }
    };

    /**
     * 发送消息给全部的client(你也可以指定发送给某个client,也可
     * 以根据自己的业务来封装一下Bean,记得要实现Parcelable接口来序列化
     * @param tag
     * @param message
     */
    private void sendMessageToAllClient(String tag,String message){
       for (int i = 0 ; i < callbackList.getRegisteredCallbackCount();i++){
           try {
               callbackList.getBroadcastItem(i).callback(tag,message);
           } catch (RemoteException e) {
               e.printStackTrace();
           }
       }
    }
}
Client1和Client2代码是一样的,就是相互发消息:
package com.helang.app2;

import android.content.ComponentName;
import android.content.Intent;
import android.content.ServiceConnection;
import android.os.Handler;
import android.os.IBinder;
import android.os.RemoteException;
import android.support.v7.app.AppCompatActivity;
import android.os.Bundle;
import android.view.View;
import android.widget.Button;
import android.widget.EditText;
import android.widget.TextView;

import com.helang.lib.IMyAidlCallBackInterface;
import com.helang.lib.IMyAidlInterface;

public class MainActivity extends AppCompatActivity {
    private EditText editText;
    private Button bt_send;
    private TextView text;

    private IMyAidlInterface iMyAidlInterface;
    private ServiceCallBack serviceCallBack;

    private MyServiceConnection myServiceConnection;

    private Handler handler = new Handler();


    @Override
    protected void onCreate(Bundle savedInstanceState) {
        super.onCreate(savedInstanceState);
        setContentView(R.layout.activity_main);
        bt_send = findViewById(R.id.bt_send);
        editText = findViewById(R.id.editText);
        text = findViewById(R.id.text);

        bt_send.setOnClickListener(new View.OnClickListener() {
            @Override
            public void onClick(View view) {
                if (iMyAidlInterface != null){
                    try {
                        iMyAidlInterface.sendMessage("app2",editText.getText().toString().trim());
                    } catch (RemoteException e) {
                        e.printStackTrace();
                    }
                }
            }
        });

        bindService();
    }

    @Override
    protected void onDestroy() {
        super.onDestroy();
        unbindService();
    }

    private void bindService(){
        myServiceConnection = new MyServiceConnection();
        serviceCallBack = new ServiceCallBack();
        Intent intent = new Intent();
        intent.setComponent(new ComponentName("com.helang.messagecenterdemo",
                "com.helang.messagecenterdemo.MyService"));
        startService(intent);//开启远程服务
        bindService(intent,myServiceConnection,BIND_AUTO_CREATE);//绑定服务

    }

    private void unbindService(){
        if (myServiceConnection != null){
            try {
                iMyAidlInterface.unregisterListener(serviceCallBack);
            } catch (RemoteException e) {
                e.printStackTrace();
            }
            unbindService(myServiceConnection);
        }
    }

    /**
     * 连接Service
     */
    class MyServiceConnection implements ServiceConnection {

        @Override
        public void onServiceConnected(ComponentName componentName, IBinder iBinder) {
            iMyAidlInterface = IMyAidlInterface.Stub.asInterface(iBinder);

            handler.post(new Runnable() {
                @Override
                public void run() {
                    //注册回调
                    if (iMyAidlInterface != null){
                        try {
                            iMyAidlInterface.registerListener(serviceCallBack);
                        } catch (RemoteException e) {
                            e.printStackTrace();
                        }
                    }
                }
            });

        }

        @Override
        public void onServiceDisconnected(ComponentName componentName) {

        }
    }

    /**
     * service回到client的类
     */
    class ServiceCallBack extends IMyAidlCallBackInterface.Stub{

        @Override
        public void callback(final String tag, final String message) throws RemoteException {
            runOnUiThread(new Runnable() {
                @Override
                public void run() {
                    text.append("tag="+tag+"  message="+message);
                }
            });
        }
    }
}
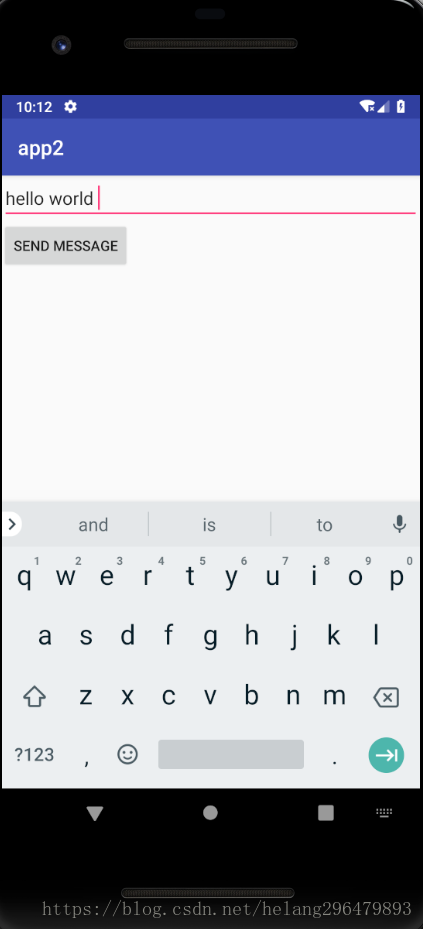
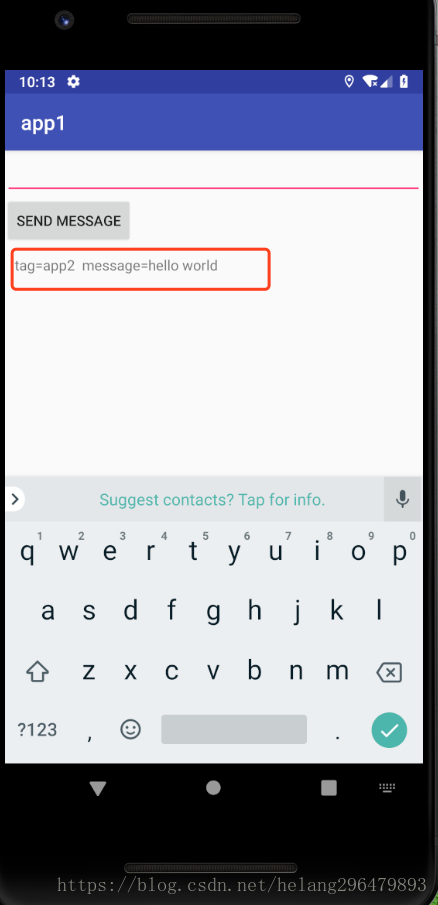
看看效果吧,Client2(app2)发消息给Client1(app1)
![]()
![]()
顺便说一句,提前打开Center服务,因为android 8.0之后的版本直接远程开启其他App后台进程服务,是行不通了,可以绑定一个前台进程,网上方法有很多,我这里就简单处理了
源码我都放在github:https://github.com/helang1991/MessageCenter
喜欢的就给个star吧