kotlin框架Anko的使用及常用的项目配置
之前的几篇文章重复的讲了一些项目的基础配置,这一节就让我们把之前的那些抽取出来,单独的写一篇短文,之后的文章我们就直接使用这个配置就可以啦
创建我们的项目,命名为BaseProject,勾选kotlin支持
项目的代码已经上传到BlogDemo的BaseProject里啦
一、分包项目及样式修改
1)分包
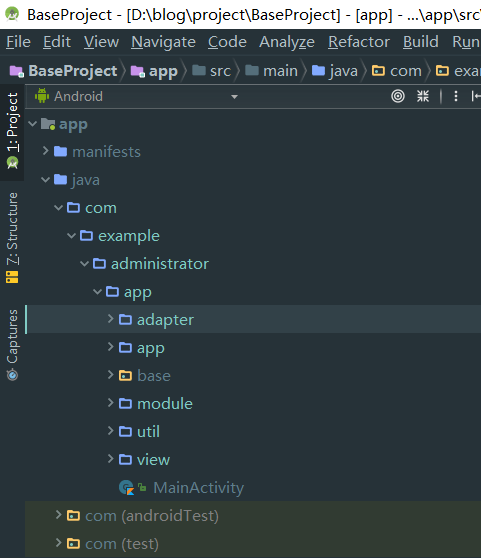
我们先创建以下6个包
- app 自定义Application
- base 基础类
- module 业务包
- util 工具包
- view 自定义控件包
- adapter 包
2)修改标题栏
然后我们进去res-values-styles下,把主题修改成没有标题的样式
<!-- Base application theme. -->
<style name="AppTheme" parent="Theme.AppCompat.Light.NoActionBar">
    <!-- Customize your theme here. -->
    <item name="colorPrimary">@color/colorPrimary</item>
    <item name="colorPrimaryDark">@color/colorPrimaryDark</item>
    <item name="colorAccent">@color/colorAccent</item>
</style>
3)全屏Activity
在base包中创建WinActivity基础Activity
/**
 * Created by 舍长 on 2018/5/28.
 * 舍长:
 * 全屏化基础Activity
 * 在kotlin中,一个类要能被子类继承,父类本身要加上open关键字
 */
open class WinActivity : AppCompatActivity() {

    override fun onCreate(savedInstanceState: Bundle?) {
        super.onCreate(savedInstanceState)
        //      设置全屏
        win()
    }

    private fun win() {
        window.setFlags(WindowManager.LayoutParams.FLAG_FULLSCREEN, WindowManager.LayoutParams.FLAG_FULLSCREEN)
    }
}
之后我们把要使用到全屏的Activity继承于WinActivity就可以啦
二、Anko框架
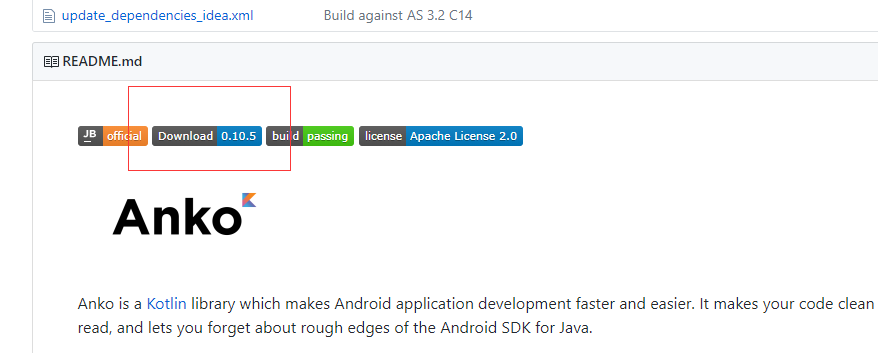
Anko是kotin的一个扩展框架,它封装了一些方法,方便我们进行开发,现在我们在当前的module,也就是app的build.gradle中加入Anko的依赖
 compile "org.jetbrains.anko:anko-commons:0.10.5"
 compile "org.jetbrains.anko:anko-design:0.10.5" // For SnackBars
这里的0.10.5即是Anko的版本号,在Github页面上就可以看见
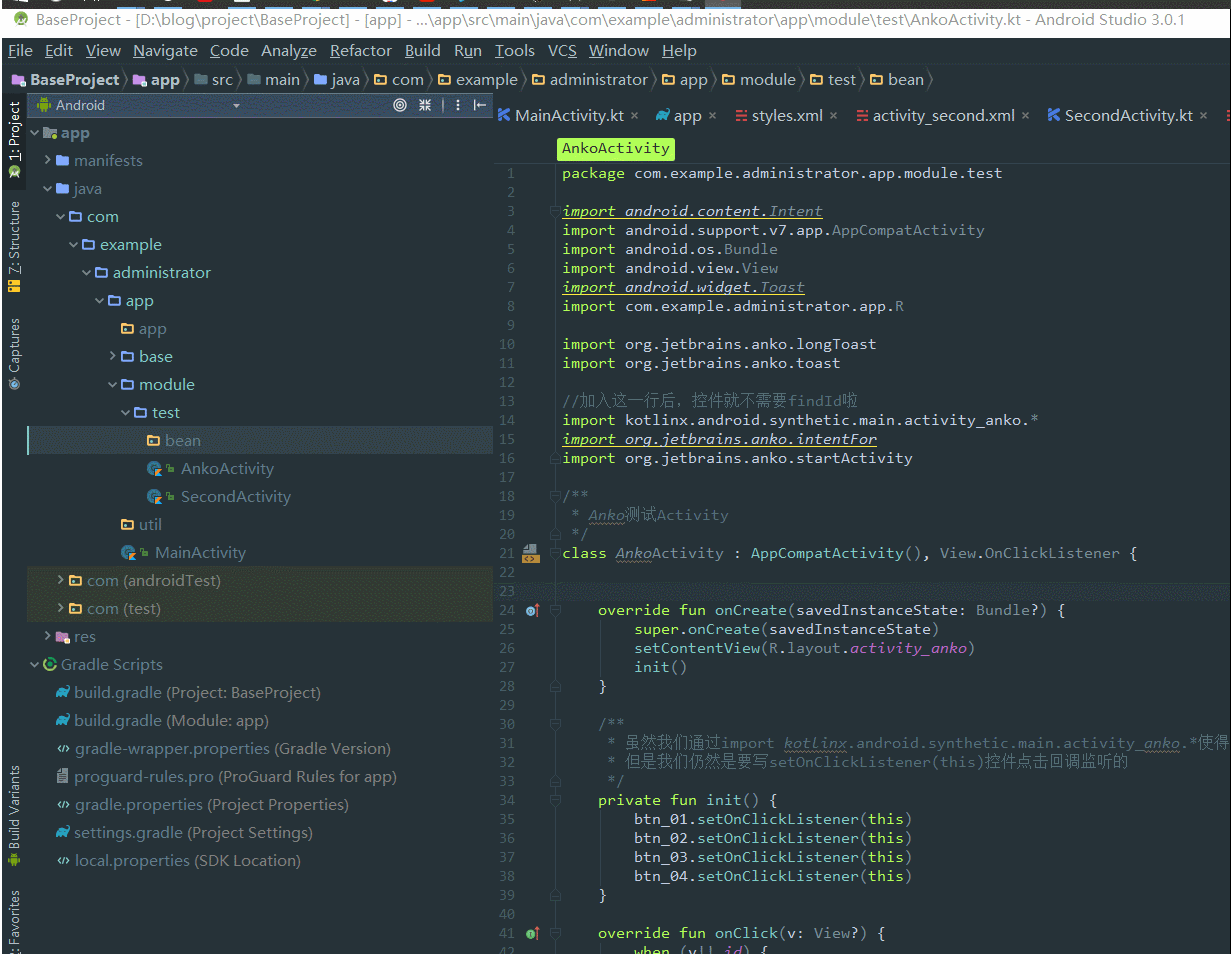
在module业务包下创建test包,创建AnkoActivity,用于测试Anko常用的一些方法。并且我们在导包中加入这么一行
import kotlinx.android.synthetic.main.activity_anko.*
它的作用是添加了这一行后我们就不需要再findViewById了,activity_anko的意思是当前Activity布局的包名。
我把通用的import kotlinx.android.synthetic.main..*在File-Setting-LiveTemplates制作成了代码模版,关于代码模版的制作可以参考这篇课程
1)吐司
在activity_anko布局文件中创建4个按钮
<?xml version="1.0" encoding="utf-8"?>
<LinearLayout xmlns:android="http://schemas.android.com/apk/res/android"
    xmlns:app="http://schemas.android.com/apk/res-auto"
    xmlns:tools="http://schemas.android.com/tools"
    android:layout_width="match_parent"
    android:layout_height="match_parent"
    android:orientation="vertical">

    <Button
        android:id="@+id/btn_01"
        android:layout_width="match_parent"
        android:layout_height="wrap_content"
        android:text="吐司" />

    <Button
        android:id="@+id/btn_02"
        android:layout_width="match_parent"
        android:layout_height="wrap_content"
        android:text="长吐司" />

    <Button
        android:id="@+id/btn_03"
        android:layout_width="match_parent"
        android:layout_height="wrap_content"
        android:text="页面跳转" />

    <Button
        android:id="@+id/btn_04"
        android:layout_width="match_parent"
        android:layout_height="wrap_content"
        android:text="携带数据的页面跳转" />

</LinearLayout>
回到Activity实现按钮的点击事件后测试我们的Anko封装的toast。
import org.jetbrains.anko.longToast
import org.jetbrains.anko.toast
//加入这一行后,控件就不需要findId啦
import kotlinx.android.synthetic.main.activity_anko.*
class AnkoActivity : AppCompatActivity(), View.OnClickListener {


    override fun onCreate(savedInstanceState: Bundle?) {
        super.onCreate(savedInstanceState)
        setContentView(R.layout.activity_anko)
        init()
    }

    /**
     * 虽然我们通过import kotlinx.android.synthetic.main.activity_anko.*使得不需要写控件的fndId,
     * 但是我们仍然是要写setOnClickListener(this)控件点击回调监听的
     */
    private fun init() {
       btn_01.setOnClickListener(this)
       btn_02.setOnClickListener(this)
       btn_03.setOnClickListener(this)
       btn_04.setOnClickListener(this)
    }

    override fun onClick(v: View?) {
        when (v!!.id) {
//          短吐司
            R.id.btn_01 -> {
//          短吐司原来的写法
//                Toast.makeText(this, "原生的吐司", Toast.LENGTH_SHORT).show()
//          使用Anko的写法
                toast("Anko的短吐司")
            }
//          长吐司
            R.id.btn_02 -> {
//          长吐司原来的写法
//                Toast.makeText(this, "原生的吐司", Toast.LENGTH_LONG).show()
//          使用Anko的写法
                longToast("Anko的长吐司")
            }
            R.id.btn_03 -> {

            }
            R.id.btn_03 -> {

            }
        }
    }
}
修改module的AndroidMaifext.xml文件的启动项测试一下吧。
2)页面跳转
在test包下创建SecondActivity作为跳转后的界面。
/**
 * 跳转后的界面
 */
class SecondActivity : AppCompatActivity() {

    override fun onCreate(savedInstanceState: Bundle?) {
        super.onCreate(savedInstanceState)
        setContentView(R.layout.activity_second)
    }
}
先来看看跳转Activity原本需要的代码
// 原生跳转
startActivity(Intent(this@AnkoActivity, SecondActivity::class.java))
使用使用Anko后的代码
startActivity<SecondActivity>()
Activity完整代码
//加入这一行后,控件就不需要findId啦
import kotlinx.android.synthetic.main.activity_anko.*
import org.jetbrains.anko.intentFor
import org.jetbrains.anko.startActivity

/**
 * Anko测试Activity
 */
class AnkoActivity : AppCompatActivity(), View.OnClickListener {


    override fun onCreate(savedInstanceState: Bundle?) {
        super.onCreate(savedInstanceState)
        setContentView(R.layout.activity_anko)
        init()
    }

    /**
     * 虽然我们通过import kotlinx.android.synthetic.main.activity_anko.*使得不需要写控件的fndId,
     * 但是我们仍然是要写setOnClickListener(this)控件点击回调监听的
     */
    private fun init() {
        btn_01.setOnClickListener(this)
        btn_02.setOnClickListener(this)
        btn_03.setOnClickListener(this)
        btn_04.setOnClickListener(this)
    }

    override fun onClick(v: View?) {
        when (v!!.id) {
            R.id.btn_01 -> {
//          短吐司原来的写法
//                Toast.makeText(this, "原生的吐司", Toast.LENGTH_SHORT).show()
//          使用Anko的写法
                toast("Anko的短吐司")
            }
            R.id.btn_02 -> {
//          长吐司原来的写法
//                Toast.makeText(this, "原生的吐司", Toast.LENGTH_LONG).show()
//          使用Anko的写法
                longToast("Anko的长吐司")
            }
            R.id.btn_03 -> {
//          原生跳转
//                startActivity(Intent(this@AnkoActivity, SecondActivity::class.java))
//          Anko跳转
                startActivity<SecondActivity>()
            }
            R.id.btn_04 -> {
//          原生携带数据跳转
//                val intent = Intent(this, SecondActivity::class.java)
//                intent.putExtra("name", 5)
//                startActivity(intent)
//           Anko携带数据跳转
                startActivity<SecondActivity>("name" to "tonjie", "age" to 20)
            }
        }
    }
}
在SecondActivity中接受传递过来的数据
/**
 * 跳转后的界面
 */
class SecondActivity : AppCompatActivity() {

    override fun onCreate(savedInstanceState: Bundle?) {
        super.onCreate(savedInstanceState)
        setContentView(R.layout.activity_second)
        val intent = intent
        val name = intent.getStringExtra("name")
        val age = intent.getStringExtra("20")
        Log.d("tonjies", "name: " + name + " age:" + 20)
    }
}
三,插件安装
1)Json To Kotlin
Java代码生成JavaBean实体类一般用JsonFormat插件进行生成,但是JsonFormat在Kotlin中是使用不了的。
所以我们使用kotlin生成JavaBean的插件,JSON To Kotlin。
打开File-Setting-Plugins-Browse respositories 搜索 JSON To Kotlin Class 安装,重启应用后我们在test包中创建bean包,生成以下Json数据的实体类.
{
    "name": "tonjie",
    "age":"18"
}
打开Setting-Other-勾选Enable Inner Class Model 的作用是使得生成的数据都以内部类的形式出现,不勾选的话会默认把所有的类都生成在包内
四、工具类封装
1)Log工具类
为了方便测试,我们在util下创建L类,封装log。
另外自己也写过一篇关于Java工具类封装的文章,
import android.util.Log

/**
 * Created by 舍长 on 2018/4/27.
 * 在kotlin中,加了object后,L类就成为了一个单例模式的类,相当于帮我们省略掉了以前Java实现单例的代码
 * 最后我们可以直接L.d调用类中的方法
 */
object L {
    //    TAG
    public var TAG: String = "tonJies"

    fun d(test: String) {
        Log.d(TAG, test)
    }
}
使用方法
L.d("name: " + name)
2)sharedPreferences封装类
**
 * Created by 舍长 on 2018/6/9.
 * 舍长:sharedPreferences封装类
 */
class ShareUtils {

    val NAME = "config"


    /**
     * 存储String类型的值
     * @param mContext this
     * @param key      key值
     * @param value    要存储的String值
     */
    fun putString(mContext: Context, key: String, value: String) {
        val sharedPreferences = mContext.getSharedPreferences(NAME, Context.MODE_PRIVATE)
        sharedPreferences.edit().putString(key, value).commit()
    }

    /**
     * 获取String类型的值
     * @param mContext this
     * @param key      key
     * @param defValue 默认值
     * @return
     */
    fun getString(mContext: Context, key: String, defValue: String): String? {
        val sharedPreferences = mContext.getSharedPreferences(NAME, Context.MODE_PRIVATE)
        return sharedPreferences.getString(key, defValue)
    }


    /**
     * 存储Int类型的值
     * @param mContext this
     * @param key      key
     * @param value    要存储的Int值
     */
    fun putInt(mContext: Context, key: String, value: Int) {
        val sharedPreferences = mContext.getSharedPreferences(NAME, Context.MODE_PRIVATE)
        sharedPreferences.edit().putInt(key, value).commit()
    }


    /**
     * 获取Int类型的值
     * @param mContext this
     * @param key      key
     * @param defValue 默认值
     * @return
     */
    fun getInt(mContext: Context, key: String, defValue: Int): Int {
        val sharedPreferences = mContext.getSharedPreferences(NAME, Context.MODE_PRIVATE)
        return sharedPreferences.getInt(key, defValue)
    }


    /**
     * 存储Boolean类型的值
     * @param mContext this
     * @param key      key
     * @param value    要存储Boolean值
     */
    fun putBoolean(mContext: Context, key: String, value: Boolean) {
        val sharedPreferences = mContext.getSharedPreferences(NAME, Context.MODE_PRIVATE)
        sharedPreferences.edit().putBoolean(key, value).commit()
    }

    /**
     * 获取Boolean类型的值
     * @param mContext this
     * @param key      key
     * @param defValue 默认值
     * @return
     */
    fun getBoolean(mContext: Context, key: String, defValue: Boolean?): Boolean {
        val sharedPreferences = mContext.getSharedPreferences(NAME, Context.MODE_PRIVATE)
        return sharedPreferences.getBoolean(key, defValue!!)
    }

    //删除 单个 key
    fun deleShare(context: Context, key: String) {
        val sharedPreferences = context.getSharedPreferences(NAME, Context.MODE_PRIVATE)
        sharedPreferences.edit().remove(key).commit()
    }

    //删除全部 key
    fun deleAll(context: Context) {
        val sharedPreferences = context.getSharedPreferences(NAME, Context.MODE_PRIVATE)
        sharedPreferences.edit().clear().commit()
    }
在test包下创建ShareActivity进行测试
import kotlinx.android.synthetic.main.activity_share.*

/**
 * sharedPreferences封装类测试
 */
class ShareActivity : AppCompatActivity(), View.OnClickListener {

    override fun onCreate(savedInstanceState: Bundle?) {
        super.onCreate(savedInstanceState)
        setContentView(R.layout.activity_share)
        init()
    }


    /**
     * 虽然我们通过import kotlinx.android.synthetic.main.activity_anko.*使得不需要写控件的fndId,
     * 但是我们仍然是要写setOnClickListener(this)控件点击回调监听的
     */
    private fun init() {
        btn1.setOnClickListener(this)
        btn2.setOnClickListener(this)
        btn3.setOnClickListener(this)
        btn4.setOnClickListener(this)
    }

    override fun onClick(v: View?) {
        when (v!!.id) {
            R.id.btn1 -> {
//              存储String类型
                ShareUtils.putString(this,"name","tonjie")
                ShareUtils.putString(this,"age","20")
            }
//              取出String类型
            R.id.btn2 -> {
                ShareUtils.getString(this,"name","20")
            }
            R.id.btn3 -> {
//              删除单个key
                ShareUtils.deleShare(this,"name")
            }
            R.id.btn4 -> {
//              删除所有key
                ShareUtils.deleAll(this)
            }
        }
    }
}
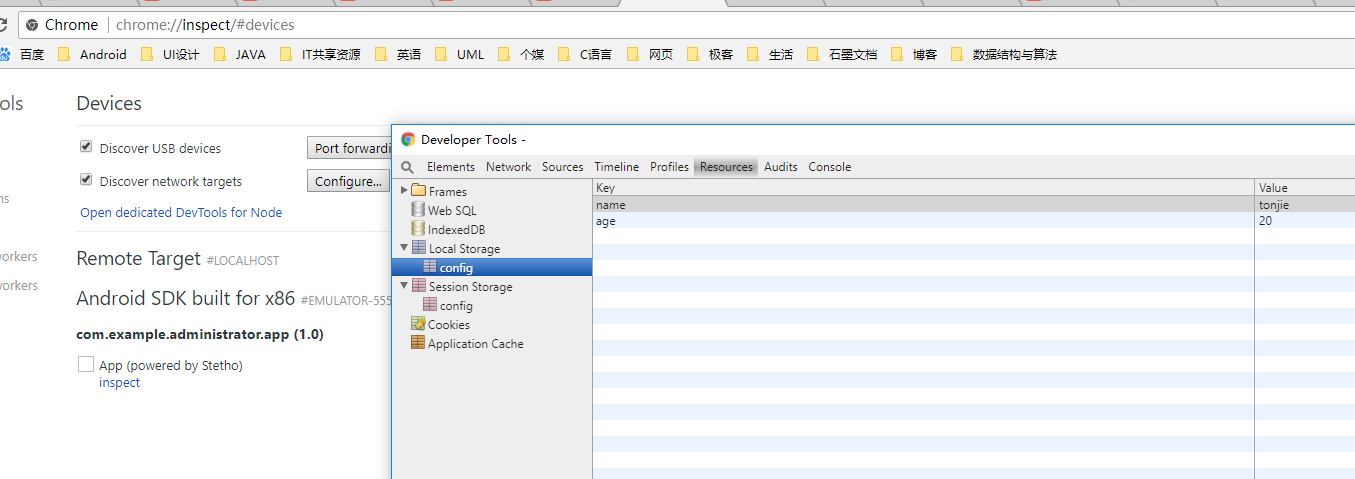
之后我们在build.gradle下添加数据库数据查看框架stetho
compile 'com.facebook.stetho:stetho:1.3.1'
在app包下创建自定义Application,初始化stetho,最后别忘了在AndroidMainfest.xml中去引用
/**
 * Created by 舍长 on 2018/6/9.
 * 舍长:
 */
class App : Application() {
    override fun onCreate() {
        super.onCreate()
        Stetho.initializeWithDefaults(this)
    }
}
    <application
        android:name=".app.App"
        ...
运行程序,打开控制台,打开谷歌在地址栏中输入chrome://inspect/#devices进行测试
五,其他
1)view包
在步骤一时我们创建的view包还没有用,这个包的作用是用来放置我们的自定义控件的,比如我们创建一个Views类
/**
 * Created by 舍长 on 2018/6/24.
 * 舍长:自定义控件
 */
class Views : View {

    constructor(context: Context) : super(context)

    @RequiresApi(Build.VERSION_CODES.LOLLIPOP)
    constructor(context: Context, attrs: AttributeSet) : super(context, attrs)
}
2)adapter包
还剩下的adapter是用来存放例如RecyclerView这样的适配器的
/**
 * Created by 舍长 on 2018/6/24.
 * 舍长:自定义控件
 */
class Views : View {

    constructor(context: Context) : super(context)

    @RequiresApi(Build.VERSION_CODES.LOLLIPOP)
    constructor(context: Context, attrs: AttributeSet) : super(context, attrs)
}
文章参考自以下教程:
https://coding.imooc.com/class/81.html
https://www.jianshu.com/p/03da9f91f41f
https://github.com/Kotlin/anko
由衷感谢,文章不足之处,希望能得到您的指正。如果本文对您有帮助,还希望能给个赞,么么扎