前言
本文就是简单介绍下 Generator 语法编译后的代码。
Generator
function* helloWorldGenerator() {
  yield 'hello';
  yield 'world';
  return 'ending';
}
我们打印下执行的结果:
var hw = helloWorldGenerator();

console.log(hw.next()); // {value: "hello", done: false}
console.log(hw.next()); // {value: "world", done: false}
console.log(hw.next()); // {value: "ending", done: true}
console.log(hw.next()); // {value: undefined, done: true}
Babel
具体的执行过程就不说了,我们直接在 Babel 官网的 Try it out 粘贴上述代码,然后查看代码被编译成了什么样子:
/**
 * 我们就称呼这个版本为简单编译版本吧
 */
var _marked = /*#__PURE__*/ regeneratorRuntime.mark(helloWorldGenerator);

function helloWorldGenerator() {
  return regeneratorRuntime.wrap(
    function helloWorldGenerator$(_context) {
      while (1) {
        switch ((_context.prev = _context.next)) {
          case 0:
            _context.next = 2;
            return "hello";

          case 2:
            _context.next = 4;
            return "world";

          case 4:
            return _context.abrupt("return", "ending");

          case 5:
          case "end":
            return _context.stop();
        }
      }
    },
    _marked,
    this
  );
}
猛一看,好像编译后的代码还蛮少的,但是细细一看,编译后的代码肯定是不能用的呀,regeneratorRuntime 是个什么鬼?哪里有声明呀?mark 和 wrap 方法又都做了什么?
难道就不能编译一个完整可用的代码吗?
regenerator
如果你想看到完整可用的代码,你可以使用 regenerator,这是 facebook 下的一个工具,用于编译 ES6 的 generator 函数。
我们先安装一下 regenerator:
npm install -g regenerator
然后新建一个 generator.js 文件,里面的代码就是文章最一开始的代码,我们执行命令:
regenerator --include-runtime generator.js > generator-es5.js
我们就可以在 generator-es5.js 文件看到编译后的完整可用的代码。
而这一编译就编译了 700 多行…… 编译后的代码可以查看 generator-es5.js
总之编译后的代码还蛮复杂,我们可以从中抽离出大致的逻辑,至少让简单编译的那段代码能够跑起来。
mark 函数
简单编译后的代码第一段是这样的:
var _marked = /*#__PURE__*/ regeneratorRuntime.mark(helloWorldGenerator);
我们查看完整编译版本中 mark 函数的源码:
runtime.mark = function(genFun) {
  genFun.__proto__ = GeneratorFunctionPrototype;
  genFun.prototype = Object.create(Gp);
  return genFun;
};
这其中又涉及了 GeneratorFunctionPrototype 和 Gp 变量,我们也查看下对应的代码:
function Generator() {}
function GeneratorFunction() {}
function GeneratorFunctionPrototype() {}

...

var Gp = GeneratorFunctionPrototype.prototype =
  Generator.prototype = Object.create(IteratorPrototype);

GeneratorFunction.prototype = Gp.constructor = GeneratorFunctionPrototype;

GeneratorFunctionPrototype.constructor = GeneratorFunction;

GeneratorFunctionPrototype[toStringTagSymbol] =
  GeneratorFunction.displayName = "GeneratorFunction";
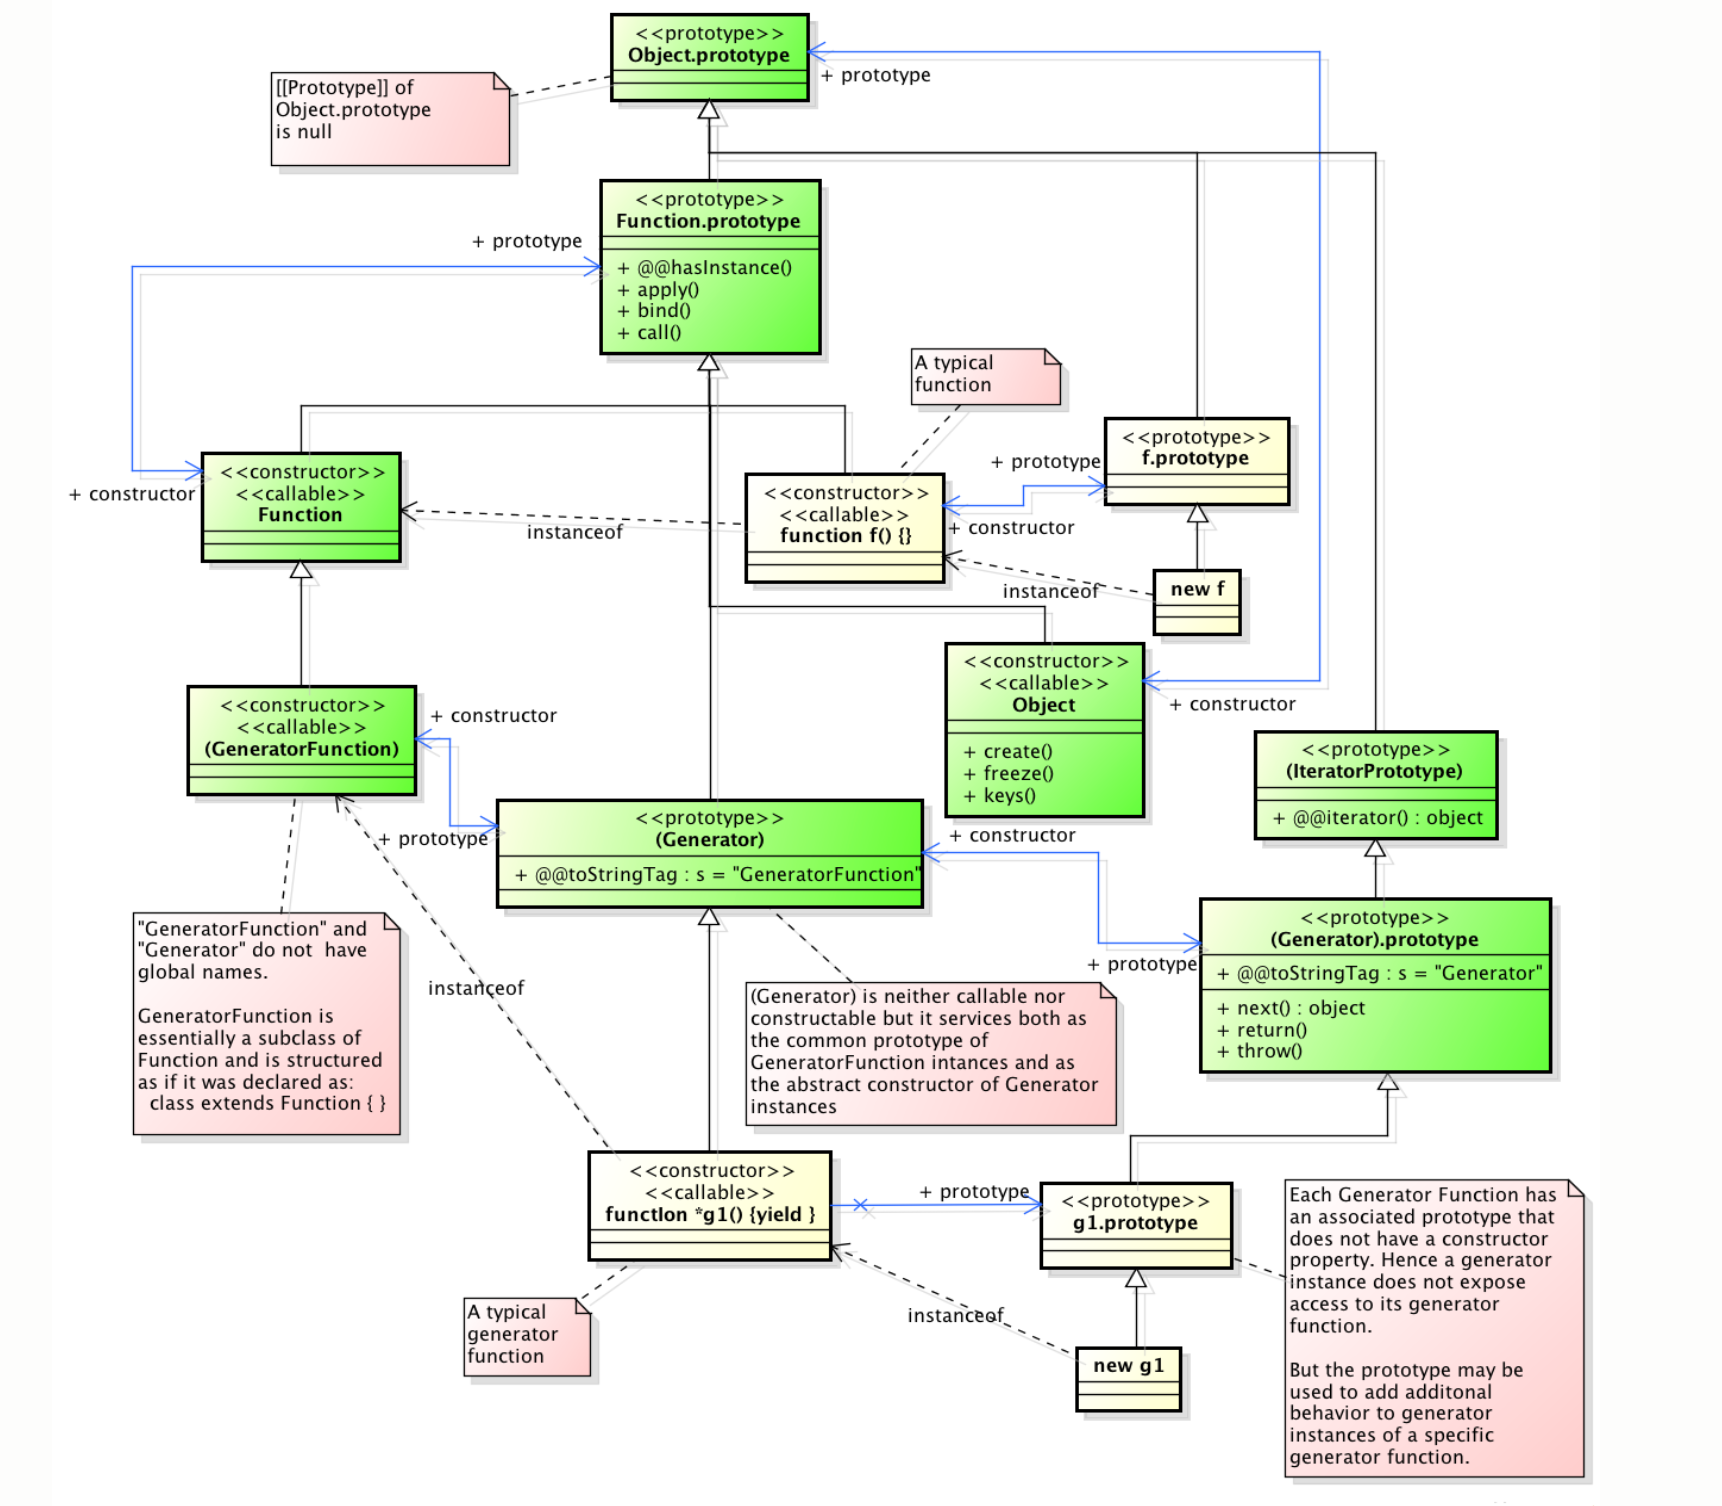
这段代码构建了一堆看起来很复杂的关系链,其实这是参照着 ES6 规范构建的关系链:
![regenerator]()
图中 +@@toStringTag:s = 'Generator' 的就是 Gp,+@@toStringTag:s = 'GeneratorFunction' 的就是 GeneratorFunctionPrototype。
构建关系链的目的在于判断关系的时候能够跟原生的保持一致,就比如:
function* f() {}
var g = f();
console.log(g.__proto__ === f.prototype); // true
console.log(g.__proto__.__proto__ === f.__proto__.prototype); // true
为了简化起见,我们可以把 Gp 先设置为一个空对象,不过正如你在上图中看到的,next()、 throw()、return() 函数都是挂载在 Gp 对象上,实际上,在完整的编译代码中,确实有为 Gp 添加这三个函数的方法:
// 117 行
function defineIteratorMethods(prototype) {
  ["next", "throw", "return"].forEach(function(method) {
    prototype[method] = function(arg) {
      return this._invoke(method, arg);
    };
  });
}

// 406 行
defineIteratorMethods(Gp);
为了简单起见,我们将整个 mark 函数简化为:
runtime.mark = function(genFun) {
  var generator = Object.create({
    next: function(arg) {
      return this._invoke('next', arg)
    }
  });
  genFun.prototype = generator;
  return genFun;
};
wrap 函数
除了设置关系链之外,mark 函数的返回值 genFun 还作为了 wrap 函数的第二个参数传入:
function helloWorldGenerator() {
  return regeneratorRuntime.wrap(
    function helloWorldGenerator$(_context) {
      ...
    },
    _marked,
    this
  );
}
我们再看下 wrap 函数:
function wrap(innerFn, outerFn, self) {
  var generator = Object.create(outerFn.prototype);
  var context = new Context([]);
  generator._invoke = makeInvokeMethod(innerFn, self, context);

  return generator;
}
所以当执行 var hw = helloWorldGenerator(); 的时候,其实执行的是 wrap 函数,wrap 函数返回了 generator,generator 是一个对象,原型是 outerFn.prototype, outerFn.prototype 其实就是 genFun.prototype, genFun.prototype 是一个空对象,原型上有 next() 方法。
所以当你执行 hw.next() 的时候,执行的其实是 hw 原型的原型上的 next 函数,next 函数执行的又是 hw 的 _invoke 函数:
generator._invoke = makeInvokeMethod(innerFn, self, context);
innerFn 就是 wrap 包裹的那个函数,其实就是 helloWordGenerato$ 函数,呐,就是这个函数:
function helloWorldGenerator$(_context) {
  while (1) {
    switch ((_context.prev = _context.next)) {
      case 0:
        _context.next = 2;
        return "hello";

      case 2:
        _context.next = 4;
        return "world";

      case 4:
        return _context.abrupt("return", "ending");

      case 5:
      case "end":
        return _context.stop();
    }
  }
}
而 context 你可以直接理解为这样一个全局对象:
var ContinueSentinel = {};

var context = {
  done: false,
  method: "next",
  next: 0,
  prev: 0,
  abrupt: function(type, arg) {
    var record = {};
    record.type = type;
    record.arg = arg;

    return this.complete(record);
  },
  complete: function(record, afterLoc) {
    if (record.type === "return") {
      this.rval = this.arg = record.arg;
      this.method = "return";
      this.next = "end";
    }

    return ContinueSentinel;
  },
  stop: function() {
    this.done = true;
    return this.rval;
  }
};
每次 hw.next 的时候,就会修改 next 和 prev 属性的值,当在 generator 函数中 return 的时候会执行 abrupt,abrupt 中又会执行 complete,执行完 complete,因为 this.next = end 的缘故,再执行就会执行 stop 函数。
我们来看下 makeInvokeMethod 函数:
var ContinueSentinel = {};

function makeInvokeMethod(innerFn, self, context) {
  var state = 'start';

  return function invoke(method, arg) {

    if (state === 'completed') {
      return { value: undefined, done: true };
    }

    context.method = method;
    context.arg = arg;

    while (true) {

      state = 'executing';

      var record = {
        type: 'normal',
        arg: innerFn.call(self, context)
      };
      if (record.type === "normal") {

        state = context.done
          ? 'completed'
          : 'yield';

        if (record.arg === ContinueSentinel) {
          continue;
        }

        return {
          value: record.arg,
          done: context.done
        };

      }
    }
  };
}
基本的执行过程就不分析了,我们重点看第三次执行 hw.next() 的时候:
第三次执行 hw.next() 的时候,其实执行了
this._invoke("next", undefined);
我们在 invoke 函数中构建了一个 record 对象:
var record = {
  type: "normal",
  arg: innerFn.call(self, context)
};
而在 innerFn.call(self, context) 中,因为 _context.next 为 4 的缘故,其实执行了:
_context.abrupt("return", 'ending');
而在 abrupt 中,我们又构建了一个 record 对象:
var record = {};
record.type = 'return';
record.arg = 'ending';
然后执行了 this.complete(record),
在 complete 中,因为 record.type === "return"
this.rval = 'ending';
this.method = "return";
this.next = "end";
然后返回了全局对象 ContinueSentinel,其实就是一个全局空对象。
然后在 invoke 函数中,因为 record.arg === ContinueSentinel 的缘故,没有执行后面的 return 语句,就直接进入下一个循环。
于是又执行了一遍 innerFn.call(self, context),此时 _context.next 为 end, 执行了 _context.stop(), 在 stop 函数中:
this.done = true;
return this.rval; // this.rval 其实就是 `ending`
所以最终返回的值为:
{
  value: 'ending',
  done: true
};
之后,我们再执行 hw.next() 的时候,因为 state 已经是 'completed' 的缘故,直接就返回 { value: undefined, done: true}
不完整但可用的源码
当然这个过程,看文字理解起来可能有些难度,不完整但可用的代码如下,你可以断点调试查看具体的过程:
(function() {
  var ContinueSentinel = {};

  var mark = function(genFun) {
    var generator = Object.create({
      next: function(arg) {
        return this._invoke("next", arg);
      }
    });
    genFun.prototype = generator;
    return genFun;
  };

  function wrap(innerFn, outerFn, self) {
    var generator = Object.create(outerFn.prototype);

    var context = {
      done: false,
      method: "next",
      next: 0,
      prev: 0,
      abrupt: function(type, arg) {
        var record = {};
        record.type = type;
        record.arg = arg;

        return this.complete(record);
      },
      complete: function(record, afterLoc) {
        if (record.type === "return") {
          this.rval = this.arg = record.arg;
          this.method = "return";
          this.next = "end";
        }

        return ContinueSentinel;
      },
      stop: function() {
        this.done = true;
        return this.rval;
      }
    };

    generator._invoke = makeInvokeMethod(innerFn, context);

    return generator;
  }

  function makeInvokeMethod(innerFn, context) {
    var state = "start";

    return function invoke(method, arg) {
      if (state === "completed") {
        return { value: undefined, done: true };
      }

      context.method = method;
      context.arg = arg;

      while (true) {
        state = "executing";

        var record = {
          type: "normal",
          arg: innerFn.call(self, context)
        };

        if (record.type === "normal") {
          state = context.done ? "completed" : "yield";

          if (record.arg === ContinueSentinel) {
            continue;
          }

          return {
            value: record.arg,
            done: context.done
          };
        }
      }
    };
  }

  window.regeneratorRuntime = {};

  regeneratorRuntime.wrap = wrap;
  regeneratorRuntime.mark = mark;
})();

var _marked = regeneratorRuntime.mark(helloWorldGenerator);

function helloWorldGenerator() {
  return regeneratorRuntime.wrap(
    function helloWorldGenerator$(_context) {
      while (1) {
        switch ((_context.prev = _context.next)) {
          case 0:
            _context.next = 2;
            return "hello";

          case 2:
            _context.next = 4;
            return "world";

          case 4:
            return _context.abrupt("return", "ending");

          case 5:
          case "end":
            return _context.stop();
        }
      }
    },
    _marked,
    this
  );
}

var hw = helloWorldGenerator();

console.log(hw.next());
console.log(hw.next());
console.log(hw.next());
console.log(hw.next());
ES6 系列
ES6 系列目录地址:https://github.com/mqyqingfeng/Blog
ES6 系列预计写二十篇左右,旨在加深 ES6 部分知识点的理解,重点讲解块级作用域、标签模板、箭头函数、Symbol、Set、Map 以及 Promise 的模拟实现、模块加载方案、异步处理等内容。
如果有错误或者不严谨的地方,请务必给予指正,十分感谢。如果喜欢或者有所启发,欢迎 star,对作者也是一种鼓励。
双十一广告:阿里云双十一1折拼团活动:已满6人,都是最低折扣了
【满6人】1核2G云服务器99.5元一年298.5元三年 2核4G云服务器545元一年 1227元三年
【满6人】1核1G MySQL数据库 119.5元一年
【满6人】3000条国内短信包 60元每6月
参团地址:http://click.aliyun.com/m/1000020293/
作者: 冴羽
原文链接
本文为云栖社区原创内容,未经允许不得转载。