欢迎关注个人公众号:Java技术大杂烩,每天10点精美文章准时奉上
本文将从以下几个方面介绍
相关文章
前言
类图
工厂类实现
数据库连接实现
连接池的实现
从连接池中获取连接(流程图)
把连接放入到连接池中(流程图)
相关文章
Mybatis 解析配置文件的源码解析
Mybatis 类型转换源码分析
前言
在使用 Mybatis 的时候,数据库的连接一般都会使用第三方的数据源组件,如 C3P0,DBCP 和 Druid 等,其实 Mybatis 也有自己的数据源实现,可以连接数据库,还有连接池的功能,下面就来看看 Mybatis 自己实现的数据源头和连接池的一个实现原理。
类图
Mybatis 数据源的实现主要是在 datasource 包下:
![]()
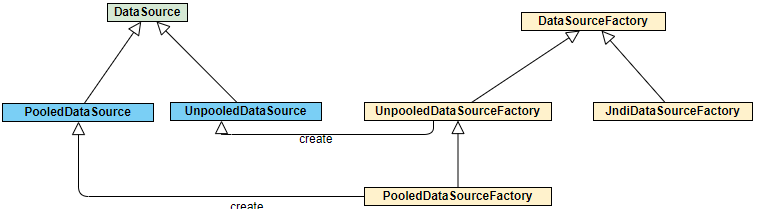
我们常见的数据源组件都实现了 Javax.sql.DataSource 接口,Mybatis 也实现该接口并且提供了两个实现类 UnpooledDataSource 和 PooledDataSource 一个使用连接池,一个不使用连接池,此外,对于这两个类,Mybatis 还提供了两个工厂类进行创建对象,是工厂方法模式的一个应用,首先来看下它们的一个类图:
![]()
关于上述几个类,PooledDataSource 和 UnpooledDataSource 是数据源实现的主要逻辑,代码比较复杂,放在后面来看,现在先看看看两个工厂类 。
DataSourceFactory
先来看看 DataSourceFactory 类,该类是 JndiDataSourceFactory 和 UnpooledDataSourceFactory 两个工厂类的顶层接口,只定义了两个方法,如下所示:
public interface DataSourceFactory {
  // 设置 DataSource 的相关属性,一般在初始化完成后进行设置
  void setProperties(Properties props);
  // 获取数据源 DataSource 对象
  DataSource getDataSource();

}
UnpooledDataSourceFactory
UnpooledDataSourceFactory 主要用来创建 UnpooledDataSource 对象,它会在构造方法中初始化 UnpooledDataSource 对象,并在 setProperties 方法中完成对 UnpooledDataSource 对象的配置
public class UnpooledDataSourceFactory implements DataSourceFactory {
  // 数据库驱动前缀
  private static final String DRIVER_PROPERTY_PREFIX = "driver.";
  private static final int DRIVER_PROPERTY_PREFIX_LENGTH = DRIVER_PROPERTY_PREFIX.length();
  // 对应的数据源,即 UnpooledDataSource
  protected DataSource dataSource;

  public UnpooledDataSourceFactory() {
    this.dataSource = new UnpooledDataSource();
  }
  // 对数据源 UnpooledDataSource 进行配置
  @Override
  public void setProperties(Properties properties) {
    Properties driverProperties = new Properties();
    // 创建 DataSource 相应的 MetaObject
    MetaObject metaDataSource = SystemMetaObject.forObject(dataSource);
    // 遍历 properties 集合,该集合中存放了数据源需要的信息
    for (Object key : properties.keySet()) {
      String propertyName = (String) key;
      // 以 "driver." 开头的配置项是对 DataSource 的配置,记录到 driverProperties  中
      if (propertyName.startsWith(DRIVER_PROPERTY_PREFIX)) {
        String value = properties.getProperty(propertyName);
        driverProperties.setProperty(propertyName.substring(DRIVER_PROPERTY_PREFIX_LENGTH), value);
      } else if (metaDataSource.hasSetter(propertyName)) { // 该属性是否有 set 方法
        // 获取对应的属性值
        String value = (String) properties.get(propertyName);
        // 根据属性类型进行类型的转换,主要是 Integer, Long, Boolean 三种类型的转换
        Object convertedValue = convertValue(metaDataSource, propertyName, value);
        // 设置DataSource 的相关属性值
        metaDataSource.setValue(propertyName, convertedValue);
      } else {
        throw new DataSourceException("Unknown DataSource property: " + propertyName);
      }
    }
    // 设置 DataSource.driverProerties 属性值
    if (driverProperties.size() > 0) {
      metaDataSource.setValue("driverProperties", driverProperties);
    }
  }
  // 返回数据源
  @Override
  public DataSource getDataSource() {
    return dataSource;
  }
  // 类型转
  private Object convertValue(MetaObject metaDataSource, String propertyName, String value) {
    Object convertedValue = value;
    Class<?> targetType = metaDataSource.getSetterType(propertyName);
    if (targetType == Integer.class || targetType == int.class) {
      convertedValue = Integer.valueOf(value);
    } else if (targetType == Long.class || targetType == long.class) {
      convertedValue = Long.valueOf(value);
    } else if (targetType == Boolean.class || targetType == boolean.class) {
      convertedValue = Boolean.valueOf(value);
    }
    return convertedValue;
  }
}
JndiDataSourceFactory 依赖 JNDI 服务器中获取用户配置的 DataSource,这里可以不看。
PooledDataSourceFactory
PooledDataSourceFactory 主要用来创建 PooledDataSource 对象,它继承了 UnpooledDataSource 类,设置 DataSource 参数的方法复用UnpooledDataSource 中的 setProperties 方法,只是数据源返回的是 PooledDataSource 对象而已。
public class PooledDataSourceFactory extends UnpooledDataSourceFactory {

  public PooledDataSourceFactory() {
    this.dataSource = new PooledDataSource();
  }
}
以上这些就是 Mybatis 用来创建数据源的工厂类,下面就来看下数据源的主要实现。
UnpooledDataSource
UnpooledDataSource 不使用连接池来创建数据库连接,每次获取数据库连接时都会创建一个新的连接进行返回;
public class UnpooledDataSource implements DataSource {
  // 加载 Driver 类的类加载器
  private ClassLoader driverClassLoader;
  // 数据库连接驱动的相关配置
  private Properties driverProperties;
  // 缓存所有已注册的数据库连接驱动
  private static Map<String, Driver> registeredDrivers = new ConcurrentHashMap<String, Driver>();

  private String driver;
  private String url;
  private String username;
  private String password;
  // 是否自动提交
  private Boolean autoCommit;
  // 事物隔离级别
  private Integer defaultTransactionIsolationLevel;

  // 静态块,在初始化的时候,从 DriverManager 中获取所有的已注册的驱动信息,并缓存到该类的 registeredDrivers集合中
  static {
    Enumeration<Driver> drivers = DriverManager.getDrivers();
    while (drivers.hasMoreElements()) {
      Driver driver = drivers.nextElement();
      registeredDrivers.put(driver.getClass().getName(), driver);
    }
  }

  public UnpooledDataSource() {
  }

  public UnpooledDataSource(String driver, String url, String username, String password) {
    this.driver = driver;
    this.url = url;
    this.username = username;
    this.password = password;
  }
}
接下来看下获取连接的方法:
  // 获取一个新的数据库连接
  @Override
  public Connection getConnection(String username, String password) throws SQLException {
    return doGetConnection(username, password);
  }

  // 根据 properties 获取一个新的数据库连接
  private Connection doGetConnection(Properties properties) throws SQLException {
    // 初始化数据库驱动
    initializeDriver();
    // 通过 DriverManager 来获取一个数据库连接
    Connection connection = DriverManager.getConnection(url, properties);
    // 配置数据库连接的 autoCommit 和隔离级别
    configureConnection(connection);
    // 返回新连接
    return connection;
  }

  // 初始化数据库驱动
  private synchronized void initializeDriver() throws SQLException {
    // 如果当前的驱动还没有注册,则进行注册
    if (!registeredDrivers.containsKey(driver)) {
      Class<?> driverType;
      try {
        if (driverClassLoader != null) {
          driverType = Class.forName(driver, true, driverClassLoader);
        } else {
          driverType = Resources.classForName(driver);
        }
        // 创建驱动
        Driver driverInstance = (Driver)driverType.newInstance();
        // 向  JDBC 的 DriverManager 注册驱动
        DriverManager.registerDriver(new DriverProxy(driverInstance));
        // 向本类的 registeredDrivers 注册驱动
        registeredDrivers.put(driver, driverInstance);
      } catch (Exception e) {
        throw new SQLException("Error setting driver on UnpooledDataSource. Cause: " + e);
      }
    }
  }

  // 设置数据库连接的 autoCommit 和隔离级别
  private void configureConnection(Connection conn) throws SQLException {
    if (autoCommit != null && autoCommit != conn.getAutoCommit()) {
      conn.setAutoCommit(autoCommit);
    }
    if (defaultTransactionIsolationLevel != null) {
      conn.setTransactionIsolation(defaultTransactionIsolationLevel);
    }
  }
以上代码就是 UnpooledDataSource 类的主要实现逻辑,每次获取连接都是从数据库新创建一个连接进行返回,又因为,数据库连接的创建是一个耗时的操作,且数据库连接是非常珍贵的资源,如果每次获取连接都创建一个,则可能会造成系统的瓶颈,拖垮响应速度等,这时就需要数据库连接池了,Mybatis 也提供了自己数据库连接池的实现,就是 PooledDataSource 类。
PooledDataSource
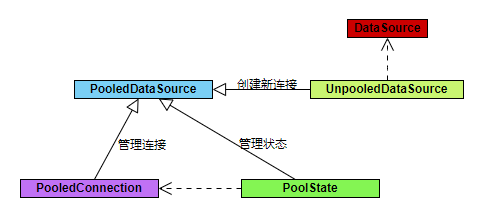
PooledDataSource 是一个比较复杂的类,PooledDataSource 新创建数据库连接是使用 UnpooledDataSource 来实现的,且 PooledDataSource 并不会管理 java.sql.Connection 对象,而是管理 PooledConnection 对象,在 PooledConnection 中封装了真正的数据库连接对象和其代理对象;此外,由于它是一个连接池,所以还需要管理连接池的状态,比如有多少连接是空闲的,还可以创建多少连接,此时,就需要一个类来管理连接池的对象,即 PoolState 对象;先来看下 PooledDataSource 的一个 UML 图:
![]()
PooledConnection
先来看看 PooledConnection 类,它主要是用来管理数据库连接的,它是一个代理类,实现了 InvocationHandler 接口,
class PooledConnection implements InvocationHandler {
  // close 方法
  private static final String CLOSE = "close";
  // 记录当前的 PooledConnection 对象所在的 PooledDataSource 对象,该 PooledConnection 对象是从 PooledDataSource 对象中获取的,当调用 close 方法时会将 PooledConnection 放回该 PooledDataSource 中去
  private PooledDataSource dataSource;
  // 真正的数据库连接
  private Connection realConnection;
  // 数据库连接的代理对象
  private Connection proxyConnection;
  // 从连接池中取出该连接的时间戳
  private long checkoutTimestamp;
  // 该连接创建的时间戳
  private long createdTimestamp;
  // 该连接最后一次被使用的时间戳
  private long lastUsedTimestamp;
  // 用于标识该连接所在的连接池,由URL+username+password 计算出来的hash值
  private int connectionTypeCode;
  // 该连接是否有效
  private boolean valid;

  // 创建连接
  public PooledConnection(Connection connection, PooledDataSource dataSource) {
    this.hashCode = connection.hashCode();
    this.realConnection = connection;
    this.dataSource = dataSource;
    this.createdTimestamp = System.currentTimeMillis();
    this.lastUsedTimestamp = System.currentTimeMillis();
    this.valid = true;
    this.proxyConnection = (Connection) Proxy.newProxyInstance(Connection.class.getClassLoader(), IFACES, this);
  }

  // 废弃该连接
  public void invalidate() {
    valid = false;
  }

  // 判断该连接是否有效,
  // 1.判断 valid 字段
  // 2.向数据库中发送检测测试的SQL,查看真正的连接还是否有效
  public boolean isValid() {
    return valid && realConnection != null && dataSource.pingConnection(this);
  }
 //     setter / getter  方法
}
接下来看下 invoke 方法,该方法是 proxyConnection 这个连接代理对象的真正代理逻辑,它会对 close 方法进行代理,并且在调用真正的连接之前对连接进行检测。
  @Override
  public Object invoke(Object proxy, Method method, Object[] args) throws Throwable {
    String methodName = method.getName();
    // 如果执行的方法是 close 方法,则会把当前连接放回到 连接池中去,供下次使用,而不是真正的关闭数据库连接
    if (CLOSE.hashCode() == methodName.hashCode() && CLOSE.equals(methodName)) {
      dataSource.pushConnection(this);
      return null;
    } else {
      try {
        // 如果不是 close 方法,则 调用 真正的数据库连接执行
        if (!Object.class.equals(method.getDeclaringClass())) {
          // 执行之前,需要进行连接的检测
          checkConnection();
        }
        // 调用数据库真正的连接进行执行
        return method.invoke(realConnection, args);
      } catch (Throwable t) {
        throw ExceptionUtil.unwrapThrowable(t);
      }
    }
  }
PoolState
PoolState 类主要是用来管理连接池的状态,比如哪些连接是空闲的,哪些是活动的,还可以创建多少连接等。该类中只是定义了一些属性来进行控制连接池的状态,并没有任何的方法。
public class PoolState {
  // 该 PoolState 属于哪个 PooledDataSource
  protected PooledDataSource dataSource;

  // 来用存放空闲的 pooledConnection 连接
  protected final List<PooledConnection> idleConnections = new ArrayList<PooledConnection>();

  // 用来存放活跃的 PooledConnection 连接
  protected final List<PooledConnection> activeConnections = new ArrayList<PooledConnection>();

  // 请求数据库连接的次数
  protected long requestCount = 0;
  // 获取连接的累计时间
  protected long accumulatedRequestTime = 0;
  // checkoutTime 表示从连接池中获取连接到归还连接的时间
  // accumulatedCheckoutTime 记录了所有连接的累计 checkoutTime 时长
  protected long accumulatedCheckoutTime = 0;
  // 连接超时的连接个数
  protected long claimedOverdueConnectionCount = 0;
  // 累计超时时间
  protected long accumulatedCheckoutTimeOfOverdueConnections = 0;
  // 累计等待时间
  protected long accumulatedWaitTime = 0;
  // 等待次数
  protected long hadToWaitCount = 0;
  // 无效的连接数
  protected long badConnectionCount = 0;

  //  setter / getter  方法
}
PooledDataSource
PooledDataSource 它是一个简单的,同步的,线程安全的数据库连接池
知道了 UnpooledDataSource 用来创建数据库新的连接,PooledConnection 用来管理连接池中的连接,PoolState 用来管理连接池的状态之后,来看下 PooledDataSource 的一个逻辑,该类中主要有以下几个方法:获取数据库连接的方法 popConnection,把连接放回连接池的方法 pushConnection,检测数据库连接是否有效的方法 pingConnection ,还有 关闭连接池中所有连接的方法 forceCloseAll,接下来就来看看这几个方法是怎么实现,在看之前,先看下该方法定义的一些属性:
public class PooledDataSource implements DataSource {

  // 连接池的状态
  private final PoolState state = new PoolState(this);

  // 用来创建真正的数据库连接对象
  private final UnpooledDataSource dataSource;

  // 最大活跃的连接数,默认为 10
  protected int poolMaximumActiveConnections = 10;

  // 最大空闲连接数,默认为 5
  protected int poolMaximumIdleConnections = 5;

  // 最大获取连接的时长
  protected int poolMaximumCheckoutTime = 20000;

  // 在无法获取到连接时,最大等待的时间
  protected int poolTimeToWait = 20000;

  // 在检测一个连接是否可用时,会向数据库发送一个测试 SQL
  protected String poolPingQuery = "NO PING QUERY SET";
  // 是否允许发送测试 SQL
  protected boolean poolPingEnabled;

  // 当连接超过 poolPingConnectionsNotUsedFor 毫秒未使用时,会发送一次测试 SQL 语句,测试连接是否正常
  protected int poolPingConnectionsNotUsedFor;

  // 标志着当前的连接池,是 url+username+password 的 hash 值
  private int expectedConnectionTypeCode;

  // 创建连接池
  public PooledDataSource(String driver, String url, String username, String password) {
    dataSource = new UnpooledDataSource(driver, url, username, password);
    expectedConnectionTypeCode = assembleConnectionTypeCode(dataSource.getUrl(), dataSource.getUsername(), dataSource.getPassword());
  }

   // 生成 hash 值
   private int assembleConnectionTypeCode(String url, String username, String password) {
    return ("" + url + username + password).hashCode();
  }
  //   setter /  getter 方法
}
接下来看下从数据库连接池中获取连接的实现逻辑:
从 连接池中获取连接的方法主要是在 popConnection 中实现的,先来看下它的一个流程图:
![]()
代码逻辑如下:
  // 获取连接
  @Override
  public Connection getConnection(String username, String password) throws SQLException {
    return popConnection(username, password).getProxyConnection();
  }

  // 从连接池中获取连接
  private PooledConnection popConnection(String username, String password) throws SQLException {
    // 等待的个数
    boolean countedWait = false;
    // PooledConnection 对象
    PooledConnection conn = null;
    long t = System.currentTimeMillis();
    // 无效的连接个数
    int localBadConnectionCount = 0;

    while (conn == null) {
      synchronized (state) {
        // 检测是否还有空闲的连接
        if (!state.idleConnections.isEmpty()) {
          // 连接池中还有空闲的连接,则直接获取连接返回
          conn = state.idleConnections.remove(0);
        } else {
          // 连接池中已经没有空闲连接了
          if (state.activeConnections.size() < poolMaximumActiveConnections) {
            // 活跃的连接数没有达到最大值,则创建一个新的数据库连接
            conn = new PooledConnection(dataSource.getConnection(), this);
          } else {
            // 如果活跃的连接数已经达到允许的最大值了,则不能创建新的数据库连接
            // 获取最先创建的那个活跃的连接
            PooledConnection oldestActiveConnection = state.activeConnections.get(0);
            long longestCheckoutTime = oldestActiveConnection.getCheckoutTime();
            // 检测该连接是否超时
            if (longestCheckoutTime > poolMaximumCheckoutTime) {
              // 如果该连接超时,则进行相应的统计
              state.claimedOverdueConnectionCount++;
              state.accumulatedCheckoutTimeOfOverdueConnections += longestCheckoutTime;
              state.accumulatedCheckoutTime += longestCheckoutTime;
              // 将超时连接移出 activeConnections 集合
              state.activeConnections.remove(oldestActiveConnection);
              if (!oldestActiveConnection.getRealConnection().getAutoCommit()) {
                  // 如果超时未提交,则自动回滚
                  oldestActiveConnection.getRealConnection().rollback();
              }
              // 创建新的 PooledConnection 对象,但是真正的数据库连接并没有创建
              conn = new PooledConnection(oldestActiveConnection.getRealConnection(), this);
              conn.setCreatedTimestamp(oldestActiveConnection.getCreatedTimestamp());
              conn.setLastUsedTimestamp(oldestActiveConnection.getLastUsedTimestamp());
              // 设置该超时的连接为无效
              oldestActiveConnection.invalidate();
            } else {
               // 如果无空闲连接,无法创建新的连接且无超时连接,则只能阻塞等待
              // Must wait
              try {
                if (!countedWait) {
                  state.hadToWaitCount++; // 等待次数
                  countedWait = true;
                }
                long wt = System.currentTimeMillis();
                // 阻塞等待
                state.wait(poolTimeToWait);
                state.accumulatedWaitTime += System.currentTimeMillis() - wt;
              } catch (InterruptedException e) {
                break;
              }
            }
          }
        }
        // 已经获取到连接
        if (conn != null) {
          if (conn.isValid()) {
            // 如果连连接有效,事务未提交则回滚
            if (!conn.getRealConnection().getAutoCommit()) {
              conn.getRealConnection().rollback();
            }
            // 设置 PooledConnection 相关属性
            conn.setConnectionTypeCode(assembleConnectionTypeCode(dataSource.getUrl(), username, password));
            conn.setCheckoutTimestamp(System.currentTimeMillis());
            conn.setLastUsedTimestamp(System.currentTimeMillis());
            // 把连接加入到活跃集合中去
            state.activeConnections.add(conn);
            state.requestCount++;
            state.accumulatedRequestTime += System.currentTimeMillis() - t;
          } else {
            // 无效连接
            state.badConnectionCount++;
            localBadConnectionCount++;
            conn = null;
          }
        }
      }
    }
    return conn;
  }
以上就是从连接池获取连接的主要逻辑。
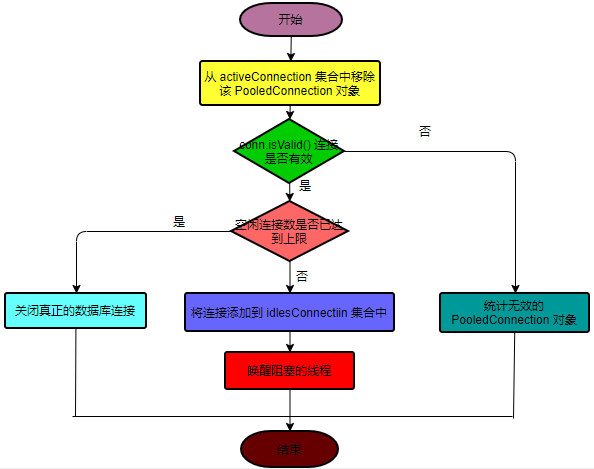
现在来看下当执行 close 方法的时候,会把连接放入的连接池中以供下次重新使用,把连接放入到连接池中的方法为 pushConnection 方法,它也是 PooledDataSource 类的一个主要方法,先来看下它的流程图:
![]()
代码如下:
  // 把不用的连接放入到连接池中
  protected void pushConnection(PooledConnection conn) throws SQLException {

    synchronized (state) {
      // 首先从活跃的集合中移除掉该连接
      state.activeConnections.remove(conn);
      // 检测连接是否有效
      if (conn.isValid()) {
         // 如果空闲连接数没有达到最大值,且 PooledConnection 为该连接池的连接
        if (state.idleConnections.size() < poolMaximumIdleConnections && conn.getConnectionTypeCode() == expectedConnectionTypeCode) {
          // 累计 checkout 时长
          state.accumulatedCheckoutTime += conn.getCheckoutTime();
          // 事务回滚
          if (!conn.getRealConnection().getAutoCommit()) {
            conn.getRealConnection().rollback();
          }
          // 为返还的连接创建新的 PooledConnection 对象
          PooledConnection newConn = new PooledConnection(conn.getRealConnection(), this);
          // 把该连接添加的空闲链表中
          state.idleConnections.add(newConn);
          newConn.setCreatedTimestamp(conn.getCreatedTimestamp());
          newConn.setLastUsedTimestamp(conn.getLastUsedTimestamp());
          // 设置该连接为无效状态
          conn.invalidate();
          // 唤醒阻塞等待的线程
          state.notifyAll();
        } else {
          // 如果空闲连接数已经达到最大值
          state.accumulatedCheckoutTime += conn.getCheckoutTime();
          if (!conn.getRealConnection().getAutoCommit()) {
            conn.getRealConnection().rollback();
          }
          // 则关闭真正的数据库连击破
          conn.getRealConnection().close();
          // 设置该连接为无效状态
          conn.invalidate();
        }
      } else {
        // 无效连接个数加1
        state.badConnectionCount++;
      }
    }
  }
以上代码就是把不用的连接放入到连接池中以供下次使用,
在上面两个方法中,都调用了 isValid 方法来检测连接是否可用,该方法除了检测 valid 字段外,还会调用 pingConnection 方法来尝试让数据库执行测试 SQL 语句,从而检测真正的数据库连接对象是否依然正常可用。
  // 检测连接是否可用
  public boolean isValid() {
    return valid && realConnection != null && dataSource.pingConnection(this);
  }
  // 向数据库发送测试 SQL 来检测真正的数据库连接是否可用
  protected boolean pingConnection(PooledConnection conn) {
    // 结果
    boolean result = true;

    try {
      // 检测真正的数据库连接是否已经关闭
      result = !conn.getRealConnection().isClosed();
    } catch (SQLException e) {
      result = false;
    }
     // 如果真正的数据库连接还没关闭
    if (result) {
      // 是否执行测试 SQL 语句
      if (poolPingEnabled) {
         // 长时间(poolPingConnectionsNotUsedFor 指定的时长)未使用的连接,才需要ping操作来检测连接是否正常
        if (poolPingConnectionsNotUsedFor >= 0 && conn.getTimeElapsedSinceLastUse() > poolPingConnectionsNotUsedFor) {
          try {
            // 发送测试 SQL 语句执行
            Connection realConn = conn.getRealConnection();
            Statement statement = realConn.createStatement();
            ResultSet rs = statement.executeQuery(poolPingQuery);
            rs.close();
            statement.close();
            if (!realConn.getAutoCommit()) {
              realConn.rollback();
            }
            result = true;
          } catch (Exception e) {
            try {
              conn.getRealConnection().close();
            } catch (Exception e2) {
            }
            result = false;
          }
        }
      }
    }
    return result;
  }
此外,当修改 PooledDataSource 相应的字段,如 数据库的 URL,用户名或密码等,需要将连接池中连接全部关闭,之后获取连接的时候从重新初始化。关闭连接池中全部连接的方法为 forceCloseAll:
  public void forceCloseAll() {
    synchronized (state) {
      expectedConnectionTypeCode = assembleConnectionTypeCode(dataSource.getUrl(), dataSource.getUsername(), dataSource.getPassword());
      // 处理活跃的连接
      for (int i = state.activeConnections.size(); i > 0; i--) {
        try {
          PooledConnection conn = state.activeConnections.remove(i - 1);
          // 设置连接为无效状态
          conn.invalidate();
          // 获取数据库真正的连接
          Connection realConn = conn.getRealConnection();
          // 事物回滚
          if (!realConn.getAutoCommit()) {
            realConn.rollback();
          }
          // 关闭数据库连接
          realConn.close();
        } catch (Exception e) {
          // ignore
        }
      }
      // 处理空闲的连接
      for (int i = state.idleConnections.size(); i > 0; i--) {
        try {
          PooledConnection conn = state.idleConnections.remove(i - 1);
          // 设置为无效状态
          conn.invalidate();
          Connection realConn = conn.getRealConnection();
          if (!realConn.getAutoCommit()) {
            realConn.rollback();
          }
          realConn.close();
        } catch (Exception e) {

        }
      }
    }
  }
总结
在连接池中提到了 连接池中的最大连接数和最大空闲数,在 获取连接和把连接放入连接池中都有判断,
1. 获取连接:首先从连接池中进行获取,如果连接池中已经没有空闲的连接了,则会判断当前的活跃连接数是否已经达到允许的最大值了,如果没有,则还可以创建新的连接,之后把它放到活跃的集合中进行使用,如果当前活跃的已达到最大值,则阻塞。
2.返还连接到连接池,在返还连接的时候,进行判断,如果空闲连接数已达到允许的最大值,则直接关闭真正的数据库连接,否则把该连接放入到空闲集合中以供下次使用。
Mybatis 数据源中,主要的代码逻辑还是在连接池类 PooledDataSource 中,对于获取连接的方法 popConnection,返还连接的方法 pushConnection ,需要结合上图来看,才能看得清楚。