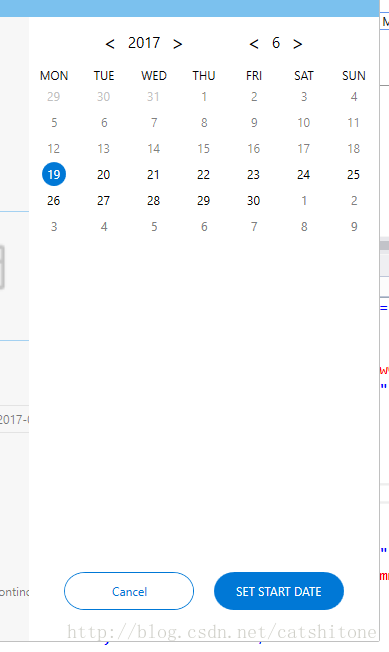
首先上图,看下样式
![静态样式]()
![gif动图]()
原理
1. 总览:
Calendar本质上是一个6x7的列表,这个列表可以用ItemsControl来实现。其填充的每一个item都是一个自定义样式的Button,Button外面是一个圆形的border。根据Button按钮的IsEnabled状态,设置foreground以达到灰色不点击的效果。
2. ItemsControl内容的生成:
主要是想办法生成第一行第一列的日期,其他的日期只需要DateTime.AddDays(i)即可。代码参考:
private void SetCalendar(int year, int month)
{
_days.Clear();
DateTime datetime = new DateTime(year, month, 1);
int week = (int)datetime.DayOfWeek;
datetime = datetime.AddDays(1 - week);
for (int i = 0; i < 42; i++)
{
_days.Add(datetime.AddDays(i));
}
OnPropertyChanged("Days");
}
首先,将当前年月传入,获取到当前月份的第一天是周几,然后推算出ItemsControl的第一行第一列的Datetime,最后就是顺次相加即可。
实现
1. 界面的实现
先上代码:
<Grid Grid.RowSpan="4" Margin="0,54,0,0" Visibility="{Binding IsShowCalendar,Converter={StaticResource BoolToVisibilityCollapseConverter}}" Background="White" Width="350" HorizontalAlignment="Right">
<Grid.RowDefinitions>
<RowDefinition Height="50"></RowDefinition>
<RowDefinition Height="auto"></RowDefinition>
<RowDefinition Height="auto"></RowDefinition>
<RowDefinition Height="*"></RowDefinition>
</Grid.RowDefinitions>
<StackPanel HorizontalAlignment="Center" Orientation="Horizontal">
<Button VerticalAlignment="Center" Command="{Binding YearCommand}" CommandParameter="Pre" Style="{StaticResource TransparentButtonStyle}">
<Button.Content>
<TextBlock Text="<" FontSize="20"></TextBlock>
</Button.Content>
</Button>
<TextBlock VerticalAlignment="Center" FontSize="15" Text="{Binding CurrentYear}"></TextBlock>
<Button VerticalAlignment="Center" Command="{Binding YearCommand}" CommandParameter="Next" Style="{StaticResource TransparentButtonStyle}">
<Button.Content>
<TextBlock Text=">" FontSize="20"></TextBlock>
</Button.Content>
</Button>
<Button Margin="50,10,10,10" VerticalAlignment="Center" Command="{Binding MonthCommand}" CommandParameter="Pre" Style="{StaticResource TransparentButtonStyle}">
<Button.Content>
<TextBlock Text="<" FontSize="20"></TextBlock>
</Button.Content>
</Button>
<TextBlock VerticalAlignment="Center" Text="{Binding CurrentMonth}" FontSize="15"></TextBlock>
<Button VerticalAlignment="Center" Command="{Binding MonthCommand}" CommandParameter="Next" Style="{StaticResource TransparentButtonStyle}">
<Button.Content>
<TextBlock Text=">" FontSize="20"></TextBlock>
</Button.Content>
</Button>
</StackPanel>
<UniformGrid Grid.Row="1" Columns="7">
<TextBlock Text="MON" TextAlignment="Center"></TextBlock>
<TextBlock Text="TUE" TextAlignment="Center"></TextBlock>
<TextBlock Text="WED" TextAlignment="Center"></TextBlock>
<TextBlock Text="THU" TextAlignment="Center"></TextBlock>
<TextBlock Text="FRI" TextAlignment="Center"></TextBlock>
<TextBlock Text="SAT" TextAlignment="Center"></TextBlock>
<TextBlock Text="SUN" TextAlignment="Center"></TextBlock>
</UniformGrid>
<ItemsControl Grid.Row="2" ScrollViewer.HorizontalScrollBarVisibility="Auto"
ScrollViewer.VerticalScrollBarVisibility="Auto"
ItemsSource="{Binding Days}">
<ItemsControl.ItemTemplate>
<DataTemplate>
<Button Background="{Binding Converter={StaticResource BACKUP_DateTimeToColorConverter}}" Style="{StaticResource CalendarTransparentButtonStyle}"
Content="{Binding Converter={StaticResource BACKUP_DateTimeToDayConverter}}"
Command="{Binding DataContext.ChooseDateCommand,RelativeSource={RelativeSource FindAncestor,AncestorType={x:Type Window}}}" CommandParameter="{Binding}"
MouseDoubleClick="Button_MouseDoubleClick">
<Button.Foreground>
<MultiBinding Converter="{StaticResource BACKUP_DateTimeToForegroundMultiConverter}">
<Binding></Binding>
<Binding Path="DataContext.CurrentMonth" RelativeSource="{RelativeSource FindAncestor,AncestorType={x:Type Window}}"></Binding>
</MultiBinding>
</Button.Foreground>
<Button.IsEnabled>
<MultiBinding Converter="{StaticResource BACKUP_DateTimeToEnableMultiConverter}">
<Binding></Binding>
<Binding Path="DataContext.CutoffDayBegin" RelativeSource="{RelativeSource FindAncestor,AncestorType={x:Type Window}}"></Binding>
<Binding Path="DataContext.CutoffDayEnd" RelativeSource="{RelativeSource FindAncestor,AncestorType={x:Type Window}}"></Binding>
</MultiBinding>
</Button.IsEnabled>
</Button>
</DataTemplate>
</ItemsControl.ItemTemplate>
<ItemsControl.ItemsPanel>
<ItemsPanelTemplate>
<UniformGrid Columns="7"></UniformGrid>
</ItemsPanelTemplate>
</ItemsControl.ItemsPanel>
</ItemsControl>
<StackPanel Grid.Row="3" HorizontalAlignment="Center" VerticalAlignment="Bottom" Margin="0,0,0,31" Orientation="Horizontal">
<Button Content="Cancel" Style="{StaticResource btnSecondaryStyle}" Grid.Row="2" Command="{Binding HideCalendarCommand}"></Button>
<Button Content="{Binding CalendarSetText}" Style="{StaticResource btnPrimaryStyle}" Grid.Row="2" Command="{Binding HideCalendarCommand}"></Button>
</StackPanel>
</Grid>
其中,大量用到了Binding和MVVM,如果对方面还不是很扎实,可以参考下刘铁锰的视频.
这段代码中,主要部分是ItemsControl的ItemsSource绑定。这里绑定的是Days,其类型是
public ObservableCollection<DateTime> _days = new ObservableCollection<DateTime>();
        public ObservableCollection<DateTime> Days
        {
            get
            {
                return _days;
            }
        }
在设置Button的前景色和IsEnabled状态的时候,你也看到了用的是MultiBinding,并定义了两个Converter:
1. DateTimeToForegroundMultiConverter
 class DateTimeToForegroundMultiConverter : IMultiValueConverter
    {
        public object Convert(object[] values, Type targetType, object parameter, CultureInfo culture)
        {
            DateTime dt=new DateTime();
            if(values[0] is DateTime)
            {
                dt = (DateTime)values[0];
            }
            int currentMonth;
            Int32.TryParse(values[1].ToString(), out currentMonth);
            if (dt.Month == currentMonth)
            {
                if(dt.ToShortDateString()==DateTime.Now.ToShortDateString())
                {
                    return new SolidColorBrush(Colors.White);
                }
                else
                {
                    return new SolidColorBrush(Colors.Black);
                }
            }
            else
            {
                return new SolidColorBrush(Colors.Gray);
            }
        }

        public object[] ConvertBack(object value, Type[] targetTypes, object parameter, CultureInfo culture)
        {
            return null;
        }
    }
2. DateTimeToEnableMultiConverter
 class DateTimeToEnableMultiConverter : IMultiValueConverter
    {
        public object Convert(object[] values, Type targetType, object parameter, CultureInfo culture)
        {

            DateTime currentDay, cutoffDayBegin,cutoffDayEnd;
            if(values[0] is DateTime&&values[1] is DateTime&&values[2] is DateTime)
            {
                currentDay = (DateTime)values[0];
                cutoffDayBegin = (DateTime)values[1];
                cutoffDayEnd = (DateTime)values[2];
                if (DateTime.Compare(currentDay, cutoffDayBegin) >= 0 && DateTime.Compare(currentDay, cutoffDayEnd) <= 0)
                {
                    return true;
                }
                else
                {
                    return false;
                }
            }
            else
            {
                return false;
            }


        }

        public object[] ConvertBack(object value, Type[] targetTypes, object parameter, CultureInfo culture)
        {
            return null;
        }
    }
2. 后台ViewModel的实现
其实后台没有什么代码,有一个SetCalendar方法,在月份或者年份发生变动的时候调用一下即可。
private void SetCalendar(int year, int month)
        {
            _days.Clear();
            DateTime datetime = new DateTime(year, month, 1);
            int week = (int)datetime.DayOfWeek;
            datetime = datetime.AddDays(1 - week);
            for (int i = 0; i < 42; i++)
            {

                _days.Add(datetime.AddDays(i));
            }
            OnPropertyChanged("Days");
        }
还有一个就是Button点击之后的Command命令:
 private void exeChooseDate(object obj)
        {
            DateTime dt;
            DateTime.TryParse(obj.ToString(), out dt);
            CurrentMonth = dt.Month;
            CurrentYear = dt.Year;
        }
Button每点击一次,就会执行一次这个方法,CurrentMonth和CurrentYear这两个属性的值就会被更改,一些来决定是否需要重新绘制UI切换的上一个/下一个月份。
CurrentMonth和CurrentYear属性见下:
private int _currentYear = 2010;
        public int CurrentYear
        {
            get
            {
                return _currentYear;
            }
            set
            {
                if (_currentYear != value && value > 1978 && value < 9999)
                {
                    _currentYear = value;
                    OnPropertyChanged("CurrentYear");
                    SetCalendar(_currentYear, CurrentMonth);
                }
            }
        }

        private int _currentMonth = 1;
        public int CurrentMonth
        {
            get
            {
                return _currentMonth;
            }
            set
            {
                if (_currentMonth != value && value < 13 && value > 0)
                {
                    _currentMonth = value;
                    OnPropertyChanged("CurrentMonth");
                    SetCalendar(CurrentYear, _currentMonth);
                }
            }
        }