![]()
前言
上一篇《Tomcat中的连接器是如何设计的》介绍了Tomcat中连接器的设计,我们知道连接器是负责监听网络端口,获取连接请求,然后转换符合Servlet标准的请求,交给容器去处理,那么我们这篇文章将顺着上一篇文章的思路,看看一个请求到了容器,容器是如何请求的。
说明:本文tomcat版本是9.0.21,不建议零基础读者阅读。
从Adapter中说起
我们继续跟着上篇文章Adapter的源码,继续分析,上篇文章结尾的源码如下:
  //源码1.类:  CoyoteAdapter implements Adapter
public void service(org.apache.coyote.Request req, org.apache.coyote.Response res)
            throws Exception {

        Request request = (Request) req.getNote(ADAPTER_NOTES);
        Response response = (Response) res.getNote(ADAPTER_NOTES);
        postParseSuccess = postParseRequest(req, request, res, response);
            if (postParseSuccess) {
                //check valves if we support async
                request.setAsyncSupported(
                        connector.getService().getContainer().getPipeline().isAsyncSupported());
                // Calling the container
                connector.getService().getContainer().getPipeline().getFirst().invoke(
                        request, response);
            }

    }
上面的源码的主要作用就是获取到容器,然后调用getPipeline()获取Pipeline,最后去invoke调用,我们来看看这个Pipeline是做什么的。
//源码2.Pipeline接口
public interface Pipeline extends Contained {
  public Valve getBasic();
  public void setBasic(Valve valve);
  public void addValve(Valve valve);
  public Valve[] getValves();
  public void removeValve(Valve valve);
  public Valve getFirst();
  public boolean isAsyncSupported();
  public void findNonAsyncValves(Set<String> result);
}
//源码3. Valve接口
public interface Valve {
 public Valve getNext();
 public void setNext(Valve valve);
 public void backgroundProcess();
 public void invoke(Request request, Response response)
        throws IOException, ServletException;
 public boolean isAsyncSupported();
我们从字面上可以理解Pipeline就是管道,而Valve就是阀门,实际上在Tomcat中的作用也是和字面意思差不多。每个容器都有一个管道,而管道中又有多个阀门。我们通过后面的分析来证明这一点。
管道-阀门(Pipeline-Valve)
我们看到上面的源码是Pipeline和Valve的接口,Pipeline主要是设置Valve,而Valve是一个链表,然后可以进行invoke方法的调用。我们回顾下这段源码:
//源码4
connector.getService().getContainer().getPipeline().getFirst().invoke(
                        request, response);
这里是直接获取容器的管道,然后获取第一个Valve进行调用。我们在之前提到过Valve是一个链表,这里只调用第一个,也就是可以通过Next去调用到最后一个。我们再回顾下我们第一篇文章《Tomcat在SpringBoot中是如何启动的》中提到过,容器是分为4个子容器,分别为Engine、Host、Context、Wrapper,他们同时也是父级和子级的关系,Engine>Host>Context>Wrapper。
我之前提到过,每个容器都一个Pipeline,那么这个是怎么体现出来的呢?我们看容器的接口源码就可以发现,Pipeline是容器接口定义的一个基本属性:
//源码5.
public interface Container extends Lifecycle {
    //省略其他代码
  /**
     * Return the Pipeline object that manages the Valves associated with
     * this Container.
     *
     * @return The Pipeline
     */
    public Pipeline getPipeline();

}
我们知道了每个容器都有一个管道(Pipeline),管道中有许多阀门(Valve),Valve可以进行链式调用,那么问题来了,父容器管道中的Valve怎么调用到子容器中的Valve呢?在Pipeline的实现类StandardPipeline中,我们发现了如下源码:
 /**
// 源码6.
     * The basic Valve (if any) associated with this Pipeline.
     */
    protected Valve basic = null;
       /**
     * The first valve associated with this Pipeline.
     */
    protected Valve first = null;

     public void addValve(Valve valve) {

        //省略部分代码

        // Add this Valve to the set associated with this Pipeline
        if (first == null) {
            first = valve;
            valve.setNext(basic);
        } else {
            Valve current = first;
            while (current != null) {
                //这里循环设置Valve,保证最后一个是basic
                if (current.getNext() == basic) {
                    current.setNext(valve);
                    valve.setNext(basic);
                    break;
                }
                current = current.getNext();
            }
        }

        container.fireContainerEvent(Container.ADD_VALVE_EVENT, valve);
    }
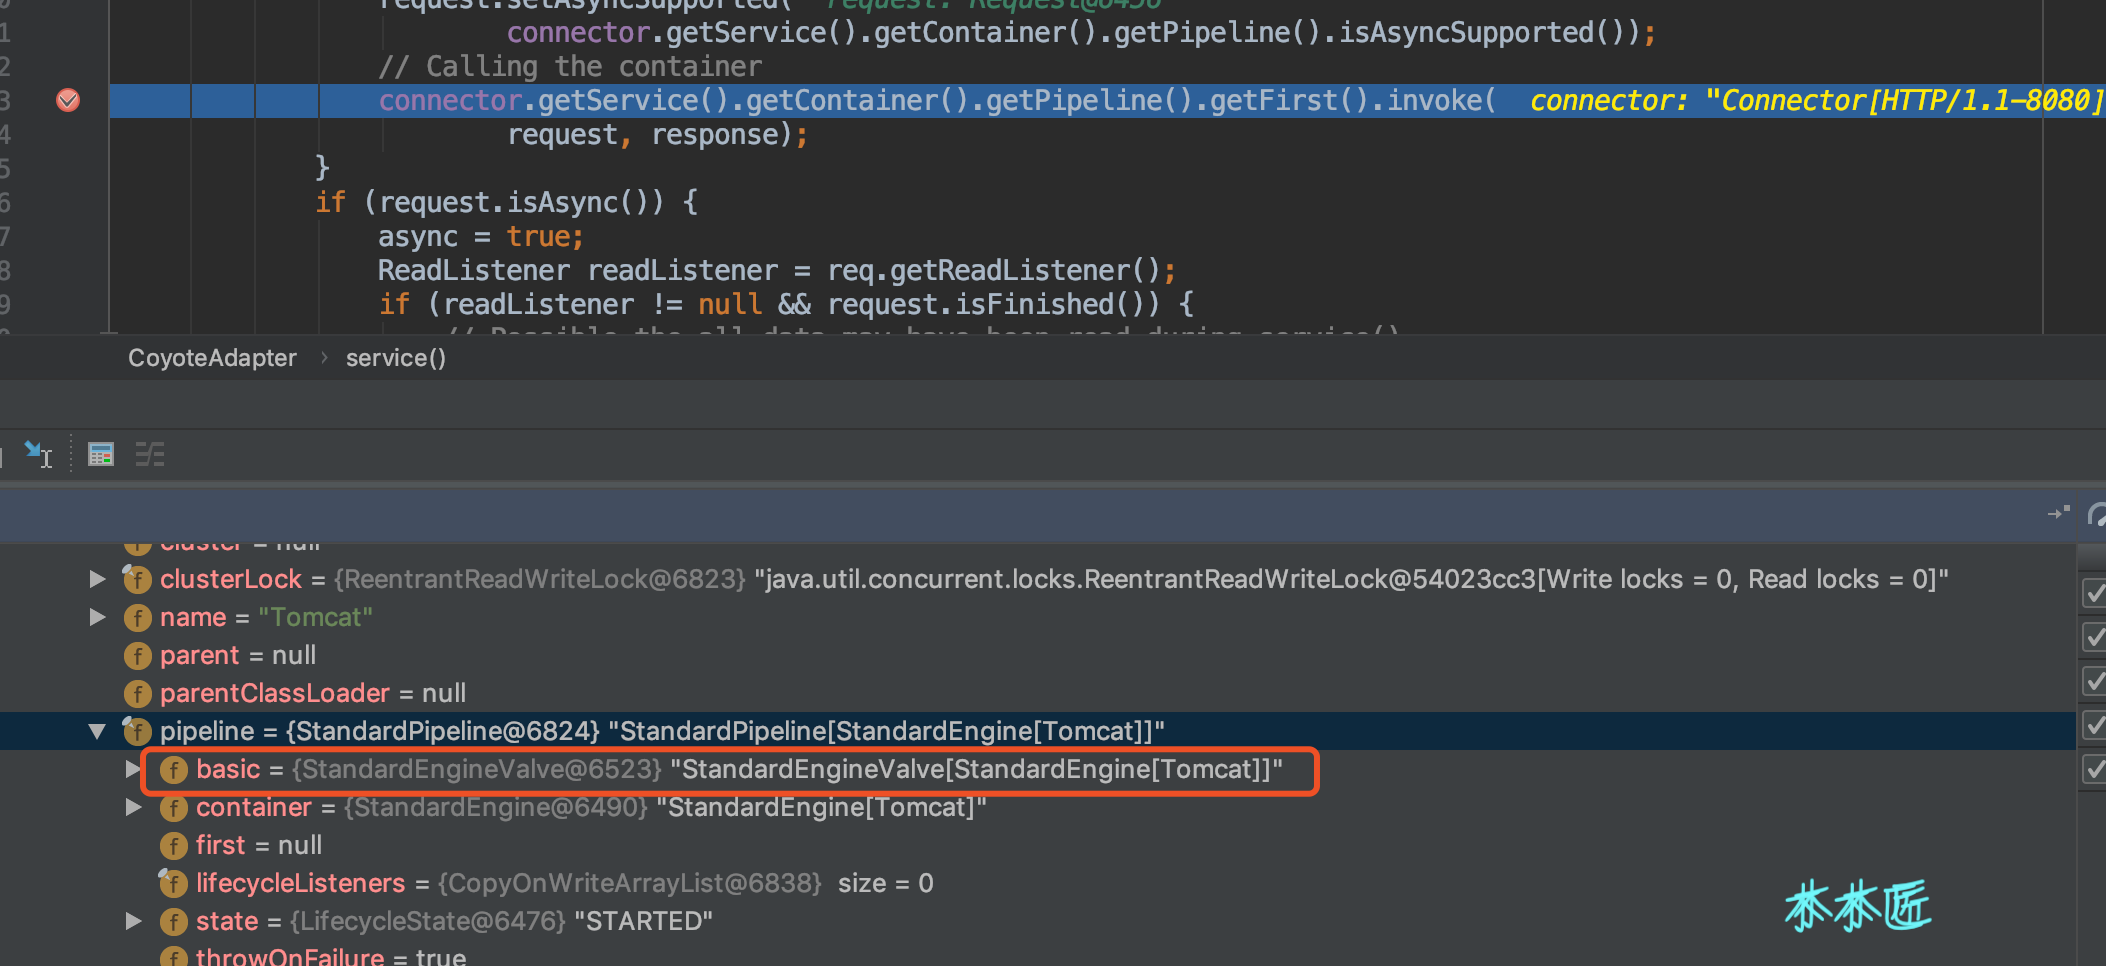
根据如上代码,我们知道了basic是一个管道(Pipeline)中的最后一个阀门,按道理只要最后一个阀门是下一个容器的第一个阀门就可以完成全部的链式调用了。我们用一个请求debug下看看是不是和我们的猜测一样,我们在CoyoteAdapter中的service方法中打个断点,效果如下: ![]()
这里我们可以知道,在适配器调用容器的时候,也就是调用Engine的管道,只有一个阀门,也就是basic,值为StandardEngineValve。我们发现这个阀门的invoke方法如下:
//源码7.
public final void invoke(Request request, Response response)
        throws IOException, ServletException {

        // Select the Host to be used for this Request
        Host host = request.getHost();
        if (host == null) {
            // HTTP 0.9 or HTTP 1.0 request without a host when no default host
            // is defined. This is handled by the CoyoteAdapter.
            return;
        }
        if (request.isAsyncSupported()) {
            request.setAsyncSupported(host.getPipeline().isAsyncSupported());
        }

        // Ask this Host to process this request
        host.getPipeline().getFirst().invoke(request, response);
    }
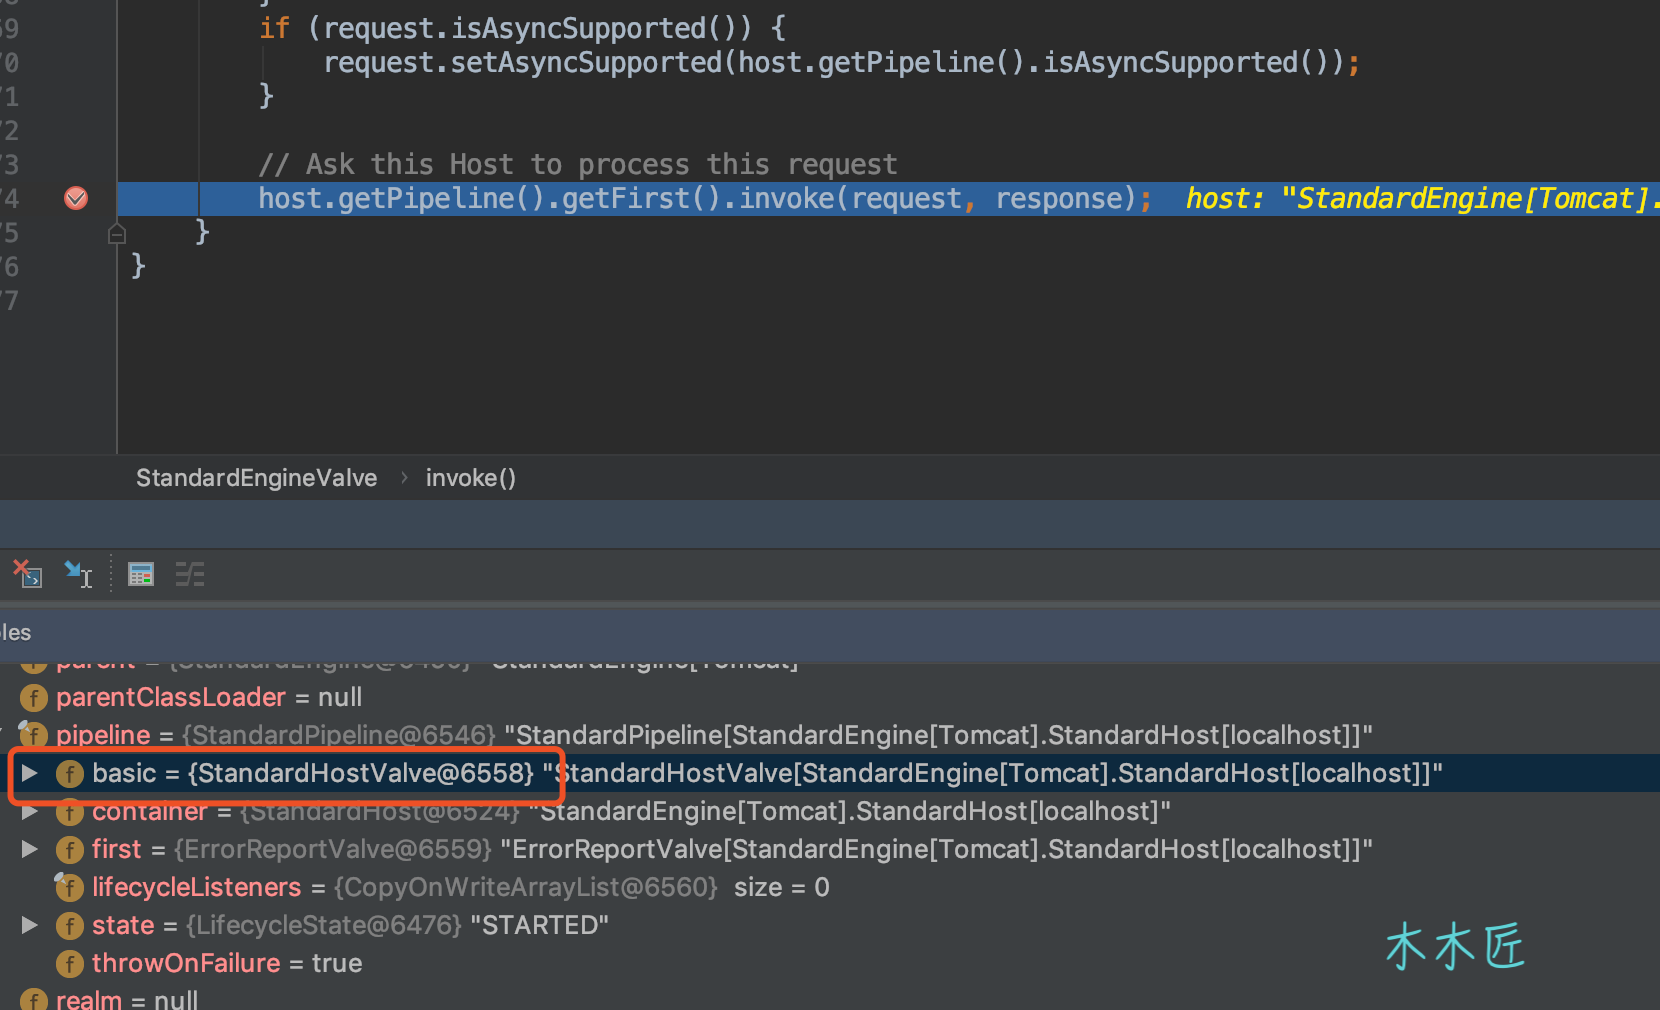
我们继续debug查看结果如下: ![]()
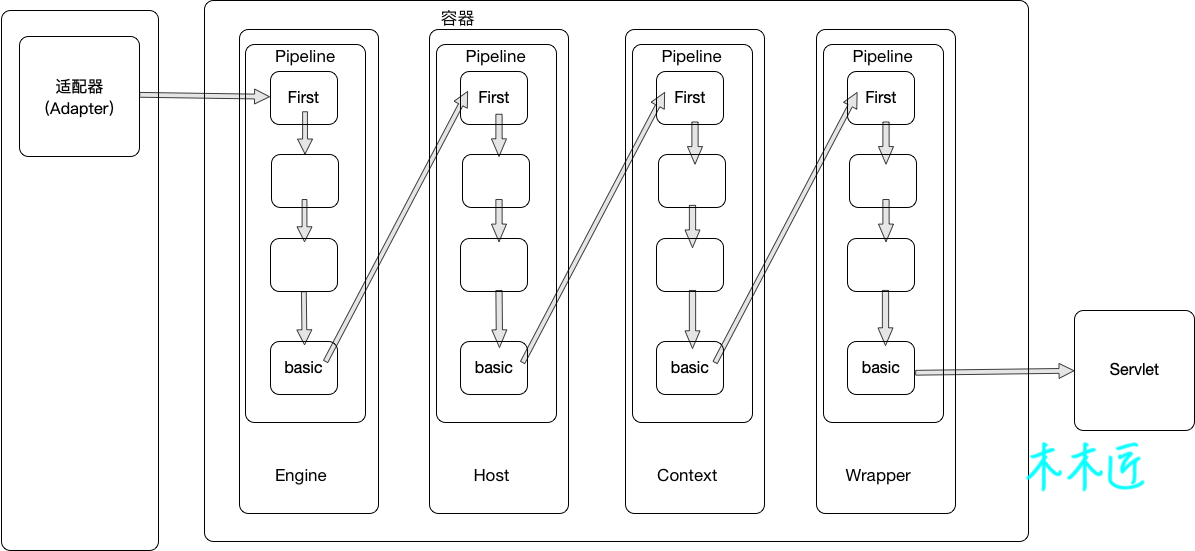
所以这里的basic实际上将会调用到Host容器的管道(Pipeline)和阀门(Valve),也就是说,每个容器管道中的basic是负责调用下一个子容器的阀门。我用一张图来表示:
![]()
这张图清晰的描述了,Tomcat内部的容器是如何流转请求的,从连接器(Connector)过来的请求会进入Engine容器,Engine通过管道(Pieline)中的阀门(Valve)来进行链式调用,最后的basic阀门是负责调用下一个容器的第一个阀门的,一直调用到Wrapper,然后Wrapper再执行Servlet。
我们看看Wrapper源码,是否真的如我们所说:
//源码8.
 public final void invoke(Request request, Response response)
        throws IOException, ServletException {
            //省略部分源码
        Servlet servlet = null;
        if (!unavailable) {
            servlet = wrapper.allocate();
        }

        // Create the filter chain for this request
        ApplicationFilterChain filterChain =
                ApplicationFilterFactory.createFilterChain(request, wrapper, servlet);

         filterChain.doFilter(request.getRequest(),
                                    response.getResponse());
        }
看到这里,你可能会说这里明明只是创建了过滤器(Filter)并且去调用而已,并没有去调用Servlet ,没错,这里确实没有去调用Servlet,但是我们知道,过滤器(Filter)是在Servlet之前执行的,也就是说,filterChain.doFilter执行完之后变会执行Servlet。我们看看ApplicationFilterChain的源码是否如我们所说:
//源码9.
 public void doFilter(ServletRequest request, ServletResponse response)
        throws IOException, ServletException {
        //省略部分代码
        internalDoFilter(request,response);
    }
//源码10.
 private void internalDoFilter(ServletRequest request,
                                  ServletResponse response)
        throws IOException, ServletException {
        //省略部分代码
        // Call the next filter if there is one
        if (pos < n) {
         //省略部分代码
            ApplicationFilterConfig filterConfig = filters[pos++];
            Filter filter = filterConfig.getFilter();
            filter.doFilter(request, response, this);
            return;
        }
        //调用servlet
        // We fell off the end of the chain -- call the servlet instance
        servlet.service(request, response);
通过源码我们发现,在调用完所有的过滤器(Filter)之后,servlet就开始调用service。我们看看servlet的实现类
![]()
这里我们熟悉的HttpServlet和GenericServlet是Tomcat包的类,实际上只有HttpServlet,因为GenericServlet是HttpServlet的父类。后面就是移交给了框架去处理了,Tomcat内部的请求已经到此是完成了。
Tomcat的多应用隔离实现
我们知道,Tomcat是支持部署多个应用的,那么Tomcat是如何支持多应用的部署呢?是怎么保证多个应用之间不会混淆的呢?要想弄懂这个问题,我们还是要回到适配器去说起,回到service方法
//源码11.类:CoyoteAdapter
public void service(org.apache.coyote.Request req, org.apache.coyote.Response res)
            throws Exception {
            //省略部分代码
            // Parse and set Catalina and configuration specific
            // request parameters
            //处理URL映射
            postParseSuccess = postParseRequest(req, request, res, response);
            if (postParseSuccess) {
                //check valves if we support async
                request.setAsyncSupported(
                        connector.getService().getContainer().getPipeline().isAsyncSupported());
                // Calling the container
                connector.getService().getContainer().getPipeline().getFirst().invoke(
                        request, response);
            }
}
我们在之前的源码中只谈到了connector.getService().getContainer().getPipeline().getFirst().invoke( request, response) 这段代码,这部分代码是调用容器,但是在调用容器之前有个postParseRequest方法是用来处理映射请求的,我们跟进看看源码:
//源码12.类:CoyoteAdapter
 protected boolean postParseRequest(org.apache.coyote.Request req, Request request,
            org.apache.coyote.Response res, Response response) throws IOException, ServletException {
        省略部分代码
        boolean mapRequired = true;
         while (mapRequired) {
            // This will map the the latest version by default
            connector.getService().getMapper().map(serverName, decodedURI,
                    version, request.getMappingData());
            //没有找到上下文就报404错误
            if (request.getContext() == null) {
                // Don't overwrite an existing error
                if (!response.isError()) {
                    response.sendError(404, "Not found");
                }
                // Allow processing to continue.
                // If present, the error reporting valve will provide a response
                // body.
                return true;
            }
            }
这里就是循环去处理Url映射,如果Context没有找到,就返回404错误,我们继续看源码:
//源码13.类:Mapper
public void map(MessageBytes host, MessageBytes uri, String version,
                    MappingData mappingData) throws IOException {

        if (host.isNull()) {
            String defaultHostName = this.defaultHostName;
            if (defaultHostName == null) {
                return;
            }
            host.getCharChunk().append(defaultHostName);
        }
        host.toChars();
        uri.toChars();
        internalMap(host.getCharChunk(), uri.getCharChunk(), version, mappingData);
    }
    //源码14.类:Mapper
 private final void internalMap(CharChunk host, CharChunk uri,
            String version, MappingData mappingData) throws IOException {
        //省略部分代码
        // Virtual host mapping 处理Host映射
        MappedHost[] hosts = this.hosts;
        MappedHost mappedHost = exactFindIgnoreCase(hosts, host);

         //省略部分代码
        if (mappedHost == null) {
             mappedHost = defaultHost;
            if (mappedHost == null) {
                return;
            }
        }

        mappingData.host = mappedHost.object;

        // Context mapping 处理上下文映射
        ContextList contextList = mappedHost.contextList;
        MappedContext[] contexts = contextList.contexts;
        //省略部分代码
        if (context == null) {
            return;
        }
        mappingData.context = contextVersion.object;
        mappingData.contextSlashCount = contextVersion.slashCount;

        // Wrapper mapping 处理Servlet映射
        if (!contextVersion.isPaused()) {
            internalMapWrapper(contextVersion, uri, mappingData);
        }

    }
由于上面的源码比较多,我省略了很多代码,保留了能理解主要逻辑的代码,总的来说就是处理Url包括三部分,映射Host,映射Context和映射Servlet(为了节省篇幅,具体细节源码请感兴趣的同学自行研究)。
这里我们可以发现一个细节,就是三个处理逻辑都是紧密关联的,只有Host不为空才会处理Context,对于Servlet也是同理。所以这里我们只要Host配置不同,那么后面所有的子容器都是不同的,也就完成了应用隔离的效果。但是对于SpringBoot内嵌Tomcat方式(使用jar包启动)来说,并不具备实现多应用的模式,本身一个应用就是一个Tomcat。
为了便于理解,我也画了一张多应用隔离的图,这里我们假设有两个域名admin.luozhou.com和web.luozhou.com 然后我每个域名下部署2个应用,分别是User,log,blog,shop。那么当我去想去添加用户的时候,我就会请求admin.luozhou.com域名下的User的Context下面的add的Servlet(说明:这里例子设计不符合实际开发原则,add这种粒度应该是框架中的controller完成,而不是Servlet)。
![]()
总结
这篇文章我们研究了Tomcat中容器是如何处理请求的,我们来回顾下内容:
- 连接器把请求丢给适配器适配后调用容器(
Engine)
- 容器内部是通过管道(
Pieline)-阀门(Valve)模式完成容器的调用的,父容器调用子容器主要通过一个basic的阀门来完成的。
- 最后一个子容器
wrapper完成调用后就会构建过滤器来进行过滤器调用,调用完成后就到了Tomcat内部的最后一步,调用servlet。也可以理解我们常用的HttpServlet,所有基于Servlet规范的框架在这里就进入了框架流程(包括SpringBoot)。
- 最后我们还分析了Tomcat是如何实现多应用隔离的,通过多应用的隔离分析,我们也明白了为什么Tomcat要设计如此多的子容器,多子容器可以根据需要完成不同粒度的隔离级别来实现不同的场景需求。
版权声明:原创文章,转载请注明出处。