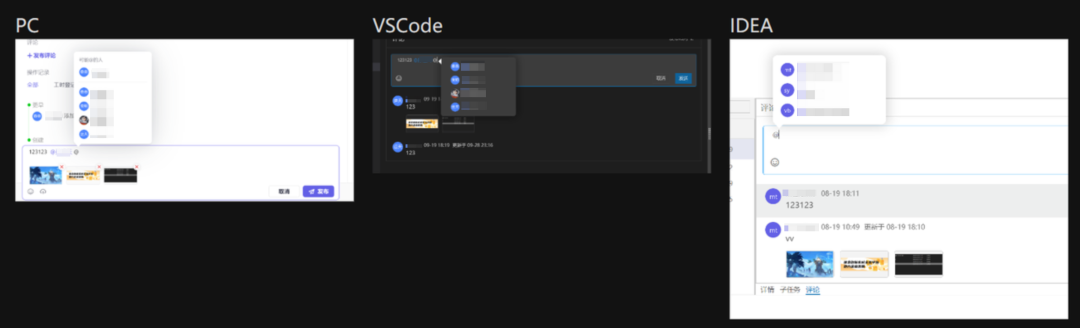
LigaAI 的评论编辑器、附件展示以及富文本编辑器都支持在 Vue2(Web)与 Vue3(VSCode、lDEA)中使用。这样不仅可以在不同 Vue 版本的工程中间共享代码,还能为后续升级 Vue3 减少一定阻碍。
![]()
那么,同时兼容 Vue2 与 Vue3 的代码该如何实现?业务实践中又有哪些代码精简和优化的小技巧?让我们先从兼容代码的工程化讲起。
1. 工程化:编写同时兼容 Vue2 与 Vue3 的代码
原理上,兼容工作由两部分完成:
- 编译阶段:负责根据使用的项目环境,自动选择使用 Vue2 或 Vue3 的 API。使用时,只需要从
Vue-Demi 里面 import 需要使用的 API,就会自动根据环境进行切换;可以分为在浏览器中运行(IIFE)和使用打包工具(cjs、umd、esm)两种情况。
- 运行阶段:转换
createElement 函数的参数,使 Vue2 与 Vue3 的参数格式一致。Vue2 和 Vue3 Composition API 的区别非常小,运行时 API 最大的区别在于 createElement 函数的参数格式不一致,Vue3 换成了 React JSX 格式。
1.1 编译阶段——IIFE
在 window中定义一个 VueDemi 变量,然后检查 window 中的 Vue 变量的版本,根据版本 reexport 对应的 API。
    var VueDemi = (function (VueDemi, Vue, VueCompositionAPI) {
      // Vue 2.7 有不同,这里只列出 2.0 ~ 2.6 的版本
      if (Vue.version.slice(0, 2) === '2.') {
        for (var key in VueCompositionAPI) {
              VueDemi[key] = VueCompositionAPI[key]
        }
        VueDemi.isVue2 = true
      } else if (Vue.version.slice(0, 2) === '3.') {
        for (var key in Vue) {
        VueDemi[key] = Vue[key]
        }
        VueDemi.isVue3 = true
      }
        return VueDemi
      })(this.VueDemi,this.Vue,this.VueCompositionAPI)
1.2 编译阶段——打包工具
利用 npm postinstall 的 hook,检查本地的 Vue 版本,然后根据版本 reexport 对应的 API。
    const Vue = loadModule('vue') // 这里是检查本地的 vue 版本
    if (Vue.version.startsWith('2.')) {
      switchVersion(2)
    }
    else if (Vue.version.startsWith('3.')) {
      switchVersion(3)
    }
    function switchVersion(version, vue) {
      copy('index.cjs', version, vue)
      copy('index.mjs', version, vue)
    }
    // VueDemi 自己的 lib 目录下有 v2 v3 v2.7 三个文件夹,分别对应不同的 Vue 版本,Copy 函数的功能就是把需要的版本复制到 lib 目录下
    // 然后在 package.json 里面指向 lib/index.cjs 和 lib/index.mjs
    function copy(name, version, vue) {
      const src = path.join(dir, `v${version}`, name)
      const dest = path.join(dir, name)
      fs.write(dest, fs.read(src))
    }
1.3 运行阶段 createElement 函数的区别
1.3.1 Vue 2
- attrs 需要写在
attrs 属性中;
on: { click=> {}}- scopedSlots 写在
scopedSlots 属性中。
    h(LayoutComponent, {
        staticClass: 'button',
        class: { 'is-outlined': isOutlined },
        staticStyle: { color: '#34495E' },
        style: { backgroundColor: buttonColor },
        attrs: { id: 'submit' },
        domProps: { innerHTML: '' },
        on: { click: submitForm },
        key: 'submit-button',
        // 这里只考虑 scopedSlots 的情况了
        // 之前的 slots 没必要考虑,全部用 scopedSlots 是一样的
        scopedSlots: {
          header: () => h('div', this.header),
          content: () => h('div', this.content),
        },
      }
    );
1.3.2 Vue 3
attrs 和 props 一样,只需写在最外层;onClick: ()=> {}- slot 写在
createElement 函数的第三个参数中。
        class: ['button', { 'is-outlined': isOutlined }],
        style: [{ color: '#34495E' }, { backgroundColor: buttonColor }],
        id: 'submit',
        innerHTML: '',
        onClick: submitForm,
        key: 'submit-button',
      }, {
        header: () => h('div', this.header),
        content: () => h('div', this.content),
      }
    );
1.4 完整代码
    import { h as hDemi, isVue2 } from 'vue-demi';

    // 我们使用的时候使用的 Vue2 的写法,但是 props 还是写在最外层,为了 ts 的智能提示
    export const h = (
      type: String | Record<any, any>,
      options: Options & any = {},
      children?: any,
    ) => {
      if (isVue2) {
        const propOut = omit(options, [
          'props',
          // ... 省略了其他 Vue 2 的默认属性如 attrs、on、domProps、class、style
        ]);
        // 这里提取出了组件的 props
        const props = defaults(propOut, options.props || {});
        if ((type as Record<string, any>).props) {
          // 这里省略了一些过滤 attrs 和 props 的逻辑,不是很重要
          return hDemi(type, { ...options, props }, children);
        }
        return hDemi(type, { ...options, props }, children);
      }

      const { props, attrs, domProps, on, scopedSlots, ...extraOptions } = options;

      const ons = adaptOnsV3(on); // 处理事件
      const params = { ...extraOptions, ...props, ...attrs, ...domProps, ...ons }; // 排除 scopedSlots

      const slots = adaptScopedSlotsV3(scopedSlots); // 处理 slots
      if (slots && Object.keys(slots).length) {
        return hDemi(type, params, {
          default: slots?.default || children,
          ...slots,
        });
      }
      return hDemi(type, params, children);
    };

    const adaptOnsV3 = (ons: Object) => {
      if (!ons) return null;
      return Object.entries(ons).reduce((ret, [key, handler]) => {
        // 修饰符的转换
        if (key[0] === '!') {
          key = key.slice(1) + 'Capture';
        } else if (key[0] === '&') {
          key = key.slice(1) + 'Passive';
        } else if (key[0] === '~') {
          key = key.slice(1) + 'Once';
        }
        key = key.charAt(0).toUpperCase() + key.slice(1);
        key = `on${key}`;

        return { ...ret, [key]: handler };
      }, {});
    };

    const adaptScopedSlotsV3 = (scopedSlots: any) => {
      if (!scopedSlots) return null;
      return Object.entries(scopedSlots).reduce((ret, [key, slot]) => {
        if (isFunction(slot)) {
          return { ...ret, [key]: slot };
        }
        return ret;
      }, {} as Record<string, Function>);
    };
2. 编码技巧:利用代数数据类型精简代码
这里跟大家分享我自己总结的用于优化代码的理论工具。温馨提示,可能和书本上的原有概念有些不同。
于我而言,衡量一段代码复杂度的方法是看状态数量。状态越少,逻辑、代码就越简单;状态数量越多,逻辑、代码越复杂,越容易出错。因此,我认为「好代码」的特征之一就是,在完成业务需求的前提下,尽量减少状态的数量(即大小)。
那么,什么是状态?在 Vue 的场景下,可以这么理解:
- data 里面的变量就是状态,props、计算属性都不是状态。
- Composition API 中
ref 和 reactive 是状态,而 computed 不是状态。
2.1 什么是「状态」?
状态是可以由系统内部行为更改的数据,而状态大小是状态所有可能的值的集合的大小,记作 size(State)。而代码复杂度 = States.reduce((acc, cur) => acc * size(cur),1)。
2.1.1 常见数据类型的状态大小
一些常见的数据类型,比如 unit 的状态大小是 1,在前端里可以是 null、undefined;所有的常量、非状态的大小也是 1。而 Boolean的状态大小是 2。
Number和 String 一类有多个或无限个值的数据类型,在计算状态大小时需明确一点,我们只关心状态在业务逻辑中的意义,而不是其具体值,因此区分会影响业务逻辑的状态值即可。
例如,一个接口返回的数据是一个数字,但我们只关心这个数字是正数还是负数,那么这个数字的状态大小就是 2。
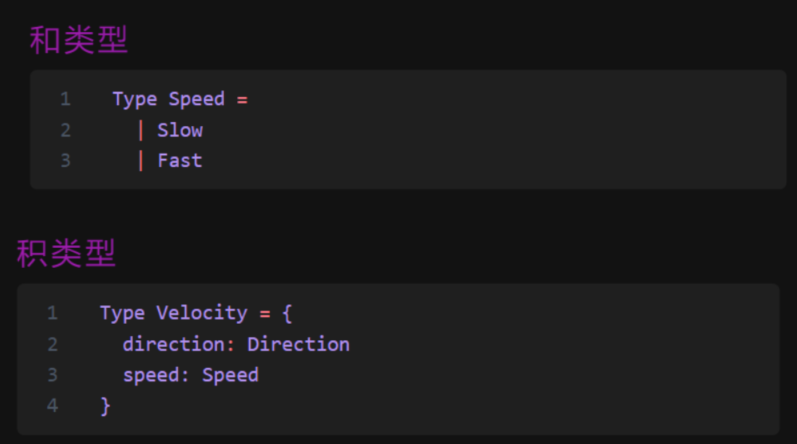
2.1.2 复合类型的状态大小
复合类型分为和类型与积类型两种。
![]()
和类型状态大小的计算公式为 size(C) = size(A) + size(B),而积类型状态大小的计算公式为 size(C) = size(A) * size(B)。
了解完代码优化标准后,我们通过一个案例说明如何利用代数数据类型,精简代码。
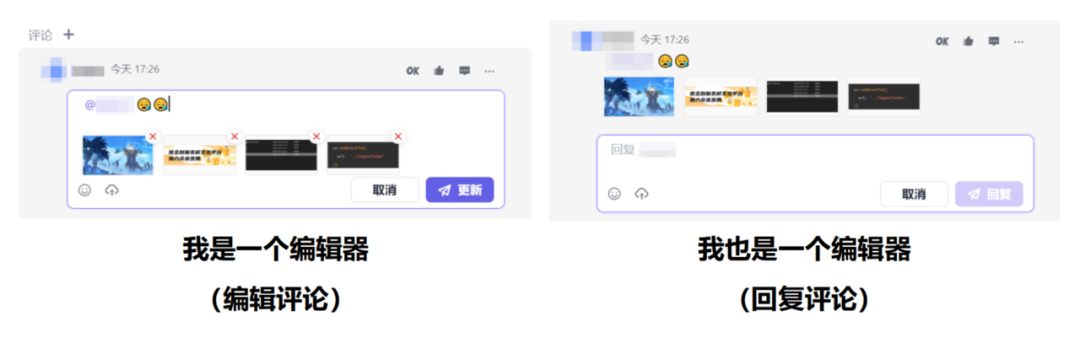
2.2 案例:评论编辑器的显示控制
在 LigaAI 中,每个评论都有两个编辑器,一个用来编辑评论,一个用来回复评论;且同一时间最多只允许存在一个活动的编辑器。
![]()
2.2.1 优化前的做法
为回复组件定义两个布尔变量 IsShowReply 和 IsShowEdit ,通过 v-if 控制是否显示编辑器。点击「回复」按钮时,逻辑如下:
(1) 判断自己的 IsShowReply 是否为 true,如果是,直接返回; (2) 判断自己的 IsshowEdit,如果为 true 则修改为 false,关闭编辑评论; (3) 依次设置所有其他评论组件的 IsShowReply 和 IsShowEdit 为 false; (4) 修改自己的 IsShowReply 为 true。
当有 10 个评论组件时,代码复杂度是多少?
    size(CommentComponent) = size(Boolean) * size(Boolean) = 2 * 2 = 4
    size(total) = size(CommentComponent) ^ count(CommentComponent) = 4 ^ 10 = 1048576
尽管逻辑上互斥,但这些组件在代码层面毫无关系,可以全部设置为 true。如果代码出现问题(包括写错),没处理好互斥,这种情况完全可能出现。处理互斥还涉及查找 dom 和组件,出问题的几率也会大大提高。
2.2.2 优化后的做法
在 store 中定义一个字符串变量 activeCommentEditor,表示当前活动的评论组件及其类型。
    type CommentId = number;
    type ActiveCommentStatus = `${'Edit' | 'Reply'}${CommentId}` | 'Close'; // TS 的模板字符串类型
    let activeCommentEditor: ActiveCommentStatus = 'Close';
除 'Close' 外,该变量还由两部分组成。第一部分说明当前是「编辑评论」还是「回复评论」,第二部分说明评论的 id。按钮的回调函数(如点击回复),只需要设置
activeCommentEditor = `Reply${id}`
组件使用时,可以这样
    v-if="activeCommentEditor === `Edit${id}`"
    v-if="activeCommentEditor === `Reply${id}`"
就这么简单,没有判断,没有 dom,没有其他组件。虽然 id 是 number,但于前端而言只是一个常量,所以其大小为 1。那么当有 10 个评论组件时,这段代码的复杂度就是
size(total) = size('Reply''Edit') * count(Comment) * 1 + size('close') = 2 * 10 * 1 +1 = 21
在实际使用中,我们发现确实存在 21 种状态;在代码层面,我们也精准控制了这个值只能在这 21 种正确的状态中,所以出错的几率也大大降低(几乎不可能出错)。
以上就是今天想跟大家分享的 Vue2 和 Vue3 代码兼容的实现和优化方案。后续我们也会分享或补充更多相关案例与完整代码,请持续关注 LigaAI@oschina 。
LigaAI - 新一代智能研发协作平台 助力开发者扬帆远航,欢迎申请试用我们的产品,期待与你一路同行!